 Przejdź do treści

Otrzymałeś pierwsze próbki produkcyjne, a części zatrzymują się w formie. Wypychacze pozostawiają ślady. Niektóre części mają nawet ślady szarpania na bokach. Twój wykonawca formy mówi, że potrzebujesz większego odciągu. Prosiłeś o brak odciągu, ponieważ CAD wyglądał dobrze. Teraz masz formę o wartości 12 000, która wymaga poprawki. Dobra wiadomość: jest to jeden z najłatwiejszych problemów do uniknięcia, jeśli zrozumiesz kąty odciągu przed rozpoczęciem produkcji formy.
Ten artykuł omawia, co kąt zanurzenia1 jest, dlaczego ma znaczenie, standardowe wartości w zależności od materiału i tekstury, a błędy, które widziałem, kosztują prawdziwe pieniądze w rzeczywistych seriach produkcyjnych.
- Standardowy kąt odciągu wynosi 1 do 2 stopni na stronę dla większości polerowanych powierzchni.
- Powierzchnie teksturowane wymagają dodatkowo 1 do 1,5 stopnia kąta odbiorczego na każdy stopień tekstury.
- Kąt zerowy jest możliwy, ale ryzykowny i prawie nigdy nieopłacalny w produkcji.
- Kąt odbiorczy musi być zastosowany przed rozpoczęciem budowy narzędzia — przeróbki są kosztowne.
- Kurczliwość, materiał i grubość ścianki — wszystkie wpływają na minimalny potrzebny kąt odbiorczy.
Czym Jest Kąt Odcięcia w Formowaniu Wtryskowym?
A formowanie wtryskowe Kąt odbiorczy to zamierzony skos wbudowany w każdą pionową powierzchnię gniazda formy. Można o nim myśleć jako o lekkim nachyleniu, które dodajesz do ścianki, aby detal mógł swobodnie wysunąć się po ostygnięciu i skurczeniu się na rdzeniu. Bez niego detal obejmuje stal jak uszczelnienie próżniowe, a wypychanie staje się walką między wypychaczami a powierzchnią formy.
Kąt odciągu jest mierzony w stopniach od pionowej osi kierunku otwierania formy. Odciąg 1 stopnia oznacza, że ściana wychyla się na zewnątrz o około 0,0175 mm na każdy mm głębokości. Na zagłębieniu o głębokości 50 mm daje około 0,87 mm luzu na stronę na górze. Brzmi niewiele, ale to różnica między czystym wypychaniem i zatrzymaniem części.
Każda pionowa powierzchnia w części wymaga odciągu. Dotyczy to ścian zewnętrznych, wewnętrznych żeber, wypustów, zagłębień, a nawet otworów przelotowych. Jeśli powierzchnia jest równoległa do kierunku otwierania formy i nie ma pochylenia, część będzie się szarpać podczas wypychania, pozostawiając zadrapania, ślady lub odkształcenia.

Dlaczego kąt odciągu ma znaczenie dla jakości części?
Ta sekcja dotyczy znaczenia kąta odciągu dla jakości części oraz jego wpływu na koszt, jakość, czas lub ryzyko sourcingu. Kąt odciągu wpływa bezpośrednio na cztery rzeczy: estetykę części, dokładność wymiarową, żywotność formy i czas cyklu. Gdy część zatrzymuje się w formie, to forma wtryskowa system wyrzutowy2 musi pracować ciężej. Wypychacze pozostawiają ślady. Powierzchnia detalu ma ślady wleczenia. W najgorszych przypadkach detal pęka lub odkształca się przed uwolnieniem.
Niewystarczający odciąg również przyspiesza zużycie formy. W każdym cyklu część szarpie się przeciw ścianie gniazda podczas wypychania. Po 100 000 cyklach ciągłe ścieranie poleruje i niszczy powierzchnię stali. Forma, która powinna wytrzymać 500 000 cyklów, może wymagać polerowania lub naprawy już przy 200 000.
Po stronie produkcji, części trudne do wyjęcia spowalniają cykl. Jeśli operator musi ręcznie wybijać część lub jeśli robot ma problemy z jej uchwyceniem, tracisz sekundy na cykl. W skali przekłada się to na realne pieniądze. 3-sekundowe opóźnienie w 30-sekundowym cyklu oznacza 10-procentową stratę wydajności.
„Kąt odciągu 1 stopnia może zmniejszyć siłę wyjęcia nawet o 50% w porównaniu do braku kąta odciągu.”Prawda
Kąt odbiorczy niweluje efekt podciśnienia pomiędzy kurczącym się tworzywem a rdzeniem formy. Nawet niewielki kąt drastycznie zmniejsza współczynnik tarcia podczas wypychania, redukując siłę potrzebną od systemu wypychaczy.
„Jeśli forma ma wystarczająco dużo wypychaczy, nie potrzebujesz kąta odciągu.”Fałsz
Więcej wypychaczy lepiej rozkłada siłę, ale nie mogą one przezwyciężyć podstawowego tarcia między równoległą ścianą a kurczącym się plastikiem. Bez kąta odciągu wypychacze tylko koncentrują siłę na mniejszych obszarach, zwiększając ryzyko śladów po wypychaczach i deformacji części.
Jakie są standardowe wartości kątów odciągu?
Nie istnieje jeden właściwy kąt odciągu — zależy od materiału, wykończenia powierzchni, głębokości i wymagań tolerancji. Ale poniżej wartości, które w praktyce działają w tysiącach form produkcyjnych.
| Wykończenie powierzchni | Minimalny kąt odciągu | Recommended Draft | Uwagi |
|---|---|---|---|
| Polished (SPI A-1 to A-3) | 0.5° | 1° | Gładka powierzchnia łatwo się uwalnia |
| Standardowy (SPI B-1 do B-3) | 1° | 1.5° | Lekkie ślady obróbki mechanicznej |
| Drobna faktura (VDI 12-24) | 1° | 1,5° do 2° | Dodaj 1° na każdy stopień głębokości tekstury |
| Średnia tekstura (VDI 27-33) | 1.5° | 2° do 3° | Tekstura przylega do powierzchni detalu |
| Gruba tekstura (VDI 36-45) | 2° | 3° do 5° | Głęboka faktura działa jak mikro-podcięcia |
| Polerowane, kąt zerowy | 0° | Not recommended | Tylko dla płytkich elementów poniżej 10 mm |
Zasada, której używam: zacznij od 1 stopnia na stronę dla powierzchni polerowanych, dodaj 1 stopień za każdy wzrost stopnia tekstury i nigdy nie schodź poniżej 0,5 stopnia na czymkolwiek głębszym niż 10 mm. Jeśli twój klient sprzeciwia się kątowi ze względu na ograniczenia wymiarowe, pokaż mu kalkulację kosztów przeróbki w porównaniu do stożka 0,5 stopnia.
Dla wewnętrznych elementów, takich jak żebra i stopki, kwestia kąta odbiorczego jest bardziej krytyczna. Tworzywo kurczy się na rdzeniu podczas chłodzenia, tworząc mocny uścisk. Żebra powinny mieć minimum 0,5 stopnia na stronę, ale 1 stopień jest bezpieczniejszy. Stopki potrzebują co najmniej 0,5 stopnia na zewnątrz, a wewnętrzny otwór również powinien mieć kąt odbiorczy, jeśli jest formowany przez kołek rdzeniowy.
Jak skurcz materiału wpływa na wymagania dotyczące kątów odciągu?
skurcz3 jest powodem, dla którego kąt odciągu w ogóle istnieje. Gdy plastik stygnie w formie, kurczy się. Jeśli część ma kształt kubka lub pudełka, ten skurcz ściąga ściany mocno na rdzeń formy. Im wyższy współczynnik skurczu, tym mocniejszy chwyt i tym większy kąt odciągu jest potrzebny.
| Materiał | Współczynnik skurczu | Min Draft (Polished) | Min. nachylenie (z fakturą) |
|---|---|---|---|
| ABS | 0.4–0.7% | 0.5° | 1.5° |
| Poliwęglan (PC) | 0.5–0.7% | 0.5° | 1.5° |
| Poliamid 6 (PA6) | 0,5–1,5% | 1° | 2° |
| Poliamid 66 (PA66) | 0,8–2,0% | 1° | 2,5° |
| Glass-Filled Nylon | 0.2–0.8% | 0.5° | 1.5° |
| PP (polipropylen) | 1,0–2,5% | 1° | 2,5° |
| PE (polietylen) | 1.5–3.0% | 1.5° | 3° |
| POM (Acetal) | 1.5–2.5% | 1° | 2,5° |
| PBT | 0,8–2,0% | 1° | 2° |
Materiały krystaliczne, takie jak nylon, PP i POM, kurczą się bardziej niż materiały amorficzne, takie jak ABS i PC. Oznacza to, że mocniej obejmują rdzeń i wymagają większego odciągu. Nylon wypełniony szkłem jest wyjątkiem: włókna szklane zmniejszają kurczliwość, więc faktycznie potrzebuje mniejszego odciągu niż nylon niewypełniony, mimo że włókna sprawiają, że materiał jest bardziej ścierny dla formy.
Kiedyś realizowaliśmy projekt obudowy z PP, gdzie klient nalegał na nachylenie 0,5 stopnia ze średnią fakturą. Detale zakleszczały się co drugi cykl. Skończyło się na ponownym wycięciu rdzenia, aby dodać 1,5 stopnia więcej nachylenia – trzy tygodnie straconej produkcji. PP ze skurczem 2,5% na teksturowanej powierzchni nigdy nie zadziałałoby przy 0,5 stopnia.
Co się dzieje, gdy kąt odciągu jest niewystarczający?
Objawy pojawiają się natychmiast na hali produkcyjnej. Oto, co zobaczysz, w kolejności narastania:
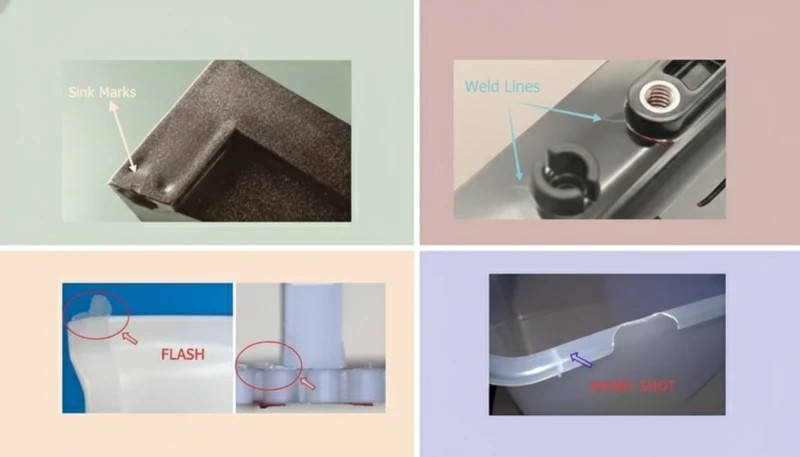
Po pierwsze, ślady wyciągania. Powierzchnia części otrzymuje równoległe zadrapania w kierunku wyciągania. Na wypolerowanych częściach jest to natychmiast widoczne i dyskwalifikuje część kosmetycznie. Na teksturowanych częściach tekstura jest polerowana w pasmach, tworząc nierównomierne wykończenie, którego żadna obróbka końcowa nie naprawi.
Po drugie, ślady po wypychaczach. Gdy element stawia opór przy wypychaniu, wypychacze koncentrują siłę na małych obszarach. Powstają białe ślady naprężeń wewnątrz, widoczne ślady nacisku wypychaczy, a nawet dziury od wypychaczy, jeśli ścianka jest cienka. W naszym zakładzie uważamy każdy ślad po wypychaczu głębszy niż 0,1 mm za wadę na widocznych powierzchniach.
Po trzecie, odkształcenie elementu. Jeśli element zostanie wypchnięty, ale przy dużym wysiłku wypychania, może ulec wypaczeniu, wygięciu lub pęknięciu. Elementy cienkościenne są szczególnie podatne. Siła potrzebna do wypchnięcia elementu bez odciągu z głębokiej wnęki może przekroczyć wytrzymałość konstrukcyjną ścianki, powodując trwałe odkształcenie.
Po czwarte, uszkodzenie formy. Z czasem ciągłe wyciąganie z dużą siłą zużywa otwory wypychaczy, rysuje powierzchnie gniazd i może pękać rdzenie. Forma pracująca z zerowym odciągiem głębokich kieszeni może wymagać wymiany wypychaczy co 50 000 cykli zamiast co 200 000. To czterokrotny koszt utrzymania.
„Dodanie 1 stopnia odciągu do teksturowanej powierzchni może całkowicie wyeliminować ślady wyciągania.”Prawda
Dodatkowe zwężenie tworzy luz między kurczącym się plastikiem a teksturowaną powierzchnią stali. Ten luz przerywa mechaniczne zazębienie między wzorem tekstury a zestaloną powierzchnią części, umożliwiając czyste uwolnienie.
„Kąt odciągu ma znaczenie tylko dla części kosmetycznych — części konstrukcyjnych nie potrzebują go.”Fałsz
Odciąg to wymóg mechaniczny, nie tylko kosmetyczny. Części konstrukcyjne podlegają tym samym siłom skurczu i tarcia podczas wyprężania. W rzeczywistości części konstrukcyjne o wąskich tolerancjach są jeszcze bardziej wrażliwe na odkształcenia wywołane wyprężaniem spowodowane niedostatecznym nachyleniem.
Jak tekstura i wykończenie powierzchni zmieniają wymagania dotyczące kąta odbiorczego?
Tu tkwi źródło większości problemów z odciągiem. Wypolerowana powierzchnia formy jest zasadniczo gładka – element wysuwa się z minimalnym tarciem. Ale teksturowana powierzchnia ma mikroskopijne szczyty i doliny, które działają jak małe podcięcia. Gdy plastik się kurczy, owija się wokół tych szczytów, tworząc mechaniczne zaczepienie, które stawia opór wypychaniu.
Standardowa zasada branżowa: dodaj 1 stopień nachylenia na każde 0,01 mm głębokości faktury. Większość dostawców faktur klasyfikuje swoje wzory w skali od drobnej do grubej. Drobna faktura piaskowana może mieć głębokość 0,01 mm i potrzebować tylko 1 dodatkowego stopnia. Głębiona faktura skórki może mieć głębokość 0,05 mm i potrzebować 5 dodatkowych stopni oprócz podstawowego nachylenia.
Jeśli określasz teksturę na swojej części, zawsze poinformuj narzędziownika przed wycięciem formy. Zmiana wykończenia powierzchni po wykonaniu narzędzia często oznacza ponowne wycięcie gniazda, aby dodać kąt odciągu, co jest kosztowne i może wpłynąć na wymiary części. Mieliśmy przypadek, gdy klient dodał teksturę VDI-33 do formy zaprojektowanej na wypolerowane wykończenie z 1 stopniem odciągu. Formę trzeba było wyciągnąć, gniazdo ponownie wyciąć do 3,5 stopnia i ponownie wypolerować. Sześć tygodni przestoju.
Jak obliczyć kąt odciągu dla swojej części?
Podstawowe obliczenie jest proste. Luz odciągu równa się tangensowi kąta odciągu pomnożonemu przez głębokość elementu:
Luz na stronę = tan(kąt odciągu) x głębokość
Na przykład, kąt odciągu 1 stopnia na ścianie o głębokości 50 mm daje: tan(1°) x 50 = 0,0175 x 50 = 0,87 mm luzu na stronę. Przy 2 stopniach jest to 1,75 mm na stronę. Przy 3 stopniach – 2,62 mm na stronę.
Praktyczne pytanie nie dotyczy matematyki – tylko tego, czy twój detal toleruje tak dużą zmienność rozmiaru od dołu do góry. Dla większości obudów i korpusów, zwężenie o 1 do 2 mm na 50 mm ściany jest niewidoczne dla użytkownika końcowego. Ale dla precyzyjnych komponentów, takich jak koła zębate, siedzenia łożysk lub powierzchnie łączeniowe, możesz potrzebować ściślejszego nachylenia lub zastosowania alternatywnych strategii wyprężania.
| Głębokość (mm) | Odciąg 0,5° | Odciąg 1° | Nachylenie 1,5° | Nachylenie 2° | Nachylenie 3° |
|---|---|---|---|---|---|
| 10 | 0.09 | 0.17 | 0.26 | 0.35 | 0.52 |
| 25 | 0.22 | 0.44 | 0.65 | 0.87 | 1.31 |
| 50 | 0.44 | 0.87 | 1.31 | 1.75 | 2.62 |
| 75 | 0.65 | 1.31 | 1.96 | 2.62 | 3.93 |
| 100 | 0.87 | 1.75 | 2.62 | 3.49 | 5.24 |
Zauważ, że nawet niewielka głębokość 10 mm z 0,5 stopnia daje tylko 0,09 mm luzu. To ledwie wystarcza, aby pokonać tarcie powierzchniowe, zwłaszcza jeśli występuje jakakolwiek tekstura. Dlatego większość narzędziowników sprzeciwia się czemukolwiek poniżej 1 stopnia — margines błędu jest zbyt mały.
Jakie są typowe błędy dotyczące kąta odciągu?
Typowe błędy związane z kątem odciągu to główne kategorie lub opcje omówione w tej sekcji. Po 20 latach budowy form te same błędy powtarzają się w kółko. Oto te, które kosztują najwięcej pieniędzy:
Błąd 1: Stosowanie odciągu tylko na ścianach zewnętrznych. Wewnętrzne elementy, takie jak żebra, wzmocnienia i przeguby, są często pomijane. Te powierzchnie kurczą się na rdzeniu podobnie jak zewnętrzne ściany, ale trudniej je wyjąć, ponieważ wypychacze nie mogą do nich bezpośrednio dotrzeć. Każde żebro wymaga co najmniej 0,5 stopnia na stronę. Każde wzmocnienie wymaga co najmniej 0,5 stopnia na zewnątrz.
Błąd 2: Przeciwstawne kierunki odciągów. Jeśli odciągniesz stronę gniazda w jedną stronę, a stronę rdzenia w drugą, część staje się grubsza na jednym końcu i cieńsza na drugim. To tworzy nierównomierną grubość ścianki, powodującą odkształcenia i wgłębienia. Cały kąt odciągu dla danej cechy powinien zbiegać się w kierunku linii podziału, aby grubość ścianki pozostawała stała.
Błąd 3: Pomijanie odciągu na powierzchniach przylegania. Kiedy otwór przelotowy lub okno jest formowane przez obie połowy formy, powierzchnia styku również potrzebuje nachylenia. Bez niego obszar kontaktu stali ze stalą działa jak hamulec podczas otwierania formy. Widzieliśmy formy, w których prasa musiała zwiększyć nacisk o 20 procent, aby pokonać tarcie styku wynikające z braku nachylenia na poziomych powierzchniach.
Błąd 4: Nieuwzględnienie tekstury po formowaniu. Niektórzy klienci planują dodać teksturę po formowaniu poprzez malowanie lub tampondruk. Jeśli kąt odciągu został obliczony dla wypolerowanej powierzchni, a proces końcowy dodaje grubość, efektywny luz maleje. Zawsze projektuj dla końcowego stanu powierzchni, a nie stanu po formowaniu.
Błąd 5: Brak odciągu w głębokich kieszeniach. To najkosztowniejszy błąd. Głębokie kieszenie bez nachylenia prawie zawsze powodują problemy z wyprężaniem. Jeśli projekt absolutnie nie może mieć nachylenia, zaplanuj od samego początku podzielony rdzeń lub rdzeń składany. Kosztuje to więcej początkowo, ale pozwala uniknąć kosztów przeróbek później.
Jak radzić sobie z odciągiem na skomplikowanych geometriach części?
Nie każda część to prosty prostopadłościan o prostych ścianach. Prawdziwe części produkcyjne mają podcięcia, elementy boczne, ukośne otwory i asymetryczną geometrię. Oto jak radzić sobie z kątem odciągu w typowych złożonych scenariuszach.
Powierzchnie skośne. Jeśli ściana jest już pochylona bardziej niż wymagany kąt odciągu, nie trzeba dodawać więcej. Ściana odchylona o 5 stopni od pionu ma już 5 stopni odciągu. Dodawaj kąt odciągu tylko wtedy, gdy powierzchnia jest bliższa pionowi niż minimalne wymaganie.
Żebra i rozpory. Narysuj żeberka od podstawy do wierzchołka. Podstawa to najgrubsza część i miejsce, gdzie żebro styka się ze ścianą. Wierzchołek jest najcieńszy. Typowe żebro ma od 0,5 do 1 stopnia na stronę, co naturalnie sprawia, że wierzchołek jest cieńszy. Upewnij się, że wierzchołek nie jest cieńszy niż 0,5 mm, inaczej nie wypełni się prawidłowo.
Gwinty i podcięcia. Gwinty zewnętrzne formowane w gnieździe wymagają kąta odciągu na bokach gwintu, co zmienia jego profil. Dlatego większość seryjnych części gwintowanych używa wkładek gwintowanych lub wykręcanych rdzeni zamiast bezpośrednio formowanych gwintów. Jeśli musisz formować gwinty, współpracuj z wykonawcą formy, aby potwierdzić, czy sprawdzian gwintu nadal będzie pasował po zastosowaniu kąta odciągu.
Wzory żaluzji i kratek wentylacyjnych. Te elementy mają cienkie żebra, które wymagają kąta odciągu po obu stronach. Ponieważ są cienkie i głębokie, są newralgicznymi punktami podczas wyciskania. Użyj minimum 1 stopnia na stronę i określ polerowane powierzchnie na formie dla tych elementów.
Jaki kąt odciągu należy określić w projektowaniu formy?
Oto ramy decyzyjne, których używam podczas przeglądu projektu formy pod kątem odpowiedniości kąta odciągu. Działa dla 95 procent części produkcyjnych:
Krok 1: Zidentyfikuj każdą powierzchnię równoległą do kierunku otwarcia formy. Oznacz je w swoim systemie CAD kolorami. Czerwony dla braku kąta odciągu, żółty dla kąta granicznego (0,5 stopnia lub mniej), zielony dla odpowiedniego kąta (1 stopień lub więcej).
Krok 2: Dla każdej czerwonej lub żółtej powierzchni określ wykończenie powierzchni. Powierzchnie polerowane mogą mieć mniejszy kąt odciągu. Powierzchnie teksturowane wymagają większego. Skonsultuj się z dostawcą tekstury w sprawie zalecanego kąta odciągu dla danego wzoru.
Krok 3: Sprawdź skurcz materiału. Skonfrontuj współczynnik skurczu z powyższą tabelą kątów odciągu. Wyższy skurcz oznacza, że potrzebujesz większego kąta odciągu, aby przezwyciężyć przyczepność do rdzenia.
Krok 4: Sprawdź, czy grubość ścianki jest jednolita od dołu do góry. Jeśli dodanie kąta odciągu sprawia, że ścianka jest zbyt gruba lub zbyt cienka na jednym końcu, dostosuj geometrię części, aby to zrekompensować. Przesunięcie linii podziału lub zmiana profilu ścianki to zazwyczaj najprostsze rozwiązania.
Krok 5: Przejrzyj projekt z wykonawcą formy przed cięciem stali. 30-minutowy przegląd projektu może zaoszczędzić tygodnie przeróbek. Twój wykonawca formy wie z doświadczenia, które elementy są newralgiczne podczas wyciskania.
W naszej fabryce nasi inżynierowie sprawdzają każdy projekt formy pod kątem odpowiedniości odbicia przed rozpoczęciem obróbki. Nasz zespół sprawdza żebra, kołki, teksturowane ścianki boczne i kierunek wypychania względem rekordu DFM, więc przeróbki związane z odbiciem utrzymują się poniżej 1% na ponad 100 zestawów form dostarczanych miesięcznie z naszej fabryki w Szanghaju.
Dlatego nasz zespół traktuje kąt odciągu jako element przeglądu ryzyka produkcyjnego, a nie kosmetyczne preferencje CAD. Nasi inżynierowie zaznaczają każdą powierzchnię bez kąta odciągu lub z kątem granicznym przed cięciem stali, a następnie potwierdzają, że klient akceptuje niewielki stożek, zanim rozpocznie się obróbka.
Często zadawane pytania
Jaki jest minimalny kąt odciągu dla formowania wtryskowego?
Minimalny kąt odbicia wynosi 0,5 stopnia na stronę dla polerowanych powierzchni na materiałach o niskim skurczu, takich jak ABS lub PC. Dla powierzchni teksturowanych lub materiałów o wysokim skurczu, takich jak PP lub nylon, praktyczne minimum to 1,5 do 2 stopni. Wszystko poniżej 0,5 stopnia jest niezwykle ryzykowne i powinno być stosowane tylko na płytkich elementach o głębokości poniżej 10 mm z polerowanymi powierzchniami formy i solidnymi systemami wypychania. W środowiskach produkcyjnych większość doświadczonych wykonawców narzędzi nie zaleci zejścia poniżej 1 stopnia na jakiejkolwiek powierzchni głębszej niż 15 mm, niezależnie od wykończenia lub materiału.
Czy można formować wtryskowo bez kąta odciągu?
Technicznie tak, ale prawie nigdy nie jest to zalecane dla serii produkcyjnych. Brak kąta odciągu jest możliwy dla bardzo płytkich elementów poniżej 10 mm z polerowanymi powierzchniami formy i materiałami o niskim skurczu. Dla wszystkiego głębszego brak kąta odciągu spowoduje ślady ciągnięcia podczas wyciskania, wypychanie przez trzpienie, odkształcenie części i przyspieszone zużycie formy, które drastycznie skraca jej żywotność. Jeśli Twój projekt bezwzględnie wymaga braku kąta odciągu, zaplanuj od początku alternatywne metody wyciskania, takie jak podmuch powietrza, płyty odbierające lub składane rdzenie. Te alternatywy zwiększają koszt i złożoność, ale są konieczne, aby uniknąć problemów produkcyjnych.
Ile odbicia potrzebujesz dla teksturowanych części formowanych wtryskowo?
Standardowa zasada to 1 stopień kąta odciągu na każde 0,01 mm głębokości tekstury. Delikatna tekstura o klasie VDI 12-24 zazwyczaj wymaga dodatkowo 1 do 1,5 stopnia kąta odciągu ponad bazowy 1 stopień. Średnie tekstury potrzebują łącznie 2-3 stopni na stronę. Grube tekstury, takie jak ziarno skóry, mogą wymagać łącznie 3-5 stopni na stronę. Zawsze potwierdzaj to z dostawcą tekstury, ponieważ ich konkretna głębokość wzoru decyduje o dokładnych wymaganiach. Brak dodania wystarczającego kąta odciągu dla tekstury to jeden z najczęstszych i najkosztowniejszych błędów projektowania form w branży.
Czy kąt odbicia wpływa na tolerancje części?
Tak, kąt odbicia zmienia wymiary części od dołu do góry odchylanej powierzchni i ten efekt musi być uwzględniony w specyfikacjach tolerancji. Na ścianie o głębokości 50 mm z 1 stopniem odbicia, górna część ściany jest około 0,87 mm szersza na stronę niż dolna. Dla większości części kosmetycznych to stożkowanie jest niewidoczne dla użytkownika. Dla precyzyjnych części z powierzchniami łączącymi, musisz kontrolować, który koniec odbicia utrzymuje krytyczny wymiar i jasno zakomunikować to swojemu wykonawcy narzędzi w specyfikacji tolerancji, aby uniknąć problemów z montażem.
Jaka jest różnica między kątem odbicia a stożkowaniem?
W kontekście formowania wtryskowego, kąt odciągu i stożek odnoszą się do tej samej cechy geometrycznej, zdefiniowanej jako celowe pochylenie zastosowane na powierzchniach pionowych w celu wyjęcia części. Kąt odciągu to standardowy termin używany w projektowaniu form i jest mierzony w stopniach od kierunku otwarcia formy. Stożek jest czasem używany w kontekście obróbki i może być wyrażony jako stosunek, np. 1:50. W praktycznych dyskusjach o projektowaniu form są one zamienne, ale najlepszą praktyką jest zawsze podawanie wartości w stopniach, aby uniknąć nieporozumień między zespołami projektowymi i produkcyjnymi.
Jak dodaje się odbicie do żeber i kołków?
Żebra powinny mieć kąt odciągu od podstawy, gdzie łączą się ze ścianką, aż do wierzchołka. Użyj 0,5 do 1 stopnia na stronę i upewnij się, że wierzchołek nie jest cieńszy niż 0,5 mm, aby uniknąć problemów z napełnianiem podczas formowania. Półki potrzebują kąta odciągu na powierzchni zewnętrznej minimum 0,5 stopnia, a wewnętrzny otwór również potrzebuje kąta odciągu, jeśli jest formowany przez trzpień rdzeniowy. Dla półek wyższych niż 15 mm rozważ zwiększenie kąta odciągu do 1 stopnia na stronę, aby zapewnić niezawodne wyciskanie. Zawsze sprawdzaj, czy kierunki kąta odciągu żeber i półek są zgodne z kątem odciągu głównej ścianki, aby zachować jednolitą grubość ścianki w całej części.
Jakiego kąta odbicia potrzebuje nylon wypełniony szkłem?
Nylon wypełniony szkłem zazwyczaj wymaga 0,5 do 1 stopnia odbicia na stronę dla polerowanych powierzchni oraz 1,5 do 2 stopni dla powierzchni teksturowanych. Włókna szklane zmniejszają skurcz w porównaniu z nylonem niewypełnionym, co faktycznie obniża wymagania dotyczące odbicia po stronie skurczu. Jednak nylon wypełniony szkłem jest ścierny dla powierzchni formy, więc odpowiedni kąt odbicia pomaga zmniejszyć tarcie i znacząco wydłużyć żywotność formy. Włókna nie zmieniają podstawowego obliczenia kąta odbicia, ale zmniejszony skurcz oznacza, że część słabiej obejmuje rdzeń, dając nieco większy margines dla minimalnych wartości odbicia niż w przypadku nylonu niewypełnionego.
–text Jak zastosować wiedzę o kącie odciągu w kolejnym projekcie?
Kąt odbicia to jedna z tych podstawowych rzeczy, które oddzielają płynny przebieg produkcji od kosztownego projektu przeróbek. Zasady są proste: 1 stopień na stronę minimum dla polerowanych powierzchni, dodaj 1 stopień na każdy stopień tekstury, uwzględnij skurcz materiału i nigdy nie rozpoczynaj obróbki stali bez przejrzenia każdej pionowej powierzchni pod kątem odpowiedniego odbicia.
Jeśli masz wynieść jedną rzecz z tego artykułu, niech to będzie: dodawaj kąt odciągu wcześnie, dodawaj go hojnie i przeglądaj go z wykonawcą formy, zanim forma zostanie wycięta. Pomaga również mapowanie decyzji dotyczących kąta odciągu względem etapy formowania wtryskowego, ponieważ kąt odbicia wpływa na napełnianie, chłodzenie, wypychanie i kontrolę, a nie tylko na wygląd CAD. Koszt dodatkowego stopnia odbicia na etapie projektowania wynosi zero. Koszt dodania go po zbudowaniu formy mierzy się w tygodniach i tysiącach dolarów.
Potrzebujesz formy wykonanej dobrze za pierwszym razem? Skorzystaj z naszego supplier sourcing guide aby sprawdzić, czy producent form może przejrzeć kąty odbicia, ryzyka DFM i dowody wypychania, zanim zobowiążesz się do wykonania narzędzia.
-
draft angle: Kąt odbicia to stożek zastosowany na pionowych powierzchniach gniazda formy, mierzony w stopniach, który umożliwia wypchnięcie uformowanej części bez tarcia lub uszkodzenia. ↩
-
system wypychania: System wyciskania jest zdefiniowany jako zespół mechaniczny wewnątrz formy, który wypycha schłodzoną część z gniazda, zazwyczaj składający się z wypychaczy, tulei lub płyt odbierających. ↩
-
skurcz: Skurcz odnosi się do wymiarowej redukcji części plastikowej podczas jej schładzania od temperatury stopu do temperatury pokojowej, zazwyczaj wyrażanej jako procent pierwotnego wymiaru formy. ↩


