 Overslaan naar inhoud

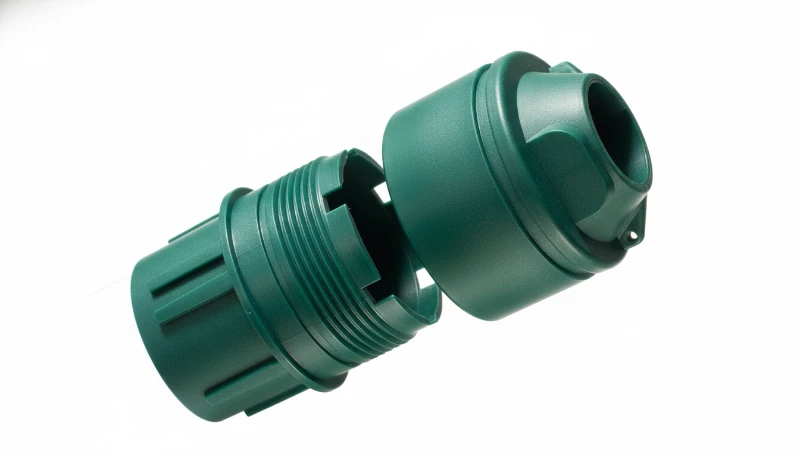
Cold slug is one of those spuitgieten1 defects that sneaks up on you. You set the temperatures, you run a few good shots, and then a solidified chunk of plastic appears in your part, right at the gate or in the runner. It ruins the cosmetic surface, weakens structural integrity, and can scrap an entire batch before you notice.
I have seen cold slug happen with everything from ABS housings to glass-filled nylon gears. In most cases, the root cause traces back to one of three things: inadequate nozzle temperature, a poorly designed cold slug well, or excessive barrel decompression. The frustrating part is that cold slug does not always show up consistently — it can appear only during cold starts, or only on certain cavities in a multi-cavity mold.
This guide covers every angle of cold slug formation — from the physics of melt solidification in the nozzle and sprue, to the matrijsontwerp2 features that catch or fail to catch these frozen plugs. Whether you are troubleshooting an existing defect or designing a new mold from scratch, you will find actionable steps grounded in real production experience from our spuitgieten operaties.
- Cold slug = solidified plastic trapped in the melt stream, usually at the nozzle, gate, or runner
- The number one cause is nozzle tip temperature dropping below the melt freezing point between shots
- Proper cold slug well design in the mold catches slugs before they reach the cavity
- Hot runner systems nearly eliminate cold slug but add cost and maintenance complexity
- Detection ranges from simple visual checks to X-ray and thermal analysis for critical parts
What Is a Cold Slug in Injection Molding?
A cold slug is a solidified chunk of plastic that forms when melt temperature drops below the freezing point before the cavity fills. It is not a short shot or sink mark — cold slugs are prematurely frozen material carried into the part by subsequent injection cycles. They typically appear as raised bumps, discolored spots, or small pits near the gate area.
For a broader look at ontwerp van spuitgietmatrijzen, our pillar guide covers tooling structure, thermal control, and manufacturability tradeoffs.
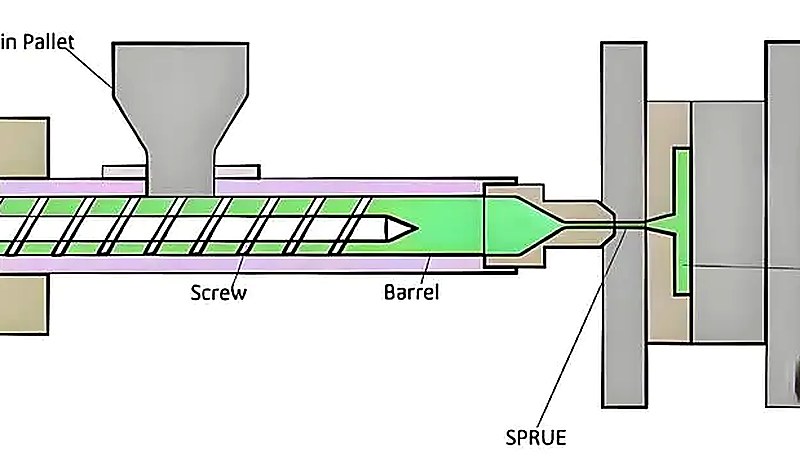
In technical terms, cold slugs typically form at three locations: (1) at the spuitgieten machine nozzle tip, where heat loss is fastest between shots; (2) in the sprue and runner system, where the melt travels through cold steel channels; and (3) at the gate, where the cross-section narrows and the flow velocity changes dramatically. Each location has different root causes and different fixes.
On our shop floor, we see cold slug most often during cold starts, when the mold has not reached thermal equilibrium yet, or when production switches from a high-melt-temperature material (like PEEK at 370 °C) to something cooler (like PP at 220 °C) and the operator does not purge the barrel completely. The residual high-temp material solidifies in the nozzle and gets injected as a cold slug into the first few shots of the new run.
What Causes Cold Slug During Injection Molding?
The root cause is always the same: the melt loses too much heat before it reaches the cavity. But the reasons behind that heat loss vary. Here are the four most common culprits we encounter in production.
Nozzle Temperature Too Low or Unstable
The nozzle is the last point where you can control melt temperature before it enters the mold. If the nozzle heater band is undersized, poorly controlled, or simply set too low, the melt at the tip cools between shots. When the next injection cycle starts, that cooled plug of plastic gets pushed into the sprue as a cold slug. This is especially common with materials that have a narrow processing window, such as polycarbonate or POM.
We once traced a recurring cold slug problem on a medical device housing back to a worn thermocouple on the nozzle — the controller showed 260 °C, but the actual tip temperature was cycling between 230 °C and 270 °C. Replacing the thermocouple and adding an insulation jacket solved it immediately.
“Cold slugs only form in cold runner mold systems.”Echt
False. Cold slugs can form in any injection molding system, including warmloper3 molds, if the nozzle tip temperature drops below the melt’s freezing point. Hot runners reduce the risk but do not eliminate it entirely.
“Increasing nozzle temperature always eliminates cold slug.”Vals
False. While low nozzle temperature is a common cause, cold slugs can also originate from cold mold surfaces, long runners, or excessive decompression. Simply cranking up the nozzle temperature can introduce other defects like stringing or material degradation.
Mold Temperature Below Optimal Range
When the mold steel is too cold, the melt solidifies on contact with the cavity walls. If the frozen layer builds up faster than the cavity fills, cold slugs appear in the part. This is particularly problematic for thin-wall molding, where the flow channel is already narrow.
The fix is not always to increase mold temperature — that can increase cycle time and cause warpage. Instead, you need to optimize the cooling circuit layout so that the temperature is uniform across the mold face, and ensure that the areas near the gate are warm enough to prevent premature freeze-off.
Excessive Barrel Decompression (Suck-Back)
Decompression — also called suck-back — pulls the melt away from the nozzle tip after holding pressure ends. If you overdo it, you pull air into the nozzle, and the melt at the tip oxidizes and cools rapidly. On the next shot, that degraded, cooled material enters the cavity as a cold slug. This is one of the most overlooked causes, because operators often add decompression to prevent drooling without realizing the side effect.
Long or Narrow Runner Systems
Every millimeter of runner length is an opportunity for the melt to lose heat. Long, thin runners with high surface-area-to-volume ratios cause rapid cooling. By the time the melt reaches the gate, its temperature may have dropped below the flow threshold, and the leading edge solidifies into a cold slug. This is why multi-cavity molds with balanced runner layouts are so important — they minimize the runner length to each cavity.
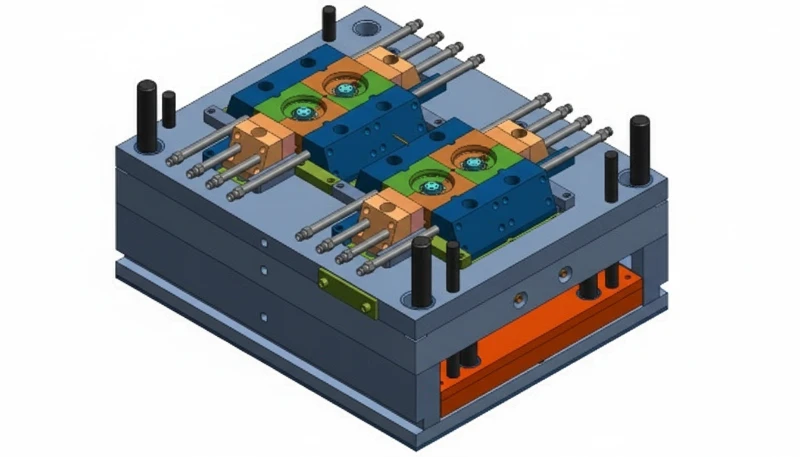
How Does Mold Design Contribute to Cold Slug?
Vormontwerp is probably the single biggest factor in whether cold slug becomes a chronic problem or a non-issue. A well-designed mold accounts for heat loss at every stage and includes features specifically meant to catch or prevent cold slugs.
The Cold Slug Well
The cold slug well (also called a cold slug pocket or catch pad) is a small cavity placed directly opposite the sprue entrance in the runner system. Its job is to catch the cold slug that naturally forms at the nozzle tip between shots. When the injection cycle starts, the first material to enter the mold is the coldest — that plug gets pushed straight into the cold slug well instead of into the runner and cavity. If your mold does not have cold slug wells, or if they are too small, cold slugs will travel downstream.
A properly sized cold slug well should have a volume at least 1.5 times the volume of the nozzle tip channel. It should be easy to eject and clean during maintenance. In multi-cavity molds, every runner branch should have its own cold slug well.
Gate Design and Location
The gate is the narrowest point in the flow path, and it is where the melt undergoes the highest shear and the fastest cooling. Small gate diameters (especially sub-gates or pinpoint gates) create high shear heating but also restrict flow, which can cause the melt to freeze off prematurely. Edge gates and fan gates provide a larger cross-section and are less prone to cold slug formation.
Gate location also matters. If the gate is far from the sprue, the melt has to travel a longer runner, losing more heat along the way. Placing gates closer to the sprue — or using a hot runner drop directly into the cavity — eliminates most of the runner heat loss.
Runner Cross-Section Shape
Round runners have the lowest surface-area-to-volume ratio, meaning the least heat loss per unit of melt flow. Full-round runners are the gold standard for cold slug prevention. Trapezoidal runners are a common compromise because they are easier to machine, but they have about 20% more surface area than equivalent round runners, which translates to faster heat loss. Half-round runners should be avoided entirely for any material prone to cold slug.
“A cold slug well should be placed opposite the sprue entrance in the runner.”Echt
True. The cold slug well is intentionally positioned opposite the sprue to catch the first, coldest material that enters the mold — the slug that formed at the nozzle tip between shots.
“Round runners cause more cold slug than trapezoidal runners.”Vals
False. Round runners have the lowest surface-area-to-volume ratio, meaning less heat loss and fewer cold slugs. Trapezoidal runners are easier to machine but lose heat faster.
What Process Parameters Lead to Cold Slug Formation?
The four process parameters that are most likely to cause cold slugs are injection speed, holding pressure, cooling time, and barrel decompression. Even a perfect mold will produce cold slugs with wrong settings. Here is how to tune each parameter.
Injectiesnelheid
Slow injection speed gives the melt more time to cool as it flows through the runner. For materials with fast crystallization rates (like POM or PA66), a slow fill speed is almost guaranteed to produce cold slugs at the gate. Increasing injection speed pushes the melt through the runner faster, reducing residence time and heat loss. However, excessive speed can cause flash and jetting, so you need to find the sweet spot.
Holding Pressure and Time
Insufficient holding pressure means the cavity is not fully packed. The frozen layer at the walls grows inward, and the remaining melt in the center can solidify into a cold slug before the gate freezes off. If you see sink marks combined with cold slugs, increasing holding pressure and extending holding time often solves both problems simultaneously.
Koeltijd
Counterintuitively, excessive cooling time between shots can make cold slug worse on the next cycle. When the mold sits idle with cooling water flowing, the sprue bushing and gate area continue to cool down. By the time the next shot fires, those surfaces are colder than they were during steady-state production, and the leading edge of the new melt freezes on contact. Optimizing cooling time for the thickest section of the part — not the sprue — helps avoid this.
In our Shanghai factory, we run 47 injection molding machines from 90T to 1850T. Cold slug issues show up most often on our larger presses (800T and above), where the nozzle-to-mold distance is longer and heat management becomes more critical. We have learned to add external nozzle heaters and thermal insulation jackets on these machines to keep the melt at a consistent temperature from barrel to gate.
How Can You Detect and Identify Cold Slugs?
Cold slugs are detected through visual inspection, X-ray or CT scanning, or thermal analysis (DSC/TGA). Early detection prevents defective parts from reaching customers. In our factory, the QC team maps the defect to the fill, pack, cooling, or ejection stage, then traces the cold material to its origin. Our engineers also record nozzle temperature, decompression distance, and first-shot scrap rate so the corrective action is tied to process evidence, not guesswork.
Visuele inspectie
Cold slugs show up as visible blemishes on the part surface — typically a raised bump, a discolored spot, or a small pit near the gate. On transparent parts (like PMMA lenses), cold slugs appear as cloudy or opaque inclusions. This is the fastest detection method and works for most cosmetic parts, but it will not catch internal cold slugs.
X-Ray and CT Scanning
For critical applications — medical devices, automotive safety components, aerospace parts — you cannot rely on visual inspection alone. X-ray and computed tomography (CT) scanning can detect internal cold slugs that are completely invisible from the outside. CT scanning is especially valuable because it gives you a 3D map of the defect’s exact location, size, and shape.
Thermal Analysis (DSC/TGA)
When cold slugs are caused by material degradation or contamination (not just temperature issues), thermal analysis tools like Differential Scanning Calorimetry (DSC) help identify the problem. DSC can detect whether the cold slug material has a different melting point than the base resin, which indicates contamination or degraded material.
“X-ray inspection can detect internal cold slugs that are invisible on the surface.”Echt
True. X-ray and CT scanning are non-destructive methods that reveal internal defects, including cold slugs trapped inside the part wall or at the gate interface.
“Cold slugs only affect the appearance of the part, not its mechanical strength.”Vals
False. Cold slugs create stress concentrators and weak points inside the part. In structural applications, a cold slug can reduce impact strength and fatigue life significantly.
How Do You Prevent and Eliminate Cold Slugs?
Prevention is always cheaper than detection. Here is a systematic approach to eliminating cold slugs, organized from the easiest changes to the most involved modifications.
Quick Fixes (No Tooling Changes Required)
These changes can be made at the machine without modifying the mold:
Raise nozzle temperature by 5–10 °C — often enough to keep the melt at the tip above the freezing point between shots. Monitor for stringing or drooling as side effects.|||Reduce decompression distance — minimize suck-back to prevent drawing air into the nozzle. If drooling occurs, use a shut-off nozzle instead of decompression.|||Increase injection speed — faster fill reduces the time the melt spends in the cold runner. Ramp up speed gradually while watching for flash.|||Optimize mold temperature — raise the coolant temperature near the gate area by 5 °C increments. Use zoned cooling if your mold supports it.
Mold Modifications
If process changes do not solve the problem, the mold needs attention:
Add or enlarge cold slug wells — every runner branch should have a cold slug well sized to at least 1.5× the nozzle tip volume. This is a low-cost modification that can be done during a regular mold maintenance window.|||Switch from trapezoidal to full-round runners — reduces heat loss by approximately 20%. Requires recutting the runner channels on both A and B halves of the mold.|||Install a heated sprue bushing — keeps the sprue at melt temperature, preventing the most common cold slug formation point. This is a mid-cost modification that pays for itself quickly on high-volume runs.
Equipment Upgrades
For persistent cold slug problems on high-value production:
Heet runnersysteem — the gold standard for cold slug elimination. The melt stays at temperature inside the manifold, so there is no cold runner heat loss. Hot runners add $5,000–$20,000+ to the mold cost depending on the number of drops, but they eliminate runner waste and virtually eliminate cold slugs.|||Shut-off nozzle — a spring-loaded or hydraulically actuated valve at the nozzle tip that seals the melt between shots. Prevents both drooling and the formation of a cold slug at the tip.|||Insulated hot sprue — a compromise between a full hot runner and a cold runner. The sprue is heated while the rest of the runner stays cold.
Lower cost than a full hot runner but still addresses the primary cold slug formation point.
“Hot runner systems virtually eliminate cold slugs by keeping the melt at temperature inside the manifold.”Echt
True. In a hot runner system, the melt travels through heated channels from the nozzle to the gate, so there is no opportunity for premature cooling. Cold slugs become extremely rare.
“Cold slugs are always visible on the surface of the molded part.”Vals
False. Cold slugs can be fully embedded inside the part wall, invisible to the naked eye. Internal cold slugs require X-ray or CT scanning to detect and are particularly dangerous in structural applications.
What Materials Are Most Susceptible to Cold Slug?
Not all materials are equally prone to cold slug. The risk depends on three factors: melting temperature, crystallization speed, and melt viscosity. Materials that have high melting points, fast crystallization rates, or high viscosity are the most susceptible.
High-risk materials: PEEK (343–399 °C smelt), LCP (280–350 °C), PPS (280–330 °C) en glasgevulde nylons. Deze materialen hebben zeer hoge cilinder- en nozzle-temperaturen nodig, en zelfs een kleine temperatuurdaling kan voortijdige stolling veroorzaken.|||Middelrisicomaterialen: PC (260–310 °C), POM (175–225 °C) en PA66 (260–290 °C). POM (acetaal) is bijzonder lastig omdat het zeer snel kristalliseert — het venster tussen gesmolten en vast is smal.|||Laagrisicomaterialen: PP, PE, PS en ABS. Deze amorfe of langzaam kristalliserende materialen hebben brede verwerkingsvensters en verdragen temperatuurvariaties beter.
Als u een hoogrisicomateriaal spuitgiet en koude slakken een terugkerend probleem zijn, overweeg dan of een materiaal met betere vloeieigenschappen (hogere smeltstroomindex) geschikt zou kunnen zijn voor uw toepassing. Soms lost het overschakelen van een standaardkwaliteit PA66 naar een hoogvloeikwaliteit met een MFI van 60+ g/10 min het probleem volledig op zonder aanpassingen aan het gereedschap.
Conclusie
Koude slierten in spuitgieten zijn uiteindelijk een warmtebeheerprobleem. Het smeltmateriaal verliest te veel warmte voordat het de holte bereikt, en het resultaat is een gestold stuk plastic dat in uw onderdeel is ingebed. De oplossing kan zo eenvoudig zijn als het verhogen van de nozzle-temperatuur met 5 graden, of zo complex als het aanpassen van een heet-loopstelsel. Wanneer het symptoom verband houdt met smeltterugwinning of slijtage van de cilinder, inspecteren onze procesingenieurs ook de opstelling van de schroefspuitgietmachine voordat de gereedschappen worden gewijzigd. De sleutel is om te diagnosticeren waar het warmteverlies plaatsvindt — bij de nozzle, in de loop of bij de poort — en uw oplossing dienovereenkomstig te richten.
Vanuit twee decennia ervaring met spuitgietproductie bij ZetarMold, een toonaangevend leverancier spuitgieten Gevestigd in Shanghai, hebben we ontdekt dat de meest effectieve strategie om koude slakken te voorkomen een combinatie is van een goede matrijsontwerp (koude-slakputten, ronde loopkanalen, verwarmde tuitbussen) en gedisciplineerde procesregeling (spuitmondtemperatuur, inspuitsnelheid, minimale decompressie). Zorg dat deze basisprincipes goed zijn, en koude slakken worden een zeldzame uitzondering in plaats van een chronische hoofdpijn.

Veelgestelde vragen
Veelgestelde vragen
Wat is het verschil tussen een koude sliert en een onvolledige vulling?
Een koude sliert is een gestold stuk plastic dat ontstaat wanneer het smeltmateriaal voortijdig afkoelt en vast komt te zitten in het onderdeel of de loop. Een onvolledige vulling treedt op wanneer de matrijsholte niet volledig met plastic is gevuld — het onderdeel mist materiaal. Ze hebben verschillende oorzaken: koude slierten ontstaan door voortijdige stolling bij de nozzle, loop of poort, terwijl onvolledige vullingen meestal het gevolg zijn van onvoldoende injectiedruk, ontoereikende ontluchting of een onjuiste shotgrootte-instelling op de machine.
Kunnen koude slierten structurele schade veroorzaken in gegoten onderdelen?
Ja, koude slierten kunnen absoluut structurele falen in gegoten onderdelen veroorzaken. Een koude sliert die in een onderdeelwand is ingebed, creëert een spanningsconcentrator, die fungeert als een microscopische inkeping die zowel de slagvastheid als de langetermijnvermoeiingsweerstand aanzienlijk vermindert. In draagtoepassingen zoals autobevestigingen, behuizingen van medische apparaten en omhulsels voor consumentenelektronica, kan een interne koude sliert leiden tot voortijdige scheurinitiatie en catastrofaal falen onder herhaalde belastingscycli. Dit is precies de reden waarom röntgen- of CT-inspectie als essentieel wordt beschouwd voor alle structurele en veiligheidskritieke kunststofcomponenten.
Hoe weet ik of mijn koude-sliertput groot genoeg is?
Een goed gedimensioneerde koude-sliertput moet een volume hebben van minstens 1,5 keer het volume van het nozzle-tipkanaal zelf. U kunt dit in productie verifiëren door de tuittrekker na elke cyclus te inspecteren: als koude-sliertmateriaal over de put loopt en de hoofdloop binnenkomt, is de put duidelijk te klein voor uw toepassing. Een andere betrouwbare indicator is als u nog steeds koude-sliertdefecten in het eindproduct waarneemt ondanks een geïnstalleerde put — vergroot in dat geval de put met ongeveer 50 procent en test opnieuw tijdens uw volgende productierun.
Elimineert een heet-loopstelsel koude slierten volledig?
Heetloopkanalen elimineren koude slakken veroorzaakt door warmteverlies in de loopkanalen, wat de meest voorkomende bron is in koude-loopkanaalmatrijzen. Het smeltmateriaal blijft op temperatuur in het verwarmde verdeelblok, zodat er geen kans is op voortijdige afkoeling in de loopkanalen. Koude slakken kunnen echter nog steeds ontstaan bij de overgang van spuitmond naar verdeelblok of aan de punt van de ingang als de thermische balans niet correct is. Een goed ontwerp van heetloopkanalen, consistente temperatuurregeling en regelmatig onderhoud van de verwarmingszones zijn essentieel voor een bijna volledige eliminatie.
Welke inspuitsnelheid is het beste om koude slakken te voorkomen?
Snellere injectiesnelheden verminderen de verblijftijd van het smeltmateriaal in het koude-loopstelsel, waardoor warmteverlies en de kans op voortijdige stolling tijdens de vulfase worden geminimaliseerd. De ideale snelheid hangt af van het specifieke materiaal en de geometrie van het onderdeel — over het algemeen moet u de hoogste snelheid gebruiken die geen flits, straalvorming of brandvlekken op het onderdeel veroorzaakt. Voor materialen die gevoelig zijn voor koude slierten, zoals POM of PA66, zijn vul snelheden van 80 tot 120 mm per seconde typische startpunten. Valideer altijd snelheidsaanpassingen met een kleine proefrun voordat u overgaat tot grootschalige productie.
Waarom verschijnen koude slierten vaker aan het begin van een productierun?
Tijdens de opstart is de matrijsstaal nog niet in thermisch evenwicht – de holte-oppervlakken en loopkanalen zijn aanzienlijk koeler dan hun bedrijfstemperatuur in stabiele toestand. De eerste paar schoten verliezen snel warmte aan deze koude staaloppervlakken, waardoor de voorste smeltfront stolt tot koude slakken voordat de holte volledig gevuld is. Het uitvoeren van vijf tot tien spoelschoten voor de productie start, en geleidelijk opwerken naar volledige cyclussnelheid gedurende de eerste twintig schoten, helpt de matrijs een stabiele temperatuur te bereiken en startkoude-slakdefecten effectief te minimaliseren.
-
spuitgieten: Spuitgieten is een productieproces waarbij gesmolten plastic in een matrijs wordt geïnjecteerd om onderdelen met precieze geometrie en herhaalbare kwaliteit te produceren. ↩
-
matrijsontwerp: Matrijsontwerp is een gestructureerd technisch proces voor het bepalen van de poortindeling, loopkanaalgeometrie, koeling, uitwerping, ontluchting, staalkeuze en toleranties, zodat een spuitgietonderdeel betrouwbaar kan worden geproduceerd. ↩
-
warmloper: heetkanaalsysteem verwijst naar een systeem dat gebruikmaakt van verwarmde kanalen in de matrijs om plastic gesmolten te houden van de spuitmond tot de poort, waardoor runnerafval wordt geëlimineerd en het risico op koude slak wordt verminderd. ↩


