 콘텐츠로 건너뛰기

Cold slug is one of those 사출 성형1 defects that sneaks up on you. You set the temperatures, you run a few good shots, and then a solidified chunk of plastic appears in your part, right at the gate or in the runner. It ruins the cosmetic surface, weakens structural integrity, and can scrap an entire batch before you notice.
I have seen cold slug happen with everything from ABS housings to glass-filled nylon gears. In most cases, the root cause traces back to one of three things: inadequate nozzle temperature, a poorly designed cold slug well, or excessive barrel decompression. The frustrating part is that cold slug does not always show up consistently — it can appear only during cold starts, or only on certain cavities in a multi-cavity mold.
This guide covers every angle of cold slug formation — from the physics of melt solidification in the nozzle and sprue, to the 금형 설계2 features that catch or fail to catch these frozen plugs. Whether you are troubleshooting an existing defect or designing a new mold from scratch, you will find actionable steps grounded in real production experience from our 사출 성형 작업을 수행합니다.
- Cold slug = solidified plastic trapped in the melt stream, usually at the nozzle, gate, or runner
- The number one cause is nozzle tip temperature dropping below the melt freezing point between shots
- Proper cold slug well design in the mold catches slugs before they reach the cavity
- Hot runner systems nearly eliminate cold slug but add cost and maintenance complexity
- Detection ranges from simple visual checks to X-ray and thermal analysis for critical parts
What Is a Cold Slug in Injection Molding?
A cold slug is a solidified chunk of plastic that forms when melt temperature drops below the freezing point before the cavity fills. It is not a short shot or sink mark — cold slugs are prematurely frozen material carried into the part by subsequent injection cycles. They typically appear as raised bumps, discolored spots, or small pits near the gate area.
For a broader look at 사출 금형 설계, our pillar guide covers tooling structure, thermal control, and manufacturability tradeoffs.
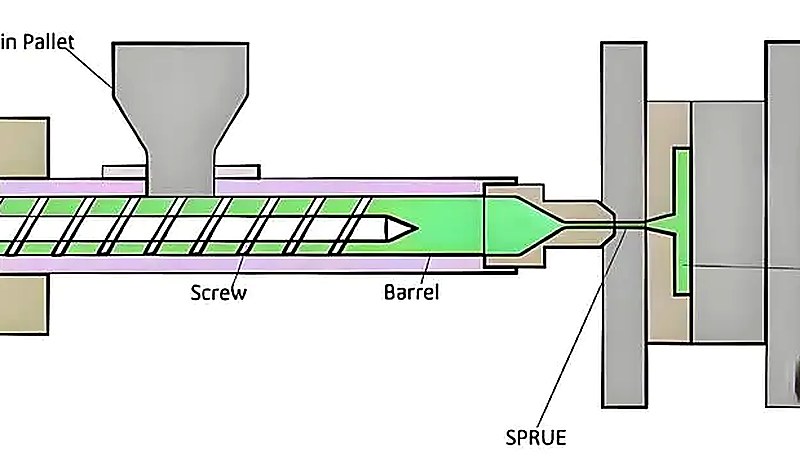
In technical terms, cold slugs typically form at three locations: (1) at the 사출 성형 machine nozzle tip, where heat loss is fastest between shots; (2) in the sprue and runner system, where the melt travels through cold steel channels; and (3) at the gate, where the cross-section narrows and the flow velocity changes dramatically. Each location has different root causes and different fixes.
On our shop floor, we see cold slug most often during cold starts, when the mold has not reached thermal equilibrium yet, or when production switches from a high-melt-temperature material (like PEEK at 370 °C) to something cooler (like PP at 220 °C) and the operator does not purge the barrel completely. The residual high-temp material solidifies in the nozzle and gets injected as a cold slug into the first few shots of the new run.
What Causes Cold Slug During Injection Molding?
The root cause is always the same: the melt loses too much heat before it reaches the cavity. But the reasons behind that heat loss vary. Here are the four most common culprits we encounter in production.
Nozzle Temperature Too Low or Unstable
The nozzle is the last point where you can control melt temperature before it enters the mold. If the nozzle heater band is undersized, poorly controlled, or simply set too low, the melt at the tip cools between shots. When the next injection cycle starts, that cooled plug of plastic gets pushed into the sprue as a cold slug. This is especially common with materials that have a narrow processing window, such as polycarbonate or POM.
We once traced a recurring cold slug problem on a medical device housing back to a worn thermocouple on the nozzle — the controller showed 260 °C, but the actual tip temperature was cycling between 230 °C and 270 °C. Replacing the thermocouple and adding an insulation jacket solved it immediately.
“Cold slugs only form in cold runner mold systems.”True
False. Cold slugs can form in any injection molding system, including 핫 러너3 molds, if the nozzle tip temperature drops below the melt’s freezing point. Hot runners reduce the risk but do not eliminate it entirely.
“Increasing nozzle temperature always eliminates cold slug.”False
False. While low nozzle temperature is a common cause, cold slugs can also originate from cold mold surfaces, long runners, or excessive decompression. Simply cranking up the nozzle temperature can introduce other defects like stringing or material degradation.
Mold Temperature Below Optimal Range
When the mold steel is too cold, the melt solidifies on contact with the cavity walls. If the frozen layer builds up faster than the cavity fills, cold slugs appear in the part. This is particularly problematic for thin-wall molding, where the flow channel is already narrow.
The fix is not always to increase mold temperature — that can increase cycle time and cause warpage. Instead, you need to optimize the cooling circuit layout so that the temperature is uniform across the mold face, and ensure that the areas near the gate are warm enough to prevent premature freeze-off.
Excessive Barrel Decompression (Suck-Back)
Decompression — also called suck-back — pulls the melt away from the nozzle tip after holding pressure ends. If you overdo it, you pull air into the nozzle, and the melt at the tip oxidizes and cools rapidly. On the next shot, that degraded, cooled material enters the cavity as a cold slug. This is one of the most overlooked causes, because operators often add decompression to prevent drooling without realizing the side effect.
Long or Narrow Runner Systems
Every millimeter of runner length is an opportunity for the melt to lose heat. Long, thin runners with high surface-area-to-volume ratios cause rapid cooling. By the time the melt reaches the gate, its temperature may have dropped below the flow threshold, and the leading edge solidifies into a cold slug. This is why multi-cavity molds with balanced runner layouts are so important — they minimize the runner length to each cavity.
How Does Mold Design Contribute to Cold Slug?
금형 설계 is probably the single biggest factor in whether cold slug becomes a chronic problem or a non-issue. A well-designed mold accounts for heat loss at every stage and includes features specifically meant to catch or prevent cold slugs.
The Cold Slug Well
The cold slug well (also called a cold slug pocket or catch pad) is a small cavity placed directly opposite the sprue entrance in the runner system. Its job is to catch the cold slug that naturally forms at the nozzle tip between shots. When the injection cycle starts, the first material to enter the mold is the coldest — that plug gets pushed straight into the cold slug well instead of into the runner and cavity. If your mold does not have cold slug wells, or if they are too small, cold slugs will travel downstream.
A properly sized cold slug well should have a volume at least 1.5 times the volume of the nozzle tip channel. It should be easy to eject and clean during maintenance. In multi-cavity molds, every runner branch should have its own cold slug well.
Gate Design and Location
The gate is the narrowest point in the flow path, and it is where the melt undergoes the highest shear and the fastest cooling. Small gate diameters (especially sub-gates or pinpoint gates) create high shear heating but also restrict flow, which can cause the melt to freeze off prematurely. Edge gates and fan gates provide a larger cross-section and are less prone to cold slug formation.
Gate location also matters. If the gate is far from the sprue, the melt has to travel a longer runner, losing more heat along the way. Placing gates closer to the sprue — or using a hot runner drop directly into the cavity — eliminates most of the runner heat loss.
Runner Cross-Section Shape
Round runners have the lowest surface-area-to-volume ratio, meaning the least heat loss per unit of melt flow. Full-round runners are the gold standard for cold slug prevention. Trapezoidal runners are a common compromise because they are easier to machine, but they have about 20% more surface area than equivalent round runners, which translates to faster heat loss. Half-round runners should be avoided entirely for any material prone to cold slug.
“A cold slug well should be placed opposite the sprue entrance in the runner.”True
True. The cold slug well is intentionally positioned opposite the sprue to catch the first, coldest material that enters the mold — the slug that formed at the nozzle tip between shots.
“Round runners cause more cold slug than trapezoidal runners.”False
False. Round runners have the lowest surface-area-to-volume ratio, meaning less heat loss and fewer cold slugs. Trapezoidal runners are easier to machine but lose heat faster.
What Process Parameters Lead to Cold Slug Formation?
The four process parameters that are most likely to cause cold slugs are injection speed, holding pressure, cooling time, and barrel decompression. Even a perfect mold will produce cold slugs with wrong settings. Here is how to tune each parameter.
사출 속도
Slow injection speed gives the melt more time to cool as it flows through the runner. For materials with fast crystallization rates (like POM or PA66), a slow fill speed is almost guaranteed to produce cold slugs at the gate. Increasing injection speed pushes the melt through the runner faster, reducing residence time and heat loss. However, excessive speed can cause flash and jetting, so you need to find the sweet spot.
Holding Pressure and Time
Insufficient holding pressure means the cavity is not fully packed. The frozen layer at the walls grows inward, and the remaining melt in the center can solidify into a cold slug before the gate freezes off. If you see sink marks combined with cold slugs, increasing holding pressure and extending holding time often solves both problems simultaneously.
냉각 시간
Counterintuitively, excessive cooling time between shots can make cold slug worse on the next cycle. When the mold sits idle with cooling water flowing, the sprue bushing and gate area continue to cool down. By the time the next shot fires, those surfaces are colder than they were during steady-state production, and the leading edge of the new melt freezes on contact. Optimizing cooling time for the thickest section of the part — not the sprue — helps avoid this.
In our Shanghai factory, we run 47 injection molding machines from 90T to 1850T. Cold slug issues show up most often on our larger presses (800T and above), where the nozzle-to-mold distance is longer and heat management becomes more critical. We have learned to add external nozzle heaters and thermal insulation jackets on these machines to keep the melt at a consistent temperature from barrel to gate.
How Can You Detect and Identify Cold Slugs?
Cold slugs are detected through visual inspection, X-ray or CT scanning, or thermal analysis (DSC/TGA). Early detection prevents defective parts from reaching customers. In our factory, the QC team maps the defect to the fill, pack, cooling, or ejection stage, then traces the cold material to its origin. Our engineers also record nozzle temperature, decompression distance, and first-shot scrap rate so the corrective action is tied to process evidence, not guesswork.
육안 검사
Cold slugs show up as visible blemishes on the part surface — typically a raised bump, a discolored spot, or a small pit near the gate. On transparent parts (like PMMA lenses), cold slugs appear as cloudy or opaque inclusions. This is the fastest detection method and works for most cosmetic parts, but it will not catch internal cold slugs.
X-Ray and CT Scanning
For critical applications — medical devices, automotive safety components, aerospace parts — you cannot rely on visual inspection alone. X-ray and computed tomography (CT) scanning can detect internal cold slugs that are completely invisible from the outside. CT scanning is especially valuable because it gives you a 3D map of the defect’s exact location, size, and shape.
Thermal Analysis (DSC/TGA)
When cold slugs are caused by material degradation or contamination (not just temperature issues), thermal analysis tools like Differential Scanning Calorimetry (DSC) help identify the problem. DSC can detect whether the cold slug material has a different melting point than the base resin, which indicates contamination or degraded material.
“X-ray inspection can detect internal cold slugs that are invisible on the surface.”True
True. X-ray and CT scanning are non-destructive methods that reveal internal defects, including cold slugs trapped inside the part wall or at the gate interface.
“Cold slugs only affect the appearance of the part, not its mechanical strength.”False
False. Cold slugs create stress concentrators and weak points inside the part. In structural applications, a cold slug can reduce impact strength and fatigue life significantly.
How Do You Prevent and Eliminate Cold Slugs?
Prevention is always cheaper than detection. Here is a systematic approach to eliminating cold slugs, organized from the easiest changes to the most involved modifications.
Quick Fixes (No Tooling Changes Required)
These changes can be made at the machine without modifying the mold:
Raise nozzle temperature by 5–10 °C — often enough to keep the melt at the tip above the freezing point between shots. Monitor for stringing or drooling as side effects.|||Reduce decompression distance — minimize suck-back to prevent drawing air into the nozzle. If drooling occurs, use a shut-off nozzle instead of decompression.|||Increase injection speed — faster fill reduces the time the melt spends in the cold runner. Ramp up speed gradually while watching for flash.|||Optimize mold temperature — raise the coolant temperature near the gate area by 5 °C increments. Use zoned cooling if your mold supports it.
Mold Modifications
If process changes do not solve the problem, the mold needs attention:
Add or enlarge cold slug wells — every runner branch should have a cold slug well sized to at least 1.5× the nozzle tip volume. This is a low-cost modification that can be done during a regular mold maintenance window.|||Switch from trapezoidal to full-round runners — reduces heat loss by approximately 20%. Requires recutting the runner channels on both A and B halves of the mold.|||Install a heated sprue bushing — keeps the sprue at melt temperature, preventing the most common cold slug formation point. This is a mid-cost modification that pays for itself quickly on high-volume runs.
Equipment Upgrades
For persistent cold slug problems on high-value production:
핫 러너 시스템 — the gold standard for cold slug elimination. The melt stays at temperature inside the manifold, so there is no cold runner heat loss. Hot runners add $5,000–$20,000+ to the mold cost depending on the number of drops, but they eliminate runner waste and virtually eliminate cold slugs.|||Shut-off nozzle — a spring-loaded or hydraulically actuated valve at the nozzle tip that seals the melt between shots. Prevents both drooling and the formation of a cold slug at the tip.|||Insulated hot sprue — a compromise between a full hot runner and a cold runner. The sprue is heated while the rest of the runner stays cold.
Lower cost than a full hot runner but still addresses the primary cold slug formation point.
“Hot runner systems virtually eliminate cold slugs by keeping the melt at temperature inside the manifold.”True
True. In a hot runner system, the melt travels through heated channels from the nozzle to the gate, so there is no opportunity for premature cooling. Cold slugs become extremely rare.
“Cold slugs are always visible on the surface of the molded part.”False
False. Cold slugs can be fully embedded inside the part wall, invisible to the naked eye. Internal cold slugs require X-ray or CT scanning to detect and are particularly dangerous in structural applications.
What Materials Are Most Susceptible to Cold Slug?
Not all materials are equally prone to cold slug. The risk depends on three factors: melting temperature, crystallization speed, and melt viscosity. Materials that have high melting points, fast crystallization rates, or high viscosity are the most susceptible.
High-risk materials: PEEK (343–399 °C 용융), LCP (280–350 °C), PPS (280–330 °C), 유리 충전 나일론. 이러한 재료는 매우 높은 배럴 및 노즐 온도가 필요하며, 약간의 온도 하락도 조기 고화를 일으킬 수 있습니다.|||중간 위험 재료: PC (260–310 °C), POM (175–225 °C), PA66 (260–290 °C). POM(아세탈)은 특히 까다로운데, 매우 빠르게 결정화되어 녹은 상태와 고체 상태 사이의 창이 좁습니다.|||저위험 재료: PP, PE, PS 및 ABS. 이러한 비정질 또는 느린 결정화 재료는 넓은 가공 범위를 가지며 온도 변화를 더 잘 견딥니다.
고위험 재료를 성형하고 있고 콜드 슬러그가 반복적으로 발생한다면, 더 나은 유동 특성(더 높은 용융 유량 지수)을 가진 재료가 응용 분야에 적합할 수 있는지 고려하세요. 때로는 표준 등급 PA66에서 MFI가 60+ g/10분인 고유동 등급으로 전환하면 금형 변경 없이 문제를 완전히 해결할 수 있습니다.
결론
사출 성형에서 콜드 슬러그는 궁극적으로 열 관리 문제입니다. 용융물이 캐비티에 도달하기 전에 너무 많은 열을 잃고, 그 결과 부품에 매립된 고체화된 플라스틱 덩어리가 생깁니다. 해결 방법은 노즐 온도를 5도 올리는 것처럼 간단할 수도 있고, 핫 러너 시스템을 개조하는 것처럼 복잡할 수도 있습니다. 증상이 용융 회수 또는 배럴 마모와 관련될 때, 우리 공정 엔지니어는 금형 변경 전에 스크류 사출 성형기 설정을 검사합니다. 핵심은 열 손실이 어디에서 발생하는지(노즐, 러너, 게이트) 진단하고 그에 따라 해결책을 집중하는 것입니다.
상하이에 본사를 둔 선도적인 기업인 ZetarMold에서 20년간 사출 성형 생산을 운영해 온 경험으로부터, 사출 성형 공급업체 가장 효과적인 콜드 슬러그 방지 전략은 적절한 금형 설계(콜드 슬러그 웰, 원형 러너, 가열 스프루 부싱)와 체계적인 공정 제어(노즐 온도, 사출 속도, 최소 감압)의 조합임을 발견했습니다. 이러한 기본 요소를 올바르게 설정하면, 콜드 슬러그는 만성적인 문제가 아닌 드문 예외가 됩니다.
자주 묻는 질문
자주 묻는 질문
콜드 슬러그와 숏 샷의 차이는 무엇인가요?
콜드 슬러그는 용융물이 조기 냉각되어 부품이나 러너에 갇힐 때 형성되는 고체화된 플라스틱 조각입니다. 숏 샷은 금형 캐비티가 플라스틱으로 완전히 채워지지 않아 부품에 재료가 부족한 상태입니다. 이들은 근본 원인이 다릅니다: 콜드 슬러그는 노즐, 러너 또는 게이트에서의 조기 고체화에서 비롯되는 반면, 숏 샷은 일반적으로 불충분한 사출 압력, 부적절한 배기 또는 기계의 잘못된 사출 크기 설정으로 인해 발생합니다.
콜드 슬러그가 성형 부품의 구조적 파손을 일으킬 수 있나요?
네, 콜드 슬러그는 성형 부품의 구조적 파손을 확실히 일으킬 수 있습니다. 부품 벽 내부에 매립된 콜드 슬러그는 응력 집중체 역할을 하며, 충격 강도와 장기 피로 저항성을 모두 크게 감소시키는 미세 노치처럼 작용합니다. 자동차 브라켓, 의료 기기 하우징, 소비자 가전 외장과 같은 하중 지지 응용 분야에서 내부 콜드 슬러그는 반복 응력 주기 하에서 조기 균열 개시와 파괴적 파손으로 이어질 수 있습니다. 이 때문에 모든 구조적 및 안전 관련 플라스틱 부품에 X선 또는 CT 검사가 필수적인 것으로 간주됩니다.
콜드 슬러그 웰이 충분히 큰지 어떻게 알 수 있나요?
적절한 크기의 콜드 슬러그 웰은 노즐 팁 채널 자체 부피의 최소 1.5배 이상의 부피를 가져야 합니다. 각 사이클 후 스프루 풀러를 검사하여 생산에서 이를 확인할 수 있습니다: 콜드 슬러그 재료가 웰을 넘쳐 메인 러너로 들어가면 웰이 응용 분야에 명확히 작은 것입니다. 또 다른 신뢰할 수 있는 지표는 웰이 설치되어 있음에도 완성 부품에서 여전히 콜드 슬러그 결함이 관찰되는 경우입니다. 그 경우 웰을 약 50% 확대하고 다음 생산 런 동안 재시험하세요.
핫 러너 시스템이 콜드 슬러그를 완전히 제거하나요?
핫 러너는 콜드 러너 금형에서 가장 흔한 원인인 러너 열 손실로 인한 콜드 슬러그를 제거합니다. 용융물은 가열된 매니폴드 내부에서 온도를 유지하므로 러너에서 조기 냉각이 발생할 기회가 없습니다. 그러나 열 균형이 맞지 않으면 노즐-매니폴드 전이부나 게이트 팁에서 여전히 콜드 슬러그가 형성될 수 있습니다. 거의 완전한 제거를 달성하기 위해서는 적절한 핫 러너 설계, 일관된 온도 제어 및 히터 존의 정기적인 유지보수가 필수적입니다.
콜드 슬러그를 방지하기 위한 최적의 사출 속도는 무엇인가요?
더 빠른 사출 속도는 콜드 러너 시스템에서 용융물 체류 시간을 줄여 충전 단계 동안 열 손실과 조기 고체화 가능성을 최소화합니다. 이상적인 속도는 특정 재료와 부품 형상에 따라 다르지만, 일반적으로 플래시, 제팅 또는 부품에 번 마크를 일으키지 않는 가장 빠른 속도를 사용해야 합니다. POM이나 PA66과 같이 콜드 슬러그가 발생하기 쉬운 재료의 경우, 초기 설정으로 초당 80~120mm의 충전 속도가 일반적입니다. 대량 생산에 들어가기 전에 항상 작은 시험 런으로 속도 변경을 검증하세요.
왜 콜드 슬러그는 생산 런 시작 시 더 자주 나타나나요?
시작 시, 금형 강철은 아직 열적 평형에 도달하지 않았습니다 — 캐비티 표면과 러너 채널은 정상 상태 작동 온도보다 상당히 낮습니다. 처음 몇 번의 사출은 이러한 차가운 강철 표면으로 빠르게 열을 잃어, 캐비티가 완전히 채워지기 전에 선행 용융 전면이 고체화되어 콜드 슬러그가 됩니다. 생산 시작 전 5~10회의 퍼지 샷을 실행하고, 처음 20회의 샷 동안 점진적으로 전체 사이클 속도로 증가시키면, 금형이 정상 상태 온도에 도달하고 시작 시 콜드 슬러그 결함을 효과적으로 최소화하는 데 도움이 됩니다.


