 Przejdź do treści

Cold slug is one of those formowanie wtryskowe1 defects that sneaks up on you. You set the temperatures, you run a few good shots, and then a solidified chunk of plastic appears in your part, right at the gate or in the runner. It ruins the cosmetic surface, weakens structural integrity, and can scrap an entire batch before you notice.
I have seen cold slug happen with everything from ABS housings to glass-filled nylon gears. In most cases, the root cause traces back to one of three things: inadequate nozzle temperature, a poorly designed cold slug well, or excessive barrel decompression. The frustrating part is that cold slug does not always show up consistently — it can appear only during cold starts, or only on certain cavities in a multi-cavity mold.
This guide covers every angle of cold slug formation — from the physics of melt solidification in the nozzle and sprue, to the projekt formy2 features that catch or fail to catch these frozen plugs. Whether you are troubleshooting an existing defect or designing a new mold from scratch, you will find actionable steps grounded in real production experience from our formowanie wtryskowe operacje.
- Cold slug = solidified plastic trapped in the melt stream, usually at the nozzle, gate, or runner
- The number one cause is nozzle tip temperature dropping below the melt freezing point between shots
- Proper cold slug well design in the mold catches slugs before they reach the cavity
- Hot runner systems nearly eliminate cold slug but add cost and maintenance complexity
- Detection ranges from simple visual checks to X-ray and thermal analysis for critical parts
What Is a Cold Slug in Injection Molding?
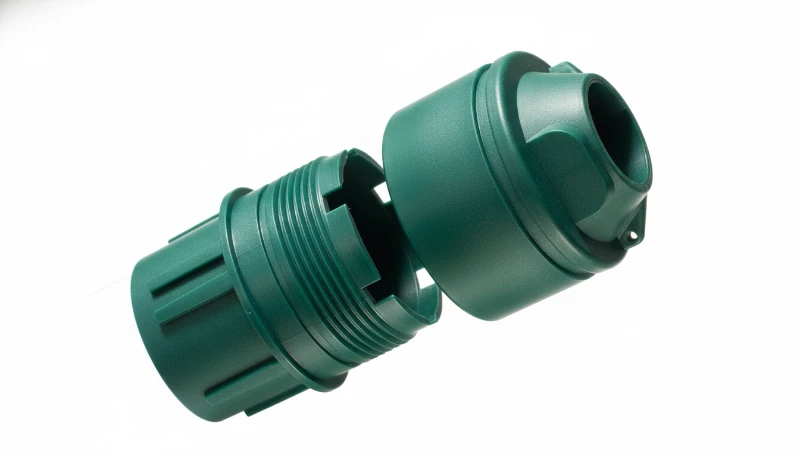
A cold slug is a solidified chunk of plastic that forms when melt temperature drops below the freezing point before the cavity fills. It is not a short shot or sink mark — cold slugs are prematurely frozen material carried into the part by subsequent injection cycles. They typically appear as raised bumps, discolored spots, or small pits near the gate area.
For a broader look at projektowanie form wtryskowych, our pillar guide covers tooling structure, thermal control, and manufacturability tradeoffs.
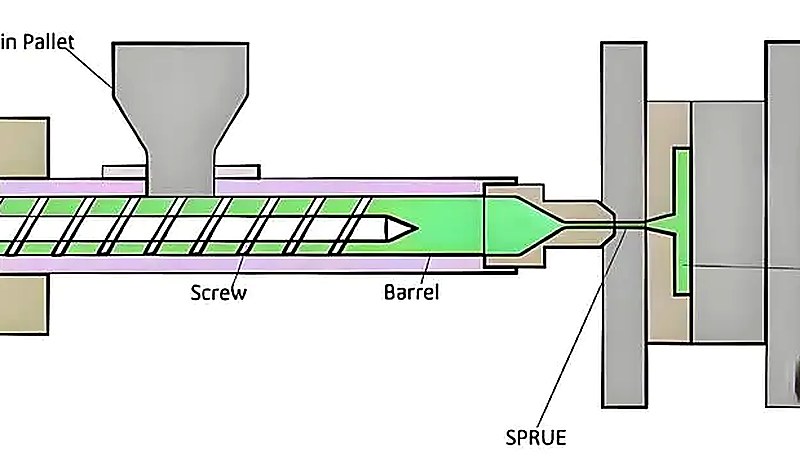
In technical terms, cold slugs typically form at three locations: (1) at the formowanie wtryskowe machine nozzle tip, where heat loss is fastest between shots; (2) in the sprue and runner system, where the melt travels through cold steel channels; and (3) at the gate, where the cross-section narrows and the flow velocity changes dramatically. Each location has different root causes and different fixes.
On our shop floor, we see cold slug most often during cold starts, when the mold has not reached thermal equilibrium yet, or when production switches from a high-melt-temperature material (like PEEK at 370 °C) to something cooler (like PP at 220 °C) and the operator does not purge the barrel completely. The residual high-temp material solidifies in the nozzle and gets injected as a cold slug into the first few shots of the new run.
What Causes Cold Slug During Injection Molding?
The root cause is always the same: the melt loses too much heat before it reaches the cavity. But the reasons behind that heat loss vary. Here are the four most common culprits we encounter in production.
Nozzle Temperature Too Low or Unstable
The nozzle is the last point where you can control melt temperature before it enters the mold. If the nozzle heater band is undersized, poorly controlled, or simply set too low, the melt at the tip cools between shots. When the next injection cycle starts, that cooled plug of plastic gets pushed into the sprue as a cold slug. This is especially common with materials that have a narrow processing window, such as polycarbonate or POM.
We once traced a recurring cold slug problem on a medical device housing back to a worn thermocouple on the nozzle — the controller showed 260 °C, but the actual tip temperature was cycling between 230 °C and 270 °C. Replacing the thermocouple and adding an insulation jacket solved it immediately.
“Cold slugs only form in cold runner mold systems.”Prawda
False. Cold slugs can form in any injection molding system, including hot runner3 molds, if the nozzle tip temperature drops below the melt’s freezing point. Hot runners reduce the risk but do not eliminate it entirely.
“Increasing nozzle temperature always eliminates cold slug.”Fałsz
False. While low nozzle temperature is a common cause, cold slugs can also originate from cold mold surfaces, long runners, or excessive decompression. Simply cranking up the nozzle temperature can introduce other defects like stringing or material degradation.
Mold Temperature Below Optimal Range
When the mold steel is too cold, the melt solidifies on contact with the cavity walls. If the frozen layer builds up faster than the cavity fills, cold slugs appear in the part. This is particularly problematic for thin-wall molding, where the flow channel is already narrow.
The fix is not always to increase mold temperature — that can increase cycle time and cause warpage. Instead, you need to optimize the cooling circuit layout so that the temperature is uniform across the mold face, and ensure that the areas near the gate are warm enough to prevent premature freeze-off.
Excessive Barrel Decompression (Suck-Back)
Decompression — also called suck-back — pulls the melt away from the nozzle tip after holding pressure ends. If you overdo it, you pull air into the nozzle, and the melt at the tip oxidizes and cools rapidly. On the next shot, that degraded, cooled material enters the cavity as a cold slug. This is one of the most overlooked causes, because operators often add decompression to prevent drooling without realizing the side effect.
Long or Narrow Runner Systems
Every millimeter of runner length is an opportunity for the melt to lose heat. Long, thin runners with high surface-area-to-volume ratios cause rapid cooling. By the time the melt reaches the gate, its temperature may have dropped below the flow threshold, and the leading edge solidifies into a cold slug. This is why multi-cavity molds with balanced runner layouts are so important — they minimize the runner length to each cavity.
How Does Mold Design Contribute to Cold Slug?
Konstrukcja formy is probably the single biggest factor in whether cold slug becomes a chronic problem or a non-issue. A well-designed mold accounts for heat loss at every stage and includes features specifically meant to catch or prevent cold slugs.
The Cold Slug Well
The cold slug well (also called a cold slug pocket or catch pad) is a small cavity placed directly opposite the sprue entrance in the runner system. Its job is to catch the cold slug that naturally forms at the nozzle tip between shots. When the injection cycle starts, the first material to enter the mold is the coldest — that plug gets pushed straight into the cold slug well instead of into the runner and cavity. If your mold does not have cold slug wells, or if they are too small, cold slugs will travel downstream.
A properly sized cold slug well should have a volume at least 1.5 times the volume of the nozzle tip channel. It should be easy to eject and clean during maintenance. In multi-cavity molds, every runner branch should have its own cold slug well.
Gate Design and Location
The gate is the narrowest point in the flow path, and it is where the melt undergoes the highest shear and the fastest cooling. Small gate diameters (especially sub-gates or pinpoint gates) create high shear heating but also restrict flow, which can cause the melt to freeze off prematurely. Edge gates and fan gates provide a larger cross-section and are less prone to cold slug formation.
Gate location also matters. If the gate is far from the sprue, the melt has to travel a longer runner, losing more heat along the way. Placing gates closer to the sprue — or using a hot runner drop directly into the cavity — eliminates most of the runner heat loss.
Runner Cross-Section Shape
Round runners have the lowest surface-area-to-volume ratio, meaning the least heat loss per unit of melt flow. Full-round runners are the gold standard for cold slug prevention. Trapezoidal runners are a common compromise because they are easier to machine, but they have about 20% more surface area than equivalent round runners, which translates to faster heat loss. Half-round runners should be avoided entirely for any material prone to cold slug.
“A cold slug well should be placed opposite the sprue entrance in the runner.”Prawda
True. The cold slug well is intentionally positioned opposite the sprue to catch the first, coldest material that enters the mold — the slug that formed at the nozzle tip between shots.
“Round runners cause more cold slug than trapezoidal runners.”Fałsz
False. Round runners have the lowest surface-area-to-volume ratio, meaning less heat loss and fewer cold slugs. Trapezoidal runners are easier to machine but lose heat faster.
What Process Parameters Lead to Cold Slug Formation?
The four process parameters that are most likely to cause cold slugs are injection speed, holding pressure, cooling time, and barrel decompression. Even a perfect mold will produce cold slugs with wrong settings. Here is how to tune each parameter.
Prędkość wtrysku
Slow injection speed gives the melt more time to cool as it flows through the runner. For materials with fast crystallization rates (like POM or PA66), a slow fill speed is almost guaranteed to produce cold slugs at the gate. Increasing injection speed pushes the melt through the runner faster, reducing residence time and heat loss. However, excessive speed can cause flash and jetting, so you need to find the sweet spot.
Holding Pressure and Time
Insufficient holding pressure means the cavity is not fully packed. The frozen layer at the walls grows inward, and the remaining melt in the center can solidify into a cold slug before the gate freezes off. If you see sink marks combined with cold slugs, increasing holding pressure and extending holding time often solves both problems simultaneously.
Czas chłodzenia
Counterintuitively, excessive cooling time between shots can make cold slug worse on the next cycle. When the mold sits idle with cooling water flowing, the sprue bushing and gate area continue to cool down. By the time the next shot fires, those surfaces are colder than they were during steady-state production, and the leading edge of the new melt freezes on contact. Optimizing cooling time for the thickest section of the part — not the sprue — helps avoid this.
In our Shanghai factory, we run 47 injection molding machines from 90T to 1850T. Cold slug issues show up most often on our larger presses (800T and above), where the nozzle-to-mold distance is longer and heat management becomes more critical. We have learned to add external nozzle heaters and thermal insulation jackets on these machines to keep the melt at a consistent temperature from barrel to gate.
How Can You Detect and Identify Cold Slugs?
Cold slugs are detected through visual inspection, X-ray or CT scanning, or thermal analysis (DSC/TGA). Early detection prevents defective parts from reaching customers. In our factory, the QC team maps the defect to the fill, pack, cooling, or ejection stage, then traces the cold material to its origin. Our engineers also record nozzle temperature, decompression distance, and first-shot scrap rate so the corrective action is tied to process evidence, not guesswork.
Kontrola wzrokowa
Cold slugs show up as visible blemishes on the part surface — typically a raised bump, a discolored spot, or a small pit near the gate. On transparent parts (like PMMA lenses), cold slugs appear as cloudy or opaque inclusions. This is the fastest detection method and works for most cosmetic parts, but it will not catch internal cold slugs.
X-Ray and CT Scanning
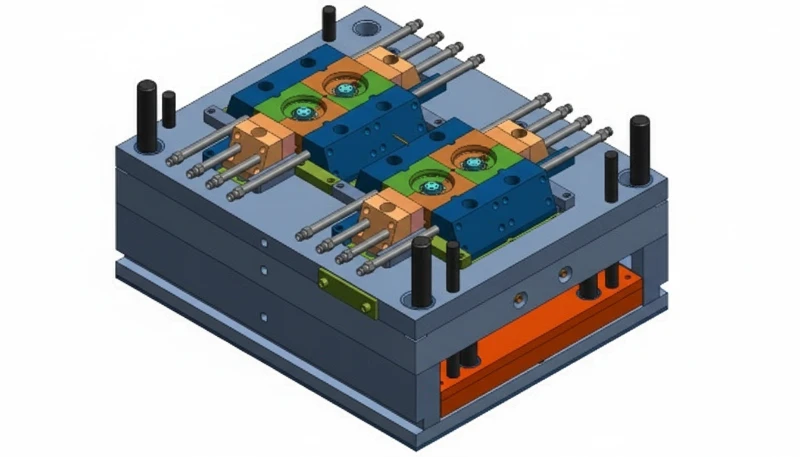
For critical applications — medical devices, automotive safety components, aerospace parts — you cannot rely on visual inspection alone. X-ray and computed tomography (CT) scanning can detect internal cold slugs that are completely invisible from the outside. CT scanning is especially valuable because it gives you a 3D map of the defect’s exact location, size, and shape.
Thermal Analysis (DSC/TGA)
When cold slugs are caused by material degradation or contamination (not just temperature issues), thermal analysis tools like Differential Scanning Calorimetry (DSC) help identify the problem. DSC can detect whether the cold slug material has a different melting point than the base resin, which indicates contamination or degraded material.
“X-ray inspection can detect internal cold slugs that are invisible on the surface.”Prawda
True. X-ray and CT scanning are non-destructive methods that reveal internal defects, including cold slugs trapped inside the part wall or at the gate interface.
“Cold slugs only affect the appearance of the part, not its mechanical strength.”Fałsz
False. Cold slugs create stress concentrators and weak points inside the part. In structural applications, a cold slug can reduce impact strength and fatigue life significantly.
How Do You Prevent and Eliminate Cold Slugs?
Prevention is always cheaper than detection. Here is a systematic approach to eliminating cold slugs, organized from the easiest changes to the most involved modifications.
Quick Fixes (No Tooling Changes Required)
These changes can be made at the machine without modifying the mold:
Raise nozzle temperature by 5–10 °C — often enough to keep the melt at the tip above the freezing point between shots. Monitor for stringing or drooling as side effects.|||Reduce decompression distance — minimize suck-back to prevent drawing air into the nozzle. If drooling occurs, use a shut-off nozzle instead of decompression.|||Increase injection speed — faster fill reduces the time the melt spends in the cold runner. Ramp up speed gradually while watching for flash.|||Optimize mold temperature — raise the coolant temperature near the gate area by 5 °C increments. Use zoned cooling if your mold supports it.
Mold Modifications
If process changes do not solve the problem, the mold needs attention:
Add or enlarge cold slug wells — every runner branch should have a cold slug well sized to at least 1.5× the nozzle tip volume. This is a low-cost modification that can be done during a regular mold maintenance window.|||Switch from trapezoidal to full-round runners — reduces heat loss by approximately 20%. Requires recutting the runner channels on both A and B halves of the mold.|||Install a heated sprue bushing — keeps the sprue at melt temperature, preventing the most common cold slug formation point. This is a mid-cost modification that pays for itself quickly on high-volume runs.
Equipment Upgrades
For persistent cold slug problems on high-value production:
System gorących kanałów — the gold standard for cold slug elimination. The melt stays at temperature inside the manifold, so there is no cold runner heat loss. Hot runners add $5,000–$20,000+ to the mold cost depending on the number of drops, but they eliminate runner waste and virtually eliminate cold slugs.|||Shut-off nozzle — a spring-loaded or hydraulically actuated valve at the nozzle tip that seals the melt between shots. Prevents both drooling and the formation of a cold slug at the tip.|||Insulated hot sprue — a compromise between a full hot runner and a cold runner. The sprue is heated while the rest of the runner stays cold.
Lower cost than a full hot runner but still addresses the primary cold slug formation point.
“Hot runner systems virtually eliminate cold slugs by keeping the melt at temperature inside the manifold.”Prawda
True. In a hot runner system, the melt travels through heated channels from the nozzle to the gate, so there is no opportunity for premature cooling. Cold slugs become extremely rare.
“Cold slugs are always visible on the surface of the molded part.”Fałsz
False. Cold slugs can be fully embedded inside the part wall, invisible to the naked eye. Internal cold slugs require X-ray or CT scanning to detect and are particularly dangerous in structural applications.
What Materials Are Most Susceptible to Cold Slug?
Not all materials are equally prone to cold slug. The risk depends on three factors: melting temperature, crystallization speed, and melt viscosity. Materials that have high melting points, fast crystallization rates, or high viscosity are the most susceptible.
High-risk materials: PEEK (temperatura topnienia 343–399 °C), LCP (280–350 °C), PPS (280–330 °C) oraz nylony napełnione szkłem. Te materiały wymagają bardzo wysokich temperatur w cylindrze i dyszy, a nawet niewielki spadek temperatury może spowodować przedwczesną krystalizację.|||Materiały o średnim ryzyku: PC (260–310 °C), POM (175–225 °C) i PA66 (260–290 °C). POM (acetal) jest szczególnie trudny, ponieważ krystalizuje bardzo szybko – okno między stanem stopionym a zestalonym jest wąskie.|||Materiały niskiego ryzyka: PP, PE, PS i ABS. Te amorficzne lub wolno krystalizujące materiały mają szerokie okna przetwórcze i lepiej tolerują wahania temperatury.
Jeśli przetwarzasz materiał wysokiego ryzyka i problem zimnych ślimaków występuje często, zastanów się, czy materiał o lepszych właściwościach płynięcia (wyższy wskaźnik płynięcia MFI) mógłby sprawdzić się w Twojej aplikacji. Czasami przejście ze standardowej klasy PA66 na klasę o wysokim płynięciu z MFI 60+ g/10 min całkowicie eliminuje problem bez żadnych zmian w narzędziu.
Wnioski
Zimny ślimak w formowaniu wtryskowym to w gruncie rzeczy problem zarządzania temperaturą. Stop traci zbyt dużo ciepła, zanim dotrze do gniazda, a rezultatem jest zestalony fragment plastiku osadzony w wyprasku. Rozwiązanie może być tak proste, jak podniesienie temperatury dyszy o 5 stopni, lub tak złożone, jak modernizacja systemu z gorącym kanałem. Gdy objaw wskazuje na odzysk stopu lub zużycie cylindra, nasi inżynierowie procesu również sprawdzają konfigurację wtryskarki zanim zmienią narzędzie. Kluczowe jest zdiagnozowanie, gdzie dochodzi do utraty ciepła – w dyszy, w kanale doprowadzającym czy w miejscu wlewowym – i dostosowanie rozwiązania odpowiednio do tego.
Z dwudziestoletniego doświadczenia w prowadzeniu produkcji wtryskowej w ZetarMold, wiodącej dostawca form wtryskowych z siedzibą w Szanghaju, odkryliśmy, że najskuteczniejszą strategią zapobiegania zimnym ślimakom jest połączenie odpowiedniego projektowania formy (studzienki na zimne ślimaki, okrągłe kanały, podgrzewane tuleje wlewowe) i zdyscyplinowanej kontroli procesu (temperatura dyszy, prędkość wtrysku, minimalna dekompresja). Prawidłowe ustawienie tych podstaw powoduje, że zimny ślimak staje się rzadkim wyjątkiem, a nie chronicznym problemem.

Często zadawane pytania
Często zadawane pytania
Jaka jest różnica między zimnym ślimakiem a niedolaniem?
Zimny ślimak to zestalony fragment plastiku, który powstaje, gdy stop przedwcześnie się ochładza i zostaje uwięziony w wyprasce lub kanale doprowadzającym. Niedolanie ma miejsce, gdy gniazdo formy nie zostaje całkowicie wypełnione plastikiem – w wyprasce brakuje materiału. Mają one różne przyczyny źródłowe: zimne ślimaki wynikają z przedwczesnej krystalizacji w dyszy, kanale doprowadzającym lub miejscu wlewowym, podczas gdy niedolania zazwyczaj są skutkiem niewystarczającego ciśnienia wtrysku, nieodpowiedniego odpowietrzania lub błędnego ustawienia wielkości porcji na maszynie.
Czy zimne grudki mogą powodować awarie strukturalne w formowanych częściach?
Tak, zimne ślimaki absolutnie mogą powodować awarie strukturalne w wypraskach. Zimny ślimak osadzony wewnątrz ścianki wypraski twor koncentrator naprężeń, działając jak mikroskopijne nacięcie, które znacząco redukuje zarówno wytrzymałość na uderzenie, jak i odporność na zmęczenie długoterminowe. W aplikacjach nośnych, takich jak wsporniki samochodowe, obudowy urządzeń medycznych i obudowy elektroniki użytkowej, wewnętrzny zimny ślimak może prowadzić do przedwczesnej inicjacji pęknięcia i katastrofalnej awarii pod wpływem powtarzających się cykli naprężeń. To właśnie dlatego kontrola rentgenowska lub tomograficzna jest uważana za niezbędną dla wszystkich strukturalnych i krytycznych dla bezpieczeństwa komponentów plastikowych.
Jak sprawdzić, czy moja studzienka na zimne ślimaki jest wystarczająco duża?
Prawidłowo dobrana studzienka na zimne ślimaki powinna mieć objętość co najmniej 1,5 razy większą niż objętość samego kanału końcówki dyszy. Można to zweryfikować w produkcji, sprawdzając wyciągacz wlewu po każdym cyklu: jeśli materiał zimnego ślimaka przelewa się przez studzienkę i dostaje do głównego kanału, to studzienka jest wyraźnie za mała dla Twojej aplikacji. Innym wiarygodnym wskaźnikiem jest obserwowanie wad zimnego ślimaka w gotowej wyprasce pomimo zainstalowanej studzienki – w takim przypadku powiększ studzienkę o około 50 procent i przetestuj ponownie podczas kolejnej serii produkcyjnej.
Czy system gorącego kanału całkowicie eliminuje zimne ślimaki?
Gorące kanały eliminują zimne ślimaki powodowane utratą ciepła w kanale, co jest najczęstszym źródłem w formach z zimnym kanałem. Stop utrzymuje temperaturę wewnątrz podgrzewanej płyty rozdzielczej, więc nie ma możliwości przedwczesnego ochłodzenia w kanale. Jednak zimne ślimaki nadal mogą powstawać na przejściu dysza-płyta rozdzielcza lub na końcówce wlewu, jeśli równowaga termiczna jest nieprawidłowa. Właściwe projektowanie gorącego kanału, stabilna kontrola temperatury i regularna konserwacja stref grzejnych są kluczowe dla osiągnięcia niemal całkowitej eliminacji.
Jaka prędkość wtrysku jest najlepsza, aby zapobiec zimnym grudkom?
Szybsze prędkości wtrysku skracają czas przebywania stopu w zimnym systemie kanałów, minimalizując straty ciepła i szansę na przedwczesną krystalizację podczas fazy napełniania. Optymalna prędkość zależy od konkretnego materiału i geometrii części — ogólnie należy stosować najszybszą prędkość, która nie powoduje wypływów, strumieniowania ani śladów przypaleń na części. Dla materiałów podatnych na zimne grudki, takich jak POM czy PA66, typowymi punktami wyjścia są prędkości napełniania od 80 do 120 mm na sekundę. Zawsze sprawdzaj każdą zmianę prędkości w małym przebiegu testowym przed przejściem do pełnoskalowej produkcji.
Dlaczego zimne ślimaki pojawiają się częściej na początku serii produkcyjnej?
Podczas rozruchu stal formy nie osiągnęła jeszcze równowagi termicznej – powierzchnie gniazd i kanały doprowadzające są znacznie chłodniejsze niż ich temperatura robocza w stanie ustalonym. Pierwsze kilka wtrysków szybko traci ciepło na tych zimnych powierzchniach stalowych, powodując, że czołowy front stopu krzepnie w zimne ślimaki, zanim gniazdo całkowicie się wypełni. Przeprowadzenie pięciu do dziesięciu wtrysków oczyszczających przed rozpoczęciem produkcji oraz stopniowe zwiększanie prędkości cyklu przez pierwsze dwadzieścia wtrysków pomaga formie osiągnąć temperaturę stanu ustalonego i skutecznie minimalizuje wady zimnych ślimaków na starcie.
-
formowanie wtryskowe: Formowanie wtryskowe to proces produkcyjny, w którym stopione tworzywo sztuczne jest wtryskiwane do wnęki formy w celu wytworzenia części o precyzyjnej geometrii i powtarzalnej jakości. ↩
-
projekt formy: Projektowanie formy to ustrukturyzowany proces inżynierski definiujący układ wlewów, geometrię kanałów, chłodzenie, wypychanie, odpowietrzanie, wybór stali i tolerancje, aby wtryskiwana wypraska mogła działać niezawodnie. ↩
-
hot runner: gorący kanał odnosi się do systemu gorących kanałów, który wykorzystuje podgrzewane kanały wewnątrz formy, aby utrzymać tworzywo w stanie stopionym od dyszy do wlewka, eliminując odpad w postaci ścieżki i zmniejszając ryzyko powstania zimnej grudki. ↩






 EN
EN  ES
ES  FR
FR  DE
DE  PT
PT  AR
AR  RU
RU  JA
JA  KO
KO  IT
IT  NL
NL  TR
TR  PL
PL 