 Overslaan naar inhoud

Look, after 20+ years of wrestling with injection molding gates, I’ve seen every conceivable way to mess up gate removal – and trust me, there are plenty. Gates are the channels that feed molten plastic into your mold cavity, but once your part is molded, they become the unwanted appendage that needs surgical removal. Get it wrong, and you’ll have stress1 marks, dimensional issues, or parts that look like they went through a wood chipper. This article covers everything you need to know about gate removal – from the basic hand tools that’ll save your bacon on low-volume runs to the fancy automated systems that’ll make your accountant either smile or cry, depending on your production volumes.
- Gate type determines removal method — submarine gates self-degating, while direct gates need manual cutting
- Production volume drives automation decision — above 50,000 parts, robotic degating pays for itself
- Gate vestige requirements dictate your tooling investment — cosmetic parts need cleaner gate design
- Material choice affects removal difficulty — brittle plastics like PC need gentler degating than flexible PP
What Are the Different Types of Injection Molding Gates?
The six main injection molding gate types are direct, edge, submarine, pin-point, fan, and diaphragm gates. Each has a distinct vestige profile and removal difficulty. You can’t talk gate removal without understanding what you’re dealing with first.
If you are comparing vendors or planning procurement, our injection molding supplier sourcing guide covers RFQ prep, qualification, and commercial risk checks.
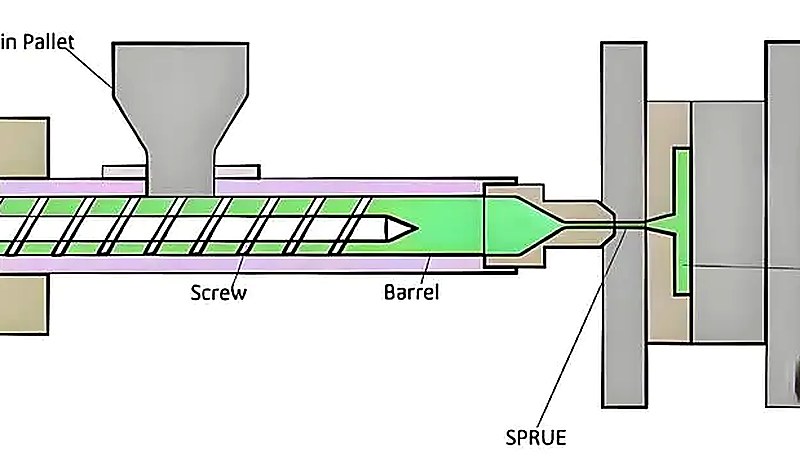
Direct/Sprue Gate
The sledgehammer of gates – big, obvious, and about as subtle as a freight train. Direct gates connect straight from the main sprue to your part, typically 3-8mm in diameter. I use these for large, thick parts where you need maximum flow rate and don’t care about gate vestige appearance. Think automotive bumpers or large housings where the gate area gets hidden or machined away. Removal is straightforward – hacksaw, band saw, or CNC machining. The vestige is substantial (2-6mm raised area), so only use direct gates where you can afford the real estate and post-machining.
Randpoort
Your bread-and-butter gate for most applications. Edge gates enter the part from the parting line, typically 0.5-2.0mm thick and 2-6mm wide. They’re the Swiss Army knife of gates – versatile, reliable, and easy to remove with standard nippers. I spec edge gates for probably 60% of the molds we design. Gate vestige is manageable (0.1-0.5mm high), and you can usually clean it up with a deburring tool. The key is gate placement – put it where the vestige won’t affect function or appearance.
Submarine/Tunnel Gate
Now we’re talking – the magician’s gate that disappears on its own. Submarine gates tunnel under the parting line and shear off automatically when you eject the part. Typical diameter is 0.8-1.5mm, and the vestige is minimal (0.05-0.2mm). These beauties are perfect for high-volume production where manual degating would kill your labor costs. The catch? Your spuitgietvorm needs precise geometry – the tunnel length should be 2-3 times the gate diameter, and the break angle needs to be spot-on or you’ll get rough vestiges.
Pin Point Gate
The precision instrument of gates. Pin point gates are tiny (0.3-0.8mm diameter) and enter through the cavity side, leaving minimal vestige. They’re ideal for cosmetic parts where gate marks are unwelcome guests. Removal requires finesse – sharp nippers or specialized gate cutters. The vestige is small but needs careful finishing to avoid sink marks or stress concentrations. I use pin point gates for medical devices, electronics housings, and anywhere appearance matters more than easy processing.
Fan Gate
The crowd-pleaser for wide, thin parts. Fan gates spread the flow across a broad area (typically 0.3-0.8mm thick, 10-50mm wide), reducing weld lines and improving oppervlakafwerking2. Think laptop covers or automotive trim panels. Removal is tedious – you’ll need sharp knives and patience to trim the entire width cleanly. The vestige is a thin ridge that needs careful sanding or routing. Fan gates are high-maintenance, but when you need uniform fill across a wide part, they’re worth the extra effort.
Diaphragm/Disk Gate
The specialty gate for cylindrical parts like bottles or containers. The gate surrounds the entire circumference of the part, providing incredibly uniform filling. Gate thickness is typically 0.2-0.6mm, and removal requires careful knife work around the entire perimeter. The vestige is a thin ring that often needs lathe work for critical applications. Diaphragm gates are beautiful for their filling characteristics but are labor-intensive to clean up unless you can afford CNC post-processing.
How Do You Manually Remove Gates from Molded Parts?
The primary manual gate removal tools are hand nippers, side cutters, deburring tools, and gate cutters. Good technique makes the difference between professional results and scrap.
Hand Nippers and Side Cutters
Your primary weapons for edge gates up to 2mm thick. I swear by Xuron or Lindstrom nippers – yeah, they cost 3-4 times more than hardware store cutters, but they’ll give you clean cuts for years. The key is blade angle and cutting technique. Position the nippers perpendicular to the gate, not angled, and cut in one smooth motion. Partial cuts create stress concentrations and ugly vestiges. For ABS and PC, I keep the cutting blades razor-sharp with 1000-grit diamond paste. Dull blades crush and tear rather than cut, especially with tough materials like POM or nylon.
Utility Knives and Razor Blades
Essential for fan gates and thin flash. Use fresh blades religiously – I change them every 50-100 cuts depending on material. The technique is score-and-snap for materials like PS and ABS, but slice-and-peel for flexible materials like TPE. Keep the blade angle low (15-20 degrees) to avoid digging into the part surface. For critical cosmetic parts, I use surgical scalpels with #11 blades – they’re sharper than standard utility blades and give cleaner cuts on thin gates.
Deburring Tools and Scrapers
The cleanup crew for gate vestiges. Deburring tools with replaceable blades work great for removing 0.1-0.3mm vestiges on most thermoplastics. The secret is light passes – don’t try to remove the entire vestige in one stroke. For glass-filled materials, use carbide deburring blades; high-speed steel dulls quickly on abrasive fillers. Curved scrapers work better on cylindrical surfaces, while straight blades handle flat areas. Always scrape toward the thicker section of the part to avoid stress concentrations.
Specialized Gate Cutters
For high-volume manual operations, specialized gate cutters pay for themselves quickly. Pneumatic gate cutters can process 500-1000 parts per hour with consistent quality – that’s 5-10 times faster than hand nippers. The initial investment is $1500-5000, but labor savings justify the cost above 10,000 parts annually. These tools use precise cutting dies matched to your specific gate geometry, giving repeatable vestige quality that hand tools can’t match.
In our Shanghai factory, we run 47 injection molding machines from 90T to 1850T, and I’ve learned that gate removal method selection can make or break your production economics. With 20+ years of injection molding experience, I’ve seen operations lose money simply because they didn’t match the degating method to their volume and quality requirements.
What Automated Gate Removal Methods Exist?
Five automated methods dominate: robotic3 degating, CNC trimming, warmloper4 auto-degating, laser cutting, and ultrasonic cutting. The key is matching automation level to production volume and part complexity.
Robotic Degating Systems
Six-axis robots with specialized cutting tools can handle complex gate geometries that would challenge human operators. A typical setup costs $150,000-300,000 but can process 1000-2000 parts per hour with consistent quality. The sweet spot is parts with 3+ gates or complex geometries where manual removal takes over 30 seconds per part. Programming time is significant – expect 2-4 weeks for complex parts – but once dialed in, you’ll get repeatable results 24/7. The robot doesn’t get tired, doesn’t call in sick, and doesn’t need benefits.
CNC Trimming Operations
For parts requiring precise gate vestige removal or where the gate area needs machined features anyway, CNC trimming makes sense. Typical cycle times are 30-180 seconds depending on complexity, with tooling costs of $5,000-25,000 for fixtures and programming. CNC works great for direct gates on automotive or aerospace parts where the gate area gets machined to final dimensions anyway. The limitation is cycle time – you need high part values ($5+ each) to justify CNC processing.
Hot Runner Auto-Degating
The Rolls Royce of gate systems. Hot runner systems with valve gates eliminate manual degating entirely by controlling plastic flow with heated probes. Initial tooling costs are 40-60% higher than cold runner systems, but you eliminate all degating labor and runner material waste. Break-even is typically 100,000-500,000 parts depending on part size and complexity. Maintenance is critical – expect $5,000-15,000 annually for heating element replacement and controller servicing.
Laser and Ultrasonic Cutting
Emerging technologies for precision degating. Laser cutting gives incredibly clean cuts with minimal heat-affected zones, perfect for medical and optical parts. Equipment costs run $200,000-500,000, limiting application to high-value parts. Ultrasonic cutting works well for thin gates on flexible materials, with lower equipment costs ($50,000-150,000) but slower processing speeds. Both technologies are still developing their niche in the spuitgieten world.
| Method | Arbeidskosten | Uitrusting Kosten | Total Cost | Break-Even Volume |
|---|---|---|---|---|
| Manual Nippers | $25-45 | $0.05 | $25.05-45.05 | 0-10K parts/year |
| Pneumatic Cutters | $15-25 | $0.50 | $15.50-25.50 | 10K-50K parts/year |
| Robotic Degating | $5-10 | $2-5 | $7-15 | 50K+ parts/year |
| Submarine Gates | $0 | $0.20 | $0.20 | 25K+ parts/year |
How Does Gate Design Affect Removal Difficulty?
Removal difficulty is determined by four factors: gate area, location, material shrinkage, and wall thickness transitions around the gate zone.
Gate Size vs Vestige Quality
There’s an inverse relationship between gate size and vestige quality – bigger gates are easier to cut cleanly but leave larger vestiges. For edge gates, the sweet spot is 0.5-1.0mm thick for most applications. Thinner gates (0.3mm) give minimal vestiges but tear during removal, especially with tough materials. Thicker gates (1.5mm+) cut cleanly but leave prominent vestiges requiring secondary finishing. The material matters too – soft materials like PE can use thinner gates, while rigid materials like PC need adequate thickness to avoid stress cracking during removal.
Gate Location Strategy
Gate placement is chess, not checkers. Put gates where vestiges won’t affect function or appearance – inside corners, non-contact surfaces, or areas that will be assembled or painted. Avoid high-stress areas where gate vestiges create stress concentrations. For cosmetic parts, locate gates on surfaces that won’t be visible in final assembly. I’ve seen beautiful parts ruined by gates placed on A-surfaces simply because the mold designer didn’t think about the final application.
Material Shrinkage Effects
Different materials shrink differently around gates, affecting vestige appearance and removal difficulty. Semi-crystalline materials like PP and POM create sink marks around thick gates due to high shrinkage (1.5-2.5%). Amorphous materials like ABS and PC have lower shrinkage (0.4-0.8%) and create more uniform vestiges. Glass-filled materials require special consideration – the fibers create abrasive wear on cutting tools and can cause rough vestige surfaces if not cut properly.
Wall Thickness Transitions
Sharp thickness changes near gates create removal problems and part defects. The transition from gate to part wall should be gradual – I use 3:1 or 4:1 tapers when possible. Abrupt transitions create stress concentrations that can cause parts to crack during degating, especially with brittle materials or at low temperatures. The gate should flow into the thickest section of the local area to minimize pressure drops and reduce sink mark potential.
When Should You Choose Self-Degating Gate Designs?
Self-degating gates are the holy grail of injection molding – parts that separate from runners automatically without manual intervention. But like most good things, they come with trade-offs that you need to understand before committing.
Submarine Gates That Auto-Separate
Submarine gates work by creating a controlled failure point that shears when the part ejects. The key parameters are tunnel length (2-3x gate diameter), break angle (typically 15-30 degrees), and material selection. Brittle materials like PS and SAN work beautifully, while tough materials like PC and POM can be stubborn. I’ve had great success with submarine gates on electronic housings, toys, and consumer products where cycle time matters more than perfect vestige appearance. The tooling is 15-25% more expensive due to the complex geometry, but you eliminate all degating labor.
Hot Runner Valve Gates
Valve gates use heated probes to control plastic flow, eliminating runners entirely. Each gate has individual control, allowing sequential filling for complex parts or family molds. The technology is mature and reliable when properly maintained, but the initial investment is substantial – $5,000-15,000 per gate depending on size and complexity. Valve gates make sense for high-volume production (100,000+ parts annually) or where runner material cost is significant. Maintenance requirements are real – expect quarterly heating element checks and annual controller calibration.
Thermal Gate Systems
Thermal gates use temperature differences to create controlled separation points. The concept is elegant – heat a section of the runner after filling, creating thermal expansion that breaks the connection. Reality is more complex, requiring precise temperature control and timing. I’ve seen successful applications in packaging and medical devices, but the technology is still evolving. Equipment costs are moderate ($25,000-75,000), but process development time can be extensive.
Investment Justification
The math on self-degating systems is straightforward but often ignored. Calculate your current degating labor cost per part, multiply by annual volume, and compare to the additional tooling investment. Factor in quality improvements, cycle time reduction, and eliminated runner material cost. For most applications, break-even is 25,000-100,000 parts depending on labor rates and part complexity. Don’t forget maintenance costs – self-degating systems require more sophisticated tooling that needs regular servicing.
What Quality Checks Are Needed After Gate Removal?
The four essential post-removal checks are visual inspection, dimensional measurement, surface roughness testing, and stress mark examination.
Visual Inspection Standards
Develop clear visual standards for acceptable gate vestige appearance. Document with photographs showing acceptable, marginal, and reject conditions. Train operators to recognize stress whitening, incomplete cuts, and surface damage. Use consistent lighting – 500-1000 lux at 6500K color temperature reveals defects that might be missed under standard factory lighting. For cosmetic parts, inspect under conditions matching the final use environment – automotive parts under automotive lighting, consumer electronics under typical home lighting.
Dimensional Verification
Gate removal can affect part dimensions through stress relief or material removal. Check critical dimensions within 0.1mm of gate locations using calibrated measuring equipment. For thin-wall parts, gate cutting stress can cause immediate dimensional changes or longer-term warpage. Establish dimensional stability by measuring parts immediately after degating, then again after 24-48 hours. Parts that move more than 0.05mm indicate excessive degating stress or poor gate design.
Vereisten voor oppervlaktefinish
Gate vestige surface finish affects both appearance and function. Rough vestiges create stress concentrations and premature failure points. Use surface roughness gauges to establish quantitative standards – typically Ra 1.6-6.3 μm for functional surfaces, Ra 0.4-1.6 μm for cosmetic surfaces. Sand or machine rough vestiges to specification rather than accepting marginal quality. The labor cost of proper finishing is usually less than the cost of field failures or customer complaints.
Common Defects Detection
Train inspectors to recognize stress whitening (indicates overload during cutting), sink marks (material shrinkage around thick gates), color variation (thermal damage from dull cutting tools), and incomplete separation (partial cuts that create stress risers). Use magnification for small gates – 2-4x is usually sufficient to reveal cutting quality. Reject parts with any stress whitening in visible areas or stress concentrations in functional areas. These defects don’t improve with time; they get worse.
“Hot runner systems eliminate all gate removal operations”Echt
Properly functioning hot runner valve gate systems eliminate physical gates entirely, requiring no degating operations. The plastic flow is controlled by heated probes that seal cleanly when closed.
“Submarine gates always produce better surface finish than edge gates”Vals
While submarine gates can produce excellent vestige quality, the surface finish depends on proper tunnel geometry, material selection, and processing parameters. Poorly designed submarine gates can tear irregularly, leaving rough vestiges worse than well-cut edge gates.
Understanding the relationship between gate design and removal efficiency helps engineers make better decisions early in the product development cycle. In practice, the most successful injection molding projects address degating strategy during the initial DFM (Design for Manufacturing) review, well before tool steel is cut. This proactive approach prevents costly mold modifications and production delays that commonly occur when gate removal is treated as an afterthought rather than a design requirement.
“Gate removal method should be determined during mold design phase”Echt
Gate design directly affects removal difficulty, vestige size, and processing economics. Deciding removal method after tooling is complete often results in suboptimal outcomes and higher production costs.
“Larger gates are always easier to remove cleanly”Vals
While larger gates provide more material to grip during cutting, they also require more cutting force and leave larger vestiges. Very large gates can cause stress concentration and cracking during removal, especially in brittle materials.
Veelgestelde vragen
Veelgestelde vragen
What is a gate vestige in injection molding?
A gate vestige is the small remaining material stub left on a molded part after the gate is removed. Think of it as the ‘belly button’ where the part was connected to the runner system. Vestige size depends on gate type and removal method – submarine gates leave minimal vestiges (0.05-0.2mm), while direct gates can leave substantial raised areas (2-6mm). The vestige quality affects both part appearance and structural integrity, so proper removal technique is critical for maintaining part specifications.
Can you remove injection molding gates without special tools?
For small gates and low volumes, basic tools like sharp knives or standard nippers can work, but results will be inconsistent and labor-intensive. Edge gates up to 1mm thick can be cut with quality side-cutters, though specialized gate nippers give cleaner results. However, for production volumes above a few hundred parts, the labor cost and quality issues make proper degating tools essential. Trying to save money on tools usually costs more in labor time and rejected parts than investing in appropriate equipment from the start.
Beïnvloedt inloopverwijdering de dimensionale nauwkeurigheid van het onderdeel?
Ja, inloopverwijdering kan de dimensionale nauwkeurigheid beïnvloeden als het verkeerd wordt gedaan. Te dicht bij het onderdeeloppervlak snijden kan materiaal van de wand verwijderen, waardoor een te klein gebied ontstaat dat buiten de tolerantie valt. Omgekeerd voegt te veel inloopoverblijfsel ongewenst materiaal toe dat de montagepast interfereert. De sleutel is het beheersen van de snijdiepte — typisch binnen ±0,1 mm van het onderdeeloppervlak. Voor onderdelen met strakke toleranties zijn dimensionale controles na verwijdering op de inloopplaats essentieel om te verifiëren dat het onderdeel nog steeds voldoet aan de tekenspecificaties en functionele eisen.
Wat is het beste inlooptype voor automatische verwijdering?
Onderwaterinlopen (tunnel gates) zijn ideaal voor automatische verwijdering omdat ze zijn ontworpen om af te breken tijdens het uitwerpen van het onderdeel zonder aanvullende operaties. De inloop tunnelt onder de scheidingslijn en breekt op een vooraf bepaalde zwakke plek, met minimaal overblijfsel (typisch 0,05-0,2 mm). Succes hangt af van de juiste tunnelgeometrie – de lengte moet 2-3 keer de inloopdiameter zijn met geschikte breekhoeken. Materiaalkeuze is ook belangrijk; broze materialen zoals PS werken beter dan taaie materialen zoals PC. Voor warmlopersystemen elimineren klepinlopen verwijdering volledig door de stroom te regelen met verwarmde probes.
Hoeveel kost geautomatiseerde inloopverwijderingsapparatuur?
Geautomatiseerde inloopverwijderingsapparatuur varieert sterk in kosten, afhankelijk van complexiteit en doorvoereisen. Een eenvoudig pneumatisch knipstation kost ongeveer 2.000 tot 5.000 USD voor kleinschalige operaties. Robotontgatencellen beginnen rond 50.000 USD en kunnen meer dan 200.000 USD bedragen voor meerassige systemen met geïntegreerde visuele geleiding. Lasersnijsystemen vallen in het bereik van 80.000 tot 150.000 USD. De ROI hangt af van arbeidsbesparingen, afvalreductie en doorvoerverbetering, waarbij de meeste systemen zich binnen 12 tot 24 maanden terugverdienen bij productievolumes boven de 100.000 onderdelen per jaar.
Zijn er inloopontwerpen die verwijdering overbodig maken?
Ja, verschillende inloopontwerpen maken handmatige verwijdering overbodig. Warmloper klepinlopen regelen de kunststofstroom met verwarmde probes, die schoon afsluiten zonder fysieke inloop om te verwijderen. Onderwaterinlopen (submarine gates) breken automatisch af tijdens het uitwerpen wanneer ze goed zijn ontworpen. Sommige thermische inloopsystemen gebruiken gecontroleerde verwarming om de loperverbinding te verbreken. Deze systemen vereisen echter een hogere initiële gereedschapsinvestering (15-60% meer) en kunnen voortdurend onderhoud nodig hebben. De beslissing hangt af van productievolume, arbeidskosten en kwaliteitseisen. Voor grootschalige productie rechtvaardigt het elimineren van ontgatenoperaties meestal de extra gereedschapskosten.
Wat veroorzaakt witte spanningsmarkeringen nabij inloopverwijderingsgebieden?
Witte spanningsmarkeringen (spanningsverbleking) treden op wanneer snijkrachten de vloeigrens van het materiaal overschrijden, wat moleculaire ketenuitlijning en veranderingen in lichtverstrooiing veroorzaakt. Veelvoorkomende oorzaken zijn botte snijgereedschappen die pletten in plaats van snijden, overmatige snijkracht, onjuiste snijhoeken, of het snijden van bevroren onderdelen die onder hun glasovergangstemperatuur zijn. Broze materialen zoals PS en rigide PVC zijn bijzonder gevoelig. Preventie omvat het gebruik van scherpe gereedschappen, goede snijtechniek, onderdelen op kamertemperatuur brengen voor het snijden, en het ontwerpen van inlopen met de juiste dikte voor een schone snede. Spanningsverbleking is permanent en vereist meestal afkeuring van het onderdeel in zichtbare gebieden.
Inloopverwijdering lijkt misschien een eenvoudige secundaire operatie, maar het is waar goede onderdelen geweldige onderdelen worden – of waar geweldige onderdelen worden verpest. De sleutel is om tijdens het matrijsontwerp aan ontgaten te denken, niet nadat de productie is gestart. Kies het juiste inlooptype voor uw volume- en kwaliteitseisen, investeer in de juiste gereedschappen en training, en stel duidelijke kwaliteitsnormen vast. Onthoud dat de goedkoopste ontgatenmethode niet altijd de meest economische is als u rekening houdt met arbeidstijd, kwaliteitsproblemen en klanttevredenheid.
Klaar om uw inloopverwijderingsproces te optimaliseren? Bij ZetarMold helpen we u vanaf dag één met het ontwerpen van matrijzen met het oog op ontgaten. Ons technisch team kan uw huidige processen evalueren en verbeteringen aanbevelen die tijd besparen, kosten verlagen en de kwaliteit verbeteren. Neem contact met ons op om te bespreken hoe een goed inloopontwerp en verwijderingsstrategie uw productie-efficiëntie kunnen verbeteren.
-
stress: Spanningsverbleking is een visuele indicator van microkristallijne schade in kunststofonderdelen, gemeten in MPa van resterende interne spanning nabij inloopgebieden. ↩
-
oppervlakafwerking: Oppervlakteruwheid wordt gedefinieerd als de afwijkingen in de richting van de normaalvector van een gemeten oppervlak ten opzichte van de ideale vorm, gemeten in micrometers (Ra-waarden). ↩
-
robotic: Robotontgaten verwijst naar het gebruik van programmeerbare meerassige armen om spuitgietonderdelen met herhaalbare precisie van lopers en inlopen te scheiden. ↩
-
warmloper: Een warmlopersysteem is een samenstelling van verwarmde componenten die in spuitgietmatrijzen worden gebruikt om gesmolten kunststof naar matrijsholtes te geleiden, waarbij de kunststof in een vloeibare toestand wordt gehouden. ↩


