 Skip to content

I. Principle
This process uses resist transfer ink, screen printing decorative patterns on the decal paper, and using the film method to transfer the decorative pattern ink to the injection mold, after drying and trimming, chemical corrosion, it will be made in the mold of the concave and convex decorative pattern.
2. Process
Base map production → photographic plate making → screen plate making → ink allocation → decal paper printing decorative pattern → ink drying → mold pretreatment → decal transfer → drying → trimming → corrosion → inspection → cleaning, rust prevention.
3. The process of decorative pattern mold
1. Basemap production
In addition to a computer or manual drawing, most of the decorative patterns on plastic samples and artificial leather are used.
A plastic sample should be selected from the pattern’s clear, uniform, flat surface, first spray a layer of black self-drying paint, dry, with more than 200 mesh white powder (calcium carbonate) coating, fill in the pattern, and then gently wipe away the prominent surface of the white powder, so that it reveals black until the layout pattern is clear, black and white, the base map will be completed.
If you choose an artificial leather decorative pattern, you can spread the artificial leather nailed tightly on the board, according to the above requirements of the same processing, the best choice of black artificial leather can save the spray paint.
2. Photographic plate making
Use CR or SO soft film, 1:1 to shoot the bottom picture. The size of the photographic negative to 100mm × 200mm or so is appropriate, easy to make screen plates and applique transfer.
3. Screen plate
With 200 ~ 300 mesh yellow polyester silk, 0.02mm thick blue photographic film, aluminum frame, and photographic negative, according to the method of manufacturing printing line screen plate manufacturing.
4. Ink blending
Select 500g of high-quality solid asphalt, packed into a clean rust-free tin, plus 300ml of kerosene, placed on the adjustable temperature electric stove boiling for 1 ~ 2h, control the state of micro-boiling, appropriate stirring, refining to the consistency suitable for screen printing, to cool to room temperature for the soft jelly, the surface and not crusted without wrinkling is good, this is asphalt ink.
Asphalt ink and 2711-4 ink (Tianjin Ink Factory products), mixed by weight 1:1, and then add Peony No78 dry oil, the amount of 2% to 5% of the weight of the mixed ink, using the ink knife to mix, it is made of resist transfer ink.
5. Decal paper printed decorative pattern
WPS400 type screen printing machine, mounted on the screen version, rubber scraper put on the appropriate amount of resist transfer ink, first with waste blue graph paper anti-interview printing, the force should be uniform, light and important moderate, do not return to the ink, until the print out uniform and clear decorative pattern, and then printed with decal paper.
Decal paper should be cut to the appropriate size before printing, with a clean rubber scraper scrape flat. Printing process, such as the occurrence of ink clogging the mesh, the pattern is not clear, indicating that the ink is too dry, you can add an appropriate amount of kerosene to thin it;
If the printed decorative pattern is easy to blur, indicating that the ink is in kerosene excess, the ink can be placed on the glass plate, repeatedly mixed with an ink knife, evaporate part of the kerosene, and then printed.
6. Ink drying
The printed decal paper into the oven grid, ink side up, evenly spread, with no overlap, with temperature control of 40 ~ 45 ℃, and baked until the ink is semi-dry state removed, that is, light touch the decal paper on the ink does not stick, a little pressure will stick, generally about 10 ~ 15min. ink baked too dry, the transfer and the mold is not sticky or have poor bonding; ink too damp, the transfer is easy to blur.

7. Mold pre-treatment
This process should be done before the decal paper printed decorative pattern. Mold to do decorative pattern surface roughness should reach above, there should be no sand holes, or scratches, to ensure that the decorative pattern is complete, clear, and consistent. Failure to meet the requirements should be supplemented by grinding.
Scrub the injection mold cavity and surrounding with gasoline to make the surface clean. Do not do decorative pattern surface protection with nitrocellulose paint, perchloroethylene paint, brush two to three times, holes, slots available rubber plug, rubber mud, and sealing tape protection.
To dry the paint film, do decorative patterns on the surface with magnesium oxide water slurry degreasing, and clean until the surface can be completely wetted by water. Then, use the sponge to absorb the water and dry, the hair dryer.
8. Applique transfer
According to the characteristics of the injection mold cavity, the applique pais per cut into a shape that is easy to paste, gently uncover a layer of thin paper printed with decorative patterns, ink facing the mold, carefully paste, requiring a flat fit without wrinkles, the plane with a rubber scraper scrape, the surface with skim cotton kneaded into a ball, vertical pressure on the paper base, so that the ink on the applique paper transfer to the mold.
After transferring, use a sponge with a small amount of water to moisten the decal paper, then gently uncover the paper base, use a sponge or absorbent paper to dry the water on the mold.
9. Drying
The ink transferred to the injection mold can be dried naturally in summer and needs to be dried with an infrared lamp in winter, requiring the surface and inside to be dry.
10. Trimming
Applique transfer mutual intersection and defective decorative pattern, with 0 or 1 tracing pen dipped in the transfer ink repair, dry with infrared light, and then use the pen repair knife to trim the excess ink, until the decorative pattern is even and clear natural articulation.
11. Corrosion
(1) the formula of corrosion solution
Ferric chloride 450 ~ 560g / L
Hydrochloric acid 5~10ml/L
Kerosene 10 ~ 15 drops / slot
Corrosion fluid Brahmi degree control 36 ~ 40 ° Be.
(2) Corrosion before preparation
Mold corrosion before, do decorative pattern with the application of magnesium oxide water slurry degreasing, cleaning, and then water gun spray tap water for 1min, to check whether the ink and mold bonding is solid.
Then use the wool row of the pen dipped in the corrosion solution brush once, no ink should be uniformly gray, completely wetted by water to ensure uniform corrosion. In the above operation process, such as ink off, should immediately stop corrosion, push down and start over, and re-applique transfer.
In normal operation, the ink and mold combination is very firm, the reason for shedding is improper operation, such as applique transfer, mold wet not dry, applique transfer paper ink baked too dry, or applique transfer after not scraping pressure, the operation should pay attention to.
(3) Etching
After confirming that the mold can be corroded, the cavity is surrounded by three layers of double-sided self-adhesive paper and PVC plastic sheeting to form a protective apron for corrosion, which is 400-600mm longer than the mold.
The corrosion machine adopts a nozzle-type spherical nozzle, half of the sphere is evenly distributed 19 nozzles, which can be uniformly three-dimensional spraying.
Hanging mold with electric hoist, cavity down, nozzle facing up and in the center of the protective apron, two people holding the mold slowly rotate, start the corrosion machine, with a stopwatch timing, corrosion 7 ~ 10min, summer take the lower limit, winter take the upper limit.
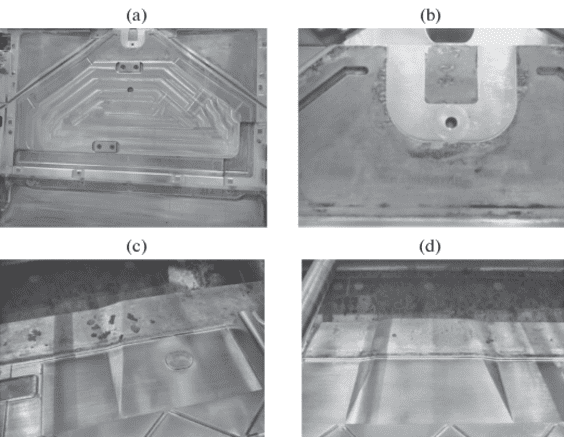
Decorative pattern corrosion depth has specific requirements of the injection mold, the application of the same steel to do decorative pattern corrosion specimens, measured the time required.

12. Test
Lift out the mold, tap water quickly rinse, with 5 ~ 10 times the magnifying glass or rubber cement embossed decorative lines, and check the corrosion depth. If the corrosion depth is not enough, can be lifted back to supplement the corrosion. Meet the requirements, immediately out of the slot cleaning.
13. Cleaning, rust prevention
Rinse the mold with tap water, wash the residual ferric chloride, remove the plastic apron, dry the surface with back silk, peel off the sealing tape and perchloroethylene paint, nitro paint wipe off with banana water, and ink wipes off with gasoline.
After cleaning, blow dry the injection mold with an electric blowing fan, and then use the back wire to dip the mold surface with anti-rust oil.
4. Process characteristics
(1) Adopt self-matched ink, which has the advantages of good corrosion resistance, strong adhesion, can dry naturally, and good transfer performance.
(2) The use of a self-made spherical corrosion nozzle, corrosion fluid can be sprayed into a uniform hemispherical surface, suitable for complex cavity corrosion, coupled with the cavity down, will not pile stagnant corrosion fluid, can obtain a uniform corrosion depth, no corner, clear pattern, high-quality decorative pattern.
(3) Simple injection molding process method, easy to operate, suitable for large, medium, and small molds, not limited by geometry.
(4) Simple equipment, little material consumption, mainly consuming decal paper, transfer ink, protective paint, low cost, high economic efficiency.
Need a Quote for Your Injection Molding Project?
Get competitive pricing, DFM feedback, and production timeline from ZetarMold’s engineering team.
Request a Free Quote → See our Injection Molding Complete Guide for a comprehensive overview.


