 Перейти к содержанию

What Exactly Are Flow Marks and Why Do They Matter?
Этот раздел посвящён тому, что именно представляют собой следы течения, почему они важны и их влиянию на стоимость, качество, сроки или риски снабжения. Для читателей, которые сравнивают литьё под давлением1 варианты, эта статья связывает литьевая форма2, пластик3 поведение материала, оценка поставщиков и решения по контролю качества, которые определяют, может ли проект перейти от проектирования к повторяемому производству.
For broader context, compare this topic with проектирование пресс-форм для литья под давлением, и supplier sourcing guide.
Flow marks are visible surface imperfections on injection molded parts that appear as wavy lines, ripple patterns, or bands of slightly different color or gloss. They form when the advancing melt front cools unevenly against the mold wall, creating a wrinkled or folded skin that gets frozen into the final part surface. In our factory, flow marks rank among the top three cosmetic defects that cause part rejections—particularly for consumer-facing products where surface appearance is critical.
- Следы течения обычно возникают из-за нестабильного потока расплава, низкой температуры, медленной скорости впрыска или плохой балансировки литников.
- Начните устранение неполадок с технологических окон, прежде чем менять сталь; тесты температуры и скорости проводятся быстрее, чем изменения оснастки.
- Для декоративных деталей подтвердите исправление с помощью образцовых панелей, осмотра при освещении и задокументированных настроек испытания перед утверждением производства.
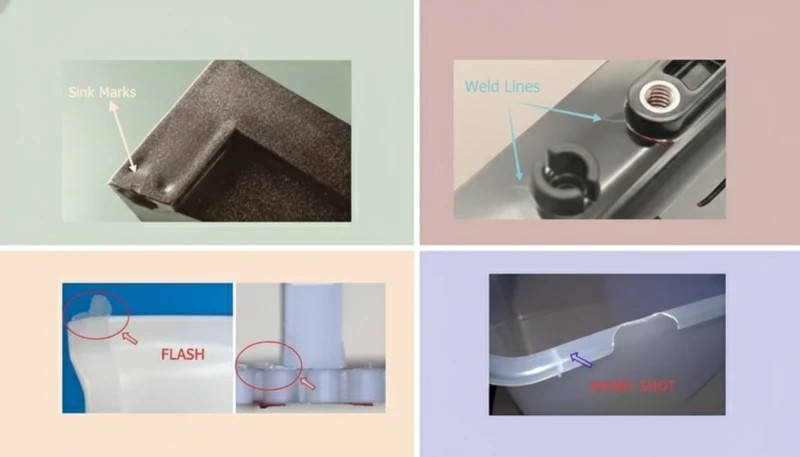
Хотя следы течения редко влияют на структурную целостность детали, они делают продукты незавершенными и непрофессиональными. Для панелей салона автомобиля, корпусов потребительской электроники и корпусов медицинских устройств даже незначительные следы течения могут привести к браку, что задерживает сроки производства и увеличивает затраты. Понимание первопричины — взаимодействия между скоростью фронта расплава, температурой и поверхностью формы — это первый шаг к устранению этого дефекта. Хорошая новость: в большинстве случаев следы течения можно полностью устранить путем корректировки параметров процесса без каких-либо изменений формы.
How Does Melt Temperature Affect Flow Mark Formation?
Melt temperature is the single most influential process parameter for flow marks. When the melt temperature is too low, the plastic skin solidifies prematurely against the mold wall, creating drag and wrinkle patterns as the still-flowing core pushes the solidified skin forward. We’ve found that a 10–20°C increase in melt temperature eliminates flow marks in roughly 50% of cases without any other changes.
| Материал | Standard Melt Temp (°C) | Recommended Temp to Reduce Flow Marks (°C) | Maximum Safe Temp (°C) |
|---|---|---|---|
| ABS | 220–240 | 240–260 | 270 |
| ПК | 280–300 | 300–320 | 330 |
| PP | 200–230 | 230–250 | 270 |
| ПММА | 220–240 | 240–260 | 270 |
| PA6 | 240–260 | 260–280 | 290 |
| POM | 190–210 | 200–215 | 220 |
We always increase temperature in 5°C increments and evaluate 10 shots at each level. Going too high risks material degradation, yellowing, or increased следы от раковины due to lower melt viscosity during packing.
«Температура расплава — это единственный наиболее важный технологический параметр для контроля следов течения при литье под давлением.»Правда
Among all adjustable process parameters, melt temperature has the most direct effect on flow mark formation. Higher melt temperature reduces viscosity, delays skin solidification, and improves melt front uniformity—all of which directly prevent the premature cooling that causes flow marks.
«Снижение температуры расплава помогает уменьшить следы течения, замедляя поток пластика.»Ложь
Lower melt temperature actually makes flow marks worse. When the melt is cooler, it solidifies faster against the mold wall, creating a thicker skin that wrinkles and drags as the core flow pushes it forward. Increasing melt temperature keeps the plastic fluid longer, allowing smooth, uniform skin formation.
How Does Mold Temperature Influence Surface Quality?
В этом разделе рассказывается о том, как температура формы влияет на качество поверхности и ее воздействие на стоимость, качество, сроки или риски снабжения. Температура формы работает в тандеме с температурой расплава, контролируя скорость образования пластиковой кожицы. Более высокая температура формы замедляет скорость охлаждения на границе расплав-форма, давая пластиковой поверхности время для гладкого формирования, а не образования складок. По нашему опыту, сочетание повышения температуры расплава с повышением температуры формы дает наилучшие результаты.
| Материал | Standard Mold Temp (°C) | Recommended for Flow Mark Reduction (°C) | Cycle Time Impact |
|---|---|---|---|
| ABS | 40–60 | 60–80 | +5–10% |
| ПК | 80–100 | 100–120 | +8–15% |
| PP | 20–50 | 50–70 | +5–8% |
| ПММА | 50–70 | 70–90 | +10–15% |
| PA6 | 60–80 | — Увеличьте давление на 3–5 бар. Сделайте 20 выстрелов для оценки стабильности. | +5–10% |
The trade-off is cycle time. Every 10°C increase in mold temperature adds roughly 3–5% to the cooling phase. For high-volume production, we balance surface quality against productivity by finding the minimum mold temperature that eliminates flow marks—often 10–15°C above the standard setting is enough.
What Injection Speed Profile Works Best for Flow Mark Prevention?
В этом разделе рассказывается о том, какой профиль скорости впрыска лучше всего подходит для предотвращения следов течения и его влиянии на стоимость, качество, сроки или риски снабжения. Скорость впрыска определяет, насколько быстро фронт расплава продвигается по полости. Для следов течения, как правило, лучше более высокая скорость — быстро движущийся фронт расплава имеет меньше времени для охлаждения и образования складок до заполнения полости. Однако профиль скорости важнее общей скорости.
We use multi-stage injection speed profiles to address flow marks:
Stage 1 (0–10% fill): Medium speed (40–60%) to establish stable melt front through the gate.
Stage 2 (10–80% fill): High speed (80–100%) to fill the majority of the cavity quickly, keeping the melt front hot.
На нашем заводе в Шанхае работают 47 машин для литья под давлением от 90 до 1850 тонн. При появлении следов течения наша технологическая команда обычно проверяет температуру расплава, температуру формы, скорость впрыска и балансировку литников в таком порядке, прежде чем рекомендовать изменения оснастки.
Stage 3 (80–98% fill): Reduced speed (50–70%) to prevent over-packing and flash at end of fill.
V/P switchover: Transition to holding pressure at 95–98% fill.
The key insight: flow marks most commonly appear in areas where the melt front slows down—thin sections, flow-length-to-thickness ratio changes, and areas far from the gate. Profiling the speed to maintain a consistent melt front velocity through these zones is more effective than simply setting a uniformly fast speed.
When Should You Modify the Gate Design Instead of the Process?
Этот раздел посвящён изменению конструкции литника вместо процесса и его влиянию на стоимость, качество, сроки или риски снабжения. Корректировки процесса имеют пределы. Если вы повысили температуру расплава до максимума материала, увеличили скорость впрыска до появления облоя и подняли температуру формы до неприемлемого цикла — а следы течения остаются — проблема в конструкции формы. Мы оцениваем, что 20–30% случаев следов течения требуют модификаций литника или литниковой системы для постоянного исправления.
Signs that gate design is the problem:
Flow marks concentrated near the gate area (gate is too small, causing excessive shear)
Flow marks appear at a specific wall thickness transition (gate location forces flow through thin area first)
Flow marks disappear with extreme process settings but return within normal operating window
Multiple cavities show flow marks in the same location (design-driven, not process variation)
Effective gate modifications:
Increase gate width or depth by 20–50%
Изменение с точечного литника на периферийный или веерный
Relocate gate to the thickest wall section
Add a runner system that delivers melt at more uniform temperature
«Увеличение сечения литника на 20–50% — это наиболее эффективное единичное изменение формы для уменьшения следов течения.»Правда
A larger gate allows the melt to enter the cavity at lower shear and more uniform temperature, reducing the turbulent flow and shear-induced cooling that cause flow marks near the gate. It also lowers the pressure required to fill, giving more process window for optimization.
«Оптимизация процесса всегда может устранить следы течения без каких-либо изменений в конструкции формы.»Ложь
While process adjustments resolve 70–80% of flow mark cases, fundamental mold design issues—such as undersized gates, poor gate location, or extreme flow-length-to-thickness ratios—create flow marks that no amount of process tweaking can fully eliminate. In these cases, gate redesign or runner modification is necessary for a permanent solution.
How Do Holding Pressure and Back Pressure Affect Flow Marks?
В этом разделе рассказывается о том, как давление подпитки и противодавление влияют на следы течения и их воздействие на стоимость, качество, сроки или риски снабжения. Хотя температура расплава и скорость впрыска привлекают основное внимание, давление подпитки и противодавление являются важными вторичными факторами, влияющими на выраженность следов течения.
Holding (Packing) Pressure: After the cavity fills, holding pressure forces the melt against the mold wall during the initial cooling phase. Adequate holding pressure (typically 40–60% of injection pressure) presses the melt surface tightly against the mold, smoothing out incipient flow marks. Insufficient holding pressure allows the surface to pull away from the mold, making flow marks more visible.
Back Pressure: Applied during screw recovery, back pressure improves melt homogeneity by ensuring better mixing and more uniform temperature throughout the shot. We typically set back pressure at 5–15 bar (70–220 psi). Higher back pressure produces more uniform melt, which reduces the temperature variations within the flow front that contribute to flow mark formation.
A practical tip from our shop floor: if flow marks appear intermittently—some shots good, some with marks—the issue is often inconsistent melt temperature caused by low back pressure. Raising back pressure by 3–5 bar usually stabilizes shot-to-shot surface quality.
What Is a Complete Adjustment Checklist for Flow Mark Elimination?
Полный контрольный список корректировок для устранения следов течения определяется функцией, ограничениями и компромиссами, объясненными в этом разделе. Мы обобщили наш заводской опыт в стандартизированный контрольный список, которому следуют наши техники в каждом случае устранения неполадок со следами течения. Этот системный подход исключает случайные изменения параметров и эффективно выявляет первопричину.
Verify material drying — Check moisture content with a moisture analyzer. Target: below material specification (typically 0.02–0.04%).
Raise melt temperature — Increase by 10°C. Evaluate 10 shots. If improved, increase another 5°C. Stay within material maximum.
Raise mold temperature — Increase by 10°C. Evaluate 10 shots. Accept the cycle time impact if surface quality improves.
Increase injection speed — Raise by 15–20%. Watch for flash at parting line. If flash appears before flow marks disappear, speed isn’t the answer.
Increase holding pressure — Raise by 5–10%. Extend hold time by 1–2 seconds. Check for dimensional changes.
Increase back pressure — Raise by 3–5 bar. Run 20 shots to evaluate consistency.
Часто задаваемые вопросы
Can flow marks be removed after molding?
Следы течения иногда можно скрыть после формования, но их не следует рассматривать как обычную проблему постобработки. Покраска, тампопечать, легкая полировка или изменение текстуры могут снизить визуальное воздействие на потребительские детали с низким риском, но эти шаги увеличивают стоимость и могут скрыть нестабильность процесса. Для повторяемого производства сначала устраните проблемы с температурой расплава, температурой формы, скоростью впрыска, балансировкой литников и условиями вентиляции. Постобработка должна быть лишь временной мерой сдерживания, пока технологическое окно процесса литья не будет скорректировано и задокументировано.
Указывают ли следы течения на структурную проблему детали?
Следы течения обычно являются косметическим дефектом, а не автоматическим сигналом структурного отказа. Они показывают, что фронт расплава охлаждался неравномерно или замедлялся во время заполнения, что влияет на глянец поверхности, цвет и внешний вид. Однако то же нестабильное технологическое окно также может создавать скрытые риски, такие как плохое подпитывание, слабость линии слияния или вариации размеров. Для декоративных корпусов основная проблема — внешний вид. Для несущих или регулируемых деталей подтвердите исправление проверкой размеров, механическими испытаниями и образцами первой статьи перед утверждением производства. Храните запись испытания вместе с утверждённой технологической картой.
Почему следы течения появляются только в определенных гнездах многогнездной формы?
Когда следы течения появляются только на определённых гнездовых формах, первопричиной обычно является дисбаланс литниковой системы или литника. Одни гнездовые формы получают более горячий и быстрый расплав, а другие — более холодный расплав после большего пути течения, более высоких потерь давления или неравномерного ограничения литника. Различия в контурах охлаждения могут усугубить дисбаланс. Проверьте картину заполнения, давление в гнездовой форме (если доступно), размеры литника, баланс литниковой системы и температуру поверхности формы для каждой гнездовой формы. Не решайте это только глобальным повышением температуры; сбалансируйте форму и проверьте все гнездовые формы в одинаковых условиях испытания.
Насколько обычно нужно повысить температуру, чтобы устранить следы течения?
Типичная первая корректировка — повышение температуры расплава на 10–20 градусов Цельсия, затем проведение контролируемого короткого испытания и осмотр той же поверхности при постоянном освещении. Если следы течения улучшаются, уточняйте меньшими шагами по 5 градусов, пока поверхность не стабилизируется без образования облоя, следов прожига, сдвига цвета или деградации материала. Температура формы также может потребовать повышения на 10–15 градусов для глянцевых или тонкостенных деталей. Всегда записывайте окончательный технологический окно, а не полагайтесь на один успешный образец.
Может ли текстурированная поверхность формы скрыть следы течения?
Текстурированная поверхность формы может сделать лёгкие следы течения менее заметными, но не устраняет причину процесса. Текстура рассеивает отражённый свет, поэтому вариации глянца труднее увидеть, особенно на матовых потребительских поверхностях. Риск заключается в том, что тот же нестабильный фронт расплава всё ещё может создавать цветовые полосы, слабость линии слияния или несоответствие между гнездовыми формами. Используйте текстуру как дизайнерский выбор только после стабилизации процесса литья. Для высокоглянцевых, прозрачных, окрашенных или видимых потребителем деталей всё равно требуется исправление процесса.
Какой самый быстрый способ диагностировать первопричину следов течения?
Самый быстрый метод диагностики — контролируемый однофакторный эксперимент. Начните с повышения температуры расплава и проверьте, исчезает ли след. Если улучшение ограничено, увеличьте температуру формы в области дефекта, затем скорректируйте профиль скорости впрыска и давление подпитки. Во время испытания сохраняйте постоянными объём впрыска, время охлаждения, партию материала и освещение при осмотре. Записывайте каждую настройку и сравнивайте изделия рядом. Если затронута только одна гнездовая форма, проверьте размер литника, баланс литниковой системы, вентиляцию и локальное охлаждение, прежде чем менять весь процесс.
Резюме: Как можно навсегда устранить следы течения?
Следы течения при литье под давлением возникают из-за преждевременного охлаждения фронта расплава у стенки формы — и устранение проблемы следует четкой иерархии. Начните с температуры расплава (+10–20°C), что решает примерно половину всех случаев. Добавьте повышение температуры формы (+10–15°C) и оптимизацию скорости впрыска для еще 30%. Для оставшихся 20%, где настройки процесса не могут устранить следы, модификации конструкции литника и литниковой системы обеспечивают постоянное решение. На нашем заводе следование этому системному подходу снизило брак, связанный со следами течения, до менее 0,5% по всем продуктовым линейкам. Ключевой принцип: поддерживайте фронт расплава горячим и движущимся равномерно, и следы течения просто не образуются.
Нужен расчёт стоимости для вашего проекта литья под давлением? ZetarMold может рассмотреть ваш DFM, материал, оснастку и производственные требования перед расчётом.
Get competitive pricing, DFM feedback, and production timeline from ZetarMold’s engineering team.
Request a Free Quote →
-
injection molding: injection molding refers to is the production process that melts plastic, injects it into a mold cavity, cools the part, and repeats the cycle for stable volume manufacturing. ↩
-
injection mold: injection mold refers to an injection mold is the precision tool that defines part geometry, cooling behavior, ejection, gating, surface finish, and repeatability. ↩
-
plastic: Литьевые формы: Полное руководство | ZetarMold ↩


