 Перейти к содержанию

- Очищайте литьевые формы каждые 50 000–100 000 выстрелов или при появлении дефектов, таких как облой, следы обгорания или поверхностная дымка.
- Следуйте пятиэтапной последовательности: сухая чистка, протирка растворителем, глубокая очистка, обработка от ржавчины, затем смазка.
- Всегда используйте латунные щетки на полированных поверхностях полости — никогда стальную проволоку или абразивные подушечки.
- Струйная очистка сухим льдом удаляет тяжелые углеродистые отложения без разборки или химических отходов за 30–60 минут.
- Регистрируйте каждое мероприятие по очистке с датой, методом и именем техника для построения графика прогнозируемого технического обслуживания.
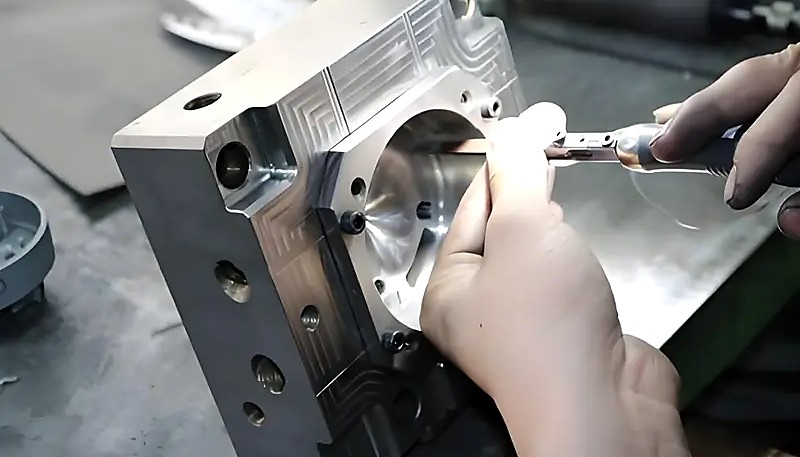
Вы уже три часа в производственном цикле, когда техник ОКК подходит и кладет деталь на стол. Вот оно — слабая коричневая полоса на поверхности, едва заметная с первого взгляда. Две смены назад форма делала идеальные детали. Теперь каждый пятый выстрел имеет след обгорания. Вы останавливаете линию, снимаете форму и обнаруживаете то, что уже подозревали: вентиляционные каналы плотно забиты карбонизированной смолой. 30-минутная работа по очистке, которая должна была быть выполнена два дня назад, только что обошлась вам в четыре часа простоя и полный лоток брака.
Для читателей, сравнивающих литьё под давлением1 варианты, эта статья связывает литьевая форма2, поведение пластикового материала, supplier evaluationи решения по контролю качества, которые определяют, может ли проект перейти от проектирования к повторяемому производству.
Наши 8 старших инженеров — каждый с более чем 10-летним опытом обслуживания пресс-форм — следуют 6-этапному рабочему процессу по качеству, который начинается с входящей инспекции формы и заканчивается исходящим контролем качества. Мы видели, как пропуск этапа проверки поверхности после очистки приводит к пропущенной микро-питтинговой коррозии, которая впоследствии вызывает дефекты облоя на производственных деталях.
На нашем заводе мы запускаем 47 литьё под давлением оборудование в три смены. Мы усвоили на горьком опыте, что очистка формы — это не задача, которую выполняют при появлении проблем, это дисциплина, которую встраивают в каждый производственный график. Это руководство охватывает точный пятиэтапный процесс, которому следуют наши техники, как выбрать правильный метод очистки и ошибки, которые повреждают формы, даже когда операторы думают, что делают всё правильно.
Почему очистка литьевых форм важна для качества деталей
Загрязнение формы является основной причиной дефектов деталей при литье под давлением. Остатки накапливаются из четырех источников: отложения деградированного полимера (углерод и воск), накопление разделительного агента, миграция смазки от толкателей и окисление на незащищенных стальных поверхностях.
| Дефект | Предотвращает образование утяжин на противоположной поверхности | Влияние на производство |
|---|---|---|
| Burn marks | Карбонизированная смола в вентиляционных каналах (эффект дизелинга) | Косметический брак, питтинг углерода на полости |
| Вспышка | Фреттинговые отложения на поверхностях плоскости разъёма | Дополнительная обрезка, брак по размерам |
| Short shots | Заблокированные вентиляционные каналы или литники | 100% брак, остановка линии |
| Помутнение поверхности | Разделительный агент или углеродная плёнка на полости | Потеря глянца, жалоба клиента |
| Затруднённое извлечение | Остатки на толкателях или стенках полости | Поломка толкателей, повреждение детали |
Данные по отраслевому обслуживанию показывают, что формы, находящиеся по документально подтверждённому графику профилактического обслуживания, служат в 2–3 раза дольше, чем формы, очищаемые только при появлении дефектов. Для формы стоимостью 20 000–80 000 долларов этот множитель напрямую означает снижение себестоимости детали и более быструю амортизацию оснастки. Очистка формы — это не затраты, а стратегия защиты капитала.
«Плановое обслуживание и очистка формы при 50 000–100 000 выстрелах предотвращает большинство дефектов деталей, связанных с поверхностью, до того, как они попадут на стол контроля качества.»Правда
Накопление остатков ускоряется после первых 50 000 выстрелов, поскольку продукты деградации полимера и выделяющиеся газообразные добавки накапливаются на поверхностях вентиляционных каналов. Очистка на этом этапе удаляет загрязнения до того, как они химически свяжутся с формовочная сталь3, сохраняет поверхности полости в пределах спецификации шероховатости и поддерживает геометрию вентиляционных каналов на расчётной глубине 0,01–0,03 мм.
«Вам нужно чистить литьевую форму только тогда, когда на деталях появляются видимые дефекты.»Ложь
К тому времени, когда дефекты становятся видны, форма уже достаточно загрязнена, чтобы производить брак — и загрязнение могло начать химически связываться со сталью полости. Невидимые слои остатков всё ещё ухудшают значения шероховатости поверхности Ra и ограничивают поток вентиляции, вызывая скрытые несоответствия, которые ускользают от визуального контроля. Плановое профилактическое очищение обходится в доли стоимости простоя и потерь от брака при аварийной разборке.
Когда чистить: триггеры и рекомендации по частоте
Очищайте форму для литья под давлением, когда счётчик выстрелов достигает 50 000–100 000 для стандартных инженерных термопластов, или немедленно при появлении дефектов деталей. Правильный интервал зависит от типа смолы, сложности детали и наблюдаемых данных о качестве — это не фиксированное универсальное число. Смолы с высоким наполнением и коррозионные материалы требуют более коротких интервалов. Хорошо ведённый журнал очистки — единственный способ построить точные, специфичные для данной формы графики профилактического обслуживания. Понимание того, как процесс литья под давлением параметры — температура смолы, скорость заполнения и давление выдержки — влияют на образование отложений, помогает установить правильный интервал очистки для каждого инструмента.
| Триггер | Требуемое действие | Оценка времени простоя |
|---|---|---|
| Каждые 50 000–100 000 выстрелов (стандартные смолы) | Полная 5-шаговая профилактическая очистка | 4–8 часов |
| Каждые 25 000–50 000 циклов (смолы с наполнителем GF/CF или FR) | Полная очистка по 5 шагам + проверка вентиляционных каналов | 4–8 часов |
| Подпалины на деталях | Очистка вентиляционных каналов + протирка полостей растворителем | 1–2 часа |
| Облой на линии разъема | Контроль поверхности разъема и повторная притирка камнем | 1–3 часа |
| Помутнение поверхности или потеря блеска | Очистка растворителем + оценка полировки полости | 2–4 hours |
| После простоя >2 недель | Антикоррозийная обработка + проверка смазки | 1–2 часа |
| После работы с ПВХ или антипиреном | Немедленная очистка растворителем + продувка вентиляционных каналов | 2–3 hours |
Смолы, наполненные стекловолокном (GF) и углеродным волокном (CF), оставляют абразивные частицы в вентиляционных каналах и на поверхностях полости, что требует очистки каждые 25 000–50 000 выстрелов. ПВХ выделяет газ хлороводорода, который атакует незащищенную сталь пресс-формы в течение нескольких часов при рабочей температуре. Огнестойкие смолы выделяют коррозионные газы (соединения фосфора и брома), которые разъедают полированные поверхности. Для этих материалов мы рассматриваем конец каждого производственного цикла как сигнал к очистке — полная протирка растворителем перед хранением пресс-формы.
5-шаговый процесс очистки формы для литья под давлением
Пятиступенчатая последовательность очистки пресс-формы включает: сухую очистку при 40–60°C, протирку растворителем, глубокую очистку, обработку от коррозии и смазку. Каждый этап обязателен — пропуск обработки от коррозии или финальной смазки после очистки делает пресс-форму уязвимой к коррозии и ускоренному износу во время следующего производственного цикла.
Шаг 1: Сухая очистка
Пока форма ещё тёплая (40–60°C) после последнего цикла, используйте мягкую латунную щётку или деревянную зубочистку, чтобы удалить свободные полимерные облои, остатки литников и поверхностные отложения с неотполированных участков. Никогда не используйте стальные щётки на полированных поверхностях полости — латунь достаточно мягкая, чтобы очищать, не оставляя царапин на закалённой инструментальной стали. Используйте фильтрованный безмасляный сжатый воздух давлением не более 0,3 МПа, чтобы выдуть остатки из вентиляционных каналов, отверстий толкателей и углублений по линии разъёма. Для закрытых зон предпочтительнее использовать вакуум вместо сжатого воздуха, чтобы избежать переноса частиц на уже очищенные поверхности.
| Инструмент / Материал | Приложение | Ключевое ограничение |
|---|---|---|
| Латунная щётка (мягкая щетина) | Неотполированные участки полости, система литников | Никогда не используйте на полированных или зеркальных поверхностях |
| Деревянная зубочистка / бамбуковая шпажка | Глубокие углы, основания ребер, тонкая детализация полостей | Нулевой риск царапин — безопасно для любой поверхности |
| Ворсоотталкивающий пылесос | Вентиляционные каналы, отверстия толкателей, зазоры по линии разъёма | Предпочтительнее сжатого воздуха в закрытых зонах |
| Фильтрованный сжатый воздух (≤0,3 МПа) | Выдувание загрязнений из вентиляционных каналов и отверстий | Должно быть обезжиренным и сухим |
| Ватные палочки | Прецизионные зоны, гравировка текста, канавки для уплотнительных колец | Одноразовое использование — не использовать повторно |
Шаг 2: Очистка растворителем
Нанесите безопасный для формы растворитель на безворсовую салфетку или поролоновый аппликатор. Изопропиловый спирт (IPA) чистотой 99% — самый безопасный универсальный выбор для полированных и покрытых поверхностей. Ацетон эффективен на неотполированной стали, но может повредить некоторые хромированные и PVD-покрытия. Специальные очистители для пресс-форм — золотой стандарт для производственных условий: они имеют сбалансированный pH для конкретных марок стали и химии загрязнений. Протирайте поверхности полости только в одном направлении — никогда не трите круговыми движениями, так как это втирает абразивные частицы с ткани в полированную сталь, создавая характерный вихревой узор, видимый при 10-кратном увеличении.
Избегайте хлорированных растворителей, таких как трихлорэтилен или дихлорметан, на хромированных, никелированных или покрытых методом PVD поверхностях — они разрушают покрытие и ускоряют расслоение. Всегда проверяйте совместимость растворителя с маркой стали вашей пресс-формы и поверхностной обработкой перед первым использованием на производственном оснащении. Позвольте растворителю полностью испариться перед переходом к Шагу 3.
Шаг 3: Глубокая очистка (сухим льдом или ультразвуком)
Для сильных углеродистых отложений, обгоревшей смолы или труднодоступных для ручной очистки зон доступны два продвинутых метода. Струйная очистка сухим льдом использует гранулы твёрдого CO₂, разгоняемые с высокой скоростью — они сублимируются при контакте, удаляя загрязнения без вторичных отходов или влаги. Её можно проводить, не снимая форму с пресса, без разборки, и она не создаёт химических отходов. Очистка одногнёздной формы занимает 30–60 минут. Это предпочтительный метод глубокой очистки для массового производства, так как он минимизирует простой.
Ультразвуковая очистка погружает разобранные компоненты пресс-формы в нагретый до 60–80°C чистящий раствор, активируемый ультразвуковыми волнами частотой 20–40 кГц. Кавитационные пузырьки проникают в тонкие вентиляционные щели глубиной 0,01–0,03 мм, отверстия под толкатели и входы охлаждающих каналов — в зоны, недоступные для ручного инструмента. Планируйте ультразвуковую очистку на периоды капитального ремонта, обычно каждые 500 000 циклов или ежегодно. Разборка добавляет 2–4 часа к общему времени очистки, поэтому данный метод предназначен для плановых окон обслуживания, а не для рутинного ТО.
Шаг 4: Обработка ржавчины и проверка поверхности
После очистки осмотрите все поверхности полости, плоскости разъема и отверстия толкателей под ярким косым светом или с помощью 10-кратной лупы. При легкой поверхностной ржавчине (белесая пленка окисления, без питтинга) нанесите средство для удаления ржавчины на основе фосфорной кислоты, выдержите 5–15 минут согласно инструкции производителя, нейтрализуйте чистой водой, немедленно высушите фильтрованным сжатым воздухом и нанесите антикоррозионное масло в течение 15 минут. При умеренном питтинге требуется механическая полировка от наждачной бумаги зернистостью 400 до 2000, затем пастами с алмазным зерном 6 мкм и 1 мкм для восстановления исходной шероховатости поверхности Ra.
| Степень серьёзности | Описание | Метод обработки |
|---|---|---|
| Легкая (пленка на поверхности) | Белёсое окисление, видимых язвин нет | Средство для удаления ржавчины + антикоррозионное масло — полировка не требуется |
| Умеренная (неглубокое коррозионное растрескивание) | Красноватые пятна, значение Ra ухудшено | Средство для удаления ржавчины + бумага зернистостью 1200–2000 + алмазная паста 1 мкм |
| Сильная (питтинг >0,1 мм) | Видимая потеря металла, влияние на размеры | Цех пресс-форм: ремонт сваркой TIG или повторная электроэрозионная обработка |
| Фреттинг-коррозия (линия разъёма) | Микро-заусенцы, нарушение герметичности под зажимным усилием | Переточить мелкозернистым бруском, повторно притечь до плоскостности |
Шаг 5: Смазка и защита от коррозии
Нанесите тонкий равномерный слой смазки для пресс-форм на все движущиеся компоненты: толкатели и втулки толкателей, направляющие штыри и направляющие втулки, направляющие слайдеров и штоки подъёмников. Используйте тип смазки, указанный для вашей формы — сухую смазку на основе ПТФЭ для медицинских форм или форм для контакта с пищевыми продуктами, силиконовую смазку для температур форм выше 100°C и литиевую смазку для стандартного производства при высоких механических нагрузках. Наносите экономно и сразу удаляйте все излишки — избыточная смазка мигрирует на поверхность полости в течение первых нескольких выстрелов и вызывает дефекты загрязнения деталей.
Если форма будет простаивать более 48 часов, нанесите антикоррозионное масло или воск на все поверхности полостей и сердечников. Для длительного хранения более одного месяца оберните компоненты в плёнку с ЛИК (летучим ингибитором коррозии) после нанесения антикоррозионного масла. Храните горизонтально в среде с контролируемой температурой и влажностью: идеально 20–25°C, относительная влажность ниже 60%. Повторно проверяйте каждые 90 дней во время хранения.
Выбор правильного метода очистки для вашей формы
Ручная очистка растворителем лучше всего подходит для планового ТО (1–2 часа), сухой лед — для глубокой очистки в прессе (0,5–1 ч), а ультразвуковая очистка — для капитального ремонта через каждые 500 000 циклов (4–8 часов). Подбирайте метод в зависимости от уровня загрязнения и доступного времени простоя.
| Method | Лучшее для | Безопасно для поверхности? | Время простоя | Химические отходы |
|---|---|---|---|---|
| Ручная (латунная щётка + растворитель) | Лёгкие поверхностные отложения, плановая профилактическая очистка | Да — только латунной щеткой на полированных поверхностях | 1–2 ч | Minimal |
| Очистка сухим льдом | Сильные углеродистые отложения, очистка в прессе | Да — безопасно для зеркальных поверхностей | 0,5–1 ч | None |
| Ультразвуковая очистка | Сложная геометрия, глубокие вентиляционные каналы, полная переборка | Да — проверьте совместимость с чистящим раствором | 4–8 ч (требуется разборка) | Утилизация очищающего раствора |
| Лазерная очистка | Прецизионные медицинские/оптические формы, бесконтактная | Да — без абразивного контакта | 1–3 ч | None |
| Химическое удаление покрытий | Сильное прилипание полимера, удаление покрытия | Зависит от типа покрытия | 2–6 ч | Значительные — требуется надлежащая утилизация |
Хорошо проектирование пресс-форм для литья под давлением играет критическую роль в том, насколько форма поддаётся очистке. Глубокие узкие рёбра с углами уклона менее 0,5° практически невозможно обработать ручными инструментами. Вентиляционные канавки мельче 0,01 мм на линии разъёма забиваются быстрее и требуют более частого внимания. Когда мы проверяем новую оснастку на нашем заводе, очищаемость является одним из критериев оценки DFM (проектирование для производства) — форма, которую легче чистить, будет дешевле в обслуживании на протяжении всего срока службы.
«Струйная очистка сухим льдом при 0,3–0,6 МПа безопасна для поверхностей полостей литьевых форм с зеркальной отделкой SPI A1 и A2.»Правда
Гранулы CO₂ сублимируются при контакте, не образуя вторичных абразивных остатков. Тепловой перепад -78°C между гранулой и тёплой сталью формы вызывает хрупкость и чистое скалывание слоёв загрязнений с поверхности без механического истирания. Правильные параметры процесса — расстояние сопла 150–300 мм и контролируемая скорость перемещения — крайне важны. Всегда выполняйте пробный проход на некритичной области новым пескоструйным аппаратом или оператором перед очисткой прецизионных поверхностей.
«Ультразвуковая очистка — самый быстрый вариант для планового обслуживания пресс-форм между производственными циклами.»Ложь
Ультразвуковая очистка требует полной разборки формы, погружения компонентов, времени цикла очистки 20–40 минут и повторной сборки — добавляя 2–4 часа к базовому процессу. Это самый тщательный метод для внутренних поверхностей, но он слишком трудоёмок для плановых интервалов профилактики. Ручная очистка растворителем и очистка сухим льдом — правильные инструменты для межциклового обслуживания; ультразвуковая очистка относится к запланированным окнам капитального ремонта.
Распространённые ошибки очистки, повреждающие формы для литья под давлением
Стальная проволочная щетка — самый разрушительный инструмент для очистки пресс-форм — она необратимо увеличивает шероховатость поверхности Ra на полированных полостях. После появления абразивные повреждения требуют полной механической переполировки от зернистости 400 до 2000 и алмазной пасты для восстановления. Неправильное время и отсутствие журналов технического обслуживания — следующие по стоимости ошибки.
Три категории охватывают большую часть повреждений при очистке: неправильный выбор инструмента (абразивные материалы на полированных поверхностях), неправильное время (очистка холодной пресс-формы или ожидание до появления дефектов) и неправильная техника (избыточная смазка, круговое протирание, полное игнорирование очистки вентиляционных каналов). Четвертая категория — отсутствие документации — не повреждает пресс-форму сразу, но делает каждое будущее решение о частоте очистки гаданием.
Неправильный инструмент, неправильное время: две основные причины
«Продувка свободного мусора сжатым воздухом перед нанесением растворителя предотвращает вызванные очисткой микроцарапины на полированных поверхностях полостей.»Правда
Свободные абразивные частицы — фрагменты полимерного облоя, углеродистые чешуйки и металлическая износная пыль — действуют как полировальная паста при протягивании под тканью по полированной стали. Предварительная продувка их очищенным сжатым воздухом (0,3 МПа, без масла) перед любым контактом с растворителем или тканью устраняет этот механизм абразивного износа. Этот единственный шаг сохраняет шероховатость поверхности Ra между плановыми циклами полировки и является наиболее экономически эффективной привычкой предотвращения повреждений в любой программе ТО пресс-форм.
«Стальная вата или наждачная бумага мелкой зернистости могут использоваться для быстрого удаления стойких отложений с поверхностей полостей литьевых форм.»Ложь
Даже наждачная бумага зернистостью 400 оставляет царапины, видимые при 10-кратном увеличении на закалённой инструментальной стали. Эти царапины необратимо увеличивают шероховатость поверхности Ra, вызывают сопротивление при выталкивании, создают точки концентрации напряжений в тонких стенках и передают текстуру на формованные детали. После появления абразивные повреждения требуют контролируемого механического полирования по полной последовательности зернистости 400–600–800–1200–2000 плюс алмазная паста для восстановления спецификации. Всегда сначала используйте латунные инструменты, деревянные щупы или одобренные химические методы.
Дополнительные частые ошибки: очистка полностью остывшей пресс-формы (остатки становятся тверже и липче ниже 40°C — очистка при 40–60°C заметно эффективнее), чрезмерная смазка толкателей (избыток смазки попадает на поверхность полости и загрязняет первые несколько отливок следующего цикла), пропуск очистки вентиляционных каналов, потому что деталь «выглядит нормально» (забитые каналы вызывают подгорания, которые часто ошибочно диагностируются как проблемы со скоростью впрыска или давлением выдержки), и отсутствие записи о проведенных чистках (без журнала нет прогнозируемого графика — только реактивное тушение пожаров).
Интеграция очистки в общую программу обслуживания пресс-форм
Cleaning is one pillar of a complete mold maintenance program. A total PM schedule integrates cleaning events with dimensional verification, wear part replacement, cooling channel flow testing, and end-of-life assessment. The goal is to maximize total shot count over the mold’s designed service life: typically 500,000–1,000,000 shots for P20 pre-hardened mold steel, and 1,000,000–2,000,000 shots for H13 or S136 hardened stainless steel. At our factory, every mold has a maintenance logbook — physical or digital — that records every cleaning event, every defect found, and every repair made.
Cooling channel maintenance is frequently overlooked in routine PM programs. Scale, biological growth, and rust deposits inside cooling channels insulate the channel walls and reduce coolant velocity, cutting heat transfer efficiency by 20–40% in severe cases. We perform a descaling flush and flow rate measurement at every inlet-outlet pair during each major overhaul. Restoring cooling efficiency to specification directly reduces cycle time and improves part-to-part consistency — two improvements that cost nothing beyond planned downtime.
Cooling Channel Maintenance: The Overlooked Priority
We also integrate a formal mold condition assessment at every 250,000-shot interval — mid-point between full overhauls. During this assessment, a toolmaker inspects cavity surface Ra at three reference points using a surface profilometer, measures ejector pin clearance against the original specification, and checks parting line flatness with a precision straightedge. Any deviation beyond 50% of the tolerance band triggers immediate corrective action rather than waiting for the next scheduled overhaul. This mid-cycle assessment prevents small issues from compounding into expensive repairs.
Documentation is the most underestimated element of any mold maintenance program. Without a complete maintenance log, you cannot build a predictive schedule — you are always reacting to defects rather than preventing them. Our log format records: mold ID, date, shot count at cleaning, cleaning method used, defects found, repairs made, and technician signature. After six months of data, patterns emerge that allow us to shorten or extend PM intervals based on actual mold behavior rather than general industry guidelines. A $15 notebook or a simple spreadsheet turns reactive maintenance into preventive maintenance.
| Этап | Action | Key Check |
|---|---|---|
| Every PM clean (50K–100K shots) | 5-step cleaning sequence | Vent depth, cavity Ra, parting line flatness |
| 250,000 shots (mid-cycle) | Condition assessment + dimensional check | Pin clearance, surface Ra at 3 reference points |
| 500,000 shots (overhaul) | Full disassembly, ultrasonic clean, cooling flush | Flow rate per channel, wear part replacement |
| Annual (or 1M shots) | Complete inspection + tooling life assessment | Steel hardness spot-check, cavity insert fit |
“Flushing injection mold cooling channels with descaling solution at every 500,000-shot overhaul prevents 20–40% heat transfer efficiency loss from scale buildup.”Правда
Mineral scale from hard water deposits layers on the inner channel walls, acting as thermal insulation. A commercial descaling solution (typically citric or phosphoric acid-based, circulated at 40–60°C for 30–60 minutes) dissolves calcium carbonate and iron oxide deposits without damaging the channel walls. Follow with a clean water flush and measure flow rate at each channel pair to confirm full blockage removal before reassembly.
“A clean cavity surface is all that matters for injection mold performance — cooling channel condition is secondary.”Ложь
Cavity surface cleanliness affects surface finish and part ejection, but a fouled cooling system affects cycle time, dimensional stability, and warp simultaneously. In our production experience, degraded cooling causes part-to-part variation that is difficult to diagnose without thermal imaging, because it manifests as inconsistent shrinkage rather than visible surface defects. Cooling channel condition is equally important to cavity surface condition — both require scheduled maintenance.
Часто задаваемые вопросы об очистке литьевых форм?
Часто задаваемые вопросы
How often should you clean an injection mold?
Clean every 50,000–100,000 shots as a baseline PM interval for standard engineering thermoplastics such as ABS, PP, and nylon. High-fill resins (GF30, CF15), flame-retardant grades, and PVC-based materials require cleaning every 25,000–50,000 shots because they deposit more aggressive residue or release corrosive gases. Always clean immediately after any run where burn marks, flash, or surface discoloration appeared on parts, regardless of shot count. Track cleaning dates and shot counts in a maintenance log to identify trends and refine your interval based on actual mold and material behavior.
What is the safest solvent for cleaning polished injection mold cavities?
Isopropyl alcohol (IPA) at 99% purity is the safest general-purpose solvent for polished cavity surfaces. It dissolves most thermoplastic residues — including polyolefin wax deposits, styrenic polymer buildup, and release agent films — without attacking chrome plating, PVD coatings, or polished tool steel. For heavier carbon deposits that IPA cannot dissolve, use a purpose-formulated mold cleaner such as Moldklenz or Slide Mold Cleaner. Acetone is effective on non-polished steel but can attack certain coatings. Always confirm solvent compatibility with your mold’s steel grade and surface treatment before first use on production tooling.
Can you clean an injection mold while it is still in the press?
Yes — both dry-ice blasting and manual solvent cleaning can be performed in-press without removing the mold from the machine. Keep the mold at 40–60°C (warm from the last production run) for maximum cleaning effectiveness, and ensure the press is in full lockout/tagout (LOTO) condition to prevent accidental mold closure during cleaning. In-press cleaning eliminates mold changeover labor, avoids the risk of reassembly errors, and is the standard approach in high-volume facilities where maximizing press uptime is a primary operational goal. Only ultrasonic cleaning requires full mold removal and disassembly.
How do you remove rust from injection mold cavities?
Apply a phosphoric acid-based rust remover specifically formulated for mold steel, following the manufacturer’s dwell time — typically 5–15 minutes depending on rust severity. Neutralize with clean water or a dilute baking soda solution (10 g/L), then dry immediately with filtered compressed air to prevent flash rusting. Apply rust-preventive oil within 15 minutes of drying. For moderate pitting, mechanical polishing from 600 grit through 2000 grit paper, then 6 µm and 1 µm diamond paste, is required to restore original surface finish Ra. If pitting exceeds 0.1 mm depth, consult a mold shop — this level typically requires TIG weld repair or EDM re-spark.
What lubricant should you use on injection mold ejector pins?
Use PTFE-based dry lubricant for clean-room, medical-device, or food-contact molds where silicone or grease migration onto part surfaces is unacceptable. For standard production molds, mold-grade lithium grease applied sparingly is effective for ejector pins, guide pins, and bushings under normal load. Silicone-based grease is preferred for high-temperature mold applications (mold temperature above 100°C) where lithium grease may degrade or flow excessively. Always wipe away all excess lubricant immediately after application — excess migrates onto the cavity surface within the first few shots and causes part surface contamination defects.
-
литьё под давлением: инъекционное формование относится к производственному процессу, который расплавляет пластик, вводит его в камеру формы, охлаждает деталь и повторяет цикл для стабильного объемного производства. ↩
-
литьевая форма: Литьевая форма — это прецизионный инструмент, определяющий геометрию детали, поведение при охлаждении, выталкивание, литниковую систему, качество поверхности и повторяемость. ↩
-
формовочная сталь: Mold steel refers to a category of tool steels selected for injection mold construction based on hardness, corrosion resistance, and polishability, including grades such as P20, H13, and S136. ↩


