 コンテンツへスキップ

Polycarbonate (PC) is one of the most versatile engineering thermoplastics in 射出成形—transparent, impact-resistant, and thermally stable. But anyone who has actually run PC on a production line knows it is also one of the most finicky materials to process. Its high melt viscosity, extreme moisture sensitivity, and tendency to trap internal stress mean that even small process deviations can produce visible defects: discoloration, silver streaks, bubbles, flow marks, and stress cracking.
In this article, we walk through the six most common PC molding defects we encounter in production—discoloration and black spots, silver streaks and bubbles, flow marks, cold material spots, and internal stress cracking. For each defect, we explain the physical mechanism, how to diagnose it from the defect pattern, and the specific process and tooling adjustments that resolve it. These insights come from two decades of hands-on PC molding experience across automotive, medical, and consumer electronics applications.
- PC moisture sensitivity (requires <0.02% moisture) is the root cause of most surface defects
- Higher melt viscosity than ABS or PP means PC needs precise temperature and pressure control
- Internal stress in transparent PC parts can cause delayed cracking days after molding
- Most defects share common fixes: proper drying, optimized barrel temperature, and adequate mold venting
- Factory experience with 400+ materials shows that drying discipline alone eliminates 60% of PC defects
What Makes Polycarbonate Injection Molding So Challenging?
Polycarbonate is one of the most difficult engineering thermoplastics to injection mold. Its unique molecular structure—linear chains with benzene rings, isopropylidene groups, and carbonate linkages—creates three core processing challenges that set it apart from easier materials like polypropylene or ABS.
If you are comparing vendors or planning procurement, our injection molding supplier sourcing guide covers RFQ prep, qualification, and commercial risk checks.
First, PC has no sharp melting point. Instead, it gradually softens across a wide temperature range (230–320 °C), which means melt viscosity remains high1 throughout normal processing. Unlike semi-crystalline polymers that thin out dramatically above their melting point, PC behaves more like a Newtonian fluid—its viscosity is more sensitive to temperature changes than to shear rate. Small temperature deviations of just 10–15 °C can push the melt from processable to degraded.
Second, PC is extremely sensitive to moisture. Even trace amounts of water (above 0.02% by weight) cause hydrolytic degradation at processing temperatures, breaking polymer chains and reducing mechanical properties. This means thorough predrying at 120 °C for 3–4 hours is mandatory—not optional. In our experience processing over 400 materials at the Shanghai factory, moisture-related defects account for roughly 60% of all PC molding problems we troubleshoot.
In our Shanghai factory, with 20+ years of injection molding experience across 400+ plastic materials, we have seen every PC defect pattern imaginable. Moisture control and barrel temperature discipline are the two variables that separate a smooth PC production run from a costly scrap event.
Third, the high viscosity of PC melt means that 射出成形金型 design must accommodate higher injection pressures, larger gates and runners, and deeper exhaust grooves than what you would need for commodity plastics. Under-sized flow channels create excessive shear heat, which paradoxically causes thermal degradation even when barrel temperatures are set correctly. Understanding these three constraints—high viscosity, moisture sensitivity, and shear sensitivity—is the foundation for preventing every defect covered in this article.

What Causes Discoloration, Yellowing, and Black Spots in PC Parts?
Discoloration is the most common visual defect in PC injection molding, caused by thermal degradation of the melt. The root cause is typically excessive barrel temperature, overly long residence time, or dead zones in the plasticizing system where degraded material accumulates and intermittently releases into the melt stream.
Pure PC resin has excellent thermal stability and can tolerate temperatures up to 300 °C without significant decomposition. The problem arises when processors use modified PC blends, recycled material, or PC compounded with flame retardants and fillers. These additives narrow the processing window considerably. For example, PC/ABS blends typically require barrel temperatures around 250 °C, while PC/PBT blends for lighting products need approximately 280 °C—each combination has its own thermal ceiling that, once exceeded, triggers irreversible yellowing or carbonization.
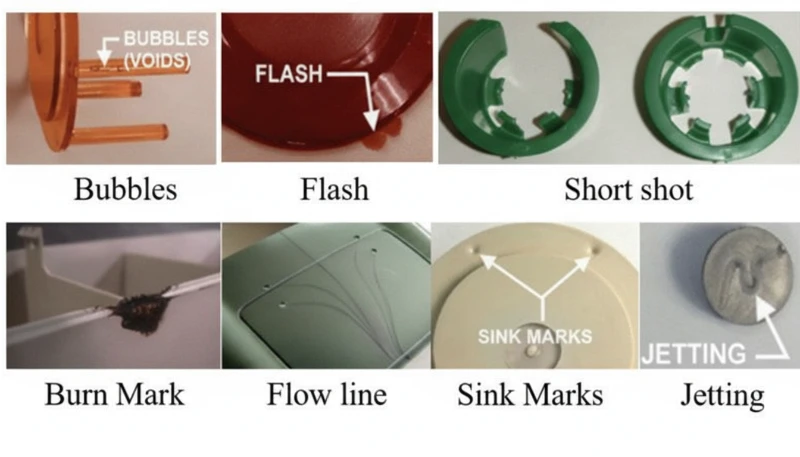
Black spots are a particularly frustrating variant because they can appear intermittently—sometimes two or three shots in a row, then disappearing. This pattern almost always indicates dead material trapped somewhere in the plasticizing system: screw check ring gaps, nozzle tip interfaces, or barrel wall scoring. The trapped material carbonizes over time, then breaks loose in chunks. When PC decomposition products accumulate beyond a critical threshold, they also catalyze further decomposition, creating a cascading effect—especially severe in flame-retardant grades.
| PC Material Type | Recommended Barrel Temp | Degradation Risk Above |
|---|---|---|
| Pure PC (optical grade) | 270-300 C | 320 C |
| ISO 10993: | 240-260 C | 280 C |
| PC with flame retardant | 230-260 C | 280 C |
| PC/PBT blend (lighting) | 260-280 C | 300 C |
| Recycled PC | 240-270 C | 290 C (variable) |
The fixes are systematic. First, verify barrel temperature setpoints against the material grade and reduce the feed and compression zone temperatures by 5–10 °C increments until discoloration stops. Second, ensure thorough drying: 120 °C for 3–4 hours using a dehumidifying dryer, never exceeding 10 hours to avoid material aging. Third, inspect the plasticizing system for dead zones—remove and clean the nozzle, check ring, and screw if air-shot melt shows discoloration even at correct temperatures. Finally, purge the barrel with a thermally stable material (PS or PE) before and after each production run, and never leave PC sitting at processing temperature during extended stops; drop the barrel to 160 °C (PC glass transition2) or below for thermal holds.
“Lowering barrel temperature is always the first step when PC parts show yellowing.”真
Lowering barrel temperature is the correct first response because excessive heat is the most common cause of PC yellowing. However, if discoloration persists after a 10-15 C reduction, the root cause likely shifts to dead material in the plasticizing system or contaminated raw material.
“Using higher back pressure always improves PC melt quality.”偽
Excessive back pressure generates additional shear heat in the barrel, which can accelerate thermal degradation of PC. The correct approach is moderate back pressure (0.5-1.5 MPa) combined with adequate drying and proper barrel temperature profiling.
Why Do Silver Streaks and Bubbles Appear on PC Products?
Silver streaks (also called gas streaks) and bubbles are surface and internal defects caused by gas trapped in the melt during cavity filling. In PC injection molding, the four gas sources are water vapor, entrained air, thermal decomposition gas, and solvent gas—water vapor and decomposition gas account for the vast majority of cases.
Silver streaks form when gas dissolved in the pressurized melt escapes to the product surface as cavity pressure drops after filling. The escaping gas leaves tiny elongated bubbles that sparkle under light, always aligned with material flow direction. Bubbles, on the other hand, are gas pockets trapped in the wall thickness—particularly visible in transparent PC parts. Vacuum bubbles are different: they form not from gas but from volumetric shrinkage when insufficient holding pressure leaves a void in thick sections.
How to Diagnose the Gas Source Behind Silver Streaks
Diagnosing which gas is responsible requires reading the defect pattern. Randomly scattered surface bubbles point to water vapor—the most common culprit in PC because the material is so hygroscopic. Fine, dense bubble clusters concentrated near the gate in a radial or fan-shaped pattern indicate entrained air, typically from excessive screw retraction speed or insufficient back pressure. Discoloration accompanying the silver streaks points to decomposition gas from overheated melt. The diagnostic process matters because each gas source requires a different fix.
For moisture-driven silver streaks, the solution is straightforward: ensure drying at 120 °C for 3–4 hours with a dehumidifying dryer. Verify effectiveness by air-shooting—the extruded melt should be continuous, smooth, and free of white vapor. For air entrainment, reduce screw speed, increase back pressure, and extend melt time during the cooling phase. For decomposition gas, lower barrel temperature section by section starting from the nozzle, and check for excessively long residence times (using oversized equipment for small parts is a common culprit).
Vacuum bubbles require a different approach because they are a shrinkage phenomenon, not a gas issue. Increase holding pressure and extend holding time to pack more material into the thick section. Position the gate at the thickest wall to ensure pressure transmission. Increase mold temperature locally at the void location to slow solidification and allow shrinkage compensation. For transparent products, post-mold slow cooling in hot water can also reduce vacuum bubble formation.
“Post-molding heat treatment at 120 C for 2 hours can significantly reduce internal stress in PC parts.”真
Heat treatment at approximately 120 C allows PC molecular chain segments to regain mobility and relax frozen elastic deformation. Oriented molecules return toward a random state, reducing both orientation and temperature stress. This is standard practice for optical and stress-critical PC applications.
“Vacuum bubbles in PC parts are caused by trapped air.”偽
Vacuum bubbles are actually caused by volumetric shrinkage during cooling, not trapped air. When holding pressure is insufficient or the gate freezes too early, the still-molten core shrinks away from the already-solidified skin, creating a void. The fix is increased holding pressure and time, not venting.
What Are Fingerprint Marks and Turbulence Lines—and How Do You Fix Them?
Fingerprint marks and turbulence lines are flow defects caused by PC melt viscosity being too high relative to injection speed and mold temperature. The melt fills the cavity in a stick-slip pattern, leaving wavy lines perpendicular to flow direction (fingerprints) or radial streaks near the gate (turbulence).
Fingerprint marks develop when injection speed and pressure are too low for the melt viscosity. The front of the melt stream contacts the cold mold wall, solidifies, and shrinks. The hot melt behind it pushes the shrunken skin forward, then that layer also cools and shrinks. This alternating advance-freeze cycle creates the characteristic wavy pattern that looks like a human fingerprint. The effect is most visible on large, flat PC surfaces—think display covers or control panels.
Turbulence marks are related but distinct. They appear as irregular flow lines radiating from the gate, caused by the melt hitting the cavity wall at high velocity and skidding across the cold surface before stabilizing into laminar flow. This defect is particularly common when gate design creates a sharp velocity transition—such as a small gate feeding into a large, thick cavity. The key distinction: fingerprints run perpendicular to flow, while turbulence lines run parallel.
Both defects share the same solution set. Increase the nozzle and front barrel temperatures to reduce melt viscosity—this is the single most effective adjustment. Raise mold temperature, especially at the location where marks appear; for appearance-critical PC parts, a mold temperature controller set to 100–120 °C is standard practice. Increase injection speed to shift the filling pattern from stick-slip to continuous flow; multi-stage injection allows you to adjust speed section by section, targeting the problem area without causing flash elsewhere. On the mold side, enlarge gates and runners to reduce flow resistance, and ensure adequate venting and cold-slug wells.
With 47 injection machines ranging from 90T to 1850T, and MOLDFLOW simulation for gate and runner optimization, we typically resolve flow mark issues during the DFM stage—before steel is ever cut. Simulation catches the velocity transitions that cause turbulence marks, allowing gate redesign before tooling.
How Do Cold Material Spots Form and How Can You Prevent Them?
Cold material spots are foggy, bright, or worm-shaped marks near the gate caused by partially solidified melt entering the cavity. They form when the melt front loses too much heat at the nozzle tip, runner, or gate before cavity filling begins—or when excessive holding pressure forces already-cooled runner material into the part.
There are two distinct mechanisms. The first is forward cold material: the melt at the nozzle tip and runner entrance cools between shots because the nozzle contacts the cold mold plate. When injection begins, this chilled material enters the cavity first. On thin-walled parts, it spreads into smoky or paste-like cloudy patches. On thick-walled parts, it forms a curved scar resembling an earthworm. The second mechanism is back-pressure cold material: excessive holding time and pressure squeeze already-cooled material from the runner and gate into the part, creating a small circular bright spot near the gate.
Prevention is straightforward but requires attention to detail. Install a cold-slug well at the end of each runner—this traps the forward cold material before it enters the cavity. Increase nozzle temperature to reduce heat loss at the tip. Increase mold temperature to narrow the gap between melt and mold surface temperatures. Reduce injection speed at the start of filling to avoid melt fracture at the gate, then increase speed for the main fill. Optimize gate position, size, and shape to avoid sharp velocity transitions. For holding-pressure cold spots, shorten holding time and reduce holding pressure to the minimum needed for dimensional stability. Also ensure thorough material drying—residual moisture in the cold-slug can worsen the visual defect.
Why Does Internal Stress Crack Transparent PC Products?
Internal stress in PC products is frozen-in molecular orientation and uneven cooling stress. It can cause warpage, reduced optical clarity, and delayed stress cracking days or weeks after molding—transparent PC parts are the canary in the coal mine.
Two primary mechanisms create internal stress. Orientation stress comes from polymer chains being stretched during flow and then frozen in place before they can relax back to a random coil configuration. Higher injection pressure, faster injection speed, and longer holding time all increase orientation by applying more shear to the melt. Temperature stress comes from the large temperature differential between the hot melt core and the cold mold wall. Because PC has high specific heat capacity and low thermal conductivity, the surface solidifies long before the interior—creating compressive stress on the outside and tensile stress on the inside.
The practical consequence is that a PC part may look perfect immediately after molding but develop micro-cracks within days, especially when exposed to organic solvents (cleaning agents, adhesives) or elevated temperatures. In our production environment, we have seen transparent PC lenses crack during assembly simply because the operator used an alcohol-based cleaning wipe—the internal stress was already at the failure threshold, and the solvent lowered it just enough to initiate cracking.
Our in-house mold manufacturing facility (100+ mold sets per month) allows us to optimize gate placement, runner geometry, and cooling channel layout specifically for stress-sensitive PC parts. Combined with ISO 9001 and ISO 13485 quality systems, we catch internal stress issues during first-article inspection using polarized light analysis.
“Polarized light analysis can detect internal stress in transparent PC parts before they crack.”真
Under polarized light, stressed PC exhibits birefringence patterns that reveal frozen molecular orientation and uneven cooling stress. This non-destructive inspection method allows factories to catch stress issues during first-article inspection, long before parts fail in service.
“Post-mold annealing at 120 C reduces internal stress in transparent PC parts.”偽
Annealing at 120 C does indeed reduce internal stress by allowing molecular chains to relax. However, it is not a substitute for proper molding parameters—it can only reduce stress that was created, not eliminate it entirely. The most effective approach is to minimize stress during molding through correct temperature and pressure settings, then use annealing as a final quality assurance step for critical components.
Reducing internal stress requires a holistic approach. Increase melt temperature to reduce viscosity and orientation during flow. Increase mold temperature to allow slower, more uniform cooling and give oriented molecules time to relax. Reduce injection pressure to the minimum needed for complete filling. Minimize holding time—over-packing is a major contributor to orientation stress. Use variable-speed injection: fast fill to avoid flow defects, then slow speed for holding to reduce molecular alignment. For parts with metal inserts, preheat inserts to approximately 200 °C to reduce the thermal mismatch. Finally, post-mold heat treatment at 120 °C for approximately 2 hours allows chain segments to regain mobility and relax frozen deformation—this is standard practice for optical-grade PC components.
“Reducing injection pressure to the minimum needed for cavity filling helps prevent internal stress in PC parts.”真
Excessive injection pressure increases molecular orientation and shear stress, which increases internal stress and the risk of warpage and stress cracking. The minimum pressure that achieves complete filling, combined with adequate melt temperature, produces the lowest-stress PC parts.
“Increasing mold temperature above 100 °C always improves the surface finish of PC parts.”偽
While higher mold temperature can reduce flow marks and improve surface gloss, exceeding 100 °C for extended cycles can cause excessively long cooling times and lead to thermal degradation of the PC resin near the gate. The optimal mold temperature range for PC is typically 80–100 °C, balancing finish quality with cycle efficiency and part stability.
What Processing Parameters Should You Monitor to Minimize PC Defects?
There are six parameters that matter most for PC defect prevention: drying, barrel temperature, injection speed, hold pressure, and mold temperature. Getting these right eliminates the vast majority of discoloration, silver streaks, bubbles, flow marks, and internal stress issues.
Drying is non-negotiable. PC requires moisture content below 0.02%3—achieved by dehumidifying dryer at 120 °C for 3–4 hours. Drying beyond 10 hours risks material degradation, especially for flame-retardant grades. Verify drying effectiveness by air-shot inspection before starting production. This single step prevents most silver streaks and surface bubbles.
Barrel temperature must be set as a profile, not a single number. For pure PC, a typical profile runs 250 °C (feed) → 270 °C (compression) → 285 °C (metering) → 290 °C (nozzle). Each modified grade has its own window—PC/ABS at roughly 20 °C lower, PC/PBT at similar or slightly higher temperatures. The key is to start at the lower end of the recommended range and increase only if flow marks or short shots appear. Never set all zones to the same temperature; a proper gradient ensures gradual plasticization without premature melting in the feed zone (which blocks air escape) or under-preheating (which traps air in the melt).
| パラメータ | Recommended Range (Pure PC) | Defects Prevented |
|---|---|---|
| 乾燥温度 | 120 C, 3-4 h, dehumidified | Silver streaks, surface bubbles |
| Barrel temperature (nozzle) | 280-295 C | Short shots, flow marks |
| 金型温度 | 80-120°C | 指紋痕、内部応力 |
| 射出速度 | 多段階:高速充填、低速保圧 | 乱流痕、過充填 |
| 保持圧力 | 射出圧力の60-80% | 真空気泡、シンクマーク |
| 保圧時間 | ゲート凍結まで(3-8秒) | 収縮ボイド、寸法変動 |
溶融滞留時間には特別な注意が必要です。小さなPC部品に過大な設備を使用することはよくある間違いです。大きなショット重量とバレル容量の比率は、材料が処理温度に長時間留まり、熱損傷を蓄積することを意味します。経験則として、ショット重量はバレル容量の少なくとも30〜40%であるべきです。大型機械で小さな部品を成形する必要がある場合は、小径スクリューを使用するか、頻繁なパージングと色変更が避けられないことを受け入れてください。最後に、金型温度はPCにとって他のほとんどのプラスチックよりも重要です。低温金型(80°C以下)での成形は、表皮の固化を加速し、内部応力を増加させ、流れ跡を増幅させます。透明部品や外観が重要な部品の場合、温度コントローラーを用いた100〜120°Cの金型温度が業界標準です。
What Are the Most Common Questions About PC Injection Molding Defects?
よくある質問
射出成形前のポリカーボネートの理想的な乾燥温度は何ですか?
ポリカーボネートは射出成形前に、水分含有量を0.02%以下にするために、除湿乾燥機を使用して120℃で3〜4時間乾燥させる必要があります。これはPC加工を成功させるための絶対条件であり、乾燥ステップを省略または短縮することは表面欠陥の最も一般的な原因です。10時間以上乾燥すると材料劣化のリスクがあり、特に熱的に敏感な難燃グレードは注意が必要です。生産開始前にエアショットテストで効果を確認してください。射出された溶融体は連続的で滑らかであり、白い蒸気がない状態であるべきです。除湿機能がない標準ホッパー乾燥機はPCには不十分です。
ポリカーボネート射出成形部品の黒点の原因は何ですか?
PC射出成形部品の黒点は、通常、可塑化システムのデッドゾーン(スクリューチェックリングの隙間、ノズル先端のインターフェース、バレル壁の傷など)に閉じ込められた炭化材料によって引き起こされます。閉じ込められた材料は時間とともに劣化し、断続的に溶融ストリームに放出され、数ショットにわたってランダムに現れては消える黒点を生成します。可塑化システムの定期的な分解と清掃、および各生産ロットの前後にPSまたはPEを使用した適切なバレルパージング手順を組み合わせることで、この問題を効果的に防止できます。長時間の機械停止中にPC材料を処理温度で放置しないでください。
ポリカーボネートの推奨射出成形温度は何ですか?
純粋なポリカーボネートの場合、推奨されるバレル温度プロファイルは250℃(供給ゾーン)から285-295℃(ノズル)であり、金型温度は80-120℃です。重要なのは、単一の設定値ではなくゾーン間の温度勾配を使用し、供給ゾーンでの早期溶融を防ぎながら徐々に可塑化することです。改質グレードは異なる範囲を持ちます:PC/ABS混合体は約20℃低く、PC/PBT混合体は同様または少し高い温度が必要かもしれません。推奨範囲の下限から開始し、流動欠陥が現れた場合のみ温度を上げてください。
透明PC製品の内部応力を防止する方法は?
透明PC部品の内部応力を防止するには、多角的なアプローチが必要です。溶融温度を高くして、流動中の粘度と分子配向を低減します。金型温度を100-120°Cに上げて、配向した分子が緩和する時間を与える、より遅く均一な冷却を実現します。完全充填に必要な最小限まで射出圧力と保圧圧力を最小化します。高速充填に続く低速保圧の可変速度射出を使用します。成形後の120°Cでの約2時間の熱処理は、光学グレード部品で凍結した分子配向を緩和させる標準的な手法です。
PC射出成形部品に銀条痕が現れるのはなぜですか?
PC部品の銀条痕は、キャビティ充填中または後にガスが製品表面に逃げることで発生し、光の下で輝く微小な細長い気泡を残します。最も一般的なガス源は不十分に乾燥された材料からの水蒸気であり、これは大多数のケースを占めます。過剰なバレル温度による熱分解ガスが第二の一般的な原因です。ゲート近くに放射状に集中した細かい密集した銀条痕は、過剰なスクロール速度または不十分な背圧による巻き込まれた空気を示します。120℃で3-4時間の適切な乾燥により、水分起因のほとんどのケースを排除できます。
ポリカーボネート射出成形の欠陥は、機械パラメータのみの調整で修正できますか?
多くのPC欠陥、特に銀条痕、変色、流れ跡は、主に乾燥条件、バレル温度プロファイリング、射出速度の最適化といった機械パラメータの調整だけで解決できます。しかし、持続的な冷材料スポットや乱流跡などの再発性欠陥は、多くの場合、ゲートの拡大、追加のベントチャネル、コールドスラグウェルなどの金型修正を必要とします。内部応力低減には、肉厚の均一性やインサートの予熱などの設計変更も必要になる場合があります。最も効果的なアプローチは、パラメータ最適化と適切な金型設計を最初から組み合わせることです。
PC部品における気泡と真空気泡の違いは何ですか?
PC部品の気泡は、水蒸気、巻き込まれた空気、またはキャビティ充填中に閉じ込められた熱分解ガスによって生じるガス充填ボイドです。これらは金型開き直後に存在し、時間とともに成長しません。真空気泡は根本的に異なります。これらは保圧圧力が厚肉部分の体積収縮を補うのに不十分な場合に、冷却中に形成される収縮誘発ボイドです。真空気泡は、内部が冷却・収縮を続けるため、脱型後に現れたり拡大したりする可能性があります。この診断上の違いは、乾燥と温度によるガス含有量の問題に対処するか、保圧圧力によるパッキングの問題に対処するかを決定します。
How Can You Get Expert Support for Your PC Injection Molding Project?
ZetarMoldは、ゼロ欠陥を要求するポリカーボネート射出成形プロジェクトの製造パートナーです。当社のエンジニアリングチームは、材料乾燥や温度プロファイリングからゲート設計、応力緩和まで、あらゆるプロジェクトにPCおよび400以上の材料の20年以上の加工経験をもたらします。自社内の金型施設、MOLDFLOWシミュレーション能力、ISO認定の品質システムにより、お客様のPC部品はDFM段階から品質を考慮して設計されます。
ポリカーボネート射出成形プロジェクトの見積もりが必要ですか?当社のエンジニアリングチームから競争力のある価格、DFMフィードバック、生産タイムラインをご提供します。今すぐ無料見積もりを請求するか、当社の Injection Molding Complete Guide プロセスの包括的な概要については。
-
melt viscosity remains high:溶融粘度が高いままとは、PCの溶融粘度はせん断速度よりも温度変化に対してより敏感であり、加工中はニュートン流体と同様に振る舞うことを指します。 ↩
-
PC glass transition: PCのガラス転移とは、ポリカーボネートが約147-150℃のガラス転移温度(Tg)を持つことを指し、これは最低熱保持温度を決定します。 ↩
-
moisture content below 0.02%: 水分含有量0.02%以下とは、成形温度での加水分解劣化を防止するために、加工前にPCが0.02%(200 ppm)以下の水分含有量を必要とすることを指します。 ↩


