 Saltar para o conteúdo

Marcas de afundamento — essas depressões irritantes na superfície de uma peça moldada que seria perfeita — são um dos defeitos mais comuns e visíveis na moldagem por injeção. Aparecem diretamente opostas às seções espessas, nervuras e bossas, e são a primeira coisa que qualquer cliente nota numa superfície cosmética.
Neste guia, explicarei o que causa as marcas de afundamento na moldagem por injeção, como preveni-las através do design e do processamento, e o que fazer quando elas já apareceram nas suas peças. Este guia baseia-se em décadas de experiência de produção em milhares de moldes.
Principais conclusões
- As marcas de afundamento são depressões superficiais causadas por retração desigual por arrefecimento em secções grossas
- Mantenha a espessura das nervuras em 50–60% da parede nominal — a prevenção mais eficaz
- As correções de design são 5–10 vezes mais baratas do que as correções pós-moldagem
- Materiais com carga de vidro reduzem significativamente o afundamento; considere mudar de grau se permitido
- Os ajustes de processamento podem reduzir o afundamento em 30–50%, mas raramente eliminam marcas causadas pelo design
Quais são as marcas de afundamento na moldagem por injeção?
As marcas de afundamento são depressões localizadas ou covinhas na superfície de uma peça moldada, geralmente aparecendo opostas a características como nervuras, bossos, secções de parede espessas ou mudanças de geometria. Ocorrem quando o material interior contrai mais do que a pele exterior durante o arrefecimento, puxando a superfície para dentro.
“Manter a espessura da base da nervura em 50–60% da espessura nominal da parede previne eficazmente marcas de afundamento visíveis.”Verdadeiro
Com uma proporção de 50–60%, as marcas de afundamento são quase invisíveis na maioria das superfícies. Acima de 70% tornam-se perceptíveis, e a 100% marcas de afundamento profundas estão virtualmente garantidas.
“Aumentar apenas a pressão de embalagem pode eliminar marcas de afundamento causadas por nervuras a 100% da espessura da parede.”Falso
Os ajustes de processamento podem reduzir, mas não eliminar, marcas de afundamento causadas pelo design. Nervuras a 100% da espessura da parede criam massas térmicas que garantem marcas de afundamento visíveis independentemente da pressão de embalagem.
O mecanismo é simples: quando uma secção espessa de plástico arrefece, a pele exterior solidifica primeiro enquanto o interior permanece fundido. À medida que o material interior arrefece e contrai, puxa a pele já solidificada para dentro, criando uma defeito de moldagem por injeção[1]. Quanto maior for a diferença de espessura entre a característica e a parede circundante, mais pronunciada será a marca de afundamento.
O Que Causa Marcas de Afundamento Durante a Moldagem?
As marcas de afundamento têm causas tanto de design como de processamento. Compreender qual é responsável no seu caso específico é o primeiro passo para as eliminar.
Causas de Design
A causa de design mais comum é a espessura excessiva do material em nervuras, bossos ou transições de parede. Quando uma nervura é demasiado espessa em relação à parede nominal, cria uma massa térmica que arrefece muito mais devagar do que a área circundante. O material da nervura contrai ao arrefecer, puxando a superfície oposta para dentro.
“Os materiais com fibra de vidro apresentam significativamente menos afundamento que os graus não reforçados.”Verdadeiro
Os cargas (fibra de vidro, mineral, talco) reduzem a contração volumétrica. Mudar de graus não preenchidos para graus com 10–20% de fibra de vidro frequentemente elimina completamente o afundamento, melhorando também a rigidez.
"Marcas de afundamento e vazios são defeitos diferentes com causas distintas."Falso
Partilham a mesma causa — retração diferencial por arrefecimento em secções grossas. A diferença é a manifestação: as marcas de afundamento aparecem na superfície, os vazios aparecem internamente, dependendo da rigidez da parede.
Outras causas de design incluem transições abruptas de espessura de parede (sem afunilamentos graduais), flanges de fixação demasiado grandes que não são vazados, e chapas de reforço grossas nos pontos de montagem. Qualquer característica que adicione uma espessura local significativa em relação à parede nominal é uma candidata a marcas de afundamento.
Causas de Processamento
Pressão de compactação insuficiente é a principal causa de processamento das marcas de afundamento. Durante a fase de compactação, material adicional é forçado para dentro da cavidade para compensar a retração. Se a pressão de compactação[2] é demasiado baixa ou o tempo de embalagem é demasiado curto, o material nas secções espessas continua a contrair sem compensação, produzindo marcas de afundamento.
Outros fatores de processamento incluem temperatura de fusão excessiva (que aumenta a retração total), tempo de arrefecimento insuficiente (ejeção antes de as secções grossas terem solidificado totalmente) e velocidade de injeção lenta (que pode causar solidificação prematura nos canais de alimentação, reduzindo a distância efetiva de compactação).
Como Prevenir Marcas de Afundamento Através do Design?
A prevenção no design é sempre mais eficaz que os ajustes de processamento porque aborda a causa principal e não o sintoma. Aqui estão as principais estratégias de design, ordenadas por impacto.
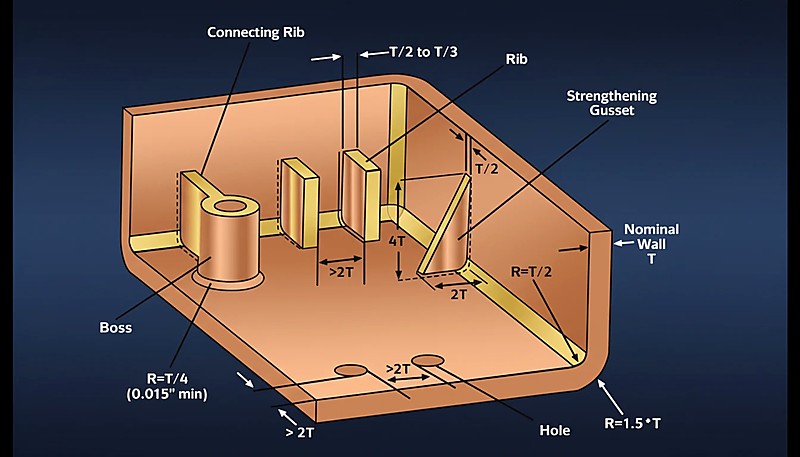
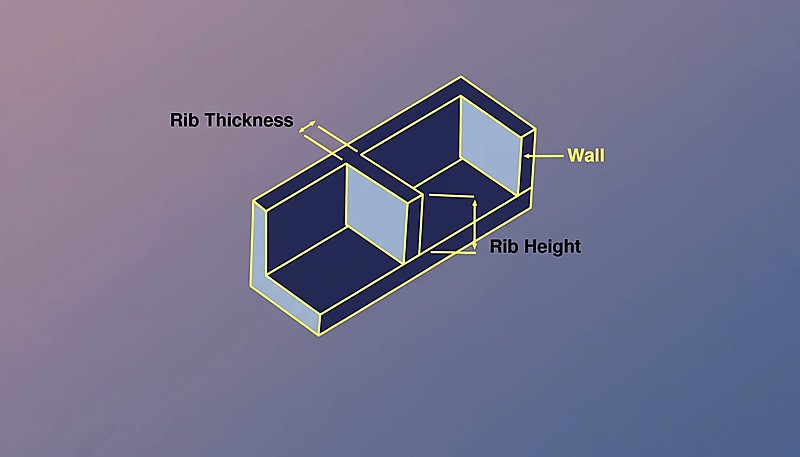
Controle a espessura das nervuras
Esta é a medida de design mais eficaz. As nervuras devem ter 50–60% da espessura nominal da parede na sua base. A 50%, as marcas de afundamento são quase invisíveis na maioria das superfícies. Acima de 70%, tornam-se perceptíveis. A 100% (onde a nervura é tão espessa como a parede), marcas de afundamento profundas estão virtualmente garantidas na superfície oposta.
Os designers frequentemente fazem nervuras demasiado grossas porque estão a pensar na rigidez estrutural, não na fabricabilidade. A solução: use múltiplas nervuras finas em vez de uma nervura grossa. Obtém rigidez equivalente ou melhor com uma fração do risco de afundamento.
Escavar Secções Espessas
Sempre que possível, escavar secções espessas para manter uma espessura de parede uniforme. Isto aplica-se especialmente a bossos (escavar o centro com um pino), placas de montagem espessas (adicionar um rebaixo no lado não cosmético) e reforços estruturais (usar uma secção transversal triangular com um centro escavado).
Utilize transições graduais
Quando a espessura da parede tem de mudar, use uma razão de afunilamento de 3:1. Para cada 1 mm de mudança de espessura, forneça pelo menos 3 mm de transição gradual. Isto distribui a diferença de retração por uma área maior, tornando qualquer depressão superficial mais rasa e menos visível.
Adicione textura superficial estrategicamente
A textura na superfície cosmética pode efetivamente ocultar marcas de afundamento menores. Uma textura média a profunda (VDI 21–27) fragmenta o padrão visual de forma suficiente para que uma depressão de 0,05–0,10 mm seja imperceptível. Não é uma correção — é uma técnica de camuflagem que funciona quando as restrições de design impedem a eliminação completa.
Como os ajustes de processamento reduzem as marcas de afundamento?
Quando as alterações de design não são possíveis — talvez o molde já esteja construído ou a espessura da característica não possa ser reduzida sem comprometer a função — os ajustes de processamento tornam-se a ferramenta principal para a redução das marcas de afundamento.
Aumentar a Pressão de Compactação
Esta é a correção de processamento mais direta. Aumentar a pressão de compactação (de manutenção) força mais material para dentro das secções grossas durante a fase de compensação, reduzindo a retração volumétrica que causa o afundamento. A limitação: pressão de compactação excessiva pode causar rebarbas, maior tensão residual e crescimento dimensional além da tolerância.
Aumentar o Tempo de Embalagem
A compactação deve continuar até que o canal de alimentação tenha solidificado. Se a compactação parar antes da solidificação do canal, o material flui para trás, para fora da cavidade, e a secção grossa encolhe sem controlo. Monitorize o tempo de solidificação do canal com sensores de pressão e defina o tempo de compactação para pelo menos coincidir com ele.
Reduzir a Temperatura de Fusão
Temperaturas de fusão mais baixas significam menos retração total. No entanto, isto deve ser equilibrado com a qualidade de enchimento — se a temperatura for demasiado baixa, verá curtas de injeção, alta pressão de injeção e acabamento superficial deficiente. Uma redução de 5–10°C da temperatura de fusão padrão é geralmente a faixa segura para a redução do afundamento.
Otimizar o Arrefecimento
Um arrefecimento mais rápido e uniforme reduz a janela de tempo durante a qual a retração se desenvolve. Isto significa otimizar a colocação dos canais de arrefecimento perto das secções espessas, usar inserções de cobre-berílio para extração de calor localizada e garantir caudais adequados de refrigerante. Moldadores experientes adicionam regularmente soluções de arrefecimento localizadas durante a comissionamento do molde para abordar pontos críticos de retração.
| Ajuste | Impact | Risk |
|---|---|---|
| Aumentar a pressão de compactação | Elevado | Flash, tensão residual |
| Prolongar o tempo de compactação | Médio-Alto | Tempo de ciclo mais longo |
| Reduzir a temperatura de fusão | Médio | Injeções curtas, acabamento deficiente |
| Reduzir a temperatura do molde | Médio | Visibilidade da linha de solda, marcas de fluxo |
| Velocidade de injeção mais lenta | Low-Medium | Ciclo mais longo, hesitação do fluxo |
Quais os Materiais Mais Suscetíveis a Marcas de Retração?
A escolha do material afeta significativamente a visibilidade das marcas de retração. Os materiais amorfos (ABS, PC, PMMA, PS) mostram marcas de retração mais facilmente porque têm maior contração do molde nas zonas de transição espessa-para-fina e porque as suas superfícies transparentes ou brilhantes tornam visíveis até pequenas depressões.
Os materiais semicristalinos (PP, PE, Nylon, POM) são um pouco mais tolerantes porque tendem a contrair-se de forma mais uniforme e os seus acabamentos superficiais típicos são menos reveladores. No entanto, ainda apresentam retração em superfícies polidas.
Materiais com carga — aqueles com carga de fibra de vidro, mineral ou talco — exibem significativamente menos retração porque o os cargas reduzem a contração volumétrica[3]. Se a sua aplicação permitir um grau com carga, é uma das formas mais eficazes de minimizar a retração sem alterar o projeto da peça.
| Tipo de material | Visibilidade da Retração | Recomendação de Conceção |
|---|---|---|
| Amorfo (ABS, PC, PMMA) | Elevado | Regra estrita da nervura 50–60% |
| Semicristalino (PP, Nylon, POM) | Médio | Regra padrão da nervura 60% |
| Graus preenchidos com vidro | Baixa | Até 70% aceitável |
Quando as marcas de retração são uma preocupação, mudar de um grau não preenchido para um grau com carga de vidro 10–20% frequentemente elimina completamente a retração, melhorando também a estabilidade dimensional e a rigidez.
Consegue Corrigir Marcas de Retração Após a Construção do Molde?
Sim, mas as opções reduzem-se significativamente e os custos aumentam. Eis a hierarquia de correções, da mais barata à mais cara.
- Otimização do processo: Ajustar a pressão de embalagem, o tempo de embalagem, a temperatura de fusão e o arrefecimento. Custo: tempo de máquina para testes. Eficácia: moderada para retração ligeira.
- Assistência por gás ou moldação por espuma: Para secções espessas, a moldagem por injeção com assistência de gás introduz nitrogénio na característica espessa, mantendo a qualidade da superfície enquanto esvazia o interior. Requer modificação do molde para pinos de gás. Custo: moderado. Eficácia: alta para secções espessas localizadas.
- Modificação do molde — remoção de aço: Reduzir a espessura da nervura ou esvaziar secções grossas removendo aço da cavidade. Esta é a correção mais eficaz, mas requer retrabalho de maquinagem. Custo: moderado a elevado, dependendo da complexidade da cavidade.
- Modificação do molde — adição de aço: Se precisar de aumentar a espessura da parede nalgum local para compensar, isto requer soldadura e recorte. Custo: elevado. Risco: integridade da soldadura em moldes de produção.
A ideia-chave em todas estas abordagens: é sempre mais barato prevenir as marcas de retração na fase de projeto do que corrigi-las após a construção do molde.
Como Medir e Avaliar as Marcas de Retração?
Quantificar as marcas de retração é importante para estabelecer critérios de aceitação e acompanhar melhorias do processo. Existem três métodos comuns.
Visual inspection é o método mais simples. Segure a peça à distância de um braço sob luz inclinada e procure depressões. Se as conseguir ver a 30 cm sob iluminação padrão, serão visíveis para os seus clientes. Este é um método de aprovação/reprovação, não quantitativo.
Perfilometria da superfície utiliza um perfilómetro de contacto ou ótico para medir a profundidade e largura exatas da depressão. Os critérios de aceitação típicos são 0,05 mm de profundidade máxima para superfícies cosméticas e 0,10 mm para superfícies não cosméticas.
Medição da espessura da parede por ultrassons na localização da retração revela se a parede ficou mais fina além da tolerância. Isto é útil para inspeção da qualidade[4] entre retração (depressão superficial com espessura da parede mantida) e vazio (ausência real de material no interior da parede).
O Que Deve Verificar para Prevenir Marcas de Retração?
Utilize esta lista de verificação antes e durante a comissionamento do molde para manter as marcas de retração sob controlo.
| Check Item | Critérios de Aprovação |
|---|---|
| Todas as nervuras ≤60% da parede nominal | ✓ |
| Bosses escavados para parede uniforme | ✓ |
| As transições de parede utilizam um afunilamento de 3:1 | ✓ |
| Pressão de compactação otimizada | ✓ |
| Tempo de compactação ≥ tempo de solidificação do ponto de injeção | ✓ |
| Textura superficial cosmética especificada | ✓ ou N/A |
| Seleção de material revista para encolhimento | ✓ |
Uma revisão completa de DFM que verifica todos os itens acima é a forma mais rentável de eliminar marcas de encolhimento antes que apareçam — porque a correção mais barata de uma marca de encolhimento é aquela que nunca é necessária.
Perguntas Frequentes Sobre Marcas de Afundamento?
As Reentrâncias São Sempre Visíveis?
Nem sempre. Reentrâncias inferiores a 0,02 mm são geralmente impercetíveis, mesmo em superfícies brilhantes. Em superfícies texturizadas (VDI 21+), reentrâncias até 0,05 mm podem ser escondidas. O fator-chave é a combinação da profundidade e do acabamento superficial — superfícies polidas e brilhantes mostram claramente depressões de até 0,02 mm.
As Reentrâncias Podem Ser Removidas Após a Moldação?
Não economicamente. Ao contrário de rebarbas ou arestas, as reentrâncias são volumétricas — o material encolheu abaixo do nível superficial pretendido. A pintura pode camuflar parcialmente reentrâncias menores, mas não as elimina. A única correção fiável é abordar a causa raiz através de alterações no design ou no processamento.
Qual é a Diferença Entre Reentrâncias e Vazios?
Marcas de encolhimento são depressões superficiais; vazios são cavidades internas. Partilham a mesma causa raiz (contração diferencial por arrefecimento em secções espessas), mas manifestam-se de forma diferente. Em peças de parede fina, tende-se a ver marcas de encolhimento porque a fina camada exterior é puxada para dentro. Em peças muito espessas, a contração cria vazios internos porque a camada exterior é suficientemente rígida para resistir ao puxão.
A Localização do Ponto de Injeção Afeta as Reentrâncias?
Sim. A localização do ponto de injeção determina o percurso do fluxo e a eficiência de compactação. Um ponto de injeção distante de uma secção espessa significa que a pressão de compactação diminui antes de a atingir, aumentando o risco de reentrâncias. Idealmente, os pontos de injeção devem ser posicionados perto da secção transversal mais espessa para maximizar a compensação de compactação exatamente onde é mais necessária.
Como é que a Espessura da Parede Afeta a Profundidade da Marca de Encolhimento?
Paredes nominais mais espessas produzem marcas de encolhimento mais superficiais para a mesma proporção de espessura de nervura, porque há mais material para absorver o diferencial de contração. Inversamente, peças de parede fina (abaixo de 1,5 mm) são extremamente sensíveis a até pequenos aumentos de espessura de nervura — uma nervura de 1,0 mm numa parede de 1,5 mm causará uma marca de encolhimento perceptível.
A Moldação por Injeção com Assistência de Gás é Eficaz para Prevenir Reentrâncias?
Muito eficaz, particularmente para secções espessas que não podem ser redesenhadas. A assistência de gás escava o interior de características espessas mantendo a qualidade superficial. Acrescenta custo e complexidade tanto ao molde como ao processo, mas é a forma mais fiável de eliminar reentrâncias em nervuras estruturais e bosses grandes sem reduzir as suas dimensões.
Bottom line: Mantenha as nervuras a 50–60% da parede nominal, mantenha uma espessura uniforme e aborde as marcas de encolhimento na fase de design — não depois do molde estar construído. A prevenção no design é sempre mais barata do que correções no processamento ou modificações no molde.
{
“@context”: “https://schema.org”,
“@type”: “FAQPage”,
“mainEntity”: [
{
“@type”: “Question”,
“name”: “As Marcas de Encolhimento São Sempre Visíveis?”,
“acceptedAnswer”: {
“@type”: “Answer”,
“text”: “Nem sempre. Marcas de encolhimento abaixo de 0,02 mm são geralmente imperceptíveis, mesmo em superfícies brilhantes. Em superfícies texturizadas (VDI 21+), marcas de encolhimento até 0,05 mm podem ficar escondidas. O fator-chave é a combinação de profundidade e acabamento superficial — superfícies polidas e brilhantes mostram claramente até depressões de 0,02 mm.”
}
},
{
“@type”: “Question”,
“name”: “As Reentrâncias Podem Ser Removidas Após a Moldação?”,
“acceptedAnswer”: {
“@type”: “Answer”,
“text”: “Não economicamente. Ao contrário de rebarbas ou arestas, as marcas de encolhimento são volumétricas — o material encolheu abaixo do nível superficial pretendido.
A pintura pode camuflar parcialmente marcas de encolhimento menores, mas não as elimina. A única correção fiável é abordar a causa raiz através de alterações no design ou no processamento.”
}
},
{
“@type”: “Question”,
“name”: “Qual é a Diferença Entre Marcas de Encolhimento e Vazios?”,
“acceptedAnswer”: {
“@type”: “Answer”,
“text”: “Marcas de encolhimento são depressões superficiais; vazios são cavidades internas. Partilham a mesma causa raiz (contração diferencial por arrefecimento em secções espessas), mas manifestam-se de forma diferente. Em peças de parede fina, tende-se a ver marcas de encolhimento porque a fina camada exterior é puxada para dentro. Em peças muito espessas, a contração cria vazios internos porque a camada exterior é suficientemente rígida para resistir ao puxão.
”
}
},
{
“@type”: “Question”,
“name”: “A Localização do Ponto de Injeção Afeta as Reentrâncias?”,
“acceptedAnswer”: {
“@type”: “Answer”,
“text”: “Sim. A localização do ponto de injeção determina o percurso do fluxo e a eficiência do enchimento. Um ponto de injeção longe de uma secção espessa significa que a pressão de enchimento diminui antes de lá chegar, aumentando o risco de marcas de encolhimento.
Idealmente, os pontos de injeção devem ser posicionados perto da secção transversal mais espessa para maximizar a compensação do enchimento exatamente onde é mais necessária.”
}
},
{
“@type”: “Question”,
“name”: “Como é que a Espessura da Parede Afeta a Profundidade da Marca de Encolhimento?”,
“acceptedAnswer”: {
“@type”: “Answer”,
“text”: “Paredes nominais mais grossas produzem marcas de sink mais superficiais para a mesma proporção de espessura da nervura porque há mais material para absorver a diferença de retração. Por outro lado, partes com paredes finas (inferiores a 1,5 mm) são extremamente sensíveis a pequenos aumentos na espessura da nervura — uma nervura de 1,0 mm numa parede de 1,5 mm irá sink notavelmente.”
}
},
{
“@type”: “Question”,
“name”: “É a Moldagem por Injeção Assistida por Gas Eficaz para a Prevenção de Sink?”
“acceptedAnswer”: {
“@type”: “Answer”,
“text”: “Muito eficaz, particularmente para secções grossas que não podem ser redesenhadas.
A assistência por gas hollows out o interior de características grossas mantendo a qualidade superficial. Acrescenta custo e complexidade tanto ao molde como ao processo, mas é o método mais fiável para eliminar sink em nervuras estruturais e bosses grandes sem reduzir suas dimensões.
}
}
]
}
Marcas de sink são evitáveis quando o design e o processamento trabalham em conjunto. Se está lidando com marcas de sink persistentes nas suas partes moldadas por injeção, contacte a nossa equipa de engenharia na ZetarMold. Operamos 45 máquinas (90T–1850T) de Xangai, com 8 engenheiros seniores especializados em eliminação de defeitos. A nossa análise DFM deteta características propensas a afundamento antes do corte do aço.
-
Formação de marcas de afundamento — BASF, “Part and Mold Design,” Plastics Technology Handbook, 2023. ↩
-
Efeitos da pressão de enchimento — Autodesk, “Moldflow Design Guide,” 2024. ↩
-
Dados de contração do material — “Seleção de Material Plástico,” Society of Plastics Engineers, 2025. ↩
-
Medição de defeitos — “Controlo de Qualidade na Moldagem por Injeção,” Plastics Technology, 2024. ↩


