 Zum Inhalt springen

Sinke – diese ärgerlichen Vertiefungen auf der Oberfläche eines ansonsten perfekten Spritzgussteils – sind einer der häufigsten und sichtbarsten Fehler beim Spritzgießen. Sie treten direkt gegenüber von dicken Abschnitten, Rippen und Bundstegen auf und sind das Erste, was ein Kunde auf einer kosmetischen Oberfläche bemerkt.
In diesem Leitfaden erkläre ich, was Einfallstellen beim Spritzgießen verursacht, wie man sie durch Konstruktion und Prozessführung verhindert und was zu tun ist, wenn sie bereits an Ihren Teilen aufgetreten sind. Dieser Leitfaden stützt sich auf jahrzehntelange Produktionserfahrung mit tausenden Werkzeugsätzen.
Wichtigste Erkenntnisse
- Sinke sind Oberflächenvertiefungen, die durch ungleichmäßige Abkühlschwindung in dicken Abschnitten verursacht werden.
- Rippenstärke auf 50–60 % der Nennwandstärke halten – die wirksamste Einzelmaßnahme zur Vorbeugung
- Konstruktive Änderungen sind 5–10× günstiger als Nachbearbeitungen.
- Glasgefüllte Materialien reduzieren Sinke deutlich; erwägen Sie einen Wechsel der Qualität, falls zulässig.
- Prozesseinstellungen können Einfallstellen um 30–50 % reduzieren, aber selten konstruktionsbedingte Einfallstellen beseitigen
Was sind Einfallstellen beim Spritzgießen?
Einfallstellen sind lokalisierte Vertiefungen oder Dellen auf der Oberfläche eines Formteils, die typischerweise gegenüber Merkmalen wie Rippen, Ansätzen, dicken Wandstärken oder Geometrieänderungen auftreten. Sie entstehen, wenn das innere Material während der Abkühlung stärker schrumpft als die äußere Haut und die Oberfläche nach innen zieht.
„Das Halten der Rippenbasisstärke bei 50–60 % der Nennwandstärke verhindert sichtbare Einfallstellen effektiv.“Wahr
Bei einem Verhältnis von 50–60 % sind Einfallstellen auf den meisten Oberflächen kaum sichtbar. Über 70 % werden sie bemerkbar, und bei 100 % sind tiefe Einfallstellen praktisch garantiert.
„Allein eine Erhöhung des Nachdrückdrucks kann Sinke beseitigen, die durch Rippen mit 100% der Wandstärke verursacht werden.“Falsch
Prozesseinstellungen können reduzieren, aber nicht konstruktionsbedingte Einfallstellen beseitigen. Rippen mit 100 % Wandstärke erzeugen thermische Massen, die unabhängig vom Nachdruck sichtbare Einfallstellen garantieren.
Der Mechanismus ist einfach: Wenn ein dickes Kunststoffteil abkühlt, erstarrt die äußere Haut zuerst, während das Innere noch geschmolzen bleibt. Wenn das innere Material abkühlt und schrumpft, zieht es die bereits erstarrte Haut nach innen, wodurch eine sichtbare Spritzgießfehler[1]Je größer der Dickenunterschied zwischen dem Merkmal und der umgebenden Wand ist, desto ausgeprägter ist die Einfallstelle.
Was verursacht Einfallstellen beim Spritzgießen?
Sinke haben sowohl konstruktive als auch verarbeitungsbedingte Ursachen. Zu verstehen, welche in Ihrem speziellen Fall verantwortlich ist, ist der erste Schritt zu ihrer Beseitigung.
Konstruktive Ursachen
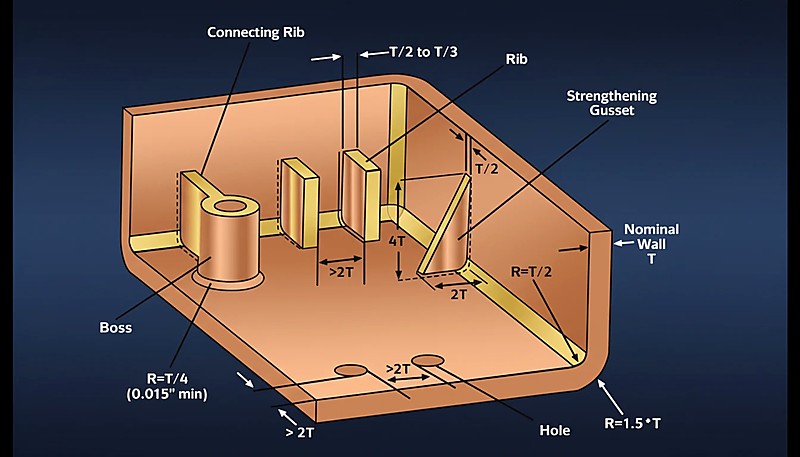
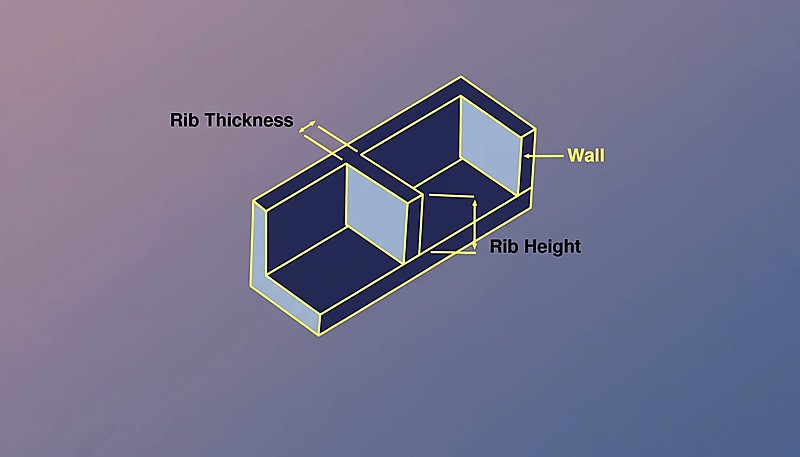
Die häufigste konstruktive Ursache ist übermäßige Materialdicke bei Rippen, Bundstegen oder Wandübergängen. Wenn eine Rippe im Verhältnis zur Nennwandstärke zu dick ist, entsteht eine thermische Masse, die viel langsamer abkühlt als der umgebende Bereich. Das Rippenmaterial schrumpft beim Abkühlen und zieht die gegenüberliegende Oberfläche nach innen.
„Glasfasergefüllte Materialien zeigen deutlich weniger Einfallstellen als ungefüllte Typen.“Wahr
Füllstoffe (Glasfaser, Mineral, Talkum) reduzieren die volumetrische Schwindung. Ein Wechsel von ungefüllten zu 10–20% glasgefüllten Qualitäten beseitigt Sinke oft vollständig und verbessert gleichzeitig die Steifigkeit.
„Sinke und Lunker sind verschiedene Fehler mit unterschiedlichen Ursachen.“Falsch
Sie haben die gleiche Ursache – unterschiedliche Schrumpfung durch Abkühlung in dicken Bereichen. Der Unterschied liegt in der Erscheinungsform: Einfallstellen treten auf der Oberfläche auf, Hohlräume entstehen im Inneren, abhängig von der Wandsteifigkeit.
Weitere konstruktive Ursachen sind abrupte Wanddickenübergänge (ohne allmähliche Verjüngung), überdimensionierte, nicht ausgeformte Bundstege und dicke Gussplatten an Befestigungspunkten. Jedes Merkmal, das eine signifikante lokale Dicke im Verhältnis zur Nennwandstärke hinzufügt, ist ein Kandidat für Sinke.
Verarbeitungsbedingte Ursachen
Ungenügender Nachdruck ist die primäre prozessbedingte Ursache für Einfallstellen. Während der Nachdruckphase wird zusätzliches Material in den Kavität gedrückt, um das Schwinden auszugleichen. Wenn der Nachdruck[2] ist zu niedrig oder die Nachdrückzeit zu kurz, schrumpft das Material in dicken Abschnitten weiter ohne Kompensation, was Sinke erzeugt.
Weitere Prozessfaktoren sind übermäßige Schmelztemperatur (die die Gesamtschrumpfung erhöht), unzureichende Kühlzeit (Auswerfen, bevor dicke Bereiche vollständig erstarrt sind) und langsame Einspritzgeschwindigkeit (die zu vorzeitigem Einfrieren an den Angüssen führen kann, wodurch die effektive Nachdruckstrecke verringert wird).
Wie verhindert man Sinke durch Konstruktion?
Konstruktive Vorbeugung ist immer wirksamer als prozessbedingte Korrekturen, da sie die Ursache und nicht das Symptom angeht. Hier sind die wichtigsten Konstruktionsstrategien, geordnet nach Wirkung.
Rippendicke kontrollieren
Dies ist die effektivste Designmaßnahme. Rippen sollten an ihrer Basis 50–60 % der nominalen Wandstärke betragen. Bei 50 % sind Einfallstellen auf den meisten Oberflächen kaum sichtbar. Über 70 % werden sie bemerkbar. Bei 100 % (wobei die Rippe so dick wie die Wand ist) sind tiefe Einfallstellen auf der gegenüberliegenden Oberfläche praktisch garantiert.
Konstrukteure machen Rippen oft zu dick, weil sie an strukturelle Steifigkeit denken, nicht an Fertigbarkeit. Die Lösung: Verwenden Sie mehrere dünne Rippen anstelle einer dicken Rippe. Sie erhalten eine gleichwertige oder bessere Steifigkeit mit einem Bruchteil des Sinkrisikos.
Dicke Abschnitte aushöhlen
Aushöhlen Sie dicke Bereiche, wo immer möglich, um eine gleichmäßige Wandstärke zu erhalten. Dies gilt besonders für Buckel (den Kern mit einem Stift ausbohren), dicke Montageflächen (eine Vertiefung auf der nicht sichtbaren Seite hinzufügen) und strukturelle Versteifungsrippen (verwenden Sie einen dreieckigen Querschnitt mit ausgehöhltem Kern).
Graduelle Übergänge verwenden
Wenn sich die Wandstärke ändern muss, verwenden Sie ein 3:1 Verjüngungsverhältnis. Für jede 1 mm Änderung der Dicke sorgen Sie für mindestens 3 mm graduellen Übergang. Dies verteilt den Schwindungsunterschied über eine größere Fläche, macht jede Oberflächenvertiefung flacher und weniger sichtbar.
Oberflächentextur strategisch hinzufügen
Eine Textur auf der sichtbaren Oberfläche kann geringe Einfallstellen effektiv verbergen. Eine mittlere bis tiefe Textur (VDI 21–27) unterbricht das visuelle Muster ausreichend, sodass eine 0,05–0,10 mm Vertiefung nicht mehr wahrnehmbar ist. Dies ist keine Lösung – es ist eine Tarnungstechnik, die funktioniert, wenn konstruktive Einschränkungen eine vollständige Beseitigung verhindern.
Wie reduzieren Prozesseinstellungen Einfallstellen?
Wenn Designänderungen nicht möglich sind – vielleicht ist das Werkzeug bereits gebaut oder die Merkmalsdicke kann ohne Beeinträchtigung der Funktion nicht reduziert werden – werden Prozesseinstellungen zum primären Werkzeug zur Reduzierung von Einfallstellen.
Nachdruck erhöhen
Dies ist die direkteste prozessbedingte Korrektur. Erhöhter Nachdruck (Haltephase) drückt mehr Material in die dicken Bereiche während der Kompensationsphase, reduziert das volumetrische Schwinden, das Einfallstellen verursacht. Die Einschränkung: Übermäßiger Nachdruck kann zu Gratbildung, erhöhter Eigenspannung und Maßabweichungen über die Toleranz hinaus führen.
Nachdruckzeit verlängern
Das Nachdrücken muss fortgesetzt werden, bis der Anguss erstarrt ist. Wenn das Nachdrücken vor dem Angusserstarren stoppt, fließt Material rückwärts aus dem Kavitätsvolumen heraus und der dicke Abschnitt schrumpft unkontrolliert. Überwachen Sie die Angusserstarrenszeit mit Drucksensoren und stellen Sie die Nachdrückzeit mindestens entsprechend ein.
Schmelztemperatur reduzieren
Niedrigere Schmelztemperaturen bedeuten weniger Gesamtschrumpfung. Dies muss jedoch mit der Füllqualität abgewogen werden – ist die Temperatur zu niedrig, kommt es zu Kurzschüssen, hohem Einspritzdruck und schlechter Oberflächenqualität. Eine Reduzierung um 5–10°C von der Standard-Schmelztemperatur ist üblicherweise der sichere Bereich zur Verringerung von Einfallstellen.
Kühlung optimieren
Schnellere, gleichmäßigere Kühlung reduziert das Zeitfenster, in dem sich Einfallstellen bilden. Das bedeutet: Optimierung der Kühlkanalplatzierung nahe dicken Bereichen, Einsatz von Beryllium-Kupfer-Einsätzen für lokale Wärmeabfuhr und Sicherstellung ausreichender Kühlmittelströmungsraten. Erfahrene Formenbauer fügen regelmäßig während der Formeninbetriebnahme lokale Kühllösungen hinzu, um Einfallstellen-Hotspots zu beheben.
| Anpassung | Impact | Risk |
|---|---|---|
| Nachdruckdruck erhöhen | Hoch | Grat, Eigenspannung |
| Nachdruckzeit verlängern | Mittel-Hoch | Längere Zykluszeit |
| Schmelztemperatur reduzieren | Mittel | Unvollständige Füllung, schlechter Oberflächenzustand |
| Formtemperatur reduzieren | Mittel | Schweißlinien-Sichtbarkeit, Flussmarken |
| Langsamere Einspritzgeschwindigkeit | Low-Medium | Längere Taktzeit, Flussstockung |
Welche Materialien sind am anfälligsten für Einfallstellen?
Die Materialwahl beeinflusst die Sichtbarkeit von Einfallstellen erheblich. Amorphe Materialien (ABS, PC, PMMA, PS) zeigen Einfallstellen leichter, da sie ein höheres Formschrumpfen in den Übergangszonen von dick zu dünn aufweisen und weil ihre transparenten oder glänzenden Oberflächen selbst geringe Vertiefungen sichtbar machen.
Teilkristalline Materialien (PP, PE, Nylon, POM) sind etwas nachsichtiger, da sie dazu neigen, gleichmäßiger zu schrumpfen und ihre typischen Oberflächenbeschaffenheiten weniger auffällig sind. Dennoch zeigen sie auf polierten Oberflächen Einfallstellen.
Gefüllte Materialien – solche mit Glasfaser-, Mineral- oder Talkum-Füllstoffen – zeigen deutlich geringere Einfallstellen, weil die Füllstoffe reduzieren das Volumenschrumpfen[3]. Wenn Ihre Anwendung einen gefüllten Werkstoff zulässt, ist dies eine der effektivsten Methoden, um Einfallstellen zu minimieren, ohne das Bauteildesign zu ändern.
| Material Typ | Sichtbarkeit der Einfallstelle | Design-Empfehlung |
|---|---|---|
| Amorph (ABS, PC, PMMA) | Hoch | Strenge 50–60% Rippenregel |
| Teilkristallin (PP, Nylon, POM) | Mittel | Standard 60% Rippenregel |
| Glasgefüllte Sorten | Niedrig | Bis zu 70% akzeptabel |
Wenn Einfallstellen ein Problem darstellen, kann der Wechsel von einem ungefüllten zu einem 10–20% glasgefüllten Werkstoff die Einfallstellen oft vollständig beseitigen und gleichzeitig die Maßhaltigkeit und Steifigkeit verbessern.
Kann man Einfallstellen beheben, nachdem das Werkzeug gebaut wurde?
Ja, aber die Optionen werden deutlich eingeschränkt und die Kosten steigen. Hier ist die Hierarchie der Lösungen, von der kostengünstigsten bis zur teuersten.
- Prozessoptimierung: Nachdruck, Nachdruckzeit, Schmelztemperatur und Kühlung anpassen. Kosten: Maschinenzeit für Versuche. Wirksamkeit: mäßig bei geringer Einfallstelle.
- Gasinnendruck- oder Schaumspritzgießen: Für dicke Bereiche führt das Gasinnendruck-Spritzgießen Stickstoff in die dicke Stelle ein, um die Oberflächenqualität zu erhalten und das Innere auszuhöhlen. Erfordert Werkzeugmodifikation für Gasdüsen. Kosten: moderat. Wirksamkeit: hoch für lokalisierte dicke Bereiche.
- Formänderung – Stahlabtrag: Reduzieren Sie die Rippenstärke oder höhlen Sie dicke Bereiche aus, indem Sie Stahl aus der Kavität entfernen. Dies ist die effektivste Lösung, erfordert jedoch Nachbearbeitung. Kosten: moderat bis hoch, abhängig von der Kavitätskomplexität.
- Formmodifikation — Stahlzusatz: Wenn Sie die Wandstärke an einer Stelle zur Kompensation erhöhen müssen, erfordert dies Schweißen und Nachbearbeitung. Kosten: hoch. Risiko: Schweißnahtintegrität in Serienwerkzeugen.
Die zentrale Erkenntnis aller Ansätze: Es ist immer kostengünstiger, Einfallstellen in der Designphase zu vermeiden, als sie nach dem Formenbau zu beheben.
Wie misst und bewertet man Einfallstellen?
Die Quantifizierung von Einfallstellen ist wichtig, um Abnahmekriterien festzulegen und Prozessverbesserungen zu verfolgen. Es gibt drei gängige Methoden.
Visuelle Inspektion ist die einfachste Methode. Halten Sie das Teil auf Armlänge unter schrägem Licht und suchen Sie nach Vertiefungen. Wenn Sie sie bei 30 cm unter Standardbeleuchtung sehen können, werden sie für Ihre Kunden sichtbar sein. Dies ist eine Bestanden/Nicht-Bestanden-Methode, nicht quantitativ.
Oberflächenprofilometrie verwendet ein Kontakt- oder optisches Profilometer, um die exakte Tiefe und Breite der Depression zu messen. Typische Akzeptanzkriterien sind 0,05 mm maximale Tiefe für kosmetische Oberflächen und 0,10 mm für nicht-kosmetische Oberflächen.
Ultraschall-Wanddickenmessung an der Einfallstelle zeigt, ob die Wand über die Toleranz hinaus verdünnt wurde. Dies ist nützlich für Qualitätskontrolle[4] zwischen Einfallstelle (Oberflächenvertiefung bei erhaltener Wandstärke) und Hohlraum (tatsächliches Materialfehlen innerhalb der Wand).
Was sollten Sie prüfen, um Einfallstellen zu vermeiden?
Nutze diese Checkliste vor und während der Werkzeuginbetriebnahme, um Sinkstellen unter Kontrolle zu halten.
| Check Item | Kriterien für Bestehen |
|---|---|
| Alle Rippen ≤60 % der Nennwandstärke | ✓ |
| Achsen auf einheitliche Wandstärke ausgehöhlt | ✓ |
| Wandübergänge verwenden einen 3:1-Verjüngungswinkel | ✓ |
| Nachdruckdruck optimiert | ✓ |
| Nachdruckzeit ≥ Angussverschlusszeit | ✓ |
| Kosmetische Oberflächentextur spezifiziert | ✓ oder N/A |
| Materialauswahl auf Schrumpfung überprüft | ✓ |
Eine umfassende DFM-Überprüfung, die jeden oben genannten Punkt prüft, ist die kosteneffizienteste Methode, um Einfallstellen zu vermeiden, bevor sie entstehen – denn die günstigste Lösung für Einfallstellen ist die, die man nie benötigt.
Häufig gestellte Fragen zu Einfallstellen?
Sind Einfallstellen immer sichtbar?
Nicht immer. Sinkstellen unter 0,02 mm sind generell nicht wahrnehmbar, sogar auf glänzenden Oberflächen. Auf strukturierten Oberflächen (VDI 21+) können Sinkstellen bis zu 0,05 mm verborgen werden. Der Schlüsselfaktor ist die Kombination von Tiefe und Oberflächengüte — polierte, glänzende Oberflächen zeigen sogar 0,02 mm Vertiefungen deutlich.
Können Einfallstellen nach dem Spritzen beseitigt werden?
Nicht wirtschaftlich. Im Gegensatz zu Grat oder Ansätzen sind Einfallstellen volumetrisch – das Material hat sich unter das beabsichtigte Oberflächenniveau zusammengezogen. Lackieren kann geringfügige Einfallstellen teilweise kaschieren, beseitigt sie aber nicht. Die einzige zuverlässige Lösung besteht darin, die Ursache durch Design- oder Prozessänderungen zu beheben.
Was ist der Unterschied zwischen Sinkstellen und Lunkern?
Sinkstellen sind Oberflächenvertiefungen; Lunker sind innere Hohlräume. Sie haben die gleiche Ursache (unterschiedliche Schrumpfung durch Abkühlung in dickeren Bereichen), aber zeigen sich unterschiedlich. Bei dünnwandigen Teilen sieht man eher Sinkstellen, weil die dünne Außenhaut nach innen gezogen wird. Bei sehr dickwandigen Teilen erzeugt die Schrumpfung stattdessen innere Lunker, weil die Außenhaut stabil genug ist, dem Zug zu widerstehen.
Beeinflusst die Angusslage Einfallstellen?
Ja. Die Angussposition bestimmt den Fließweg und die Nachdruckeffizienz. Ein Anguss weit von einem dickwandigen Bereich bedeutet, dass der Nachdruck abfällt bevor er ihn erreicht, was das Risiko von Sinkstellen erhöht. Idealerweise sollten Angüsse nahe der dicksten Querschnittsstelle positioniert werden, um Nachdruckkompensation genau dort zu maximieren, wo sie am meisten benötigt wird.
Wie beeinflusst die Wandstärke die Tiefe von Einfallstellen?
Dickere Nennwandungen erzeugen flachere Sinkstellen bei gleicher Rippendicken-Ratio, weil mehr Material vorhanden ist, um die Schrumpfungsdifferenz zu absorbieren. Umgekehrt sind dünnwandige Teile (unter 1,5 mm) extrem empfindlich gegenüber sogar kleinen Rippendickensteigerungen — eine 1,0 mm Rippe auf einer 1,5 mm Wand wird deutlich einsinken.
Ist Gasunterstützte Spritzgießtechnologie effektiv zur Vermeidung von Sinkstellen?
Sehr effektiv, besonders für dicke Abschnitte, die nicht neu gestaltet werden können. Gasassistenz höhlt das Innere dicker Merkmale aus und erhält dabei die Oberflächenqualität. Es erhöht die Kosten und Komplexität sowohl der Form als auch des Prozesses, ist aber die zuverlässigste Methode, um Einfallstellen in strukturellen Rippen und großen Achsen zu beseitigen, ohne deren Abmessungen zu reduzieren.
Bottom line: Halte Rippen bei 50–60% der Nennwandung, bewahre gleichmäßige Dicke und behandele Sinkstellen in der Designphase — nicht nachdem das Werkzeug gebaut ist. Designprävention ist immer kostengünstiger als Prozesskorrekturen oder Werkzeugmodifikationen.
{
„@context“: „https://schema.org“,
„@type“: „FAQPage“,
„mainEntity“: [
{
„@type“: „Question“,
„name“: „Sind Einfallstellen immer sichtbar?“,
"acceptedAnswer": {
"@type": "Answer",
„text“: „Nicht immer. Einfallstellen unter 0,02 mm sind generell kaum wahrnehmbar, selbst auf glänzenden Oberflächen. Auf strukturierten Oberflächen (VDI 21+) können Einfallstellen bis zu 0,05 mm verborgen bleiben. Der Schlüsselfaktor ist die Kombination aus Tiefe und Oberflächenbeschaffenheit – polierte, glänzende Oberflächen zeigen selbst 0,02 mm Vertiefungen deutlich.“
}
},
{
„@type“: „Question“,
"name": "Können Sinkstellen nach dem Spritzgießen entfernt werden?",
"acceptedAnswer": {
"@type": "Answer",
„text“: „Nicht wirtschaftlich. Im Gegensatz zu Grat oder Ansätzen sind Einfallstellen volumetrisch – das Material hat sich unter das beabsichtigte Oberflächenniveau zusammengezogen.
Lackieren kann geringfügige Einfallstellen teilweise kaschieren, beseitigt sie aber nicht. Die einzige zuverlässige Lösung besteht darin, die Ursache durch Design- oder Prozessänderungen zu beheben.“
}
},
{
„@type“: „Question“,
„name“: „Was ist der Unterschied zwischen Einfallstellen und Hohlräumen?“,
"acceptedAnswer": {
"@type": "Answer",
"text": "Sinkstellen sind Oberflächenvertiefungen; Lunker sind innere Hohlräume. Sie haben die gleiche Ursache (unterschiedliche Schrumpfung durch Abkühlung in dickeren Bereichen), aber zeigen sich unterschiedlich. Bei dünnwandigen Teilen sieht man eher Sinkstellen, weil die dünne Außenhaut nach innen gezogen wird. Bei sehr dickwandigen Teilen erzeugt die Schrumpfung stattdessen innere Lunker, weil die Außenhaut stabil genug ist, dem Zug zu widerstehen."
„
}
},
{
„@type“: „Question“,
"name": "Beeinflusst die Angussposition Sinkstellen?",
"acceptedAnswer": {
"@type": "Answer",
"text": "Ja. Die Angussposition bestimmt den Fließweg und die Nachdruckeffizienz. Ein Anguss weit von einem dickwandigen Bereich bedeutet, dass der Nachdruck abfällt bevor er ihn erreicht, was das Risiko von Sinkstellen erhöht."
Idealerweise sollten Angüsse nahe der dicksten Querschnittsstelle positioniert werden, um Nachdruckkompensation genau dort zu maximieren, wo sie am meisten benötigt wird."
}
},
{
„@type“: „Question“,
„name“: „Wie beeinflusst die Wanddicke die Tiefe der Einfallstelle?“,
"acceptedAnswer": {
"@type": "Answer",
„text“: „Dickere Nennwände erzeugen flachere Einfallstellen bei gleichem Rippendickenverhältnis, weil mehr Material vorhanden ist, um das Schrumpfungsgefälle aufzunehmen. Umgekehrt sind dünnwandige Teile (unter 1,5 mm) äußerst empfindlich gegenüber selbst geringen Rippendickenzunahmen – eine 1,0 mm Rippe auf einer 1,5 mm Wand wird deutlich einsinken.“
}
},
{
„@type“: „Question“,
„name“: „Ist Gasinjektionsspritzgießen zur Vermeidung von Einfallstellen wirksam?“,
"acceptedAnswer": {
"@type": "Answer",
„text“: „Sehr effektiv, insbesondere für dicke Bereiche, die nicht neu gestaltet werden können.
Gasunterstützung höhlt das Innere dicker Merkmale aus, während die Oberflächenqualität erhalten bleibt. Es erhöht die Kosten und Komplexität sowohl für die Form als auch für den Prozess, aber es ist die zuverlässigste Methode, um Sinkeinsenkungen in strukturellen Rippen und großen Bossen zu beseitigen, ohne deren Abmessungen zu reduzieren.”
}
}
]
}
Sinkeinsenkungen sind vermeidbar, wenn Design und Verarbeitung zusammenarbeiten. Wenn Sie mit anhaltenden Sinkeinsenkungen an Ihren spritzgegossenen Teilen zu kämpfen haben, wenden Sie sich an unser Ingenieurteam bei ZetarMold. Wir betreiben 45 Maschinen (90T–1850T) von Shanghai aus, mit 8 leitenden Ingenieuren, die sich auf die Beseitigung von Fehlern spezialisiert haben. Unser DFM-Review erkennt sinkgefährdete Merkmale, bevor der Stahl geschnitten wird.
-
Entstehung von Einfallstellen — BASF, „Teil- und Werkzeugkonstruktion“, Plastics Technology Handbook, 2023. ↩
-
Auswirkungen des Nachdruckdrucks — Autodesk, „Moldflow Design Guide“, 2024. ↩
-
Materialschrumpfungsdaten — „Kunststoffmaterialauswahl,“ Society of Plastics Engineers, 2025. ↩
-
Fehlermessung — „Spritzgieß-Qualitätskontrolle,“ Plastics Technology, 2024. ↩


