 Overslaan naar inhoud

Sink marks — those annoying depressions on the surface of an otherwise perfect molded part — are one of the most common and visible defects in injection molding. They appear directly opposite thick sections, ribs, and bosses, and they’re the first thing any customer notices on a cosmetic surface.
In this guide, I’ll explain what causes injection molding sink marks, how to prevent them through design and processing, and what to do when they’ve already appeared on your parts. This guide draws on decades of production experience across thousands of mold sets.
Belangrijkste opmerkingen
- Sink marks are surface depressions caused by uneven cooling shrinkage in thick sections
- Keep rib thickness at 50–60% of nominal wall — the single most effective prevention
- Design fixes are 5–10× cheaper than post-mold corrections
- Glass-filled materials reduce sink significantly; consider switching grades if allowed
- Processing adjustments can reduce sink 30–50% but rarely eliminate design-caused marks
What Are Sink Marks in Injection Molding?
Sink marks are localized depressions or dimples on the surface of a molded part, typically appearing opposite features like ribs, bosses, thick wall sections, or changes in geometry. They occur when the inner material shrinks more than the outer skin during cooling, pulling the surface inward.
“Keeping rib base thickness at 50–60% of nominal wall thickness effectively prevents visible sink marks.”Echt
At 50–60% ratio, sink marks are barely visible on most surfaces. Above 70% they become noticeable, and at 100% deep sink marks are virtually guaranteed.
“Increasing packing pressure alone can eliminate sink marks caused by ribs at 100% of wall thickness.”Vals
Processing adjustments can reduce but cannot eliminate design-caused sink marks. Ribs at 100% wall thickness create thermal masses that guarantee visible sink regardless of packing pressure.
The mechanism is straightforward: when a thick section of plastic cools, the outer skin solidifies first while the interior remains molten. As the interior material cools and contracts, it pulls the already-solidified skin inward, creating a visible injection molding defect[1]. The deeper the thickness differential between the feature and the surrounding wall, the more pronounced the sink mark.
What Causes Sink Marks During Molding?
Sink marks have both design and processing causes. Understanding which is responsible in your specific case is the first step toward eliminating them.
Design Causes
The most common design cause is excessive material thickness at ribs, bosses, or wall transitions. When a rib is too thick relative to the nominal wall, it creates a thermal mass that cools much slower than the surrounding area. The rib material shrinks as it cools, pulling the opposite surface inward.
“Glass-filled materials exhibit significantly less sink than unfilled grades.”Echt
Fillers (glass fiber, mineral, talc) reduce volumetric shrinkage. Switching from unfilled to 10–20% glass-filled grades often eliminates sink completely while improving stiffness.
“Sink marks and voids are different defects with different root causes.”Vals
They share the same root cause — differential cooling shrinkage in thick sections. The difference is manifestation: sink marks appear on the surface, voids appear internally, depending on wall rigidity.
Other design causes include abrupt wall thickness transitions (without gradual tapers), oversized bosses that aren’t cored, and thick gusset plates at mounting points. Any feature that adds significant local thickness relative to the nominal wall is a sink mark candidate.
Processing Causes
Insufficient packing pressure is the primary processing cause of sink marks. During the packing phase, additional material is forced into the cavity to compensate for shrinkage. If the packing pressure[2] is too low or the packing time is too short, the material in thick sections continues to shrink without compensation, producing sink marks.
Other processing factors include excessive melt temperature (which increases total shrinkage), insufficient cooling time (ejecting before thick sections have fully solidified), and slow injection speed (which can cause premature freeze-off at gates, reducing the effective packing distance).
How Do You Prevent Sink Marks Through Design?
Design prevention is always more effective than processing fixes because it addresses the root cause rather than the symptom. Here are the key design strategies, ordered by impact.
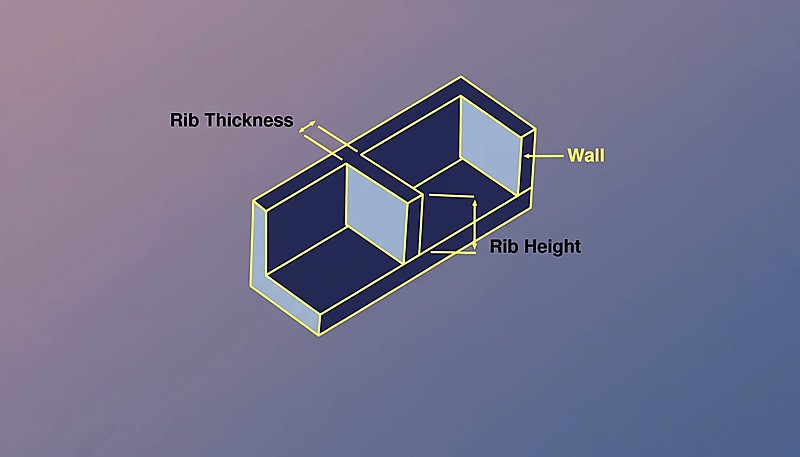
Control Rib Thickness
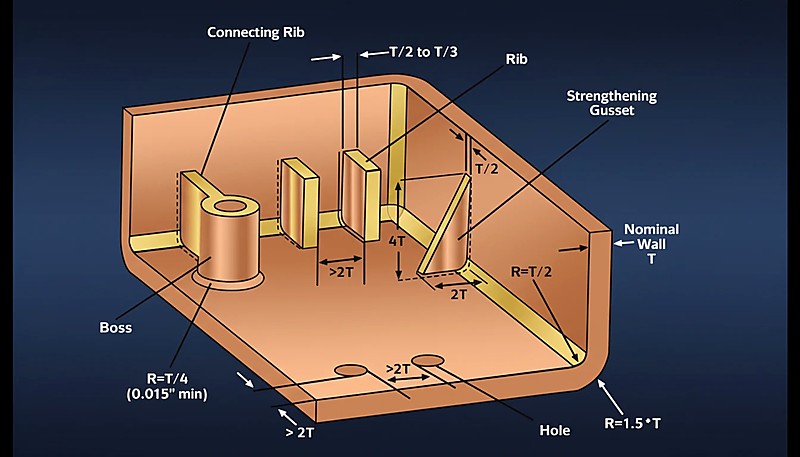
This is the single most effective design measure. Ribs should be 50–60% of the nominal wall thickness at their base. At 50%, sink marks are barely visible on most surfaces. Above 70%, they become noticeable. At 100% (where the rib is as thick as the wall), deep sink marks are virtually guaranteed on the opposite surface.
Designers often make ribs too thick because they’re thinking about structural stiffness, not manufacturability. The solution: use multiple thin ribs instead of one thick rib. You get equivalent or better stiffness with a fraction of the sink risk.
Core Out Thick Sections
Wherever possible, hollow out thick sections to maintain uniform wall thickness. This applies especially to bosses (core the center with a pin), thick mounting pads (add a recess on the non-cosmetic side), and structural gussets (use a triangular cross-section with a cored center).
Use Gradual Transitions
When wall thickness must change, use a 3:1 taper ratio. For every 1 mm of thickness change, provide at least 3 mm of gradual transition. This distributes the shrinkage differential over a larger area, making any surface depression shallower and less visible.
Add Surface Texture Strategically
Texture on the cosmetic surface can effectively hide minor sink marks. A medium-to-deep texture (VDI 21–27) breaks up the visual pattern enough that a 0.05–0.10 mm depression becomes imperceptible. This isn’t a fix — it’s a camouflage technique that works when design constraints prevent complete elimination.
How Do Processing Adjustments Reduce Sink Marks?
When design changes aren’t possible — perhaps the mold is already built or the feature thickness can’t be reduced without compromising function — processing adjustments become the primary tool for sink mark reduction.
Increase Packing Pressure
This is the most direct processing fix. Increasing packing (holding) pressure forces more material into the thick sections during the compensation phase, reducing the volumetric shrinkage that causes sink. The limitation: excessive packing pressure can cause flash, increased residual stress, and dimensional growth beyond tolerance.
Extend Packing Time
Packing must continue until the gate has frozen. If packing stops before gate freeze, material flows backward out of the cavity, and the thick section shrinks unchecked. Monitor gate freeze time with pressure sensors, and set packing time to at least match it.
Reduce Melt Temperature
Lower melt temperatures mean less total shrinkage. However, this must be balanced against fill quality — if the temperature is too low, you’ll see short shots, high injection pressure, and poor surface finish. A reduction of 5–10°C from the standard melt temperature is usually the safe range for sink reduction.
Optimize Cooling
Snellere, uniformere koeling verkleint het tijdsvenster waarin zinkmarkeringen ontstaan. Dit betekent het optimaliseren van de plaatsing van koelkanalen nabij dikke secties, het gebruik van berylliumkoper inzetstukken voor lokale warmteafvoer en het waarborgen van voldoende koelvloeistofdebiet. Ervaren matrijzenmakers voegen regelmatig lokale koeloplossingen toe tijdens de matrijsproef om zinkhotspots aan te pakken.
| Aanpassing | Impact | Risk |
|---|---|---|
| Verhoog persdruk | Hoog | Flits, restspanning |
| Pakduur verlengen | Middelhoog | Langere cyclusduur |
| Verlaag smelttemperatuur | Medium | Onvolledige vulling, slechte afwerking |
| Moldtemperatuur verlagen | Medium | Laslijn zichtbaarheid, stromingsmarkeringen |
| Langzamere inspuitsnelheid | Low-Medium | Langere cyclus, stromingsaarzeling |
Welke Materialen Zijn Het Meest Vatbaar voor Zinkmarkeringen?
Materiaalkeuze heeft een aanzienlijke invloed op de zichtbaarheid van zinkmarkeringen. Amorf materialen (ABS, PC, PMMA, PS) vertonen zinkmarkeringen gemakkelijker omdat ze een hogere krimpspanning hebben in de overgangszones van dik naar dun en omdat hun transparante of glanzende oppervlakken zelfs kleine deukjes zichtbaar maken.
Semi-kristallijne materialen (PP, PE, Nylon, POM) zijn iets vergevingsgezinder omdat ze de neiging hebben gelijkmatiger te krimpen en hun typische oppervlakafwerkingen minder zichtbaar zijn. Ze vertonen echter nog steeds zinkingen op gepolijste oppervlakken.
Gevulde materialen — die met glasvezel, mineraal of talkvullers — vertonen aanzienlijk minder zink omdat de vulstoffen verminderen volumetrische krimp[3]. If your application allows a filled grade, it’s one of the most effective ways to minimize sink without changing the part design.
| Type materiaal | Zichtbaarheid van zinkingen | Ontwerpadvies |
|---|---|---|
| Amorf (ABS, PC, PMMA) | Hoog | Strikte 50–60% TPV ribbelregel |
| Semi-kristallijn (PP, Nylon, POM) | Medium | Standaard 60% ribregel |
| Met glasvezel versterkte kwaliteiten | Laag | Tot 70% TPV acceptabel |
Wanneer zinkingen een zorg zijn, kan overschakelen van een ongevuld naar een 10–20% TPV glasgevuld type vaak de zinkingen volledig elimineren, terwijl ook de dimensionale stabiliteit en stijfheid verbeteren.
Kun je zinkingen repareren nadat de mal is gebouwd?
Yes, but the options narrow significantly and costs increase. Here’s the hierarchy of fixes, from cheapest to most expensive.
- Procesoptimalisatie: Pas persdruk, persduur, smelttemperatuur en koeling aan. Kosten: machinetijd voor proeven. Effectiviteit: matig voor kleine zinkmarkeringen.
- Gasassistentie of schuimspuitgieten: Voor dikke secties introduceert gasondersteunde spuitgieten stikstof in de dikke structuur, waardoor de oppervlaktekwaliteit behouden blijft terwijl het binnenste wordt uitgehold. Vereist matrijsaanpassing voor gaspinnen. Kosten: matig. Effectiviteit: hoog voor gelokaliseerde dikke secties.
- Matrijsaanpassing — staal verwijderen: Verklein de dikte van de ribben of hol dikke secties uit door staal uit de holte te verwijderen. Dit is de meest effectieve oplossing maar vereist nabewerking. Kosten: matig tot hoog, afhankelijk van de complexiteit van de holte.
- Malaanpassing — staaltoevoeging: Als u ergens de wanddikte moet vergroten om te compenseren, vereist dit lassen en opnieuw frezen. Kosten: hoog. Risico: lasintegriteit in productiematrijzen.
The key insight across all these approaches: it’s always cheaper to prevent sink marks in the design phase than to fix them after the mold is built.
Hoe Meet en Evalueer Je Zinkmarkeringen?
Het kwantificeren van zinkmarkeringen is belangrijk voor het vaststellen van acceptatiecriteria en het volgen van procesverbeteringen. Er zijn drie gangbare methoden.
Visuele inspectie is the simplest method. Hold the part at arm’s length under angled light and look for depressions. If you can see them at 30 cm under standard lighting, they’ll be visible to your customers. This is a pass/fail method, not quantitative.
Oppervlakteprofilometrie gebruikt een contact- of optische profilometer om de exacte diepte en breedte van de indeuking te meten. Typische acceptatiecriteria zijn 0,05 mm maximale diepte voor cosmetische oppervlakken en 0,10 mm voor niet-cosmetische oppervlakken.
Ultrasone wanddikte meting op de zinkingslocatie laat zien of de wand dunner is geworden dan de tolerantie. Dit is nuttig voor kwaliteitsinspectie[4] tussen zink (oppervlakte-indrukking met behouden wanddikte) en holte (daadwerkelijk materiaalgebrek binnen de wand).
Wat Moet U Controleren om Zinkmarkeringen te Voorkomen?
Use this checklist before and during mold commissioning to keep sink marks under control.
| Check Item | Slaagcriteria |
|---|---|
| Alle ribben ≤60% van nominale wand | ✓ |
| Bosses cored to uniform wall | ✓ |
| Wall transitions use 3:1 taper | ✓ |
| Packing pressure optimized | ✓ |
| Packing time ≥ gate freeze time | ✓ |
| Cosmetic surface texture specified | ✓ or N/A |
| Material selection reviewed for shrink | ✓ |
A thorough DFM review that checks every item above is the most cost-effective way to eliminate sink marks before they appear — because the cheapest sink mark fix is the one you never need.
Frequently Asked Questions About Sink Marks?
Are Sink Marks Always Visible?
Not always. Sink marks under 0.02 mm are generally imperceptible, even on glossy surfaces. On textured surfaces (VDI 21+), sink marks up to 0.05 mm can be hidden. The key factor is the combination of depth and surface finish — polished, glossy surfaces show even 0.02 mm depressions clearly.
Can Sink Marks Be Removed After Molding?
Not economically. Unlike flash or burrs, sink marks are volumetric — the material has shrunk below the intended surface level. Painting can partially camouflage minor sink but won’t eliminate it. The only reliable fix is addressing the root cause through design or processing changes.
What Is the Difference Between Sink Marks and Voids?
Sink marks are surface depressions; voids are internal cavities. They share the same root cause (differential cooling shrinkage in thick sections) but manifest differently. In thin-wall parts, you tend to see sink marks because the thin outer skin gets pulled inward. In very thick parts, the shrinkage creates internal voids instead because the outer skin is rigid enough to resist the pull.
Does Gate Location Affect Sink Marks?
Yes. Gate location determines the flow path and packing efficiency. A gate far from a thick section means packing pressure drops before reaching it, increasing sink risk. Ideally, gates should be positioned near the thickest cross-section to maximize packing compensation exactly where it’s needed most.
How Does Wall Thickness Affect Sink Mark Depth?
Thicker nominal walls produce shallower sink marks for the same rib thickness ratio because there’s more material to absorb the shrinkage differential. Conversely, thin-wall parts (under 1.5 mm) are extremely sensitive to even small rib thickness increases — a 1.0 mm rib on a 1.5 mm wall will sink noticeably.
Is Gas-Assist Injection Molding Effective for Sink Prevention?
Very effective, particularly for thick sections that can’t be redesigned. Gas assist hollows out the interior of thick features while maintaining surface quality. It adds cost and complexity to both the mold and the process, but it’s the most reliable way to eliminate sink in structural ribs and large bosses without reducing their dimensions.
Bottom line: Keep ribs at 50–60% of nominal wall, maintain uniform thickness, and address sink in the design phase — not after the mold is built. Design prevention is always cheaper than processing fixes or mold modifications.
{
“@context”: “https://schema.org”,
“@type”: “FAQPage”,
“mainEntity”: [
{
“@type”: “Question”,
“name”: “Are Sink Marks Always Visible?”,
“acceptedAnswer”: {
“@type”: “Answer”,
“text”: “Not always. Sink marks under 0.02 mm are generally imperceptible, even on glossy surfaces. On textured surfaces (VDI 21+), sink marks up to 0.05 mm can be hidden. The key factor is the combination of depth and surface finish \u2014 polished, glossy surfaces show even 0.02 mm depressions clearly.”
}
},
{
“@type”: “Question”,
“name”: “Can Sink Marks Be Removed After Molding?”,
“acceptedAnswer”: {
“@type”: “Answer”,
“text”: “Not economically. Unlike flash or burrs, sink marks are volumetric \u2014 the material has shrunk below the intended surface level.
Painting can partially camouflage minor sink but won’t eliminate it. The only reliable fix is addressing the root cause through design or processing changes.”
}
},
{
“@type”: “Question”,
“name”: “What Is the Difference Between Sink Marks and Voids?”,
“acceptedAnswer”: {
“@type”: “Answer”,
“text”: “Sink marks are surface depressions; voids are internal cavities. They share the same root cause (differential cooling shrinkage in thick sections) but manifest differently. In thin-wall parts, you tend to see sink marks because the thin outer skin gets pulled inward. In very thick parts, the shrinkage creates internal voids instead because the outer skin is rigid enough to resist the pull.
”
}
},
{
“@type”: “Question”,
“name”: “Does Gate Location Affect Sink Marks?”,
“acceptedAnswer”: {
“@type”: “Answer”,
“text”: “Yes. Gate location determines the flow path and packing efficiency. A gate far from a thick section means packing pressure drops before reaching it, increasing sink risk.
Ideally, gates should be positioned near the thickest cross-section to maximize packing compensation exactly where it’s needed most.”
}
},
{
“@type”: “Question”,
“name”: “How Does Wall Thickness Affect Sink Mark Depth?”,
“acceptedAnswer”: {
“@type”: “Answer”,
“text”: “Thicker nominal walls produce shallower sink marks for the same rib thickness ratio because there’s more material to absorb the shrinkage differential. Conversely, thin-wall parts (under 1.5 mm) are extremely sensitive to even small rib thickness increases \u2014 a 1.0 mm rib on a 1.5 mm wall will sink noticeably.”
}
},
{
“@type”: “Question”,
“name”: “Is Gas-Assist Injection Molding Effective for Sink Prevention?”,
“acceptedAnswer”: {
“@type”: “Answer”,
“text”: “Very effective, particularly for thick sections that can’t be redesigned.
Gas assist hollows out the interior of thick features while maintaining surface quality. It adds cost and complexity to both the mold and the process, but it’s the most reliable way to eliminate sink in structural ribs and large bosses without reducing their dimensions.”
}
}
]
}
Sink marks are preventable when the design and processing work together. If you’re dealing with persistent sink marks on your injection molded parts, neem contact op met ons technische team bij ZetarMold. Wij bedienen 45 machines (90T–1850T) vanuit Shanghai, met 8 senior engineers die gespecialiseerd zijn in het elimineren van defecten. Onze DFM-beoordeling signaleert zinkgevoelige kenmerken voordat het staal wordt gesneden.
-
Zinkmarkeringvorming — BASF, “Onderdeel- en Matrijsontwerp,” Handboek Kunststoftechnologie, 2023. ↩
-
Effecten van pakdruk — Autodesk, “Moldflow Ontwerpgids,” 2024. ↩
-
Materiaal krimpdata — “Plastic Material Selection,” Society of Plastics Engineers, 2025. ↩
-
Defectmeting — “Injection Molding Quality Control,” Plastics Technology, 2024. ↩


