 Overslaan naar inhoud

tegendruk1 Met ervaring in meer dan 400 kunststofmaterialen en een eigen matrijsproductiefaciliteit, stelt ons technische team de terugdrukparameters af als onderdeel van elk matrijstestprotocol — want zelfs een goed gebouwde matrijs kan geen goede onderdelen produceren als de smeltkwaliteit inconsistent is.
- Back pressure controls screw retreat speed during plasticization, directly affecting melt quality
- Typical back pressure ranges from 5 to 20 bar (0.5–2 MPa) for most engineering plastics
- Too-low back pressure causes air traps, color streaks, and shot-weight variation
- Too-high back pressure leads to material degradation, drooling, and longer cycle times
- Always start low and increase gradually while inspecting parts for defects
What Is Back Pressure in Injection Molding?
Tegendruk bij spuitgieten wordt gedefinieerd door de functie, beperkingen en afwegingen die in deze sectie worden uitgelegd. Tegendruk is de gecontroleerde weerstand die tijdens de plastificeringsfase op de schroef wordt uitgeoefend, typisch 50–200 bar (725–2.900 psi), die het smeltmengsel comprimeert en homogeniseert. Het wordt soms genoemd plasticizing pressure2 of schroef-tegendruk — de weerstand die op de achterkant van de schroef wordt uitgeoefend terwijl deze tijdens de terugslagfase achteruit draait. Zonder dit trekt de schroef te snel terug, waardoor het smeltmengsel los en vol luchtbellen blijft.
In hydraulic machines, back pressure is set by adjusting the overflow valve on the injection cylinder. In all-electric machines, the servo motor controls it directly. The key point is that back pressure is not a single number you set once — it is a dynamic parameter you tune based on material, part geometry, mold design, and even ambient conditions.
How Is Back Pressure Formed During Plasticization?
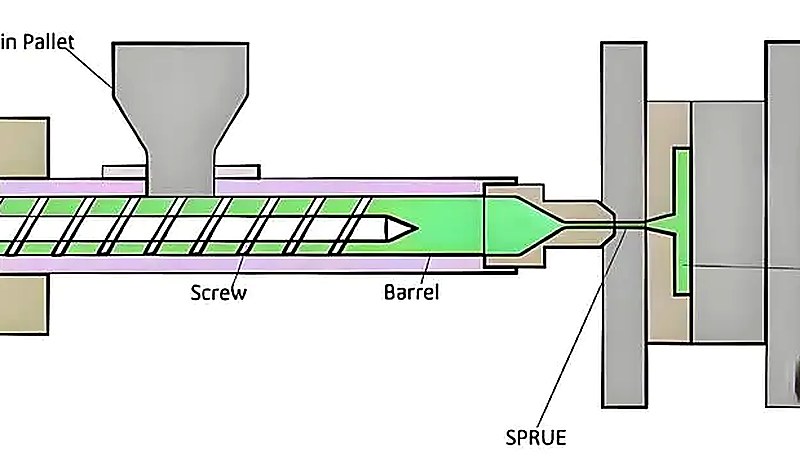
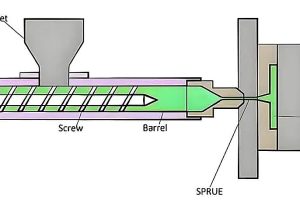
Deze sectie gaat over tegendruk die tijdens plastificatie ontstaat en de impact ervan op kosten, kwaliteit, timing of inkooprisico. Tegendruk ontstaat wanneer het gesmolten polymeer dat zich voor de schroefpunt ophoopt voldoende kracht genereert om de schroef naar achteren te duwen, en de tegendrukklep deze terugtrekking beperkt om het smeltmengsel te comprimeren en homogeniseren. Tijdens de schroefplastificatiefase draait de schroef om materiaal te smelten en te doseren. Naarmate gesmolten plastic zich voor de schroefpunt ophoopt, duwt het de schroef naar achteren. De tegendrukklep beperkt hoe snel de olie van de injectiecilinder kan wegstromen, waardoor weerstand tegen deze achterwaartse beweging ontstaat.
Het proces werkt als volgt: de schroef draait → materiaal smelt en beweegt vooruit → smeltdruk bouwt op → schroef wordt teruggeduwd → tegendrukklep weerstaat deze terugtrekking → het smeltmengsel wordt gecomprimeerd en gehomogeniseerd. Hoe strakker de klep is ingesteld, hoe langzamer de schroef van de spuitgietmachine retraites, en hoe grondiger het smeltmengsel wordt gemengd en gecompacteerd.
In our Shanghai factory, we run 47 injection molding machines from 90T to 1850T. Over 20+ years of production, we have found that back pressure tuning accounts for roughly 30% of the defect-reduction gains when optimizing a new mold setup.
Where Do You Find the Back Pressure Adjustment Valve?
Deze sectie gaat over het vinden van de tegendrukregelklep en de impact ervan op kosten, kwaliteit, timing of inkooprisico. De tegendrukklep bevindt zich aan de achterkant van de injectiecilinder op hydraulische machines, of in het screw recovery3 menu op de controller voor elektrische machines. Op hydraulische machines regelt de klep hoe snel hydraulische olie uit de injectiecilinder wegstroomt terwijl de schroef tijdens plastificatie terugtrekt.
For all-electric machines, there is no hydraulic valve. Instead, the servo motor that drives the screw applies a programmable torque limit during retraction. You set this in the machine controller under screw recovery parameters. The principle is identical — you are controlling how much resistance the screw encounters while retreating.
How Do You Determine the Correct Back Pressure Value?
There is no single magic number. The typical-range for back pressure is between 5 and 20 bar (0.5 to 2 MPa) for most engineering plastics, but the exact value depends on several factors: the material being processed, the screw design, the part geometry, and the mold temperature. A good starting rule of thumb is to set back pressure at 10–20% of the maximum injection pressure and adjust from there.
Material-specific starting points we use in our factory:
- PP, PE (polyolefins): 5–10 bar — these materials melt easily and do not need high compaction
- ABS, PS: 8–15 bar — moderate pressure for consistent color mixing and density
- PC, PMMA (transparent resins): 10–20 bar — higher pressure ensures optical clarity and eliminates air bubbles
- PA (nylon), PBT: 8–15 bar — enough to compact the melt without causing degradation
- PVC, POM: 3–8 bar — keep it low, these materials are heat-sensitive and degrade quickly under high back pressure
“Increasing back pressure improves melt homogeneity and reduces air bubbles in the molded part.”Echt
Higher back pressure slows screw retreat, giving the material more time to mix and compress. This expels trapped air and creates a more uniform melt, which directly reduces bubbles and voids in the finished part.
“You should always set back pressure as high as possible for the best part quality.”Vals
Excessive back pressure raises melt temperature, increases cycle time, and can cause material degradation — especially with heat-sensitive resins like PVC. It also causes nozzle drooling and flash. The correct approach is to start low and increase only until defects disappear.
What Are the Proven Methods for Adjusting Back Pressure?
Het aanpassen van tegendruk gaat niet alleen om het draaien aan een knop. Het is een systematisch proces dat begrip van je materiaal, observatie van het onderdeel en incrementele aanpassingen vereist — onderdeel van het bredere stappen van spuitgieten. Hier is de methode die wij op onze productievloer volgen elke keer dat we een nieuwe matrijs opstellen.
How Do You Adjust by Material Type?
Different polymers have vastly different viscosity curves, thermal stability windows, and sensitivity to shear heat. Low-melting-point materials like PE and PP need very little back pressure — 5 to 10 bar is usually sufficient. Engineering plastics like PC and POM need more careful treatment: PC benefits from 10 to 20 bar for clarity and density, while POM and PVC should stay below 8 bar to avoid thermal degradation. Glass-filled materials often require slightly higher back pressure (15–20 bar) to break down glass fiber bundles and achieve uniform distribution.
How Do You Adjust by Part Size and Geometry?
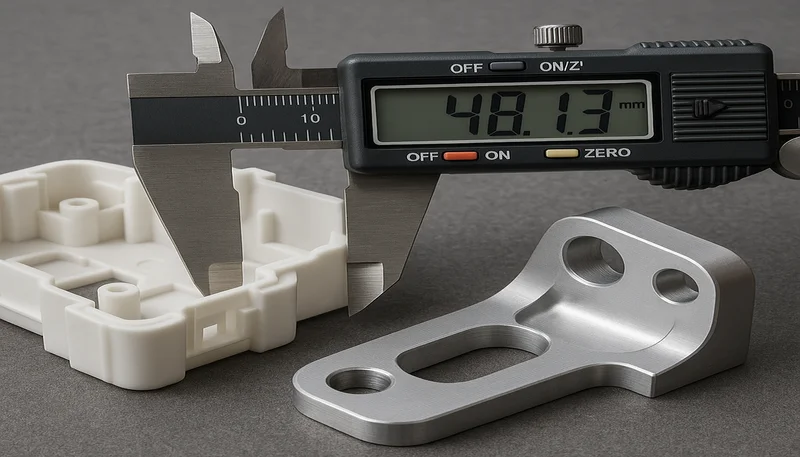
Larger parts with thick walls benefit from higher back pressure because the increased melt density helps fill the cavity consistently and reduces shrinkage sinks. Thin-wall parts, on the other hand, need a balance — too much back pressure raises melt temperature and can cause flash at the parting line. For precision parts with tight tolerances (±0.05 mm or tighter), we typically fine-tune back pressure in 1-bar increments while monitoring part weight and dimensions with a scale and calipers.
How Do You Use Dynamic Back Pressure Profiling?
Modern machines allow you to program back pressure in stages during the screw recovery phase. Instead of a single constant value, you can set, for example: Stage 1 at 5 bar for the first 30% of stroke (gentle start to avoid disturbing the cushion), Stage 2 at 15 bar for the middle 50% (main compaction and mixing), and Stage 3 at 8 bar for the final 20% (reduce pressure near the end to prevent drooling). This staged approach gives you better control over melt quality without the side effects of running high pressure through the entire recovery phase.
With experience across 400+ plastic materials and an in-house mold manufacturing facility, our engineering team tunes back pressure parameters as part of every mold trial protocol — because even a well-built mold cannot produce good parts if the melt quality is inconsistent.
What Happens If Back Pressure Is Set Incorrectly?
terugdrukregeling The screw retreats too fast, and the melt is loose and full of air. You will see gas marks (silver streaks) on the part surface, inconsistent shot weight, internal bubbles, and uneven gloss. Color mixing becomes patchy — especially with masterbatch — because the screw did not have enough resistance to properly blend the pigment into the melt. In severe cases, parts will show dimensional instability, with weight varying shot-to-shot by 2% or more.
When back pressure is too high: The melt temperature rises due to excessive shear, which can degrade heat-sensitive materials. You may notice discoloration (yellowing of white parts, dark streaks in colored parts), longer screw recovery times that extend cycle time, and nozzle drooling between shots. In extreme cases, excessive back pressure causes flash at the mold parting line because the melt is too hot and fluid. It also increases mechanical wear on the screw, barrel, and check ring.
“Low back pressure often causes silver streaks and bubbles on the part surface due to trapped air in the melt.”Echt
Without sufficient back pressure, the screw retreats rapidly and does not compress the melt adequately. Air gets trapped in the molten polymer, and when the material is injected into the cavity, these air pockets create silver streaks (gas marks) and internal voids.
“If your parts have sink marks, you should always increase back pressure to fix the problem.”Vals
Sink marks are primarily caused by insufficient holding pressure or cooling time, not back pressure. While back pressure affects melt density, adjusting holding pressure, packing time, and cooling parameters is the correct approach for sink marks. Increasing back pressure may actually worsen the issue by raising melt temperature.
What Are the Benefits of Proper Back Pressure Adjustment?
The benefits of proper back pressure adjustment are the main categories or options explained in this section. Getting back pressure right pays off across every aspect of production. First, melt homogeneity improves dramatically — colors blend evenly, additives disperse properly, and you get consistent material properties throughout the part. Shot weight stabilizes to within 0.2–0.5% variation, which means part dimensions stay within tolerance shot after shot.
Proper back pressure also eliminates a whole category of surface defects: gas marks, cold slugs, and gloss variation drop off significantly. For transparent parts made from PC or PMMA, the difference between 10 bar and 15 bar of back pressure can be the difference between a crystal-clear lens and one full of internal haze.
Finally, consistent back pressure reduces the need for downstream rework. Parts come out right the first time, which means less scrap, fewer quality holds, and shorter lead times — and that is where the real cost savings show up in production.
How Should You Approach Back Pressure Optimization?
Adjusting back pressure is not complicated, but it does require attention to detail. Start with the material-specific baseline values, observe your parts carefully, and adjust in small increments. Watch for the telltale signs: silver streaks mean increase back pressure; drooling and discoloration mean decrease it. Use dynamic profiling on modern machines for even better control.
Need help dialing in your injection molding parameters? See our Injection Molding Complete Guide for a comprehensive overview of all key process settings. For mold design and production support, check our Injection Mold Complete Guide. Klaar om onderdelen in te kopen? Our injection molding supplier sourcing guide leidt je door het selecteren en kwalificeren van een fabriek.
Veelgestelde vragen
What is the normal back pressure range for injection molding?
The normal back pressure range for most engineering plastics is 5 to 20 bar (0.5–2 MPa). Polyolefins like PP and PE typically run at 5–10 bar, while higher-performance materials such as PC and PMMA may require 10–20 bar to achieve adequate melt density. Heat-sensitive resins like PVC and POM should stay below 8 bar to avoid thermal degradation. A practical starting point is 10–20% of maximum injection pressure. From there, increase gradually in 1–2 bar increments while monitoring part quality — look for the elimination of silver streaks and consistent shot weight as indicators that you are in the right range.
How does back pressure affect part quality?
Back pressure directly controls melt density and homogeneity during screw recovery. Proper settings eliminate trapped air bubbles, ensure uniform color mixing with masterbatches, stabilize shot weight to within 0.2–0.5% variation, and reduce surface defects like silver streaks and gloss inconsistency. Too little back pressure causes voids, color streaks, and dimensional instability shot-to-shot. Too much raises melt temperature through excessive shear, leading to material degradation, nozzle drooling, flash, and longer cycle times. The impact is especially critical for transparent parts where even minor melt inconsistencies become visible defects.
Can back pressure be too high in injection molding?
Yes, excessive back pressure is a common production problem. It raises melt temperature through shear heating, which degrades heat-sensitive materials like PVC and POM — causing discoloration, dark streaks, or burning. It also causes nozzle drooling between shots, flash at the mold parting line, significantly longer screw recovery times that extend overall cycle time, and accelerated mechanical wear on the screw, barrel, and check ring. If you notice any of these symptoms, reduce back pressure in 3–5 bar increments and monitor whether the problems resolve within the next few shots.
How do you adjust back pressure for different plastics?
Start with material-specific baselines: 5–10 bar for PP and PE, 8–15 bar for ABS and PS, 10–20 bar for PC and PMMA, and 3–8 bar for PVC and POM. These ranges account for differences in melt viscosity, thermal stability, and shear sensitivity. After setting the baseline, observe the parts closely: increase back pressure if you see gas marks, silver streaks, or inconsistent color mixing; decrease if you see nozzle drooling, discoloration, or flash. Fine-tune in 1–2 bar increments, and always document your final settings for future production runs on the same mold.
What is the difference between back pressure and holding pressure?
Back pressure and holding pressure operate at completely different stages of the injection molding cycle and serve distinct purposes. Back pressure acts during the screw recovery (plasticization) phase — it controls resistance against the screw’s backward movement, directly affecting how thoroughly the melt is mixed, compacted, and deaerated before injection. Holding pressure, by contrast, acts after the cavity is filled — it compensates for volumetric shrinkage as the part cools and solidifies. Confusing the two is a common beginner mistake; adjusting the wrong one will not fix the defect you are targeting.
Does back pressure affect cycle time?
Yes, higher back pressure directly slows screw recovery because the screw must retreat against greater resistance. If screw recovery time exceeds cooling time, it becomes the cycle bottleneck and total cycle time increases proportionally. This is why dynamic (staged) back pressure profiling is preferred on modern machines — you can apply higher pressure during the middle portion of recovery for optimal melt quality, then reduce near the end to speed up the final stage. This approach maximizes both part quality and production throughput without the tradeoff of uniformly high back pressure.
Why does my injection molding machine drool from the nozzle?
Nozzle drooling typically indicates that back pressure is set too high or barrel temperature near the nozzle zone is excessive. The elevated pressure pushes molten material through the nozzle tip between shots, creating stringers or drools that cause cold slugs and blocked gates in the next cycle. Try reducing back pressure by 3–5 bar first. If drooling persists, lower the nozzle zone barrel temperature by 5–10°C. For materials prone to drooling, consider using a shut-off nozzle (spring-loaded or mechanically actuated) as a hardware solution to complement proper pressure settings.
Should I use staged back pressure for every mold?
Staged back pressure is most beneficial for parts requiring high melt quality that are also sensitive to drooling or thermal degradation. If you are running simple commodity parts with forgiving materials like PP or PE, a single-stage setting is usually sufficient and easier to manage. For engineering plastics, optical or transparent components, and precision molds with tight tolerances, staged profiling almost always improves results — the cost is just a few minutes of setup time. Consider it standard practice for any mold running PC, PMMA, glass-filled materials, or multi-cavity tools where consistency across cavities is critical.
-
back pressure: Back pressure is a controlled resistance applied to the screw during the plasticization phase, ensuring that the molten polymer achieves consistent density and homogeneity inside the barrel before injection. ↩
-
plasticizing pressure: Plasticizing pressure refers to the same parameter as back pressure — it describes the resistance that slows screw retraction during the material recovery phase of injection molding. ↩
-
screw recovery: Screw recovery is an essential phase of the injection molding cycle in which the screw rotates and retreats to plasticize and accumulate a measured volume of molten material for the next injection shot. ↩



 EN
EN  ES
ES  FR
FR  DE
DE  PT
PT  AR
AR  RU
RU  JA
JA  KO
KO  IT
IT  NL
NL  TR
TR  PL
PL 