 Перейти к содержанию

противодавление1 — это один из тех параметров литья под давлением, который отделяет хорошие детали от отличных. Установите его правильно, и ваш расплав будет однородным, вес впрыска стабильным, а детали будут выходить чистыми. Установите его неправильно, и вы будете целый день бороться с пузырями, цветными полосами и колебаниями размеров. На нашем заводе в Шанхае мы ежедневно регулируем противодавление на 47 машинах для литья под давлением от 90T до 1850T — и после более чем 20 лет практики мы поняли, что правильная настройка противодавления часто является самым быстрым способом устранения хронических дефектов деталей.
- Противодавление контролирует скорость отступления шнека во время пластификации, напрямую влияя на качество расплава
- Типичный диапазон противодавления для большинства инженерных пластиков составляет от 5 до 20 бар (0,5–2 МПа)
- Слишком низкое противодавление вызывает воздушные ловушки, цветные полосы и колебания веса впрыска
- Слишком высокое противодавление приводит к деградации материала, подтеканию и увеличению времени цикла
- Всегда начинайте с низкого значения и постепенно увеличивайте, проверяя детали на дефекты
What Is Back Pressure in Injection Molding?
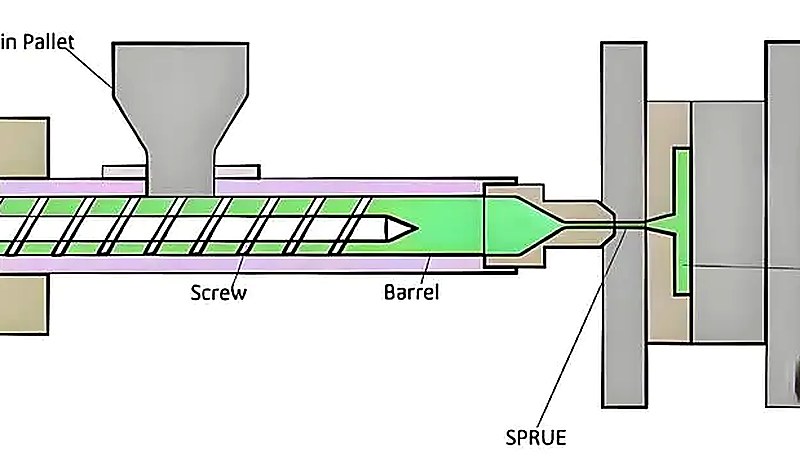
Противодавление в литье под давлением определяется функцией, ограничениями и компромиссами, объясненными в этом разделе. Противодавление — это контролируемое сопротивление, прилагаемое к шнеку во время фазы пластификации, обычно 50–200 бар (725–2900 psi), которое сжимает и гомогенизирует расплав. Его иногда называют давление пластификации2 или противодавление шнека — сопротивление, прилагаемое к задней части шнека при его вращении назад во время фазы возврата. Без него шнек отводится слишком быстро, оставляя расплав рыхлым и полным воздушных карманов.
В гидравлических машинах противодавление устанавливается путем регулировки перепускного клапана на инжекционном цилиндре. В полностью электрических машинах серводвигатель управляет им напрямую. Ключевой момент заключается в том, что противодавление — это не единое число, которое вы устанавливаете один раз — это динамический параметр, который вы настраиваете в зависимости от материала, геометрии детали, конструкции пресс-формы и даже окружающих условий.
Как формируется противодавление во время пластификации?
Этот раздел посвящен противодавлению, формируемому во время пластификации, и его влиянию на стоимость, качество, сроки или риск снабжения. Противодавление формируется, когда расплавленный полимер, накапливающийся перед концом шнека, создает достаточную силу, чтобы оттолкнуть шнек назад, а клапан противодавления ограничивает это отступление для сжатия и гомогенизации расплава. Во время фазы пластификации шнека шнек вращается для плавления и дозирования материала. По мере накопления расплавленного пластика перед концом шнека он отталкивает шнек назад. Клапан противодавления ограничивает скорость слива масла из инжекционного цилиндра, создавая сопротивление этому обратному движению.
Процесс работает так: шнек вращается → материал плавится и движется вперед → давление расплава нарастает → шнек отталкивается назад → клапан противодавления сопротивляется этому отступлению → расплав сжимается и гомогенизируется. Чем сильнее установлен клапан, тем медленнее Шнек термопластавтомата отступает, и тем тщательнее расплав перемешивается и уплотняется.
На нашем заводе в Шанхае мы эксплуатируем 47 машин для литья под давлением от 90T до 1850T. За более чем 20 лет производства мы обнаружили, что настройка противодавления составляет примерно 30% от достижений в снижении дефектов при оптимизации новой настройки пресс-формы.
Где находится регулировочный клапан противодавления?
Этот раздел посвящен поиску регулировочного клапана обратного давления и его влиянию на стоимость, качество, сроки или риски снабжения. Клапан обратного давления расположен в задней части цилиндра впрыска на гидравлических машинах или в восстановление червяка3 меню на контроллере для электрических машин. На гидравлических машинах клапан регулирует скорость слива гидравлического масла из цилиндра впрыска при отводе шнека во время пластификации.
Для полностью электрических машин гидравлического клапана нет. Вместо этого серводвигатель, приводящий шнек, применяет программируемый предел крутящего момента во время отвода. Это устанавливается в контроллере машины в параметрах восстановления шнека. Принцип идентичен — вы контролируете, какое сопротивление встречает шнек при отступлении.
Как определить правильное значение противодавления?
Не существует единого магического числа. Типичный диапазон противодавления для большинства инженерных пластиков составляет от 5 до 20 бар (0,5 до 2 МПа), но точное значение зависит от нескольких факторов: обрабатываемого материала, конструкции шнека, геометрии изделия и температуры формы. Хорошее эмпирическое правило для начала — установить противодавление на уровне 10–20% от максимального давления впрыска и корректировать оттуда.
Материало-специфичные отправные точки, которые мы используем на нашем заводе:
- PP, PE (полиолефины): 5–10 бар — эти материалы легко плавятся и не требуют высокой уплотненности
- АБС, ПС: 8–15 бар — умеренное давление для стабильного смешения цветов и плотности
- ПК, ПММА (прозрачные смолы): 10–20 бар — более высокое давление обеспечивает оптическую прозрачность и устраняет пузырьки воздуха
- ПА (нейлон), ПБТ: 8–15 бар — достаточно для уплотнения расплава без вызывания деградации
- ПВХ, ПОМ: 3–8 бар — держите его низким, эти материалы чувствительны к нагреву и быстро деградируют при высоком противодавлении
«Увеличение противодавления улучшает однородность расплава и уменьшает воздушные пузыри в отлитой детали.»Правда
Более высокое противодавление замедляет отвод шнека, давая материалу больше времени на смешивание и сжатие. Это вытесняет захваченный воздух и создает более однородный расплав, что напрямую уменьшает пузыри и пустоты в готовом изделии.
«Вы всегда должны устанавливать противодавление как можно выше для наилучшего качества детали.»Ложь
Чрезмерное противодавление повышает температуру расплава, увеличивает время цикла и может вызвать деградацию материала — особенно у термочувствительных смол, таких как PVC. Это также вызывает подтекание из сопла и облой. Правильный подход — начать с низкого значения и увеличивать только до тех пор, пока дефекты не исчезнут.
Какие проверенные методы регулировки противодавления существуют?
Регулировка противодавления — это не просто поворот регулятора. Это систематический процесс, который включает понимание вашего материала, наблюдение за изделием и внесение постепенных изменений — часть более широкого этапы литья под давлением. Вот метод, которому мы следуем на нашем производственном участке каждый раз, когда настраиваем новую форму.
Как производится настройка в зависимости от типа материала?
Различные полимеры имеют совершенно разные кривые вязкости, окна термической стабильности и чувствительность к сдвиговому нагреву. Материалы с низкой температурой плавления, такие как PE и PP, требуют очень небольшого противодавления — обычно достаточно 5–10 бар. Инженерные пластики, такие как PC и POM, требуют более осторожного обращения: PC выигрывает от 10 до 20 бар для прозрачности и плотности, в то время как POM и PVC должны оставаться ниже 8 бар, чтобы избежать термического разложения. Стеклонаполненные материалы часто требуют немного более высокого противодавления (15–20 бар) для разрушения пучков стекловолокна и достижения равномерного распределения.
Как регулировать в зависимости от размера и геометрии детали?
Крупные детали с толстыми стенками выигрывают от более высокого противодавления, поскольку увеличенная плотность расплава помогает равномерно заполнять полость и уменьшает усадочные раковины. С другой стороны, тонкостенные детали требуют баланса — слишком высокое противодавление повышает температуру расплава и может вызвать облой на линии разъема. Для прецизионных деталей с жесткими допусками (±0,05 мм или уже) мы обычно тонко настраиваем противодавление с шагом в 1 бар, контролируя вес и размеры детали с помощью весов и штангенциркуля.
Как использовать динамическое профилирование противодавления?
Современные машины позволяют программировать противодавление поэтапно во время фазы возврата шнека. Вместо одного постоянного значения можно установить, например: Этап 1 — 5 бар для первых 30% хода (плавный старт, чтобы не нарушить подушку), Этап 2 — 15 бар для средних 50% (основное уплотнение и смешивание) и Этап 3 — 8 бар для последних 20% (снижение давления ближе к концу для предотвращения подтекания). Такой поэтапный подход дает лучший контроль над качеством расплава без побочных эффектов от работы под высоким давлением на протяжении всей фазы возврата.
Имея опыт работы с более чем 400 видами пластиковых материалов и собственное производство пресс-форм, наша инженерная команда настраивает параметры обратного давления в рамках каждого протокола испытаний пресс-форм — потому что даже хорошо изготовленная пресс-форма не сможет производить качественные детали, если качество расплава нестабильно.
Что происходит, если обратное давление установлено неправильно?
When back pressure is too low: The screw retreats too fast, and the melt is loose and full of air. You will see gas marks (silver streaks) on the part surface, inconsistent shot weight, internal bubbles, and uneven gloss. Color mixing becomes patchy — especially with masterbatch — because the screw did not have enough resistance to properly blend the pigment into the melt. In severe cases, parts will show dimensional instability, with weight varying shot-to-shot by 2% or more.
When back pressure is too high: The melt temperature rises due to excessive shear, which can degrade heat-sensitive materials. You may notice discoloration (yellowing of white parts, dark streaks in colored parts), longer screw recovery times that extend cycle time, and nozzle drooling between shots. In extreme cases, excessive back pressure causes flash at the mold parting line because the melt is too hot and fluid. It also increases mechanical wear on the screw, barrel, and check ring.
“Low back pressure often causes silver streaks and bubbles on the part surface due to trapped air in the melt.”Правда
Without sufficient back pressure, the screw retreats rapidly and does not compress the melt adequately. Air gets trapped in the molten polymer, and when the material is injected into the cavity, these air pockets create silver streaks (gas marks) and internal voids.
“If your parts have sink marks, you should always increase back pressure to fix the problem.”Ложь
Sink marks are primarily caused by insufficient holding pressure or cooling time, not back pressure. While back pressure affects melt density, adjusting holding pressure, packing time, and cooling parameters is the correct approach for sink marks. Increasing back pressure may actually worsen the issue by raising melt temperature.
Каковы преимущества правильной регулировки противодавления?
The benefits of proper back pressure adjustment are the main categories or options explained in this section. Getting back pressure right pays off across every aspect of production. First, melt homogeneity improves dramatically — colors blend evenly, additives disperse properly, and you get consistent material properties throughout the part. Shot weight stabilizes to within 0.2–0.5% variation, which means part dimensions stay within tolerance shot after shot.
Proper back pressure also eliminates a whole category of surface defects: gas marks, cold slugs, and gloss variation drop off significantly. For transparent parts made from PC or PMMA, the difference between 10 bar and 15 bar of back pressure can be the difference between a crystal-clear lens and one full of internal haze.
Finally, consistent back pressure reduces the need for downstream rework. Parts come out right the first time, which means less scrap, fewer quality holds, and shorter lead times — and that is where the real cost savings show up in production.
Как следует подходить к оптимизации противодавления?
Adjusting back pressure is not complicated, but it does require attention to detail. Start with the material-specific baseline values, observe your parts carefully, and adjust in small increments. Watch for the telltale signs: silver streaks mean increase back pressure; drooling and discoloration mean decrease it. Use dynamic profiling on modern machines for even better control.
Need help dialing in your injection molding parameters? See our Injection Molding Complete Guide for a comprehensive overview of all key process settings. For mold design and production support, check our Injection Mold Complete Guide. Ready to source parts? Our injection molding supplier sourcing guide walks you through selecting and qualifying a factory.
Часто задаваемые вопросы
What is the normal back pressure range for injection molding?
The normal back pressure range for most engineering plastics is 5 to 20 bar (0.5–2 MPa). Polyolefins like PP and PE typically run at 5–10 bar, while higher-performance materials such as PC and PMMA may require 10–20 bar to achieve adequate melt density. Heat-sensitive resins like PVC and POM should stay below 8 bar to avoid thermal degradation. A practical starting point is 10–20% of maximum injection pressure. From there, increase gradually in 1–2 bar increments while monitoring part quality — look for the elimination of silver streaks and consistent shot weight as indicators that you are in the right range.
How does back pressure affect part quality?
Back pressure directly controls melt density and homogeneity during screw recovery. Proper settings eliminate trapped air bubbles, ensure uniform color mixing with masterbatches, stabilize shot weight to within 0.2–0.5% variation, and reduce surface defects like silver streaks and gloss inconsistency. Too little back pressure causes voids, color streaks, and dimensional instability shot-to-shot. Too much raises melt temperature through excessive shear, leading to material degradation, nozzle drooling, flash, and longer cycle times. The impact is especially critical for transparent parts where even minor melt inconsistencies become visible defects.
Can back pressure be too high in injection molding?
Yes, excessive back pressure is a common production problem. It raises melt temperature through shear heating, which degrades heat-sensitive materials like PVC and POM — causing discoloration, dark streaks, or burning. It also causes nozzle drooling between shots, flash at the mold parting line, significantly longer screw recovery times that extend overall cycle time, and accelerated mechanical wear on the screw, barrel, and check ring. If you notice any of these symptoms, reduce back pressure in 3–5 bar increments and monitor whether the problems resolve within the next few shots.
How do you adjust back pressure for different plastics?
Start with material-specific baselines: 5–10 bar for PP and PE, 8–15 bar for ABS and PS, 10–20 bar for PC and PMMA, and 3–8 bar for PVC and POM. These ranges account for differences in melt viscosity, thermal stability, and shear sensitivity. After setting the baseline, observe the parts closely: increase back pressure if you see gas marks, silver streaks, or inconsistent color mixing; decrease if you see nozzle drooling, discoloration, or flash. Fine-tune in 1–2 bar increments, and always document your final settings for future production runs on the same mold.
What is the difference between back pressure and holding pressure?
Back pressure and holding pressure operate at completely different stages of the injection molding cycle and serve distinct purposes. Back pressure acts during the screw recovery (plasticization) phase — it controls resistance against the screw’s backward movement, directly affecting how thoroughly the melt is mixed, compacted, and deaerated before injection. Holding pressure, by contrast, acts after the cavity is filled — it compensates for volumetric shrinkage as the part cools and solidifies. Confusing the two is a common beginner mistake; adjusting the wrong one will not fix the defect you are targeting.
Does back pressure affect cycle time?
Yes, higher back pressure directly slows screw recovery because the screw must retreat against greater resistance. If screw recovery time exceeds cooling time, it becomes the cycle bottleneck and total cycle time increases proportionally. This is why dynamic (staged) back pressure profiling is preferred on modern machines — you can apply higher pressure during the middle portion of recovery for optimal melt quality, then reduce near the end to speed up the final stage. This approach maximizes both part quality and production throughput without the tradeoff of uniformly high back pressure.
Why does my injection molding machine drool from the nozzle?
Nozzle drooling typically indicates that back pressure is set too high or barrel temperature near the nozzle zone is excessive. The elevated pressure pushes molten material through the nozzle tip between shots, creating stringers or drools that cause cold slugs and blocked gates in the next cycle. Try reducing back pressure by 3–5 bar first. If drooling persists, lower the nozzle zone barrel temperature by 5–10°C. For materials prone to drooling, consider using a shut-off nozzle (spring-loaded or mechanically actuated) as a hardware solution to complement proper pressure settings.
Should I use staged back pressure for every mold?
Staged back pressure is most beneficial for parts requiring high melt quality that are also sensitive to drooling or thermal degradation. If you are running simple commodity parts with forgiving materials like PP or PE, a single-stage setting is usually sufficient and easier to manage. For engineering plastics, optical or transparent components, and precision molds with tight tolerances, staged profiling almost always improves results — the cost is just a few minutes of setup time. Consider it standard practice for any mold running PC, PMMA, glass-filled materials, or multi-cavity tools where consistency across cavities is critical.
-
back pressure: Back pressure is a controlled resistance applied to the screw during the plasticization phase, ensuring that the molten polymer achieves consistent density and homogeneity inside the barrel before injection. ↩
-
plasticizing pressure: Plasticizing pressure refers to the same parameter as back pressure — it describes the resistance that slows screw retraction during the material recovery phase of injection molding. ↩
-
screw recovery: Screw recovery is an essential phase of the injection molding cycle in which the screw rotates and retreats to plasticize and accumulate a measured volume of molten material for the next injection shot. ↩


