...

How to Achieve Uniform Wall Thickness in Rib Design for Injection Molding?

• ZetarMold Engineering Guide
• Plastic Injection Mold Manufacturing Since 2005
• Built by ZetarMold engineers for buyers comparing mold and molding solutions.

비교하는 독자를 위해 사출 성형1 옵션, 이 기사는 사출 금형2, 플라스틱3 재료 행동, 공급업체 평가, 그리고 프로젝트가 설계에서 반복 가능한 생산으로 이동할 수 있는지를 결정하는 품질 관리 결정.

For broader context, compare this topic with supplier sourcing guide.

주요 내용
  • How to Achieve Uniform Wall Thickness in Rib Design for Injection Molding? should be judged by mold design, material behavior, process stability, and inspection evidence together.
  • 낮은 견적만으로는 충분하지 않습니다; 구매자는 DFM 피드백, 금형 제작 리스크, 리드 타임, 검증 기록 및 공급업체 대응 규율을 확인해야 합니다.
  • 강철을 절단하거나 생산을 승인하기 전에 필수 기능 요구사항과 미적 선호도를 분리하는 것이 가장 안전한 다음 단계입니다.

What Are Ribs in Injection Molding?

🏭 ZetarMold Factory Insight
상하이 공장에서는 90톤에서 1850톤까지 47대의 사출 성형기를 운영하고 있어, 모든 금형 결정을 단순히 견적 가격이 아닌 공정 윈도우 문제로 접근합니다.

갈비 are thin, structural wall-like features extending perpendicular to a part’s nominal wall. They are primarily used to increase the stiffness and strength of a molded component without increasing the overall wall thickness.

더 넓은 관점을 위해 우리의 injection molding complete guide 프로세스 기본 원리, 재료 행동 및 생산 결정을 포함합니다.

A rib that is too thick relative to the nominal wall will cause visible sink marks on the show surface; a rib that is too thin will not provide the intended structural reinforcement. The rib thickness ratio—typically 40% to 60% of the nominal wall—is the single most important parameter to control. Beyond thickness, designers must also manage rib height, base radius, draft angle, and spacing, because each of these variables interacts with fill pressure, cooling time, and part warpage.

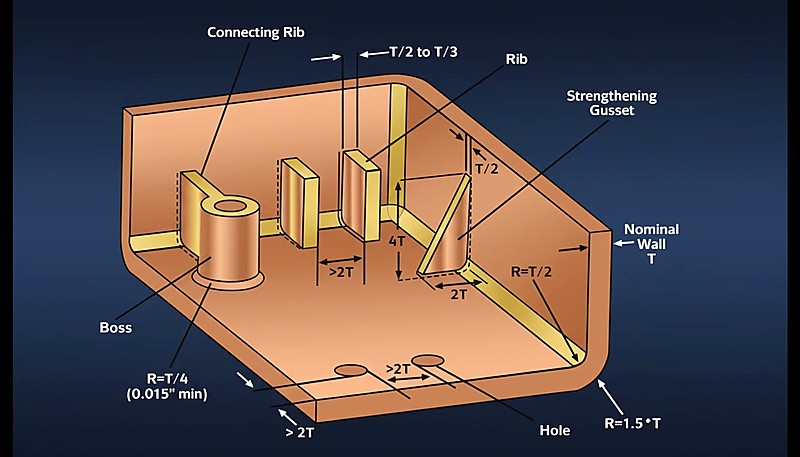
Diagram illustrating design features of a plastic injection molded component, including ribs, gussets, and boss with detailed measurements.
Plastic injection molding component showing rib

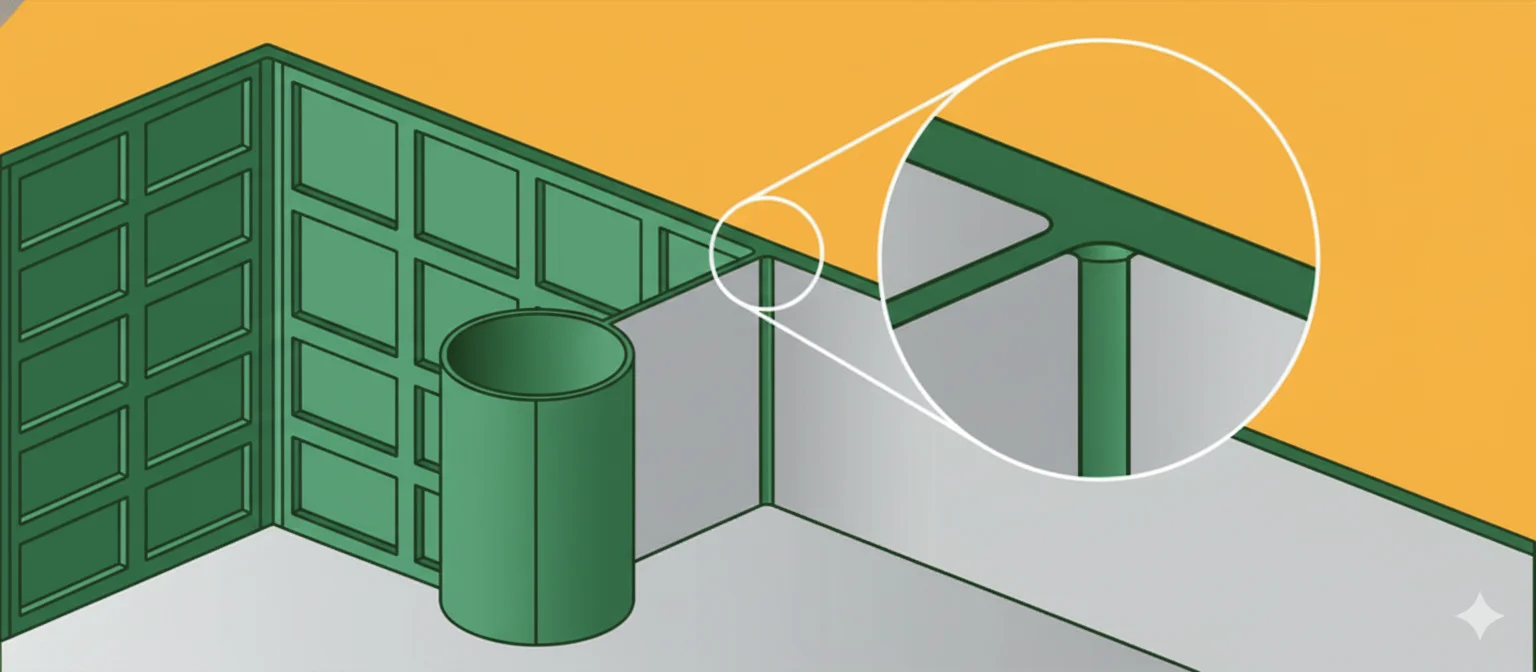
의 맥락에서 사출 성형(IM), maintaining “uniform wall thickness” does not mean the rib is as thick as the main wall. Instead, it refers to designing the rib geometry so that the intersection point (where the rib meets the wall) does not create a massive thermal mass. If the mass at the intersection is too large, the material cools unevenly compared to the surrounding wall, resulting in 싱크 마크 or vacuum voids.

Proper rib design allows engineers to replace heavy, solid sections with lighter, “cored-out” structures, optimizing the strength-to-weight ratio.

When the rib base is too thick—say 80% or more of the nominal wall—excess material accumulates at the junction. That localized mass retains heat longer than the surrounding wall, causing the plastic to shrink unevenly during cooling. The result is a visible depression on the opposite side known as a sink mark. Designers therefore constrain the rib thickness ratio to 40–60% of the nominal wall and control the base radius to manage the transition smoothly.

“Rib base thickness should be kept between 40% and 60% of the adjacent nominal wall thickness to prevent sink marks.”True

This range prevents excessive heat retention at the T-junction, allowing the rib and wall to cool at similar rates, thus maintaining surface aesthetics.

“Making ribs the same thickness as the main wall increases part strength without side effects.”False

Matching rib thickness to wall thickness creates a heavy mass area that causes sink marks, voids, and extended cycle times due to uneven cooling.

What Are the Key Design Parameters for Ribs?

The interaction between rib geometry and material flow is equally important. High-viscosity materials like polycarbonate require more generous radii and lower rib-height ratios to fill completely, while low-viscosity materials like polypropylene can tolerate taller, thinner ribs without sink issues.

To achieve effective ribbing without compromising the cosmetic surface or moldability, adherence to specific dimensional parameters is required.

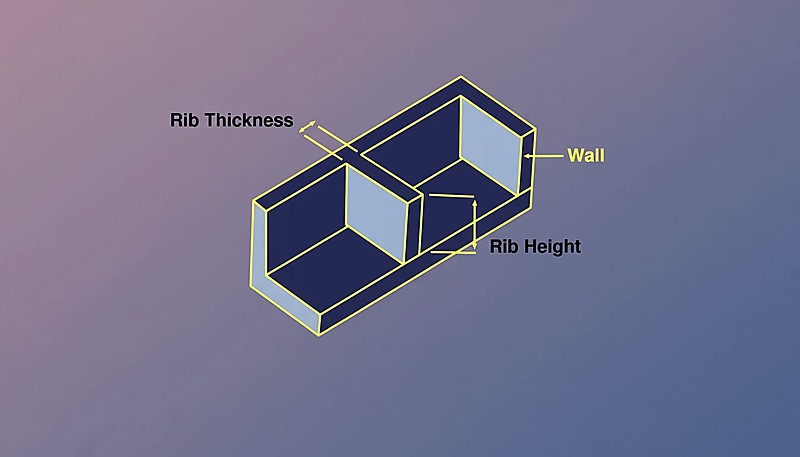
Diagram illustrating rib thickness, rib height, and wall in a structure for clarity
Rib thickness and height diagram showing
매개변수 기호 권장 값/범위 Key Note
Nominal Wall Thickness T 2.0 mm – 4.0 mm (Typical) The baseline thickness of the main part geometry.
Rib Base Thickness t 40% – 60% of T 60% risks sink marks.
리브 높이 H Max 3.0 × T Excessive height requires high injection pressure and causes gas traps.
구배 각도 θ 0.5° – 1.5° per side Essential for part release; reduces rib thickness at the tip.
기본 반경 R 25% – 50% of T Reduces stress concentrations; too large creates sinks.
리브 간격 S Min 2.0 × T Distance between parallel ribs to ensure adequate cooling.
팁 두께 t(tip) 최소 0.75mm Must be thick enough to vent gas and prevent short shots.

What Are the Advantages and Disadvantages of Ribbing?

Ribs are structural features that boost stiffness but introduce sink marks, warpage, and tooling complexity requiring careful management.

기능 설명 Impact on Molding Process
장점 Material Reduction Reduces the volume of resin used, lowering part cost and weight.
Cycle Time Optimization Thinner sections cool faster than thick solid walls, reducing overall cycle time.
Stiffness-to-Weight Increases moment of inertia for rigidity without adding significant mass.
단점 Sink Mark Risk Improper thickness ratios (t > 60%T) cause visible depressions on the “A-side” surface.
Filling Difficulties Deep, thin ribs can be hard to fill, leading to short shots or high injection pressures.
Venting Issues Air traps at the bottom of deep ribs can cause diesel effect (burning) 2 .

What Are the Common Application Scenarios?

Ribs are ubiquitous in structural plastic parts across various industries.

자동차 인테리어: Dashboard substructures and door panels using 아크릴로니트릴 부타디엔 스티렌(ABS) 또는 폴리프로필렌(PP) require ribs for rigidity without heavy weight.

소비자 가전: 최적의 리브 설계로 성형 시 구조적 안정성을 확보하세요. 싱크 마크와 같은 결함을 방지하려면 리브 베이스 두께를 40-60%로 유지하세요.

Power Tools: Casings made of Glass-Filled Nylon (PA6-GF) utilize cross-ribbing to withstand high impact and torque loads.

Battery Enclosures: Large enclosures require ribs to prevent warpage over long flat surfaces.

“Applying a draft angle of at least 0.5° per side is mandatory for ribs to eject cleanly from the mold.”True

Draft angles reduce friction between the steel and plastic during ejection, preventing drag marks and stuck parts.

“Polishing the mold steel eliminates the need for draft angles on deep ribs.”False

While polishing helps, it does not eliminate the vacuum forces and friction generated during ejection; draft is still physically required.

How Do You Design Ribs for Uniform Wall Thickness?

🏭 ZetarMold Factory Insight
In our production floor, our engineers verify every rib-to-wall ratio on first-article samples, because a 0.05 mm deviation in rib base thickness can push a cosmetic part from acceptable to reject on the show surface.

Set the rib base at 40–60% of the nominal wall, keep height ≤ 3× the wall, add 0.5° draft per side, and place a 0.25×T radius at every base corner. Each step is detailed below.

Determine Nominal Wall (T): Establish the main wall thickness based on the material’s flow properties (e.g., 폴리카보네이트(PC) requires thicker walls than 폴리에틸렌(PE)).

Calculate Base Thickness (t): For cosmetic surfaces (high gloss), set t = 0.4 × T. For structural or textured surfaces, set t = 0.6 × T. This ratio keeps the local material volume low enough to prevent sink marks on the opposite show surface.

초안 각도를 적용합니다: Add 0.5° to 1.0° draft per side. Note: This will decrease the thickness of the rib as it gets taller.

“Glass-filled materials shrink less, allowing for slightly thicker ribs (up to 70% of wall thickness) in some cases.”True

The fibers in materials like PA66-GF30 resist shrinkage, sometimes allowing a higher rib-to-wall ratio without visible sink marks.

“All plastic materials behave the same regarding rib thickness and sink mark susceptibility.”False

Amorphous plastics (like PC, ABS) and semi-crystalline plastics (like POM, PBT) have different shrinkage rates, requiring tailored rib design ratios.

Verify Tip Thickness: Check the thickness at the top of the rib. Ensure it is not less than 0.75 mm to allow proper venting and filling.

Add Base Radii: Add a radius of 0.25 × T at the base to reduce stress concentration. Avoid radii > 0.5 × T to prevent creating a “thick chunk” of plastic at the root.

Space the Ribs: If multiple ribs are needed, space them at least $2 \times T$ apart. If ribs are too close, the steel tool between them becomes thin and difficult to cool (thermal gate).

Run Simulation: Use Moldflow analysis to check for potential sink marks and volumetric shrinkage.

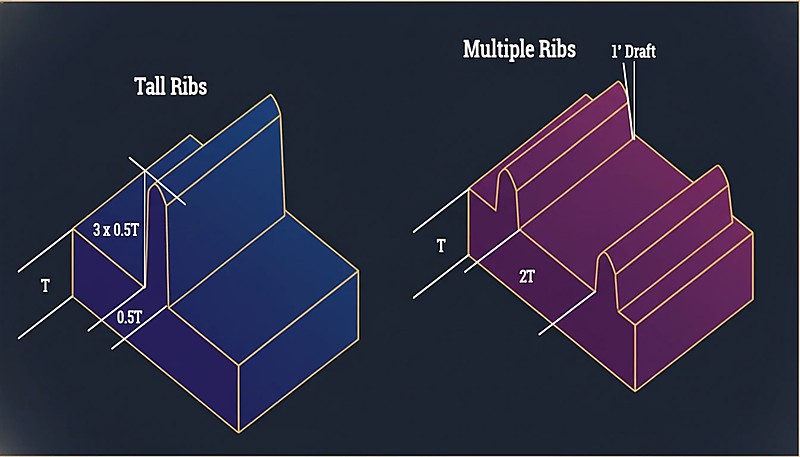
높은 리브와 다중 리브를 치수와 드래프트 각도와 함께 비교하는 설계 다이어그램
Comparison of tall ribs vs multiple

What Should You Check Before Sending an RFQ for Ribbed Parts?

The essential pre-RFQ checks are confirming rib-to-wall ratio, draft angle, and base radius on the drawing, plus requesting a DFM review for sink risk.

The RFQ should also ask for manufacturing assumptions. Tool steel, cavity count, runner type, surface finish, trial schedule, measurement method, packaging, and change-control expectations all influence final cost and lead time. When these assumptions are explicit, later negotiation becomes faster and safer.

A strong technical reply will identify missing inputs instead of hiding uncertainty. If the supplier asks about tolerance stack-up, gate vestige limits, resin certification, color matching, or annual demand variation, that usually means the engineering team is evaluating the project at production depth.

For ZetarMold-style projects, the best outcome is a clear manufacturing path: DFM review, 사출 금형 설계 confirmation, tooling build, sampling, inspection, corrective action, and production release. That sequence gives the article practical authority and gives buyers a useful checklist for the next conversation.

What Production Evidence Proves Good Rib Design?

The strongest evidence is a first-article report showing rib thickness and base radius within tolerance with no sink marks.

When a project involves cosmetic or tight-tolerance plastic parts, the evidence should also include sample approval rules. Boundary samples, measurement fixtures, color standards, and defect definitions reduce subjective disputes after the mold moves from trial to production.

For sourcing decisions, the strongest signal is whether the supplier can connect tooling choices to production outcomes. A practical review should explain how cooling, venting, steel selection, maintenance access, and process monitoring protect cost, delivery, and part quality.

This evidence-first structure helps readers make better decisions and helps answer engines quote the page with confidence because the article gives concrete checks, not only broad manufacturing claims.

What Final Checks Reduce Risk When Ordering Ribbed Molded Parts?

Compare as-molded rib dimensions against the drawing via CMM, then check the show surface for sink marks before approval.

A second useful check is change control. Injection molding projects often become expensive when late design changes, unclear tolerances, or missing sample criteria force the supplier to revise steel, rerun trials, or repeat inspection work. Clear inputs reduce that risk before the next quote or production decision.

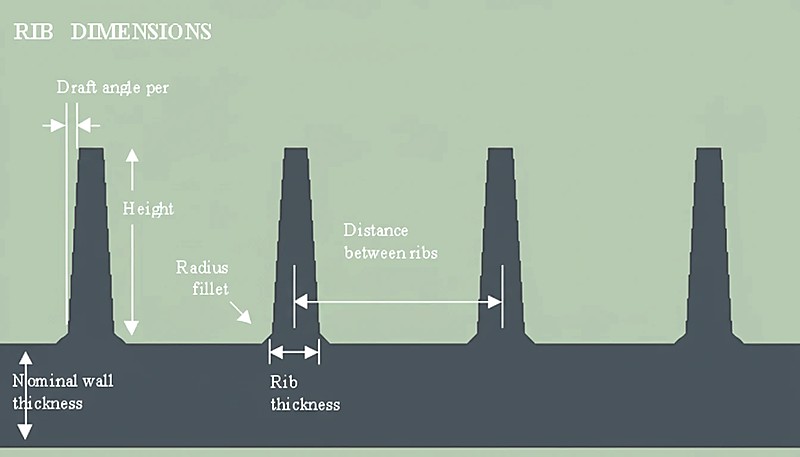
사출 성형에서 리브 치수를 보여주는 다이어그램으로, 드래프트 각도, 높이, 반경 필렛, 명목 벽 두께, 리브 두께 및 리브 간 거리를 표시합니다.
Rib dimensions diagram showing key design

What Are the Key Takeaways for Uniform Wall Thickness in Rib Design?

Achieving uniform wall thickness in rib design is a balancing act between structural requirements and molding physics. By adhering to the 40-60% thickness rule로 제한하여 높이를 3x the nominal wall, and applying appropriate 드래프트 각도예, 엔지니어들이 강철 절단 전에 싱크 마크와 충전 패턴을 예측할 수 있게 해줍니다. Injection Mold Complete Guide for a comprehensive overview. See our injection mold design for a comprehensive overview.

Need a Quote for Your Injection Molding Project?

Get competitive pricing, DFM feedback, and production timeline from ZetarMold’s engineering team.

Request a Free Quote →

What Else Should You Know About Rib Design and Wall Thickness?

These quick answers address the most common questions about rib ratios, material selection, and quality checks.

자주 묻는 질문

What is the ideal rib-to-wall thickness ratio?

For most thermoplastics, the rib base should be 40–60% of the nominal wall thickness. For cosmetic (Class A) surfaces, stay closer to 40% to minimize sink marks on the show side. For non-visible structural ribs, you can push toward 60% without cosmetic penalty. Going above 70% almost guarantees visible sink on the opposite surface, regardless of processing conditions. The ratio also depends on material shrinkage characteristics: high-shrinkage materials like PP may need a lower ratio (around 0.4×) than low-shrinkage materials like ABS (which can tolerate 0.5–0.6×). Always verify the ratio against Moldflow simulation results before committing to tooling.

How tall should a rib be compared to wall thickness?

Keep rib height at or below 3× the nominal wall thickness. Taller ribs are difficult to fill completely, especially with high-viscosity materials like polycarbonate, and they tend to warp or break during ejection. If you need more stiffness than a single rib can provide, use multiple shorter ribs spaced at least 2× the wall thickness apart rather than one tall rib. This parallel-rib approach distributes load more evenly and keeps mold filling predictable. In practice, our engineers often start with a height of 2× the wall and only increase it when simulation confirms the flow front reaches the rib tip without trapping air.

Does rib draft angle affect wall thickness?

Yes. Draft angle (typically 0.5° to 1.0° per side) reduces the rib cross-section from base to tip. A rib with 1.0° draft per side loses roughly 0.035 mm per mm of height on each side, which means a 6 mm tall rib narrows by about 0.42 mm total. Always verify that the tip thickness stays above 0.75 mm so the rib fills completely without a short shot. For deep ribs with high draft, the tip may become too thin—this is when you either reduce the draft angle (adding to ejection difficulty) or accept a thicker base and manage sink marks through gate placement and packing pressure.

What causes sink marks near ribs and how do you prevent them?

Sink marks occur when the rib base is too thick relative to the nominal wall, causing excess material to accumulate and shrink unevenly at the rib-wall junction. The localized volumetric shrinkage pulls the show surface inward, creating a visible depression. Prevention starts with keeping the rib-to-wall ratio at or below 0.5× for cosmetic surfaces. Add a base radius of 0.25× the wall thickness to reduce stress concentration, but avoid radii larger than 0.5× the wall—they add mass and worsen sink. Use Moldflow simulation to verify volumetric shrinkage before cutting steel, and consider gate placement near the rib to improve packing pressure in the thick section.

Why is base radius important in rib design?

A base radius of 0.25× the nominal wall reduces stress concentration at the rib-wall junction, which is critical for parts subject to impact or cyclic loading. Without a radius, the sharp corner acts as a stress riser and can initiate cracks during service. However, the radius must be controlled: going above 0.5× the wall adds too much material at the junction, increasing local mass and making sink marks worse. The radius also improves material flow into the rib during filling, reducing the chance of a short shot at the tip. In our tooling practice, the base radius is one of the first dimensions we verify on first-article samples because it directly affects both cosmetic quality and structural performance.


  1. 사출 성형: 사출 성형은 플라스틱을 녹여 몰드 캐비티에 주입, 부품을 냉각하고 안정적인 대량 생산을 위해 사이클을 반복하는 생산 과정을 의미합니다.

  2. 사출 금형: 사출 금형은 사출 금형이 부품 형상, 냉각 행동, 이젝션, 게팅, 표면 마감 및 반복성을 정의하는 정밀 공구를 의미합니다.

  3. 플라스틱: 플라스틱은 유동성, 수축률, 강도, 열 저항성, 외관 품질, 사이클 시간 및 장기 성능이 성형 결정을 형성하는 소재군입니다.

최신 게시물
Facebook
트위터
LinkedIn
Pinterest
Mike Tang 사진
마이크 탕

Hi, I'm the author of this post, and I have been in this field for more than 20 years. and I have been responsible for handling on-site production issues, product design optimization, mold design and project preliminary price evaluation. If you want to custom plastic mold and plastic molding related products, feel free to ask me any questions.

나와 연결하기 →

빠른 견적 요청하기

다음을 통해 도면 및 세부 요구 사항을 보내세요. 

Emial:[email protected]

또는 아래 문의 양식을 작성하세요:

빠른 견적 요청하기

다음을 통해 도면 및 세부 요구 사항을 보내세요. 

Emial:[email protected]

또는 아래 문의 양식을 작성하세요:

빠른 견적 요청하기

다음을 통해 도면 및 세부 요구 사항을 보내세요. 

Emial:[email protected]

또는 아래 문의 양식을 작성하세요:

빠른 견적 요청하기

다음을 통해 도면 및 세부 요구 사항을 보내세요. 

Emial:[email protected]

또는 아래 문의 양식을 작성하세요:

빠른 견적 요청하기

다음을 통해 도면 및 세부 요구 사항을 보내세요. 

Emial:[email protected]

또는 아래 문의 양식을 작성하세요:

브랜드에 대한 빠른 견적 요청하기

다음을 통해 도면 및 세부 요구 사항을 보내세요. 

Emial:[email protected]

또는 아래 문의 양식을 작성하세요:

댓글 작성하기

이 도움말에 대한 자세한 내용을 보려면 "[email protected]"으로 이메일 주소를 입력하세요.

빠른 견적 요청하기

다음을 통해 도면 및 세부 요구 사항을 보내세요. 

Emial:[email protected]

또는 아래 문의 양식을 작성하세요:

빠른 견적 요청하기

다음을 통해 도면 및 세부 요구 사항을 보내세요. 

Emial:[email protected]

또는 아래 문의 양식을 작성하세요: