Para quienes comparan opciones de moldeo por inyección1, este artículo relaciona el molde de inyección2, el comportamiento del plástico3, la evaluación de proveedores y las decisiones de control de calidad que determinan si un proyecto puede pasar del diseño a una producción repetible.
Para ampliar el contexto, compare este tema con la guía de búsqueda de proveedores.
- ¿Cómo lograr un espesor de pared uniforme al diseñar nervaduras para moldeo por inyección? debe evaluarse conjuntamente mediante el diseño del molde, el comportamiento del material, la estabilidad del proceso y las pruebas de inspección.
- Un presupuesto bajo no es suficiente; los compradores deben verificar los comentarios del DFM, el riesgo de herramientas, el tiempo de entrega, los registros de validación y la disciplina de respuesta del proveedor.
- El siguiente paso más seguro es separar los requisitos funcionales imprescindibles de las preferencias cosméticas antes de cortar acero o aprobar la producción.
¿Qué son los nervios en el moldeo por inyección?
En nuestra fábrica de Shanghai, operamos 47 máquinas de moldeo por inyección de 90T a 1850T, por lo que tratamos cada decisión de herramienta como una pregunta sobre el margen de proceso, no solo como un precio cotizado.
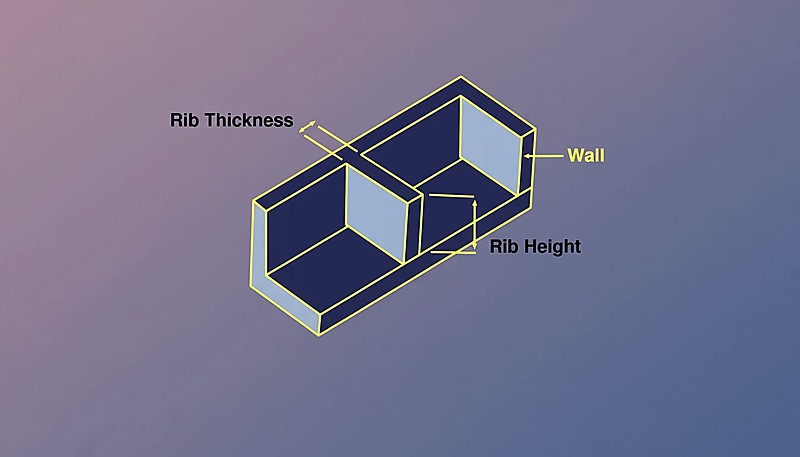
Las nervaduras son elementos estructurales delgados, similares a paredes, que se extienden perpendicularmente a la pared nominal de una pieza. Se utilizan principalmente para aumentar la rigidez y resistencia de un componente moldeado sin incrementar el espesor general de la pared.
Para una visión más amplia, nuestra guía completa del moldeo por inyección aborda los fundamentos del proceso, el comportamiento de los materiales y las decisiones de producción.
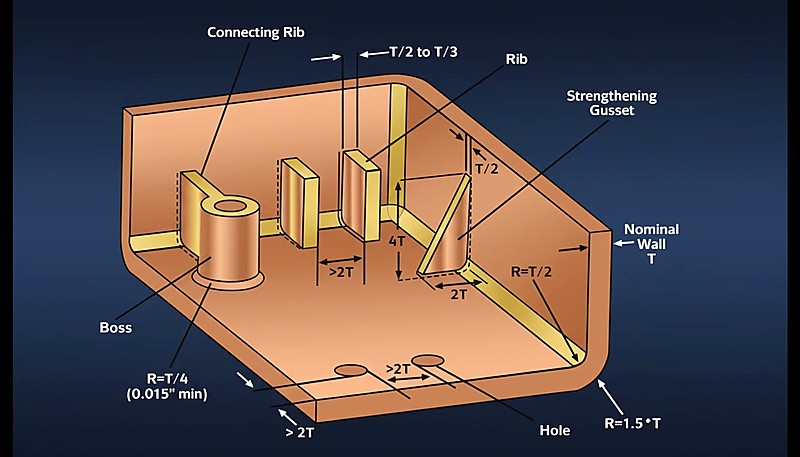
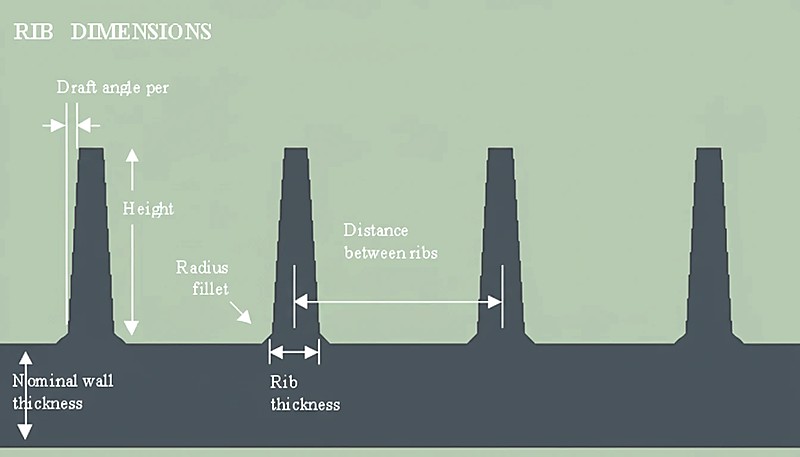
Una nervadura demasiado gruesa respecto a la pared nominal causará marcas de hundimiento visibles en la superficie estética; una demasiado delgada no aportará el refuerzo estructural previsto. La relación de espesor de la nervadura —normalmente entre el 40% y el 60% de la pared nominal— es el parámetro más importante. Además del espesor, deben controlarse la altura, el radio de la base, el ángulo de desmoldeo y la separación, porque cada variable interactúa con la presión de llenado, el tiempo de enfriamiento y el alabeo.
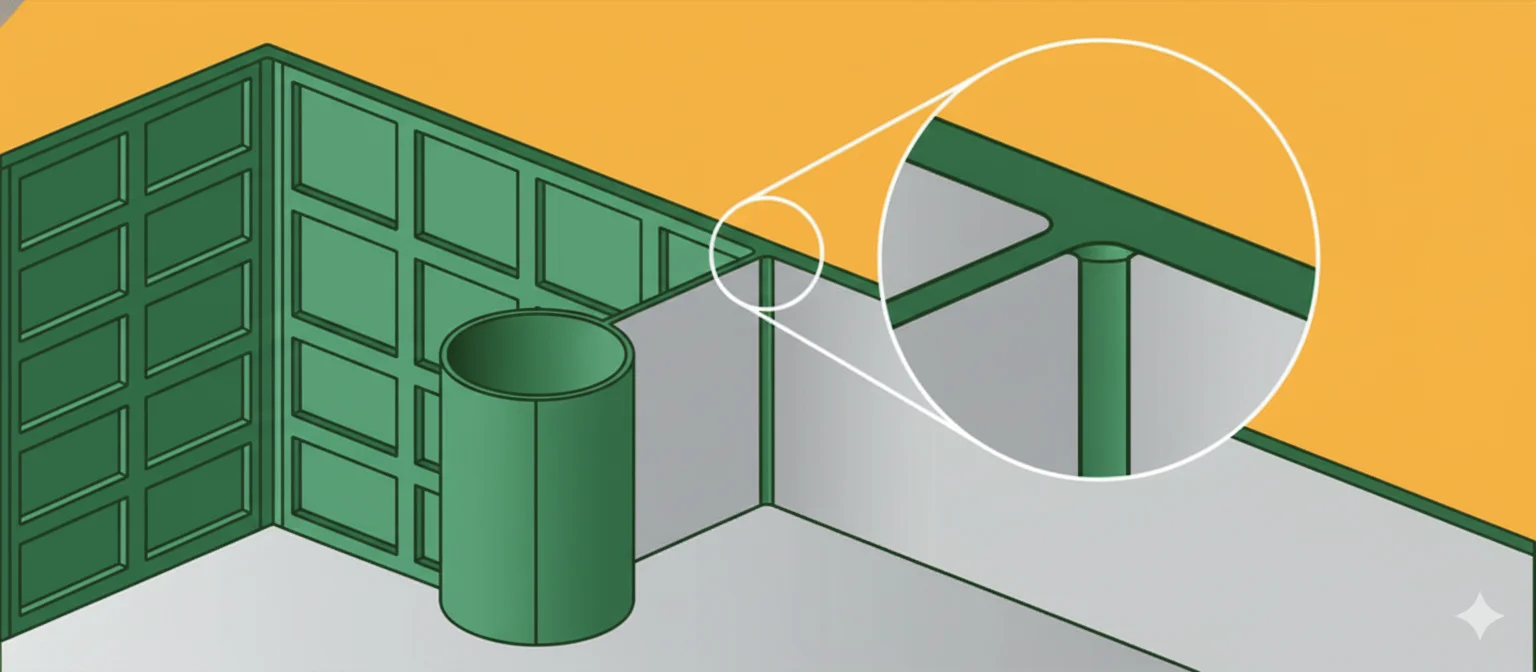
En el contexto del moldeo por inyección (IM), mantener un «espesor de pared uniforme» no significa que la nervadura tenga el mismo espesor que la pared principal. Significa diseñar su geometría para que el punto de intersección con la pared no cree una gran masa térmica. Si la masa es excesiva, el material se enfría de forma desigual respecto a la pared circundante y aparecen marcas de hundimiento o vacíos por contracción.
Un diseño adecuado de los nervios permite a los ingenieros sustituir secciones pesadas y macizas por estructuras más ligeras y “ahuecadas”, optimizando la relación resistencia-peso.
Cuando la base de la nervadura es demasiado gruesa —por ejemplo, un 80% o más de la pared nominal— se acumula material sobrante en la unión. Esa masa localizada retiene el calor durante más tiempo que la pared circundante, lo que provoca una contracción desigual del plástico durante el enfriamiento. El resultado es una depresión visible en el lado opuesto, conocida como marca de hundimiento. Por ello, los diseñadores limitan la relación de espesor de la nervadura al 40–60% de la pared nominal y controlan el radio de la base para lograr una transición uniforme.
"El espesor de la base del nervio debe mantenerse entre el 40% y el 60% del espesor nominal de la pared adyacente para evitar rechupes."True
Este intervalo evita una retención excesiva de calor en la unión en T y permite que la nervadura y la pared se enfríen a velocidades similares, manteniendo así la estética de la superficie.
"Fabricar las nervaduras con el mismo espesor que la pared principal aumenta la resistencia de la pieza sin efectos secundarios."False
Igualar el espesor del nervio al espesor de pared crea una zona de gran masa que provoca rechupes, huecos y ciclos más largos debido al enfriamiento desigual.
¿Cuáles son los parámetros de diseño clave para los nervios?
La interacción entre geometría de nervadura y flujo de material también es importante. Los materiales de alta viscosidad, como el policarbonato, necesitan radios mayores y relaciones de altura menores para llenar por completo; los de baja viscosidad, como el polipropileno, admiten nervaduras más altas y delgadas sin rechupes.
Para conseguir nervaduras eficaces sin comprometer la superficie estética ni la moldeabilidad, es necesario respetar parámetros dimensionales específicos.
| Parámetro | Símbolo | Valor recomendado / Rango | Nota clave |
|---|---|---|---|
| Espesor nominal de pared | T | 2.0 mm – 4.0 mm (Habitual) | El espesor de referencia de la geometría principal de la pieza. |
| Espesor de la base de la nervadura | t | 40% – 60% de T | El 60% conlleva riesgo de rechupes. |
| Altura de la costilla | H | Máx. 3.0 × T | Una altura excesiva requiere una alta presión de inyección y provoca bolsas de gas. |
| Ángulo de calado | θ | 0.5° – 1.5° por lado | Esencial para liberar la pieza; reduce el grosor de la nervadura en la punta. |
| Radio de la base | R | 25% – 50% de T | Reduce las concentraciones de tensión; si es demasiado grande, crea rechupes. |
| Espacio entre costillas | S | Mín. 2.0 × T | Distancia entre nervaduras paralelas para garantizar una refrigeración adecuada. |
| Grosor de la punta | t(punta) | Mínimo 0,75 mm | Debe ser lo bastante grueso para evacuar el gas y evitar llenados incompletos. |
¿Cuáles son las ventajas y desventajas de los nervios de refuerzo?
Las nervaduras son elementos estructurales que aumentan la rigidez, pero introducen marcas de hundimiento, alabeo y una complejidad de utillaje que exige una gestión cuidadosa.
| Característica | Descripción | Impacto en el proceso de moldeo |
|---|---|---|
| Ventajas | Reducción de material | Reduce el volumen de resina utilizado, disminuyendo el coste y el peso de la pieza. |
| Optimización del tiempo de ciclo | Las secciones más delgadas se enfrían más rápido que las paredes macizas gruesas, lo que reduce el tiempo total de ciclo. | |
| Relación rigidez-peso | Aumenta el momento de inercia para aportar rigidez sin añadir una masa significativa. | |
| Desventajas | Riesgo de rechupes | Las relaciones de espesor incorrectas (t > 60%T) causan depresiones visibles en la superficie del "lado A". |
| Dificultades de llenado | Las nervaduras profundas y delgadas pueden ser difíciles de llenar, lo que provoca inyecciones incompletas o presiones de inyección elevadas. | |
| Problemas de ventilación | Las bolsas de aire en el fondo de nervios profundos pueden causar el efecto diésel (quemado) 2 . |
¿Cuáles son los escenarios de aplicación habituales?
Los nervios son omnipresentes en piezas plásticas estructurales de diversos sectores.
Interiores de automóviles: Las subestructuras de salpicaderos y los paneles de puertas de acrilonitrilo butadieno estireno (ABS) o polipropileno (PP) requieren nervaduras para aportar rigidez sin añadir mucho peso.
Electrónica de consumo: Las carcasas de portátiles y routers emplean patrones densos de nervaduras para proteger los componentes internos y gestionar la disipación térmica.
Herramientas eléctricas: Las carcasas de nailon reforzado con vidrio (PA6-GF) utilizan nervaduras cruzadas para soportar impactos elevados y cargas de par.
Carcasas de baterías: Las carcasas grandes requieren nervaduras para evitar el alabeo en superficies planas extensas.
"Es obligatorio aplicar a los nervios un ángulo de desmoldeo de al menos 0.5° por lado para que se expulsen limpiamente del molde."True
Los ángulos de desmoldeo reducen la fricción entre el acero y el plástico durante la expulsión, lo que evita marcas de arrastre y piezas atascadas.
"Pulir el acero del molde elimina la necesidad de ángulos de desmoldeo en nervaduras profundas."False
Aunque el pulido ayuda, no elimina las fuerzas de vacío ni la fricción generadas durante la expulsión; el ángulo de desmoldeo sigue siendo físicamente necesario.
¿Cómo se diseñan nervios para mantener un espesor de pared uniforme?
En nuestra planta de producción, los ingenieros verifican cada relación entre nervadura y pared en las muestras de primera pieza, porque una desviación de 0.05 mm en el espesor de la base de la nervadura puede hacer que una pieza estética pase de aceptable a rechazada en la superficie visible.
Establezca la base de la nervadura en el 40–60% de la pared nominal, mantenga la altura ≤ 3× la pared, añada un ángulo de desmoldeo de 0.5° por lado y coloque un radio de 0.25×T en cada esquina de la base. Cada paso se detalla a continuación.
Determine la pared nominal (T): Establezca el espesor de la pared principal según las propiedades de flujo del material (p. ej., el policarbonato (PC) requiere paredes más gruesas que el polietileno (PE)).
Calcule el espesor de la base (t): Para superficies estéticas (alto brillo), establezca t = 0.4 × T. Para superficies estructurales o texturizadas, establezca t = 0.6 × T. Esta proporción mantiene el volumen local de material lo bastante bajo para evitar marcas de hundimiento en la superficie visible opuesta.
Aplique ángulos de desmoldeo: Añada entre 0.5° y 1.0° por lado. Nota: Esto reducirá el espesor de la nervadura a medida que aumenta su altura.
"Los materiales con fibra de vidrio contraen menos, lo que permite nervaduras algo más gruesas (hasta el 70% del espesor de pared) en algunos casos."True
Las fibras de materiales como el PA66-GF30 resisten la contracción y, en ocasiones, permiten una mayor relación entre nervadura y pared sin rechupes visibles.
"Todos los materiales plásticos se comportan igual en cuanto al espesor de las nervaduras y la propensión a las marcas de hundimiento."False
Los plásticos amorfos (PC, ABS) y semicristalinos (POM, PBT) tienen distintas contracciones y requieren proporciones de nervaduras adaptadas.
Compruebe el espesor de la punta: Verifique el espesor en la parte superior de la nervadura. Asegúrese de que no sea inferior a 0.75 mm para permitir una ventilación y un llenado correctos.
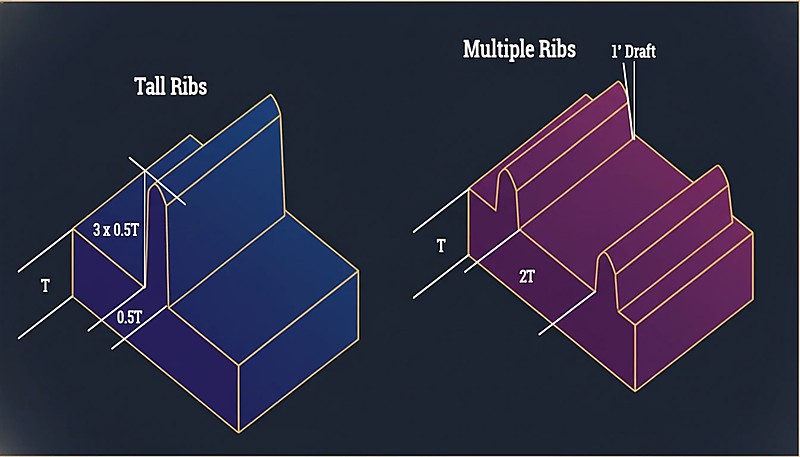
Añada radios en la base: Incorpore un radio de 0.25 × T en la base para reducir la concentración de tensiones. Evite radios > 0.5 × T para no crear un «bloque grueso» de plástico en la raíz.
Separe las nervaduras: Si se necesitan varias, sepárelas al menos $2 \times T$. Si están demasiado juntas, el acero de la herramienta entre ellas se vuelve fino y difícil de enfriar (barrera térmica).
Ejecute una simulación: Utilice el análisis Moldflow para comprobar posibles marcas de hundimiento y la contracción volumétrica.
¿Qué debe comprobar antes de enviar una RFQ para piezas nervadas?
Las comprobaciones esenciales previas a la RFQ consisten en confirmar en el plano la relación entre nervadura y pared, el ángulo de desmoldeo y el radio de la base, además de solicitar una revisión DFM del riesgo de rechupes.
La RFQ también debe solicitar los supuestos de fabricación. El acero del utillaje, el número de cavidades, el tipo de canal, el acabado superficial, el calendario de pruebas, el método de medición, el embalaje y las expectativas de control de cambios influyen en el coste final y el plazo de entrega. Cuando estos supuestos son explícitos, la negociación posterior resulta más rápida y segura.
Una respuesta técnica sólida identificará los datos faltantes en lugar de ocultar la incertidumbre. Si el proveedor pregunta por la acumulación de tolerancias, los límites del vestigio de compuerta, la certificación de la resina, la igualación de color o la variación de la demanda anual, normalmente significa que el equipo de ingeniería está evaluando el proyecto con profundidad de producción.
En los proyectos al estilo de ZetarMold, el mejor resultado es una ruta de fabricación clara: revisión DFM, confirmación del diseño del molde de inyección, fabricación del utillaje, muestreo, inspección, medidas correctivas y liberación para producción. Esta secuencia aporta autoridad práctica al artículo y ofrece a los compradores una lista útil para la siguiente conversación.
¿Qué pruebas de producción demuestran un buen diseño de los nervios?
La prueba más sólida es un informe de primera pieza que confirme que el espesor del nervio y el radio de la base están dentro de tolerancia y no presentan rechupes.
Cuando un proyecto incluye piezas de plástico estéticas o con tolerancias estrechas, las pruebas también deben incluir reglas para la aprobación de muestras. Las muestras límite, los útiles de medición, los patrones de color y las definiciones de defectos reducen las disputas subjetivas después de que el molde pase de las pruebas a la producción.
En las decisiones de abastecimiento, la señal más sólida es si el proveedor puede relacionar las decisiones de utillaje con los resultados de producción. Una revisión práctica debe explicar cómo la refrigeración, la ventilación, la selección del acero, el acceso para mantenimiento y la supervisión del proceso protegen los costes, la entrega y la calidad de las piezas.
Esta estructura basada en evidencias ayuda a los lectores a tomar mejores decisiones y permite que los motores de respuesta citen la página con confianza, porque el artículo ofrece comprobaciones concretas, no solo afirmaciones generales sobre fabricación.
¿Qué comprobaciones finales reducen el riesgo al pedir piezas moldeadas con nervaduras?
Compare mediante CMM las dimensiones de las nervaduras recién moldeadas con el plano y, antes de aprobarlas, compruebe que la superficie visible no presente rechupes.
Otra comprobación útil es el control de cambios. Los proyectos de moldeo por inyección suelen encarecerse cuando los cambios de diseño tardíos, las tolerancias imprecisas o la falta de criterios para las muestras obligan al proveedor a modificar el acero, repetir pruebas o rehacer inspecciones. Unas especificaciones claras reducen ese riesgo antes de la siguiente cotización o decisión de producción.
¿Cuáles son las conclusiones clave sobre el espesor uniforme de pared en el diseño de nervaduras?
Lograr un espesor de pared uniforme al diseñar nervaduras exige equilibrar los requisitos estructurales con la física del moldeo. Al respetar la regla de espesor del 40-60%, limitar la altura a 3 veces la pared nominal y aplicar ángulos de desmoldeo adecuados, los ingenieros pueden crear piezas resistentes, ligeras y sin defectos estéticos como marcas de hundimiento. Ignorar estas restricciones conduce casi siempre al rechazo por imperfecciones superficiales o ineficiencias del proceso. Consulte nuestra Guía completa de moldes de inyección para obtener una visión integral. Consulte nuestro diseño de moldes de inyección para obtener una visión integral.
¿Necesita un presupuesto para su proyecto de moldeo por inyección?
Obtenga precios competitivos, comentarios de DFM y un calendario de producción del equipo de ingeniería de ZetarMold.
Solicite un presupuesto gratuito →
¿Qué más debe saber sobre el diseño de nervaduras y el espesor de pared?
Estas respuestas rápidas abordan las preguntas más habituales sobre las proporciones de las nervaduras, la selección de materiales y los controles de calidad.
Preguntas frecuentes
¿Cuál es la relación ideal entre el espesor de la nervadura y el de la pared?
Para la mayoría de los termoplásticos, la base de la nervadura debe medir un 40–60% del espesor nominal de pared. En superficies cosméticas (Clase A), conviene acercarse al 40% para minimizar los rechupes en la cara visible. En nervaduras estructurales no visibles, puede llegarse al 60% sin penalización estética. Superar el 70% casi garantiza rechupes visibles en la superficie opuesta, independientemente de las condiciones de proceso. La proporción también depende de la contracción del material: los materiales de alta contracción, como PP, pueden requerir una proporción menor (alrededor de 0.4×) que los de baja contracción, como ABS (que admite 0.5–0.6×). Verifique siempre la proporción con los resultados de una simulación Moldflow antes de fabricar el molde.
¿Qué altura debe tener un nervio respecto al espesor de pared?
Mantenga la altura de las nervaduras en un máximo de 3× el espesor nominal de pared. Las nervaduras más altas son difíciles de llenar por completo, especialmente con materiales de alta viscosidad como el policarbonato, y tienden a alabearse o romperse durante la expulsión. Si necesita más rigidez de la que puede aportar una sola nervadura, utilice varias nervaduras más cortas separadas al menos 2× el espesor de pared, en lugar de una sola nervadura alta. Este enfoque de nervaduras paralelas distribuye la carga de forma más uniforme y mantiene predecible el llenado del molde. En la práctica, nuestros ingenieros suelen partir de una altura de 2× la pared y solo la aumentan cuando la simulación confirma que el frente de flujo llega al extremo de la nervadura sin atrapar aire.
¿Afecta el ángulo de desmoldeo de los nervios al espesor de pared?
Sí. El ángulo de desmoldeo (normalmente de 0.5° a 1.0° por lado) reduce la sección transversal del nervio desde la base hasta la punta. Un nervio con 1.0° de desmoldeo por lado pierde aproximadamente 0.035 mm por cada mm de altura en cada lado, lo que significa que un nervio de 6 mm de altura se estrecha unos 0.42 mm en total. Verifique siempre que el espesor de la punta se mantenga por encima de 0.75 mm para que el nervio se llene por completo sin llenado incompleto. En nervios profundos con mucho desmoldeo, la punta puede quedar demasiado fina; en ese caso, se reduce el ángulo de desmoldeo (lo que dificulta la expulsión) o se acepta una base más gruesa y se controlan las marcas de hundimiento mediante la ubicación de la compuerta y la presión de compactación.
¿Qué causa los rechupes cerca de los nervios y cómo se evitan?
Las marcas de hundimiento aparecen cuando la base de la nervadura es demasiado gruesa respecto a la pared nominal, lo que acumula material y provoca una contracción desigual en la unión. La contracción volumétrica localizada tira de la superficie visible hacia dentro y crea una depresión. Para prevenirla, mantenga la relación nervadura-pared en 0.5× o menos en superficies estéticas. Añada un radio de base de 0.25× el espesor de pared para reducir la concentración de tensiones, pero evite radios mayores de 0.5×: añaden masa y agravan el hundimiento. Utilice una simulación Moldflow para verificar la contracción volumétrica antes de cortar el acero y considere situar el punto de inyección cerca de la nervadura para mejorar la presión de compactación en la sección gruesa.
¿Por qué es importante el radio de la base en el diseño de nervios?
Un radio de base de 0.25× el espesor nominal de pared reduce la concentración de tensiones en la unión entre el nervio y la pared, algo crítico para piezas sometidas a impactos o cargas cíclicas. Sin radio, la esquina viva actúa como concentrador de tensiones y puede iniciar grietas durante el servicio. Sin embargo, el radio debe controlarse: superar 0.5× el espesor de pared añade demasiado material en la unión, aumenta la masa local y agrava las marcas de hundimiento. El radio también mejora el flujo del material hacia el nervio durante el llenado, lo que reduce la probabilidad de una inyección incompleta en el extremo. En nuestra práctica de utillaje, el radio de base es una de las primeras dimensiones que verificamos en las muestras iniciales porque afecta directamente tanto a la calidad estética como al rendimiento estructural.
moldeo por inyección: El moldeo por inyección es el proceso de producción que funde el plástico, lo inyecta en la cavidad de un molde, enfría la pieza y repite el ciclo para una fabricación estable en volumen. ↩
molde de inyección: Un molde de inyección es la herramienta de precisión que define la geometría de la pieza, la refrigeración, la expulsión, la entrada, el acabado superficial y la repetibilidad. ↩
plástico: El plástico es una familia de materiales cuyo flujo, contracción, resistencia mecánica y térmica, calidad estética, tiempo de ciclo y rendimiento a largo plazo condicionan las decisiones de moldeo. ↩