 コンテンツへスキップ

はじめに射出成形 プリントされた金型アセンブリ 射出成形金型 to produce high-volume parts with consistent quality. But what if you need prototype tooling1 fast, without the cost and lead time of steel molds?
However, conventional mold making can be both time-consuming and costly, particularly for small or custom production runs. 3Dプリンティング2 offers a cost-effective solution that slashes lead times from weeks to days. For teams comparing rapid-prototyping suppliers, our supplier sourcing guide explains how to qualify a molding partner before committing to printed tooling.
In this article, we will walk through the complete process of creating 3D printed molds for injection molding—from CAD design to printing, mounting, and running your first shots. We will also share practical lessons from our own tooling floor to help you decide when printed molds make sense and when they do not.
- 3D printed molds cut tooling lead time from weeks to days, ideal for low-volume prototyping
- SLA and DLP resins offer the best surface finish and dimensional accuracy for printed molds
- Typical 3D printed molds survive 10–100 shots depending on material, geometry, and injection pressure
- Always include draft angles (≥1°), uniform wall thickness, and proper vent channels in your mold design
- For production volumes above a few hundred parts, traditional steel molds are still the better investment
What Should You Know Before Choosing a 3D Printed Injection Mold?
A 3D printed injection mold is a fast prototype tool with strict process limits. Before choosing one, verify shot count, draft, part size, resin temperature, injection pressure, and whether the printed insert can survive the expected molding window.
プリントラン 3Dプリント射出成形金型は、少量生産では費用対効果が高く効率的だが、金属金型に比べて構造的完全性が低いことに注意することが重要だ。一般的に、これらの金型は30~100回の生産が可能で、ラピッドプロトタイピングの目的には理想的です。より大量に生産する場合は、従来のアルミニウムやスチールの金型の方が適しているかもしれない。
抜き勾配3: Add practical draft so the molded part releases without tearing the printed cavity or forcing the operator to pry the part out. A common starting point is 1 to 2 degrees per side, with deeper ribs, textured surfaces, or flexible materials often needing more draft after DFM review.
サイズと形: Understanding the dimensions of the desired injection molded part is crucial when selecting the appropriate size and shape of the mold. Notably, 3D printed molds differ from CNC machined molds in terms of size, typically being smaller in scale. This size difference impacts the range of injection molded parts that can be produced using 3D printed molds compared to CNC machined counterparts.
「3Dプリント金型は、設計完了から24時間以内に機能的な射出成形部品を製造可能です。」真
True — with SLA resin molds and a well-tuned injection machine, you can go from CAD to first shots within a single day. However, mold life is limited to roughly 10–100 cycles depending on geometry and pressure.
「デスクトップFDMプリンターでも生産品質の射出成形金型を製造できます。」偽
False — while FDM is the most affordable option, layer lines and porosity limit mold quality. Resin-based SLA and DLP printers produce significantly smoother, more dimensionally accurate molds suitable for low-volume runs.
In our Shanghai factory, rapid prototype molds still have to match production constraints: ZetarMold has 20+ years of tooling experience, an in-house mold manufacturing facility, and 47 injection molding machines from 90T to 1850T, so printed inserts are reviewed against real press, material, and mold-maintenance limits before trial molding.
完璧に完成した: 3Dプリント金型の表面の完全性は、高い射出成形温度が金型の性能に悪影響を及ぼすため、金属射出成形金型よりも劣ることがある。その結果、これらの金型は、洗練された仕上げが必要なプロジェクトには最適な選択ではありません。アルミニウムまたはスチール射出成形金型を選択することが優れた選択肢です。
あるいは、印刷金型にセラミックのような材料からなる遮蔽コーティングを採用することで、熱劣化を緩和し、研磨仕上げを実現することができる。
How Do You Create a CAD Design for a 3D Printed Mold?
射出成形用の3Dプリント金型を作成する最初のステップは、コンピュータ支援設計(CAD)ソフトウェアを使用して金型を設計することです。設計プロセスで考慮すべき要素には、部品の形状、成形材料、ゲートの位置、冷却チャンネルなどがあります。
3Dプリント金型を作成する際の設計上の課題を軽減するには、いくつかのヒントが有効です。まず、適切な金型材料を選択することが重要です。射出工程で発生する圧力に耐えられるよう、頑丈で剛性の高い素材を選ぶことが重要です。さらに、金型の融点は射出成形材料の融点を上回る必要がある。
第二に、金型製造を成功させるためには、綿密な金型設計が不可欠である。金型の内面は、プリント・キャリアと接触しないように配置されるべきである。金型設計に通気孔を組み込むことで、射出成形プロセス中に閉じ込められた空気を排除し、多孔質部品のような欠陥を減らすことができます。さらに、金型設計に冷却流路を組み込むと、冷却時間の短縮が容易になります。
部品を設計する際には、抜き勾配を取り入れることも考慮してください。成形品の肉厚を均一にし、鋭利な角を避けることは、留意すべき重要な要素です。射出成形のバリも重要な検討事項のひとつです。これは、押出ダイのパーティングラインから余分な材料が押し出されることで発生します。バリをなくすには、金型設計にランナーシステムを含めることをお勧めします。さらに、型締力の増加や射出圧力の低減など、設計後の調整も必要です。
How to Design a 3D Printed Mold for Injection Molding?
A good 3D printed mold design is a supported insert built around draft, venting, gate strength, and controlled ejection. Start with material strength, parting-line support, wall thickness, and a rigid frame so the cheaper tool still produces useful trial data.
3Dプリント射出成形金型の製造には、PETG、ABS、ナイロン、PP、アセタールなど数多くの材料を使用できます。3Dプリンティングプラスチック金型の材料を選択する際には、以下の2点を考慮することが重要です:
強さと剛性: 3Dプリント射出成形金型に適したプラスチックポリマーは、プリント後に強度と剛性を示す必要がある。これらの性質は、射出工程で発生する応力に金型が耐えられるようにするために不可欠です。
温度耐性: As injection molding operates at elevated temperatures to facilitate optimal flow of molten plastic, it is imperative that the plastic material chosen for mold creation possesses a melting point higher than that of the injection molding material.
金型のデザイン: 後加工やサイズ変更のために、金型に機械加工の許容誤差を考慮し、寸法精度の向上に努める。寸法の不一致を評価するために一連の金型を作成し、これらのバリエーションを金型のCADモデルに組み込む。
ゲートを開いて金型キャビティ内の圧力を緩和し、金型の寿命を延ばします。スタックモールドの片側を平らにし、もう片側を設計部品の保持に利用する。この戦略は、金型ブロックのズレやオーバーフローの可能性を軽減するのに役立ちます。
効率的な排気のために、金型キャビティの端から金型の端まで、大きなベントホールを組み込みます。これにより、金型内への材料の流れを助け、圧力を下げ、ゲート部のフラッディングを防ぎ、サイクルタイムを短縮します。厚さが1~2mm未満の表面は熱による変形を受けやすいため、過度に薄い断面は避ける。
モールドバックを調整して材料の使用量を削減することで、印刷プロセスを洗練させます。金型キャビティ以外のサポートエリアの断面サイズを小さくして、樹脂費を削減し、印刷欠陥や変形の可能性を減らします。面取りを導入することで、造形プラットフォームからのワークピースの取り外しが容易になります。2つのプリントを効果的に位置合わせするために、コーナーにセンタリングピンを使用する。
内側の顔の向き: 内側の金型面をサポートとの接触を避けるように配置することで、サポートの跡を最小限に抑える、またはなくすことができ、印刷面の品質が向上します。また、この方向は後処理の必要性を低減します。
浅い通気口: 金型設計にベントを組み込むと、射出成形工程で閉じ込められた空気の除去が容易になります。推奨される約0.05 mmの浅いベントは、射出バリなどの欠陥の可能性を低減するのに役立ちます。
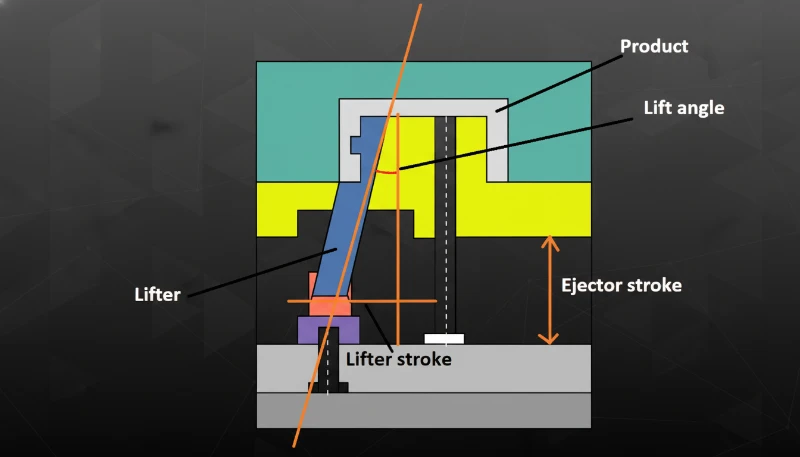
チャンネルを活用する: 20回以上の成形を目的とした金型には、金型設計に溝を組み込みます。これにより、金属棒やチューブを組み込むことができ、反りなどの射出成形不良を効果的に減らすことができます。さらに、溝を利用することで、クールダウン時間の短縮にもつながります。
レイヤーの高さ: より低い層高を選択することで、印刷された金型の平滑性が向上し、印刷された線の視認性が最小限に抑えられる。
パーツデザイン: 射出成形プロセスの品質は、使用する3Dプリント金型に大きく依存します。したがって、抜き勾配を取り入れるなど、印刷製品の成功と効率を確保するために、部品設計段階でさまざまな要素を考慮する必要があります。推奨される抜き勾配20は、プリント射出成形金型からの射出成形品の取り外しを簡単にします。
素材の選択: 3Dプリント金型の素材選びは非常に重要です。反ったり溶けたりすることなく、射出成形プロセスに伴う高温と高圧に耐えられるものでなければならない。ナイロン、ABS、ポリカーボネートなどの素材は、3Dプリント射出成形金型によく採用される。
均一な肉厚: 射出成形部品は、射出中や射出後の反りなどの欠陥を最小限に抑えるため、一定の肉厚が必要です。薄肉が必要な場合、薄いリブやガセットを組み込むことで、壁の強度を高めることができます。
「プリント金型には生産スタイルのDFMチェックが必要です。」真
This is true because wall thickness, radii, draft, venting, and gate support determine whether a low-cost printed insert generates useful molding data or only a failed trial.
「離型剤は設計不良の金型を修正できません。」偽
This is false because release compound helps demolding, but it cannot correct poor parting-line fit, inadequate draft, weak cavity walls, or a printed insert that deforms under injection pressure.
鋭い角は避ける: 鋭角な角をなくすために、金型の縁にRをつけました。この調整は、溶融プラスチックのスムーズな流れを促進し、射出成形の欠陥の発生を低減するのに役立ちます。
フラッシュを防ぐ: フラッシュは射出成形でよく見られる問題で、射出工程中に溶融プラスチックが金型から抜け出し固化してしまうものです。この欠陥は、金型半体間の適合不良、過剰な射出圧力、または金型の過充填によって生じます。
ランナーシステムを金型設計に組み込み、部品ラインの公差を確保することで、3Dプリント金型からのフラッシュを排除することができます。しかし、これらの方法がうまくいかない場合は、型締力の増加や射出圧力の低減など、設計後の調整を試すことができます。
部品を取り外すには、離型剤を使用する: 離型剤は、射出成形された部品のスムーズな取り外しを助けるために、離型工程で導入される。離型剤がないと、部品が金型にはまり込んでしまうことがあります。この場合、部品を取り外すのに過度の力が必要となり、部品や金型に損傷を与える可能性があります。
テストと検証: 3Dプリント金型を射出成形に使用する前に、その性能をテストして検証する必要があります。テストを行うことで、金型設計や材料選択に関する問題を特定し、部品の生産を開始する前に必要な調整を行うことができます。
How Do You Export CAD Design Files for 3D Printing?
CAD export is the step that turns the final mold geometry into a printable STL or 3MF file. Check units, mesh quality, wall thickness, orientation, and tolerance before slicing so the printed insert is accurate enough for molding trials.
What 3D Printing Technologies Work Best for Injection Molds?
STLファイルが準備されると、3Dプリンターを使用して射出成形金型を製造できます。金型は、溶融積層造形法(FDM)、ステレオリソグラフィー法(SLA)、選択的レーザー焼結法(SLS)、デジタル光造形法(DLP)など、さまざまな3Dプリントプロセスで作成できます。3Dプリンターと印刷材料の選択は、金型の複雑さや金型の寿命などの要因によって異なります。
FDMは通常、プラスチック金型とツーリングのための最も費用対効果の高い3Dプリントソリューションです。とはいえ、最終的な金型には目に見える層線が見られることがあり、これを除去するためにサンディングや化学仕上げが必要になります。
SLAやDLPのような樹脂ベースの3Dプリント技術は、より滑らかな表面仕上げの金型が得られるため、大規模な後処理の必要性を減らすことができ、人気のある選択肢です。もう1つの樹脂ベースの3Dプリント手法であるマテリアル・ジェットは、さまざまな素材や色を使用して、優れた表面仕上げの金型を製作できます。SLSは金型製造に強化ナイロンを使用し、強度と高い表面品質を提供します。
「100個以下の試作では、3Dプリント金型は従来の鋼製金型より90%安く、80%速く製造できます。」真
True — a printed mold might cost $50–$200 and take 1–2 days, while a steel mold for the same geometry could cost $5,000–$20,000 and take 4–8 weeks. The trade-off is durability and part consistency.
「3Dプリント金型は、アルミニウムや鋼製金型と同等の射出圧力に耐えられます。」偽
False — 3D printed molds typically handle 200–500 bar, whereas production steel molds can endure 1,000+ bar. You must reduce injection pressure and speed when using printed tooling.
What Are the Standard Configurations for 3D Printed Molds?
The standard configurations for 3d printed molds are the main categories or options explained in this section. 3D printing molds for injection molding mainly have the following two standard configurations.
3Dプリンティング金型
このセットアップでは、全体が印刷されるため、アルミニウムのサポートフレームは必要ない。その結果、金型はより多くの印刷材料を必要とし、印刷コストと時間の両方が増大する。とはいえ、フレームがないため、多用すると反りなどの不具合が生じやすい。
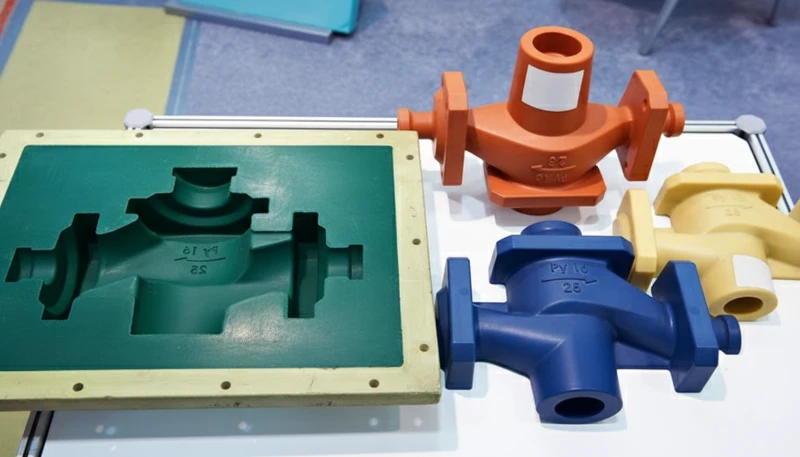
金型を金属フレームに取り付ける
3Dプリントされた金型が完成したら、射出成形プロセスで金型を固定するために、金属製のフレーム(モールドベース)に取り付ける必要がある。モールドベースにはスプルーブッシュが含まれ、溶融した材料が金型に注入される。
The configuration of the mold determines how it is mounted to the frame. There are two standard configurations of injection molds for 3D printing. The first configuration inserts the printed mold into an aluminum frame, providing stability, accuracy, and support to the mold. This configuration is more suitable for producing precise injection molded parts, helps prevent molding defects such as warping, maintains the integrity of the mold, and ensures consistent pressure distribution during the injection molding process.
2つ目の構成は、アルミフレームなしで完全に3Dプリントされた金型である。この場合、フレームは不要になるが、印刷材料が増えるため、印刷コストと時間が増加する。また、この構成で作成された金型は、サポートが不足しているため、反りなどの欠陥が発生しやすくなる。
How Do You Start the Injection Molding Process with a 3D Printed Mold?
Starting a printed-mold injection trial is a controlled setup process, not a normal production launch. In our Shanghai factory, we run 47 injection molding machines from 90T to 1850T; our engineers review printed inserts against press tonnage, resin temperature, and mold support, and we found that conservative startup shots make prototype tooling data more reliable.
The startup process is a controlled first-shot sequence for proving the printed insert safely. We mount the printed insert in a rigid frame, verify shutoff contact, confirm the sprue and gate path, and run conservative first shots before increasing pressure. In our factory trials, this staged startup helps separate mold-design problems from process-setting problems.
What Post-Processing Is Required for 3D Printed Molds?
Post-processing is required to make a printed mold smooth, clean, dimensionally usable, and easier to release. This can include sanding to remove layer lines, assembling multiple prints, cleaning supports, checking critical dimensions, and applying a release aid or surface treatment before injection molding trials.
サンディング: サンディングは、3Dプリントモデルの表面のレイヤー線をなくすのに役立ちます。最初は目の粗いサンドペーパーを使い、徐々に目の細かいサンドペーパーに変えていきます。過度の摩擦や熱で表面が溶けるのを防ぐため、同じ場所を長時間サンディングするのは避けてください。特に、後で接着する必要がある場合は、継ぎ目の周りをサンドペーパーで削りすぎないように注意してください。
ボンディング: 接着する際は、2つの面を輪ゴムで縛るように、接着剤を点々と塗布して密着させることをお勧めする。継ぎ目が粗い場合や隙間がある場合は、ボンドの接着剤やフィラーを使うと、より滑らかに仕上げることができる。
カラーリングだ: このステップでは、風通しがよく、ほこりのない場所で行うようにし、すべての面に均等に色がつくようにする。スプレーするときは、腕の長さの距離を保ちながらターゲットを吊るす。ソフトグルー3Dプリンティングモデルを塗装した後、1~2日乾燥させてから磨いてください。
スクリュースロットの取り付け: スクリュースロットを設置することで、3Dプリントシェルの耐用年数を延ばすことができます。しっかりとフィットさせるため、モデルの穴はネジ溝より少し小さめにします。穴の変形を防ぐため、安定性のためにモデルを固定し、高速または強引な操作は避けてください。
シリコン型反転: このプロセスには、3Dプリント金型ボックス、シリコン、樹脂、計量カップ、その他の材料が必要です。金型の体積を計算するには、まず3Dプリント金型ボックスに水を入れ、次に計量カップに水を注ぎます。
よくある質問
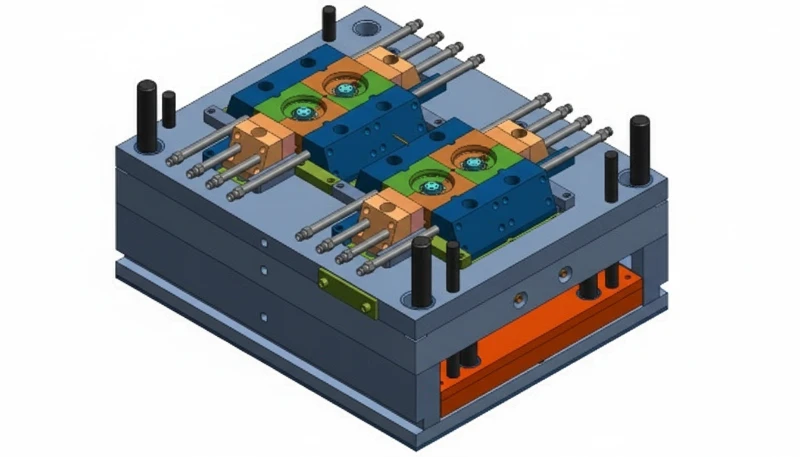
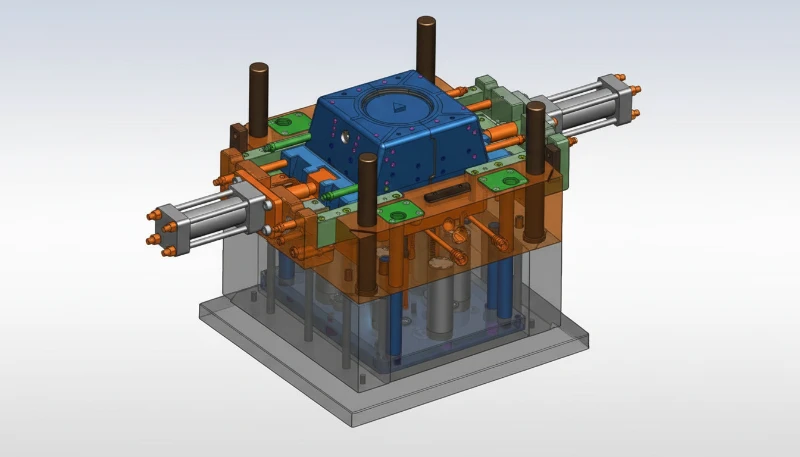
プラスチック射出成形金型アセンブリの3Dモデル
A 3D printed mold can produce a small validation run or a limited production batch, but the realistic shot count depends on resin temperature, cavity thickness, gate stress, clamping pressure, and cooling time. Some printed inserts only survive a few dozen shots, while well-supported SLA or high-temperature resin molds may run hundreds of cycles. Treat the number as an engineering estimate, not a guarantee, and inspect the cavity, gates, vents, and part dimensions during the trial. Record each shot count and failure mode carefully.
What is the best 3D printing technology for injection molds?
SLA is usually the most practical starting point for 3D printed injection molds because it can produce smoother cavity surfaces and tighter details than many low-cost FDM setups. DLP and material jetting can also work when dimensional accuracy and surface finish are controlled. FDM is useful for fit checks or very rough trials, but layer lines, porosity, and lower heat resistance often create flash, poor surface quality, or early insert failure during actual injection molding. Match the technology to resin and pressure.
Can you use a 3D printed mold for production manufacturing?
A 3D printed mold can support production only when the volume, resin, tolerance, and surface requirements are modest. It is best used for prototype validation, bridge production, and low-volume trials where speed matters more than long tool life. For high-volume programs, abrasive materials, tight tolerances, or cosmetic surfaces, aluminum or steel tooling is still the safer production path because it holds dimensions, cooling performance, and clamping pressure more consistently over many cycles. Use printed tooling to learn before scaling, then lock the production mold specification.
What materials can be injection molded using 3D printed molds?
Lower-temperature thermoplastics are the safest candidates for 3D printed molds. PP, PE, TPE, and selected ABS or nylon grades can be tested when melt temperature, injection pressure, and cycle count stay within the printed insert limits. High-temperature engineering resins, glass-filled compounds, and abrasive materials are much riskier because they can soften, crack, or wear the printed cavity quickly. Always confirm the material data sheet, mold temperature, and expected shot count before committing to printed tooling. Start with conservative processing windows.
How much does a 3D printed injection mold cost?
The cost of a 3D printed injection mold is usually far lower than a CNC-machined production mold, but the exact range depends on insert size, resin type, surface finishing, validation work, and whether a support mold base is required. A simple printed insert can be inexpensive for design validation, while a more durable prototype tool with polishing, assembly, and trial molding costs more. The right comparison is total learning cost: how quickly the mold proves geometry, gating, shrinkage, and part function before production investment.
Do 3D printed molds need post-processing before use?
Yes. Most 3D printed molds need post-processing before injection molding trials. Typical work includes removing supports, cleaning uncured resin, sanding layer marks, checking cavity dimensions, adding vents if needed, and sometimes applying a coating to improve release or reduce porosity. The mold should also be assembled into a rigid support frame so clamping force does not crack the insert. Good post-processing improves surface finish, reduces flash risk, and makes trial data more reliable. Inspect the insert again after the first shots.
When Should You Choose 3D Printed Molds Over Traditional Tooling?
3D printed molds are best when speed, learning, and low-volume validation matter more than long production life. They are useful for prototype trials, bridge tooling, and simple or moderately complex parts where the resin, pressure, tolerance, and surface requirements stay within printed-insert limits.
要するに、射出成形用の3Dプリント金型を作成するプロセスは、構造化されたアプローチに従っている。CADソフトウェアを使って金型を設計することから始まり、高品質のプリントを実現するためにプリンターの設定を微調整する。金型の表面をより美しく仕上げるために、研削や研磨などの後処理工程が必要になることもある。
Incorporating essential components, like plug-ins, and conducting comprehensive testing ensure functionality and precision. Once validated, the mold is primed for injection molding production, facilitating the rapid prototyping and manufacturing of plastic parts with intricate designs.
Need a quote for your injection molding project?
Get competitive pricing, DFM feedback, and production timeline from ZetarMold’s engineering team.
Request a Free Quote → See our Injection Molding Complete Guide for a comprehensive overview.
-
prototype tooling: Prototype tooling is an early mold or insert used to test part design, material behavior, and process risk before production tooling. ↩
-
3D printing: 3D printing is a layer-by-layer manufacturing method used to build prototype mold inserts from digital geometry. ↩
-
draft angle: Draft angle refers to the taper added to molded part walls so the part can release from the mold without damage. ↩


