 コンテンツへスキップ

Getting 射出成形1 process parameters right makes the difference between profitable production and expensive scrap. After 20 years of troubleshooting everything from warped automotive parts to sink marks in consumer electronics, I’ve learned that successful molding comes down to mastering five core parameters: temperature, pressure, speed, timing, and cooling. These aren’t just numbers on a machine display—they’re the levers that control your part quality, cycle time, and bottom line. If you are evaluating suppliers, check our sourcing guide3 for practical qualification tips.
- Temperature control affects material flow, crystallization, and surface finish—typically ranges from 180°C for PP to 280°C for PC
- Injection pressure determines cavity fill and part density, usually 800-1500 bar for most thermoplastics
- Speed parameters control shear heating and molecular orientation—injection speeds of 50-200 mm/s are common
- Holding pressure and time prevent shrinkage and sink marks—typically 60-80% of injection pressure for 3-15 seconds
- Cooling time directly impacts cycle time and part quality—calculate using wall thickness squared times material thermal diffusivity
What Are the Key Injection Molding Process Parameters?
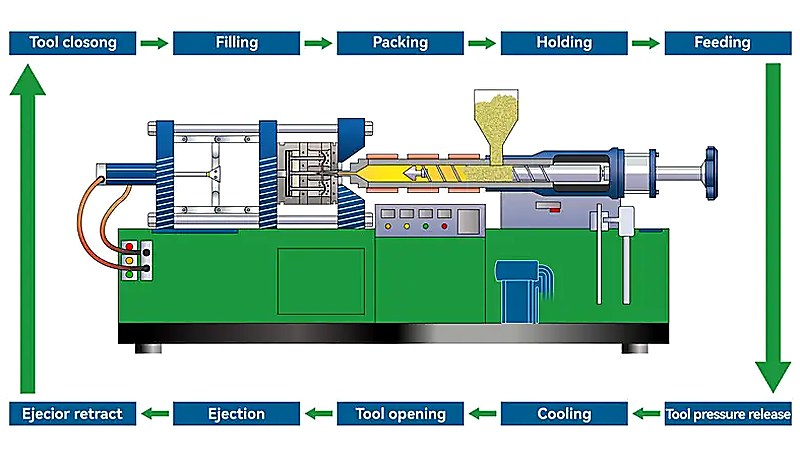
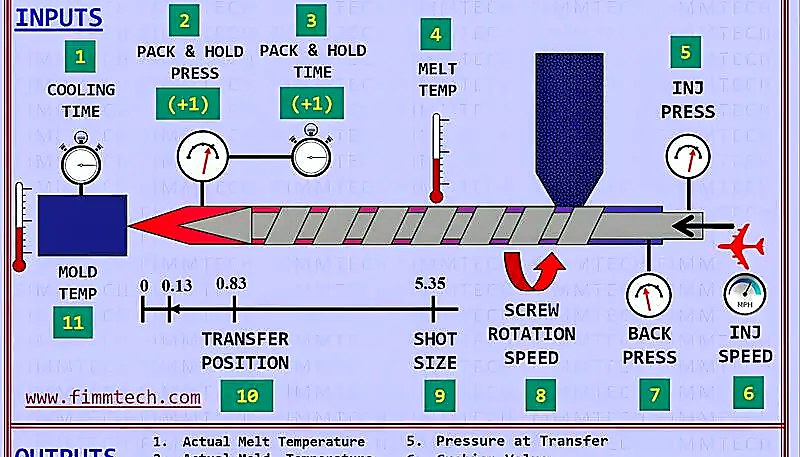
The key injection molding process parameters are the main categories or options explained in this section. The five critical injection moulding process parameters are temperature, pressure, speed, timing, and cooling—each controlling specific aspects of part quality and production efficiency. Temperature affects material viscosity and flow behavior. Pressure determines cavity filling and part density. Speed controls shear heating and molecular orientation. Timing manages material solidification. Cooling governs cycle time and dimensional stability.
Temperature parameters include barrel zones (typically 4-5 zones), nozzle temperature, and 射出成形金型 temperature. For ABS, I typically run barrel temperatures from 220°C at the feed zone to 240°C at the nozzle, with mold temperatures around 60-80°C. These temperatures ensure proper melt flow while preventing degradation.
Pressure parameters work in sequence: injection pressure fills the cavity (800-1500 bar), holding pressure maintains part density (60-80% of injection pressure), and back pressure controls melt homogeneity (3-15 bar). Speed parameters include injection speed (50-200 mm/s), screw rotation speed (50-150 RPM), and ejection speed. Timing parameters cover injection time, holding time, cooling time, and total cycle time.
How Does Temperature Affect Injection Molding Quality?
Temperature directly controls material viscosity, flow length, surface finish, and molecular structure in injection molded parts. Higher temperatures reduce viscosity, allowing longer flow lengths and better cavity filling, but excessive heat causes degradation, flash, and poor surface quality. Lower temperatures increase viscosity, potentially causing short shots and high injection pressures.
Barrel temperature profiles typically increase from rear to front zones. For polypropylene, I run 180°C at the feed zone, 200°C in the compression zone, 210°C in the metering zone, and 220°C at the nozzle. This progressive heating ensures proper plasticization without overheating. The temperature difference between zones should be 10-20°C to prevent material degradation.
Mold temperature affects crystallization in semi-crystalline plastics like nylon and polypropylene. Higher mold temperatures (80-120°C for nylon) promote crystallinity, improving chemical resistance and dimensional stability but increasing cycle time. Lower mold temperatures (40-60°C) reduce cycle time but may cause warpage and poor surface finish. I’ve seen 20% cycle time increases when mold temperature rises from 60°C to 100°C for nylon parts.
“Increasing barrel temperature by 10°C typically reduces injection pressure requirements by 50-100 bar for most thermoplastics.”真
This relationship holds true because higher temperatures reduce melt viscosity, making the material flow more easily through the runner system and into the mold cavity. I’ve consistently observed this 50-100 bar pressure reduction when optimizing process parameters for materials like ABS, PC, and nylon.
“Faster injection speeds always improve part quality by reducing flow marks and hesitation lines.”偽
While faster injection can improve surface finish in many cases, excessive speed creates problems including high shear heating, molecular orientation leading to warpage, and increased injection pressures. Optimal injection speed depends on part geometry, wall thickness, and material properties. I’ve seen warpage increase 30% when injection speed exceeded 250 mm/s in thin-wall PC parts.
What Role Does Injection Pressure Play in Part Quality?
Injection pressure determines cavity filling completeness, part density, and dimensional accuracy by forcing molten plastic through runners, gates, and into every detail of the mold cavity. Insufficient pressure causes short shots, sink marks, and low part density. Excessive pressure leads to flash, high residual stress, and difficult part ejection.
Typical injection pressures range from 800-1500 bar for most thermoplastics, but thin-wall applications may require 1800+ bar. I calculate required pressure using flow length, wall thickness, and material viscosity. For a 200mm flow length through 2mm wall thickness in ABS, expect 1000-1200 bar injection pressure at standard processing temperatures.
Holding pressure maintains part quality after cavity filling by compensating for material shrinkage during cooling. Set holding pressure at 60-80% of injection pressure—too low causes sink marks and dimensional variations, too high wastes energy and may cause flash. Holding time should be 3-15 seconds, depending on wall thickness and material thermal properties. For thick sections (>5mm), extend holding time to 10-15 seconds.
How Do Speed and Timing Parameters Shape the Final Product?
Speed and timing parameters control material flow behavior, molecular orientation, and part solidification, directly affecting surface finish, mechanical properties, and dimensional stability. Injection speed determines shear heating and flow front advancement through the cavity. Screw speed affects melt homogeneity and color dispersion. Timing parameters manage material phase transitions from liquid to solid state, governing how long each stage lasts and when transitions occur. Getting these parameters right requires understanding the interaction between material rheology, part geometry, and cooling capacity of the mold.
Injection speed typically ranges from 50-200 mm/s, but optimal speed depends on part geometry and material sensitivity. Fast injection (150-200 mm/s) improves surface finish and reduces flow marks but increases shear heating and molecular orientation. Slow injection (50-100 mm/s) reduces stress but may cause flow marks and temperature variations. I use multi-stage injection profiles: fast filling for 90% cavity volume, then slow speed for final 10% to minimize stress.
Screw rotation speed affects melt quality and cycle time. Standard speeds of 50-150 RPM provide good mixing without excessive shear heating. Higher speeds above 200 RPM cause degradation in heat-sensitive materials like PVC and POM, leading to discoloration and reduced mechanical properties. Lower speeds below 50 RPM may produce poor melt homogeneity, resulting in color streaking or inconsistent part quality. Back pressure of 3-15 bar improves mixing—use higher values (10-15 bar) for recycled materials or color-critical applications where uniform appearance is essential. I typically start with 8-10 bar back pressure and adjust based on melt temperature monitoring and visual inspection of test shots.
Why Is Mold Temperature Critical for Crystalline Plastics?
Mold temperature controls crystallization kinetics in semi-crystalline plastics like nylon, polypropylene, and POM, directly affecting mechanical properties, chemical resistance, and dimensional stability. Higher mold temperatures promote crystal formation, improving strength and chemical resistance but increasing cycle time. Lower temperatures limit crystallization, reducing properties but enabling faster production.
For nylon 66, I typically run mold temperatures of 80-120°C depending on part requirements. High-performance applications requiring maximum strength and chemical resistance need 100-120°C mold temperature, achieving 40-50% crystallinity. Consumer products prioritizing cost over performance can use 60-80°C, accepting lower crystallinity (20-30%) for faster cycles.

Polypropylene shows dramatic property changes with mold temperature. At 40°C mold temperature, expect 30-40% crystallinity with good impact resistance. At 80°C, crystallinity increases to 50-60% with higher stiffness but reduced impact strength. The key is matching mold temperature to application requirements—automotive under-hood parts need high crystallinity, while flexible packaging prefers lower crystallinity. I once ran tests on a PP gear housing where raising mold temperature from 50°C to 85°C increased tensile strength by 18% but nearly doubled cycle time. That tradeoff between mechanical performance and throughput is one every process engineer must evaluate carefully. POM follows a similar pattern—80-100°C mold temperatures produce better creep resistance for gears and mechanical components.
Parameter-related defects follow predictable patterns that experienced molders recognize immediately. Short shots indicate insufficient pressure or temperature preventing complete cavity fill. Flash suggests excessive pressure or worn tooling allowing material to escape the mold parting line. Sink marks result from inadequate holding pressure or insufficient holding time during cooling. Warpage stems from uneven cooling, excessive molecular orientation, or improper gate location creating differential shrinkage. Understanding which parameter causes each defect type is the first step toward systematic troubleshooting. I always start by checking the easiest parameter to adjust before moving to more complex causes—this diagnostic approach saves hours of trial-and-error debugging on the production floor.
For short shots, first increase injection pressure by 50-100 bar increments until the cavity fills completely. If pressure reaches machine limits above 1500 bar without improvement, increase barrel temperature by 10°C steps to reduce melt viscosity. Check for gate freeze-off by extending holding time—sometimes the gate seals before the cavity fills. Verify adequate venting as well, since trapped air prevents complete filling even at high pressures. On one automotive connector project, we traced persistent short shots to a blocked vent channel that was limiting air escape during high-speed filling.
Flash elimination requires systematic pressure reduction and mold inspection. Reduce injection pressure by 50 bar steps until flash disappears, then optimize holding pressure. Check parting line condition—worn or damaged mold surfaces cause flash at low pressures. Verify mold clamping force meets calculated requirements based on projected part area and cavity pressure.
Sink mark correction focuses on holding pressure and time optimization. Increase holding pressure to 70-80% of injection pressure. Extend holding time until gate freezes—typically 3-15 seconds depending on gate size and material. For thick sections, consider sequential valve gating or gas-assist molding to maintain pressure throughout cooling.
“Warpage in injection molded parts is primarily caused by differential shrinkage between thick and thin sections rather than material properties.”真
Differential shrinkage creates internal stresses that cause warpage as parts cool and solidify. Thick sections cool slower and shrink more than thin sections, creating stress concentrations. This is why uniform wall thickness design is critical—I’ve reduced warpage by 60% simply by maintaining consistent 2-3mm wall thickness in complex housings.
“Back pressure settings above 20 bar are always necessary for achieving good color mixing in injection molding.”偽
While back pressure improves mixing, excessive values (>20 bar) cause unnecessary shear heating, longer cycle times, and potential material degradation. Most applications achieve excellent color mixing with 5-15 bar back pressure. I’ve found that 8-12 bar provides optimal mixing for most materials without the negative effects of excessive shear.
At ZetarMold, our 20+ years of injection molding experience across 47 machines ranging from 90T to 1850T has taught us that process parameter optimization is both science and art. Working with 400+ different materials, we’ve developed parameter databases that reduce setup time by 70% and first-shot success rates above 85%. Our process engineers use statistical process control to maintain parameter stability within ±2% across production runs.
Ready to optimize your injection molding process parameters? ZetarMold’s sourcing guide provides detailed parameter recommendations for over 400 materials. Our process engineers can help you establish robust parameter windows that ensure consistent quality while minimizing cycle time. Contact us for a free process parameter audit of your current molding operations.
よくある質問
What is the optimal injection molding temperature range for ABS?
ABS injection molding temperatures typically range from 220-250°C in the barrel with mold temperatures of 60-80°C. I recommend starting with 230°C barrel temperature and 70°C mold temperature for most general-purpose applications. Higher temperatures around 240-250°C improve flow and surface finish but increase the risk of thermal degradation. Lower temperatures around 220-230°C reduce cycle time but may cause short shots in thin-wall parts. Nozzle temperature should be set 5-10°C higher than the front barrel zone to prevent premature freeze-off. Always monitor actual melt temperature with a pyrometer—target 235-245°C for optimal ABS processing results.
How do you calculate the correct holding pressure for injection molding?
Calculate holding pressure as 60-80% of the injection pressure required for complete cavity filling. Start with 70% as baseline, then adjust based on part quality. For thick sections (>4mm), use 75-80% to prevent sink marks. For thin walls (<2mm), 60-65% prevents flash while maintaining density. Monitor part weight—consistent weight indicates proper holding pressure. I use cavity pressure sensors when available, targeting 400-600 bar cavity pressure during holding phase. Holding pressure too low causes sink marks and dimensional variation. Too high wastes energy and may cause flash or difficult ejection.
射出成形でフラッシュが発生する原因とその対策は?
フラッシュは、射出圧力が型締め力を超えたとき、または金型のパーティング面が摩耗・損傷したときに発生します。必要な型締め力は、投影面積×キャビティ圧力(通常は投影面積1平方インチあたり3~5トン)で計算します。射出圧力を50~100バールずつ下げ、フラッシュが消えるまで調整します。金型の状態を確認してください。摩耗したパーティングライン、損傷したベント、不十分な金型メンテナンスは通常の圧力でもフラッシュを引き起こします。適切な金型アライメントと十分なタイバーの伸びを確認します。フラッシュはベント不足を示すこともあり、その場合は圧力低減または追加のベントチャネルが必要です。材料の粘度もフラッシュの発生傾向に影響し、メルトフローレートが高い材料ほどフラッシュしやすくなります。
射出圧力と保圧の違いは何ですか?
射出圧力は金型キャビティを完全に充填し、部品形状と材料に応じて通常800~1500バールです。保圧は冷却中の部品密度を維持し、通常は射出圧力の60~80%です。射出圧力は充填段階(1~3秒)で作用し、保圧は固化段階(3~15秒)で作用します。高い射出圧力は完全な充填と良好な表面仕上げを保証します。適切な保圧は、シンクマークと寸法収縮を防ぎます。射出圧力から保圧への移行は、キャビティ充填率95~98%で発生します。最新の成形機はキャビティ圧力フィードバックを使用して、この切り替えポイントを自動的に最適化します。
スクリュー速度はプラスチックの溶融品質にどのように影響しますか?
スクリュー速度は混合強度と滞留時間を制御し、溶融均一性と温度に直接影響します。50~150 RPMの標準速度は、過度なせん断加熱なしに良好な混合を提供します。高い速度(>200 RPM)は、PVCやPOMなどの熱感受性材料の劣化を引き起こします。低い速度(<50 RPM)は、色の混合不良や温度変動を生じる可能性があります。材料の感受性と混合要件に基づいてスクリュー速度を調整します。熱感受性材料は遅い速度(50~100 RPM)が必要です。再生材やカラーコンパウンドは高い速度(100~150 RPM)が有効です。溶融温度を監視してください。過剰なスクリュー速度はせん断加熱により温度を10~20°C上昇させます。
射出成形部品の理想的な冷却時間はどれくらいですか?
冷却時間は肉厚の二乗と材料の熱拡散率に依存します。公式:冷却時間 = (肉厚)² × 材料係数。肉厚3mmのABSの場合、冷却時間は15~25秒が目安です。ポリプロピレンは冷却が速く(材料係数0.8)、PCは遅い(材料係数1.3)。金型温度も冷却時間に影響し、10°C上昇するごとにサイクルタイムが15~20%増加します。効率的な冷却チャネル設計により、時間を30~40%短縮できます。部品の取り出し温度を測定して十分な冷却を確認します。ほとんどの熱可塑性プラスチックでは、反りを防ぐために60°C以下である必要があります。部品品質が劣化するまで体系的に冷却時間を短縮することで最適化します。
射出成形における背圧はどのように設定しますか?
背圧は、材料の混合要件と品質ニーズに応じて3~15バールの間で設定します。ほとんどの用途では5~8バールから始め、溶融状態の品質に基づいて調整します。高い背圧(10~15バール)は色の混合と溶融均一性を向上させますが、サイクルタイムとせん断加熱が増加します。低い背圧(3~5バール)はサイクルタイムを短縮しますが、色むらや混合不良の原因となる可能性があります。PVCなどの熱感受性材料は最小限の背圧(3~5バール)が必要です。再生材やマスターバッチの用途では、高い値(10~12バール)が有効です。溶融温度を監視してください。過剰な背圧はせん断加熱により温度を上昇させます。2~3バールずつ段階的に調整します。
金型温度が低すぎるとどうなりますか?
金型温度が低いと、表面仕上げ不良、キャビティ充填不完全、残留応力の増大、寸法不安定を引き起こします。表面欠陥には、フローマーク、溶着ライン、光沢不良が含まれます。部品は応力緩和により使用中に反る可能性があります。ナイロンなどの半結晶性プラスチックは、結晶化が制限されることで機械的特性が低下します。金型温度40°Cで成形したナイロン部品は、80°Cの場合と比べて強度が20~30%低下するのを確認しています。低い金型温度は、射出圧力要件を100~200バール増加させます。ただし、冷却時間は短縮され、サイクルタイムが改善されます。バランスが重要です。許容可能な部品品質を達成する最小温度を使用してください。典型的な最低温度:ABS 50°C、ナイロン 60°C、ポリプロピレン 40°C。
-
injection molding: injection molding refers to is the production process that melts plastic, injects it into a mold cavity, cools the part, and repeats the cycle for stable volume manufacturing. ↩
-
injection mold: injection mold refers to an injection mold is the precision tool that defines part geometry, cooling behavior, ejection, gating, surface finish, and repeatability. ↩
-
調達ガイド: 調達ガイドとは、金型能力、工程管理、材料知識、検査規律、信頼性によって製造パートナーを評価するのに役立つ調達ガイドを指します。 ↩





 EN
EN  ES
ES  FR
FR  DE
DE  PT
PT  AR
AR  RU
RU  JA
JA  KO
KO  IT
IT  NL
NL  TR
TR  PL
PL 