 Vai al contenuto

If you’re designing a part that combines two materials—say metal and plastic, or hard plastic and soft TPE—you’ll eventually face a choice: stampaggio di inserti1 o sovrastampaggio2. Entrambi permettono di creare parti multi-materiale in un componente singolo, ma funzionano diversamente, hanno costi diversi e si adattano a diverse applicazioni.
In practice, picking the wrong one can cost you thousands in tooling rework—not to mention weeks of project delays. I’ve seen engineers default to overmolding when insert molding would have been simpler and cheaper, and vice versa. The confusion is understandable: both processes combine materials, both eliminate secondary assembly, and both produce integrated components. But under the hood, the mechanics diverge completely.
Questo articolo illustra esattamente come funziona ogni processo, dove uno prevale rispetto all'altro e come decidere—basandosi su due decenni di esperienza pratica in fabbrica, gestendo quotidianamente entrambi i processi. Se hai bisogno di inserti metallici filettati incapsulati in plastica o di una grip morbida su un nucleo rigido, comprendere questi due processi ti aiuterà a scegliere la via giusta la prima volta.
- Insert molding places a pre-formed insert (usually metal) into the mold, then injects plastic around it in one shot.
- Overmolding molds a second material over a previously molded substrate, requiring two shots minimum.
- Insert molding excels at combining metal threads, contacts, or reinforcements with plastic housings.
- Overmolding is the go-to for soft-grip handles, seals, and multi-color consumer products.
- Tooling cost and cycle time differ significantly—understand both before committing.
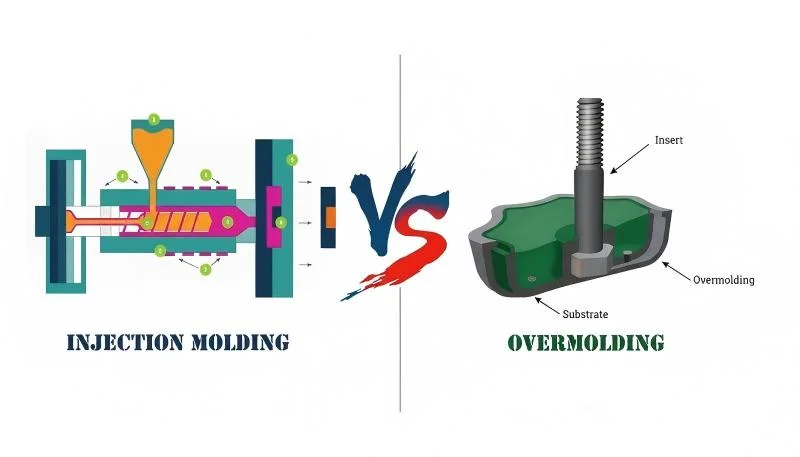
Grafico costo per componente rispetto al volume di produzione
Lo stampaggio con inserti è un processo a singolo colpo che incapsula un componente preformato—tipicamente metallico—dentro plastica fusa durante un singolo ciclo di iniezione. L'inserito è caricato nell'utensile prima di ogni colpo, e la plastica si forma intorno per creare un legame permanente.
Insert molding is a single-shot stampaggio a iniezione processo in cui un componente preformato—tipicamente un inserito metallico filettato, un contatto elettrico o un rinforzo—è posizionato nella cavità dell'utensile prima che la plastica sia iniettata intorno. Il polimero fuso fluisce intorno all'inserito, incapsulandolo e creando un legame permanente dopo il raffreddamento. Il risultato è un componente integrato singolo senza necessità di assemblaggio secondario. Se stai confrontando fornitori o pianificando l'acquisto, il nostro injection molding supplier sourcing guide covers RFQ prep, qualification, and commercial risk checks.
The inserts themselves are usually made from brass, steel, or stainless steel, and they almost always feature knurled, grooved, or threaded exteriors to improve mechanical interlocking with the plastic. In low-volume production, operators load inserts into the mold by hand. For high-volume runs, robotic arms, vibratory bowl feeders, or pick-and-place systems automate the process. Most dedicated insert molding machines use a vertical clamp configuration—gravity naturally holds the insert in position when the mold opens and closes, which dramatically reduces the risk of insert displacement during handling.
I parametri critici del processo includono la temperatura di fusione, la velocità di iniezione e la pressione di mantenimento. La temperatura di fusione varia per materiale—il PA66 lavora circa a 280–300 °C, mentre il PBT è più vicino a 240–260 °C. La velocità di iniezione deve essere sufficientemente rapida per fluire intorno all'inserito prima che l'ingresso si solidifica, ma non così rapida da spostare l'inserito.
The insert’s surface preparation is just as important. A well-designed knurl pattern, cross-drilled holes, or helical grooves on the insert provides mechanical interlock. For maximum bond strength, some applications use both mechanical features and adhesive primers.
What Is Overmolding and How Does It Work?
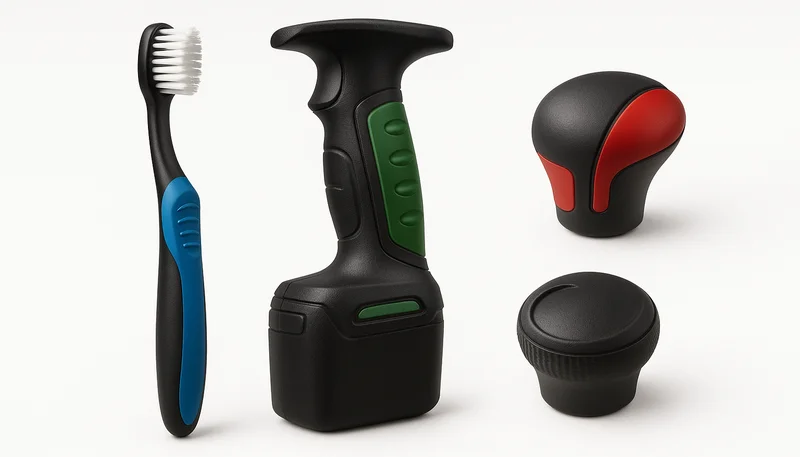
Il sovrastampaggio è un processo a due colpi che stampa un secondo materiale—tipicamente un elastomero morbido—su un substrato plastico rigido. Il risultato è un componente singolo con due zone di materiale distinte unite insieme. La situazione più comune è un corpo plastico rigido con una zona grip simile alla gomma.
There are two distinct bonding mechanisms at play, and understanding the difference is essential for reliable production. Chemical bonding occurs when the substrate and overmold materials share compatible molecular structures—the overmold material partially melts and fuses with the substrate surface at a molecular level during injection. This is the strongest bond type, but it’s highly material-dependent: not all substrate-overmold combinations bond chemically. Mechanical interlocking relies on physical features designed into the substrate—undercuts, grooves, T-slots, or through-holes—that the overmold material flows into and locks behind as it cools.
In practice, the best and most reliable overmolded parts use both mechanisms together. You design mechanical interlock features as a safety net, and then select compatible materials so the chemical bond provides the primary adhesion. If the chemical bond fails—for example, due to surface contamination or processing variations—the mechanical features keep the part intact.
Overmolding can be performed on a single machine with a rotary mold (called stampaggio a due colpi3) o su due macchine separate dove il substrato è trasferito manualmente o robotizzato tra loro. Il processo a due colpi su una macchina rotativa è più rapido, più coerente e produce una ripetibilità dimensionale migliore perché il substrato non lascia mai l'ambiente controllato. Lo stampaggio per trasferimento tra due macchine è più flessibile e più economico per gli utensili, ma introduce variabilità nella manipolazione e costi di manodopera. Materiali comuni per sovrastampaggio includono TPU per resistenza all'usura e flessibilità, SEBS per prodotti consumer soft-touch e TPV per tenuta automotive sotto cofano.
How Do Insert Molding and Overmolding Differ?
Lo stampaggio con inserti e il sovrastampaggio sono fondamentalmente diversi nel numero di cicli, nella complessità degli utensili e nel tipo di legame tra i materiali. Lo stampaggio con inserti è un processo a singolo colpo; il sovrastampaggio richiede due colpi. La tabella seguente analizza le differenze nei fattori più importanti nella produzione.
| Criteria | Stampaggio a inserti | Sovrastampaggio |
|---|---|---|
| Number of shots | Single shot | Two or more shots |
| Typical insert/substrate | Metal (brass, steel, stainless) or pre-formed component | Previously molded rigid plastic substrate |
| Overmold material | Thermoplastic resin (PA, PBT, PC, etc.) | Soft TPE, TPU, SEBS, or second rigid plastic |
| Primary bonding mechanism | Mechanical interlock (knurl, threads, undercuts, shrink-fit) | Chemical bond + mechanical interlock |
| Mold complexity | Single cavity with insert loading station | Two cavities (or rotary mold for two-shot) |
| Typical cycle time | Shorter (one injection + cooling) | Longer (two shots + transfer + cooling) |
| Tooling cost | Lower (one cavity) | N/A (secondo materiale stampato in loco) |
| Typical applications | Threaded fasteners, electrical connectors, medical needles | Soft-grip tools, seals, multi-color consumer parts |
| Volume suitability | Low to high (manual or automated insert loading) | Medium to high (automation preferred) |
The single-shot nature of insert molding makes it inherently faster per cycle—there’s no substrate transfer step, no second injection, and no additional cooling period. But insert loading time can eat into that advantage, especially if you’re hand-loading at low volumes. A skilled operator can load inserts in 5–10 seconds, but robotic loading brings that down to 1–3 seconds per cycle. On the other hand, overmolding’s two-shot process adds significant cycle time, but the result—a seamless multi-material part—often eliminates downstream assembly operations (seal installation, adhesive bonding, snap-fit assembly) that insert molding simply can’t replace.
One common misconception is that insert molding can only handle metal inserts. In reality, you can insert-mold plastic components, ceramic pieces, PCB assemblies, glass lenses, and even fabric or film inserts. The key constraint is that the insert must survive the injection temperature and pressure of the encapsulating material. Similarly, overmolding isn’t limited to soft-over-hard combinations—you can overmold a second rigid plastic for structural reinforcement or multi-color aesthetics.
When Should You Choose Insert Molding?
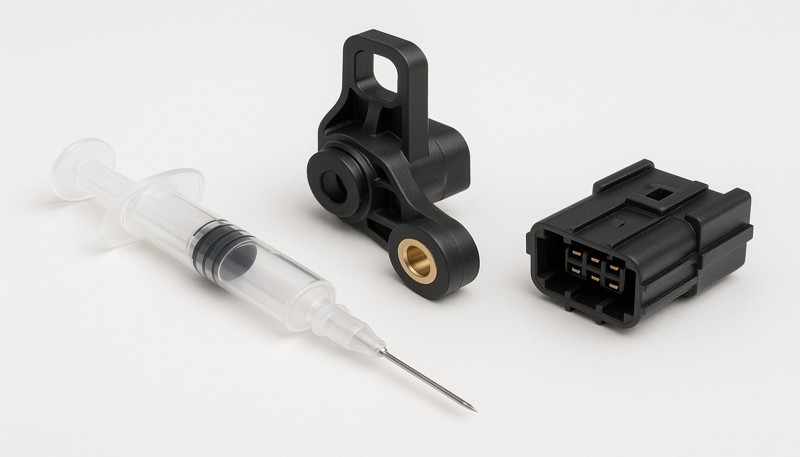
Insert molding is the right call whenever your part needs to integrate a pre-formed component—especially metal—directly into a plastic body. If you’re designing a connector housing with threaded brass inserts that need to withstand repeated assembly and disassembly cycles, insert molding produces a stronger and more consistent result than any post-molding installation method.
Electrical and Electronic Components
Connector housings, sensor bodies, PCB enclosures, and antenna assemblies frequently use insert molding to embed metal pins, terminals, or EMI shielding directly into the plastic housing. The process creates a hermetic seal around each contact, which is critical for IP-rated enclosures used in outdoor and industrial environments. In our production experience, insert-molded connectors consistently pass IP67 and IP68 testing, while parts with post-installed contacts often leak at the pin-to-plastic interface under pressure cycling.
Dispositivi medici
Surgical instruments, drug delivery devices, catheter hubs, and diagnostic equipment often combine stainless steel needles, lumens, or electrodes with plastic bodies. Insert molding provides the sterility, precision, and material compatibility these applications demand. Biocompatible plastics like PEEK, medical-grade PC, and PPSU bond well to properly prepared metal surfaces, and the single-shot process minimizes contamination risk compared to multi-step assembly.
Automotive Fasteners and Structural Components
Threaded brass inserts molded into plastic mounting brackets are found throughout modern vehicles—from dashboard mounts and interior trim clips to under-hood cable routing brackets and sensor housings. The insert provides durable threads that survive hundreds of assembly and disassembly cycles without stripping, while the stampo a iniezione design allows complex geometries that would be prohibitively expensive with all-metal construction. The weight savings from replacing metal brackets with insert-molded plastic-metal hybrids is a significant driver in automotive lightweighting.
“Overmolding typically requires a more expensive mold than insert molding because it needs two cavities or a rotary mold.”Vero
Overmolding tooling costs $15,000–$40,000+ compared to $8,000–$20,000 for insert molding, primarily because overmolding requires either two separate cavities (for transfer molding) or a rotary mold with two stations (for two-shot molding). The added complexity of aligning two cavities precisely and managing the substrate transfer mechanism drives the cost premium.
“Insert molding requires at least two injection shots to complete a part.”Falso
Insert molding is a single-shot process. The metal insert is placed in the mold cavity before the single injection cycle begins. Overmolding, by contrast, requires two or more shots to complete the part.
When Should You Choose Overmolding?
Il sovrastampaggio è la scelta giusta quando hai bisogno di due materiali con proprietà diverse in un componente senza giunture. Morbido su rigido, flessibile su solido—se l'ergonomia, la tenuta o l'estetica sono importanti, il sovrastampaggio è vincente.
Consumer Products and Ergonomic Design
Toothbrushes, power tool grips, kitchen utensils, gaming controllers, and personal care devices all use overmolding to add soft-touch surfaces over rigid structural cores. The soft TPE or TPU layer provides grip comfort, vibration dampening, impact absorption, and a premium tactile feel that’s simply impossible to achieve with a single rigid material. Consumer brands have built their entire product identity around the clean, multi-material aesthetic that overmolding enables—the visual contrast between glossy rigid plastic and matte soft-touch surfaces is instantly recognizable.

Sealing and Environmental Protection
When a part needs to be waterproof or dustproof, overmolding a soft gasket material (like a silicone-alternative TPE) directly into a rigid housing creates a monolithic seal—no separate O-ring to install, no groove to machine, no assembly step, and no leak path. This approach is standard practice for outdoor electronics, marine equipment, industrial sensors, and automotive connector systems. The bonded seal is inherently more reliable than a press-fit O-ring because there’s no groove to misalign during assembly and no compression set degradation over the product’s lifetime.
Multi-Color and Multi-Material Aesthetics
Two-shot overmolding allows different colored plastics to be molded in a single machine cycle, creating sharp, clean color boundaries without any secondary painting, pad printing, or labeling. The color is integral to the part—it won’t scratch off, fade, or peel. This is widely used in brand logos on consumer electronics, button panels on appliances, and color-coded medical device components where color permanence is a regulatory requirement.
“Overmolding completely eliminates the need for secondary assembly in multi-material parts.”Vero
Overmolding produces a finished multi-material component in the molding process itself. Seals, soft-grip surfaces, gaskets, and multi-color features are all formed during molding, which removes the need for separate assembly steps like O-ring installation, adhesive bonding, or painting.
“Brass threaded inserts can only be installed into plastic parts using ultrasonic insertion after molding.”Falso
Brass inserts can be installed through multiple methods: insert molding (loaded before injection), ultrasonic insertion (pressed into pre-molded holes using ultrasonic vibration), thermal insertion (heated and pressed in), or self-tapping installation. Insert molding produces the strongest and most consistent results because the plastic shrinks directly around the insert features.
How Do Costs Compare Between Insert Molding and Overmolding?
Cost is where the practical decision gets made. Insert molding generally has significantly lower tooling costs because you’re running a single-cavity mold—the insert loading mechanism is typically a simple fixture or manual placement. Overmolding requires either a two-station mold with a transfer mechanism or a rotary mold with two separate cavities, which can double or triple the upfront tooling investment.
On the per-part side, the economics are more nuanced. Insert molding has lower material costs (one polymer resin plus the metal insert) and shorter cycle times, but the cost of the inserts themselves adds up—brass threaded inserts typically cost $0.02–$0.15 each depending on size and quantity. Overmolding uses more material (two different polymers) and longer cycle times, but it can completely eliminate downstream assembly labor—seals, gaskets, adhesive bonding, snap-fit assembly—that would otherwise add significant per-part cost.
For high-volume production runs (50,000+ units), the labor savings from overmolding often offset the higher tooling cost within the first or second production run. For lower volumes or applications where metal integration is the primary requirement, insert molding wins on total cost of ownership.
| Cost Factor | Stampaggio a inserti | Sovrastampaggio |
|---|---|---|
| Tooling investment | $8,000–$20,000 (single cavity) | $15,000–$40,000+ (two-cavity or rotary) |
| Per-part material cost | Lower (one resin + metal insert) | Higher (two resin materials) |
| Typical cycle time | 15–40 seconds per shot | 30–80 seconds total (two shots) |
| Insert/component cost | $0.02–$0.15 per insert | N/A (second material molded in place) |
| TPU o TPE | Eliminates fastener installation | Eliminates seal/gasket/bonding steps |
| Break-even volume | Economical from ~1,000 units | Best ROI at 10,000+ units |
The bottom line: if your design primarily needs a metal component embedded in plastic, insert molding is almost always the more economical choice at any volume. If you need soft-touch features, integrated seals, or multi-color aesthetics, overmolding’s higher tooling cost pays for itself through eliminated secondary operations and improved product reliability.
What Are the Key Design Considerations for Each Process?
Insert Molding Design Guidelines
Le considerazioni di design sono fondamentalmente diverse tra lo stampaggio con inserti e il sovrastampaggio. Per lo stampaggio con inserti, la parete intorno all'inserito dovrebbe essere almeno 0,5× il diametro dell'inserito (e idealmente 1×) per prevenire segni di affondamento sulla superficie opposta e garantire un flusso di materiale adeguato per l'incapsulamento completo.
Always design the mold so that the insert is supported on at least two sides to prevent deflection or rotation during injection. Gate placement is critical: position the gate so the melt flow pushes around the insert in a balanced pattern, wrapping from both sides rather than hitting it head-on. An unbalanced flow front can shift the insert 0.2–0.5 mm off position, which may be unacceptable for tight-tolerance applications like electrical connectors.
Overmolding Design Guidelines
Chemical bond strength depends entirely on material compatibility—always consult your material supplier’s overmold adhesion chart before finalizing selections. Proven combinations include ABS + TPE, PP + SEBS, and PC + TPU. When chemical bonding isn’t possible (incompatible material pairs), you must rely entirely on mechanical interlock, which means designing undercuts, T-slots, or through-holes into the substrate that the overmold material can flow into and lock behind.
Wall thickness of the overmold layer typically ranges from 1.0 to 3.0 mm. Thinner layers (below 1.0 mm) may not achieve adequate bond strength and can be difficult to fill consistently. Thicker layers (above 3.0 mm) increase cycle time significantly due to cooling requirements and can cause warpage in the substrate. Avoid sharp transitions between substrate and overmold—use radiused edges (minimum 0.5 mm radius) to prevent stress concentrations that could lead to delamination under load or thermal cycling.
Draft angles on the overmold cavity need to account for the soft material’s flexibility—1–2° is usually sufficient for TPE overmolds, compared to the 0.5–1° often used for rigid plastics. The substrate should be designed with the overmold in mind from the start, not as an afterthought. Retroactively adding overmold features to an existing substrate design is a common source of adhesion failures.
“Overmold wall thickness below 1.0 mm can reduce bond strength and cause filling issues.”Vero
Thin overmold layers (under 1.0 mm) present two problems: the material may not achieve adequate flow to fill the cavity consistently, and the reduced contact area limits chemical bonding surface. The recommended minimum is 1.0 mm, with 1.5–2.5 mm being the optimal range for most TPE and TPU overmolds.
“Smooth cylindrical inserts provide adequate retention strength for most insert molding applications.”Falso
Smooth inserts rely solely on shrink-fit, which varies with processing conditions. Knurled or grooved inserts provide 3–5× higher pull-out strength because the plastic mechanically interlocks with the surface features. For any load-bearing application, surface preparation of the insert is essential.
What Materials Work Best for Each Process?
Material selection is critical for both processes, but the considerations are fundamentally different. For insert molding, the primary focus is on the encapsulating plastic’s ability to flow around and mechanically grip the insert during cooling and shrinkage. For overmolding, the central concern is adhesion—both chemical and mechanical—between the substrate and the overmold material.
| Processo | Substrate/Insert | Molding Material | Key Consideration |
|---|---|---|---|
| Stampaggio degli inserti | Brass threaded insert | PA6, PA66, PBT | High shrinkage creates strong mechanical lock |
| Stampaggio degli inserti | Stainless steel needle | Medical PC, PEEK | Biocompatibility, autoclave tolerance |
| Stampaggio degli inserti | Copper terminal/pin | PBT, PPS, LCP | Electrical insulation, dimensional stability |
| Stampaggio degli inserti | Aluminum heatsink | PBT, PA66 + GF | Thermal management, structural reinforcement |
| Sovrastampaggio | ABS substrate | TPE (Shore A 50–80) | Strong chemical bond, consumer products |
| Sovrastampaggio | PP substrate | SEBS, TPV | Automotive seals, soft-touch over polyolefin |
| Sovrastampaggio | PC substrate | TPU | Wear resistance, optical clarity possible |
| Sovrastampaggio | PA66 substrate | TPE-S or TPE-O | Under-hood automotive, chemical resistance |
| Sovrastampaggio | POM substrate | TPU or TPE | Applicazioni di Stampaggio a Inserimento nella Produzione in Fabbrica |
For insert molding, semi-crystalline materials like PA66 and PBT are popular because their higher shrinkage rates (1.2–2.0%) create stronger shrink-fit forces around the insert compared to amorphous materials like PC (0.5–0.7%). However, amorphous materials offer better dimensional stability and tighter tolerances—so the choice depends on whether pull-out strength or positional accuracy is the priority for your specific application.
For overmolding, always verify chemical compatibility with physical testing. Overmold bond strength testing per ASTM D903 is the industry standard for quantifying adhesion between substrate and overmold layers. Material supplier data sheets provide adhesion ratings, but actual bond strength depends on your specific processing conditions including melt temperature, injection speed, substrate surface condition, and cooling rate.
What Have We Learned From 20+ Years of Production Experience?
Running both insert molding and overmolding daily at our Shanghai facility across 47 injection molding machines (90T–1850T, including 3 dedicated two-shot machines) has taught us several lessons that textbooks don’t cover:
Insert placement accuracy is the #1 quality driver. Even 0.2 mm of insert shift can cause dimensional failure on tight-tolerance electrical connectors. We use robotic insert loading with vision verification on high-volume jobs. On our vertical clamp machines, gravity assists with positioning, but we still run in-mold sensors to confirm placement before every shot. The cost of the sensor system paid for itself within three months by eliminating scrap from misplaced inserts.
Overmold adhesion testing must start at the sampling stage, not during production ramp. We’ve seen too many projects discover bonding failures during PPAP or first-article inspection because the material combination wasn’t tested under actual production conditions. Our standard procedure requires overmold bond strength testing data on first-off samples before any overmolding job moves past the sampling phase. With 8 senior engineers (each with 10+ years of experience) and 120+ production staff, we have the bandwidth to do this right.
Cycle time optimization is where the real margin lives. For insert molding, reducing insert loading time through automation (vibratory bowl feeders, robotic pick-and-place) often cuts more cycle time than optimizing injection parameters. For overmolding, minimizing substrate transfer time between stations and optimizing simultaneous cooling of both materials are the biggest levers. Our engineering team focuses their process optimization efforts on these specific areas because they deliver the highest ROI.
We’re ISO 9001, ISO 13485, ISO 14001, and ISO 45001 certified, with a 6-step quality control process covering incoming inspection, in-process sampling, process inspection, packaging inspection, final inspection, and outgoing inspection. Whether your project needs insert molding for medical-grade components or overmolding for consumer product ergonomics, our in-house mold manufacturing facility and 100+ sets of mold delivered monthly give us the capacity and precision to deliver.
Quali sono le domande più frequenti sulla stampaggio con inserti e lo sovrastampaggio?
Domande frequenti
What is the main difference between insert molding and overmolding?
Insert molding is a single-shot process where a pre-formed insert (usually metal) is placed in the mold cavity before plastic is injected around it, creating a permanent mechanical bond through shrink-fit and surface features. Overmolding is a two-shot process where a second material is molded over a previously molded plastic substrate, bonding through both chemical adhesion and mechanical interlocking. The fundamental differences are the number of injection cycles required, the types of materials being combined, and the bonding mechanisms involved.
Is insert molding cheaper than overmolding?
Tooling for insert molding is generally less expensive because it requires only a single-cavity mold with an insert loading mechanism, while overmolding requires two separate cavities or a rotary mold, which can double or triple the upfront investment. Per-part costs are more nuanced: insert molding has lower material costs and shorter cycle times, but the metal inserts themselves add $0.02–$0.15 per piece. Overmolding costs more per cycle but can eliminate downstream assembly operations. At volumes above 10,000 units, overmolding often becomes the more economical total-cost option.
Can you overmold onto a metal substrate?
You can mold plastic over a metal component, but the manufacturing industry classifies this process as insert molding rather than overmolding. Overmolding specifically refers to molding a second plastic material over a first plastic substrate. When metal is involved as the pre-placed component, the standard terminology is insert molding regardless of the polymer being injected around it. This distinction matters because the process parameters, tooling design, and bonding mechanisms differ significantly between the two approaches, and using the correct terminology ensures clear communication with your mold maker and production team.
What materials are commonly used for overmolding?
The most widely used overmold materials include TPE (thermoplastic elastomer) for general soft-touch applications, TPU (thermoplastic polyurethane) for wear resistance and flexibility, SEBS (styrene-ethylene/butylene-styrene) for automotive and consumer products requiring chemical resistance, TPV (thermoplastic vulcanizate) for under-hood automotive sealing applications, and TPR (thermoplastic rubber) for grip surfaces. Material selection depends primarily on the substrate material for chemical bond compatibility, required hardness range on the Shore A scale, environmental operating conditions including temperature and chemical exposure, and any regulatory requirements such as FDA or USP Class VI compliance for medical applications.
How strong is the bond in overmolding?
Bond strength varies significantly based on material combination, surface preparation, and part design. Chemically bonded overmolds using compatible material pairs like ABS and TPE typically achieve peel strengths of 15–30 N/mm when tested per the ASTM D903 standard. Mechanical interlocks through undercuts, T-slots, and through-holes provide additional retention strength that is independent of chemical bonding conditions. Most reliable production overmolds combine both chemical and mechanical bonding mechanisms to ensure consistent performance across processing variations and throughout the product’s service life in real-world operating conditions.
What industries use insert molding most heavily?
The largest consumers of insert molding technology are the electronics industry (connector housings with embedded metal pins, sensor bodies with sealed terminals, PCB-level antenna assemblies), medical device manufacturers (surgical instruments with stainless steel components, drug delivery systems with needle hubs, diagnostic equipment with embedded electrodes), the automotive sector (interior trim fasteners, dashboard mounting brackets, under-hood cable clips with threaded brass inserts), and consumer appliance producers (housings with integrated mounting points and threaded standoffs). Any industry that requires durable metal features permanently integrated into plastic components relies on insert molding as a primary manufacturing process.
Can insert molding and overmolding be combined in one part?
Yes, hybrid processes combining both insert molding and overmolding are common in complex multi-material assemblies. A typical example is an electronic connector where metal contacts are first insert-molded into a rigid plastic housing, and then the entire sub-assembly is overmolded with a soft TPE seal for IP67 environmental protection. This three-material, multi-process approach is powerful but requires careful process sequencing, significantly higher tooling investment, and rigorous quality control at each manufacturing stage to ensure dimensional accuracy and bond integrity throughout the production run.
What dimensional tolerance can insert-molded parts achieve?
Insert-molded parts typically achieve tolerances of ±0.05 to ±0.15 mm on critical dimensions, following ISO 20457:2018 guidelines for injection molded components. The metal inserts themselves are machined to much tighter tolerances (±0.01–0.02 mm), and the primary challenge is maintaining the insert’s positional accuracy through the high-pressure injection process. Factors affecting final tolerance include the plastic material’s shrinkage rate, insert placement precision, gate location and flow pattern, cooling uniformity across the part, and the rigidity of the insert support structure within the mold cavity during the injection cycle.
-
stampaggio di inserti: Lo stampaggio con inserti è un processo di stampaggio a iniezione a singolo colpo in cui un componente preformato (tipicamente metallico) è posizionato nella cavità dell'utensile prima che la plastica sia iniettata intorno, creando un legame meccanico permanente tramite adattamento per contrazione e caratteristiche di interblocco superficiale. ↩
-
sovrastampaggio: Il sovrastampaggio è un processo di stampaggio a due colpi in cui un secondo materiale è stampato su un substrato precedentemente stampato. La forza di adesione tra combinazioni compatibili (ABS/TPE) tipicamente raggiunge 15–30 N/mm di resistenza allo strappo secondo ASTM D903. ↩
-
stampaggio a due colpi: lo stampaggio a due colpi utilizza un utensile rotativo per iniettare diversi materiali sequenzialmente in un ciclo di macchina, migliorando la coerenza e riducendo la manipolazione tra i colpi. ↩


