 Skip to content

Introduction: The injection molding cycle, also known as the molding cycle, is the time it takes to complete an injection molding process. It includes the time from when the mold closes to when the product is molded, cooled, the mold opens, the product is removed, and the machine is ready for the next cycle.

This cycle directly affects production efficiency and equipment utilization because it’s the total time it takes for the injection moulding machine to make a plastic part.
Accurate control of the injection molding cycle is critical to the plastics processing industry and is one of the important factors in a company’s competitiveness and market performance. This article will discuss in detail what the injection molding cycle is.
What is the Composition of the Injection Molding Cycle Time?
The injection cycle is made up of injection (mold filling), holding time, cooling and feeding (including pre-plasticization) time, mold opening (product removal), auxiliary operations (such as applying release agent, placing inserts, etc.) and mold closing time.
In the whole molding cycle, cooling time and injection time are the most important, and have a decisive influence on the performance and quality of the product. The injection cycle is an important process factor affecting injection molding.
Injection Time
The injection process can be divided into the following stages:
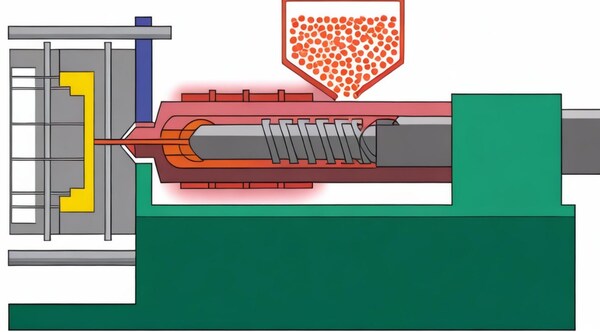
Plunger no-load period: During the time t0~t1, the material is heated and plasticized in the barrel. Before injection, the plunger (or screw) begins to move forward, but the material has not yet entered the mold cavity.

The plunger is in a no-load state. When the material flows through the nozzle and gate at high speed, the temperature rises due to shear friction, and the pressure at the plunger and nozzle increases due to flow resistance.
Mold filling stage: At time t1, the plastic melt starts to get injected into the mold cavity, and the pressure in the mold rises quickly. At time t2, the cavity gets filled, and the pressure in the mold cavity reaches its highest point. At the same time, the material temperature, plunger and nozzle pressure go up.
Pressure holding period: From t2 to t3, the plastic is still molten. The plunger has to keep pressure on the plastic to pack and shape the plastic in the mold cavity, and slowly push a little more plastic into the mold cavity to make up for the plastic shrinking as it cools.
As the material in the mold cavity cools, the pressure in the mold also starts to drop because the plastic cools and shrinks.

Return period (return pressure period or backflow period) The plunger gradually moves backward from t3, and new material (pre-plasticization) is delivered to the front end of the barrel during the process.
Due to the decrease in pressure at the barrel nozzle and gate, and the high pressure in the mold cavity, the unfrozen plastic melt is pushed back to the gate and nozzle by the internal pressure of the mold, resulting in backflow.
Solidification Period
During the time from t4 to t5, the temperature of the material in the cavity continues to decrease. When it reaches the temperature of solidification and hardening, the gate freezes and the backflow stops. The solidification time is a certain time between t4 and t5.
The subsequent cooling period is the time after the gate freezes. Actually, the cooling of the plastic in the cavity starts after the filling is completed (time t2). The subsequent cooling period is to continue cooling the product in the cavity to near the glass transition temperature of the plastic, and then demolding.
Holding Time
During the packing stage, pressure is applied to the melt to compress the polymer and push more material into the mold. This stage is used to compensate for the shrinkage of the polymer during the cooling process from the melt temperature to the ambient (room) temperature.
During the packing stage, another 5% to 25% of material can be added to the mold. The gate should be frozen during the packing stage to prevent the material from flowing out of the mold.

In terms of injection and packing time, the injection filling time of general products is very short, ranging from about 2 to 10 seconds, which varies with the shape and size of the plastic and the product.
The filling time of large and thick-walled products can reach more than 10 seconds. The packing time of general products is about 20 to 100 seconds, and large and thick-walled products can reach 1 to 5 minutes or even more.
The cooling time is based on the principle of controlling the product to not bend when demolding, and the time is short. It is generally 30 to 120 seconds, and large and thick-walled products can be appropriately extended.
Cooling Time
Cooling time is a stage in the injection molding cycle where no pressure is applied to the plastic. The mold stays closed and the plastic keeps cooling until the part can be ejected. The cooling stage is usually the longest stage in the molding cycle, and it often accounts for 80% of the total cycle time.
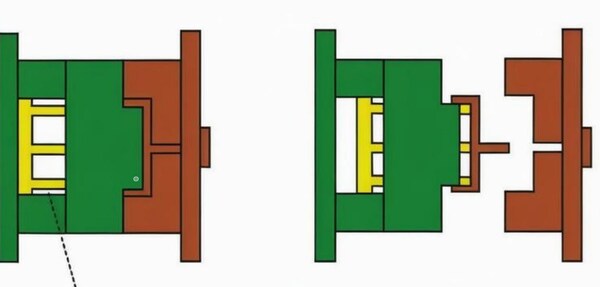
Mold Opening Time
This is the time it takes to open the mold before the next molding cycle starts. This time includes: opening the mold, ejecting the part, getting ready for the next cycle, like loading the insert (not always part of the cycle), and closing the mold.

How Many Parts are There in the Injection Moulding Cycle?
The time it takes to complete an injection moulding process is called the molding cycle, also known as the cycle time. It actually consists of the following parts:
Molding Cycle
The molding cycle is important for labor productivity and equipment utilization. So, plastic mold manufacturers should try to shorten the relevant time in the molding cycle while ensuring quality.

In the entire molding cycle, the injection unit time and cooling time are the most important, and they have a decisive influence on the quality of the product. The filling time in the injection time is proportional to the filling rate, and the filling time in production is generally around 3-5 seconds.
Dwelling Time
The time the plastic materials is under pressure in the mold is called the holding time. It makes up a large part of the total injection time, usually 20-120 seconds (for thick parts, it can be as long as 5-10 minutes). The holding time affects the dimensional accuracy of the part until the material at the gate freezes.
If it is too short, it will have no effect. The holding time also has an optimum value, which depends on the material temperature, mold temperature, gate size, and gate location. If the gate size and location and process conditions are normal, the pressure value that gives the smallest range of shrinkage for the part is usually used as the standard.
Cooling Time
The cooling time is mainly determined by the thickness of the product, the thermal and crystallization properties of the plastic, and the mold temperature. The end of the cooling time should be based on the principle of ensuring that the product does not change when demolding. The cooling time is generally between 30 and 120 seconds.
If the cooling time is too long, it is unnecessary, which not only reduces production efficiency, but also affects complex parts. Demolding is difficult, and demolding stress may even be generated when forced demolding. Other times in the molding cycle are related to whether the production process is continuously automated and the degree of continuous automation.
How to Estimate the Injection Molding Cycle?
Injection molding is a cyclic process. The molding cycle is mainly composed of material storage time, injection holding time, cooling time, mold opening and closing time, ejection and removal time.

Product cooling and screw metering and material storage are carried out at the same time. When calculating the molding cycle, take the larger value of the two (cooling time generally includes material storage time).
Material Storage and Injection Holding Time
The time for storing and injecting the material should be determined according to the properties of the plastic, the shape of the product, and the quality requirements (appearance, size, etc.). It is related to many factors such as injection pressure, injection rate, screw speed, back pressure, and temperature.
Under the premise of ensuring quality, the shortest time should be sought. When estimating the material storage time of injection molded parts, it is generally calculated between 65% and 85% of the maximum plasticizing capacity (g/s) of the injection molding machine. The injection process is usually divided into 3 stages (slow-fast-slow).
When estimating; T=W/20~50%V + t. T: total injection time; W: total injection volume (weight of a single product x number + nozzle weight); V: maximum injection speed of the injection molding machine; t: a time base required for the screw to start and stop; 80T~200T take 1~2S; 200T~500T take 2~3S; 500T~1000T take 3~4S .
Pressure Holding Time
Pressure holding time is the time from the time the mold cavity is filled to the end of the pressure holding. The choice of pressure holding time generally depends on the product’s requirements for appearance shrinkage, size and deformation.
Cooling Time
Cooling time is the time from the end of pressure holding to the opening of the mold. The length of the cooling time is affected by factors such as the shape and wall thickness of the product, the design of the mold cooling water, the mold temperature, and the properties of the melt.

Under the premise of ensuring good product quality, the cooling time should be shortened as much as possible. When the product is fixed, the design of the mold cooling water is the key factor affecting the length of the cooling time.
Mold Opening And Closing Time
The mold opening and closing time is affected by factors such as machine size and mold structure.
The core pulling structure (slide) on the mold, the mold opening and closing rack transmission mechanism, the three-plate mold (fine water outlet) mechanism, etc. will affect the mold opening and closing time. Generally, 80T~200T takes 4~8S, 200T~500T takes 6~10S, and 500T~1000T takes 8~15S.
Ejection And Pickup Time
The ejection and take-out time is affected by the ejection speed, ejection stroke, and take-out method (automatic, manual, robot). Automatic take-out is generally only used for small products with low appearance requirements (internal parts), and the take-out time is generally 0.5~2S.
When the robot takes out the product, the mold can start closing the mold after the product leaves the mold range. The ejection and take-out time is generally 3~8S, and manual take-out generally takes 1~3S more than the robot. Generally, similar products are used as references to estimate the molding cycle.
What are the Main Ways to Shorten Injection Molding?
The main reason for using high-speed automatic molding molds is to shorten the injection molding cycle and reach the limit of the injection molding machine’s plasticizing capacity to improve the quality of plastic parts, save labor, and improve production efficiency. The main methods for shortening the molding cycle are as follows.

Shorten Injection Time
To shorten the injection time, you can increase the injection pressure to shorten the time it takes for the molten material to fill the mold. This requires using gates with smaller cross-sectional areas, such as pinpoint gates and side gates.
Because these gates have a small cross-sectional area, when the molten material flows through them, it generates a very high shear rate and new heat due to high-speed friction, which increases the fluidity of the molten material and allows it to quickly fill the mold cavity. To achieve this, the runner should be as short as possible.

If you use a runnerless or hot runner gating system, the front end of the nozzle can be directly in contact with the gate, which greatly reduces the flow resistance and is more conducive to shortening the injection time.
Keep the various parts of the molded parts at a suitable temperature. During the injection process, due to the heat dissipation of the runner and the mold body, when the molten plastic flows reaches the end of the process, its temperature gradually decreases, causing the end cavity to be unfilled.

In order to avoid this phenomenon, the temperature of the mold should be higher at the end of the process. The mold temperature should also be slightly higher in areas where weld marks are likely to occur to avoid weld marks.
For this reason, local heating methods are sometimes used, or the dense arrangement of circulating water channels is used to balance the heat, that is, the outlet of the circulating water channel is set at the end of the process (the water temperature at the outlet of the water channel is higher than that at the inlet) to adjust the balance of mold temperature and ensure the fluidity of the molten material at the end of the pouring.
Install the necessary exhaust and overflow devices. During high-speed molding, because the molten plastic resin is injected at high pressure and fills the mold cavity in a short time, if the air in the cavity cannot be discharged in time and quickly, it will affect the quality of the plastic part and cause injection defects.
Therefore, when designing the mold, full consideration should be given to the setting of exhaust grooves. Generally, appropriate exhaust grooves and necessary overflow devices are set at the parting surface and the end of each process.

Shorten the Cooling And Solidification Time of the Melt
The cooling and solidification time of the melt during the injection process accounts for a large proportion. So, improving the cooling efficiency of the mold and shortening the cooling and solidification time are one of the most effective ways to shorten the molding cycle.
Improve the overall cooling efficiency of the mold. Generally speaking, the cooling of the mold body is achieved by the water in the circulating water channel taking away the heat to achieve mold cooling.

After setting up a good cooling circuit, the most important problem is to increase the flow of cooling water and try to reduce the temperature difference between the outlet and inlet of cooling water, especially for automated high-speed molding molds, the temperature difference between the outlet and inlet should be controlled within 3°C.
It is more effective to use the parallel method for cooling water channels, especially in summer when tap water is used, a special cooling water cooling and delivery device should be set up. Its function is that the water flowing out of the mold body water channel outlet has a certain temperature.
After cooling down through the cooling device, these waters flow into the inlet of the water channel with a special water pump, which can improve the cooling efficiency and can be recycled to save water.

The cooling water circuit is set as close to the molded plastic part as possible, and a flow-blocking structure such as a step or coarse thread is processed on the side wall. At this time, the cooling water flow will collide with the step part when returning and obtain heat from the core.
The cooling water that takes away the heat splashes on the step part and collides with the incoming cooling water, thereby increasing the contact area between the cooling water and the core body and increasing the cooling effect.
When the core shape is slender, due to the small size of the core, the temperature is easy to rise during molding and it is not easy to dissipate and cool down, which has a great impact on the molding cycle, and a cooling device must be set.
However, when it is impossible to set a cooling water channel from the inside, beryllium copper alloy with good thermal conductivity can be selected.
Sometimes, in order to achieve balanced cooling, you need to cool and heat a certain part of the automated high-speed mold. In automated high-speed molding, you can’t ignore the cooling problem of the runner.
If you use a cold runner system for casting molding, the main runner and the branch runner are relatively thick, so their cooling time will be relatively extended, that is, the molding cycle will be extended at the same time. Therefore, it is very necessary to set up a cooling circuit at the runner.
Shorten the Auxiliary Time
Auxiliary time refers to the time in the molding cycle, except for the injection pressure holding and cooling and curing process, that is, the time from the opening to the closing of the mold.
During this time, the plastic parts and the cast condensate are demolded to automatically fall out of the mold, the debris in the molding area of the mold body is cleared, and the moving parts are reset during the mold closing process.
The proportion of time they occupy is not large, but every second counts in the automated high-speed molding process. In order to shorten the auxiliary time, compressed air blowing is often used to automatically remove debris before closing the mold.
Conclusion
This paper mainly discusses the time components of the plastic injection molding cycle, including injection time, pressure holding time, cooling time, mold opening time, and ejection time. These time periods not only affect production efficiency and equipment utilization, but also directly determine product quality and production efficiency.

By optimizing the operation and technical parameters of each stage, the molding cycle can be effectively shortened, production efficiency can be improved, and the stability and consistency of product quality can be ensured.


