 Перейти к содержанию

Ваши детали продолжают не проходить проверку размеров, а литьевая компания продолжает винить «изменение материала». После 20 лет работы с литьем под давлением могу сказать: проблема обычно не в материале — она в методе управления процессом. Литье под давлением обманчиво повторяем до тех пор, пока это не перестает быть так, а традиционное литье оставляет вас с процессом, который отклоняется при каждом изменении влажности и партии смолы.
Развязанное инжекционное литьё (часто называемое Decoupled Molding™ или Научное литье1) разделяет заполнение, уплотнение и выдержку на независимые, измеримые этапы. Вместо одной длинной кривой давления, которую никто не может воспроизвести, вы получаете три настроенных параметра, которые можно проверить данными. В этой статье подробно рассказывается, как это работает, когда стоит приложить усилия для настройки и какие ошибки я наблюдал у инженеров, пробующих это впервые.
- Развязанное литьё разделяет заполнение, уплотнение и выдержку на три независимо управляемых этапа.
- Оно снижает вариацию веса детали до менее 0,5% — по сравнению с 2–5% при традиционном литье.
- Настройка занимает больше времени, но значения Cp/Cpk в производстве обычно превышают 1,33.
- Наиболее подходит для высокоточных деталей, медицинских изделий и многогнёздных пресс-форм.
- Требуется машина с замкнутым контуром управления скоростью впрыска и давлением.
Что такое развязанное инжекционное литьё?
Разделенное литье под давлением — это методология процесса, которая разделяет каждый цикл литья на независимо управляемые этапы заполнения, уплотнения и выдержки.
«Метод развязанного литья использует управление по скорости на этапе заполнения и переключается на управление по давлению для уплотнения.»Правда
Это фундаментальный принцип развязанного литья: заполнение управляется по скорости для достижения 95-99% заполнения полости, затем машина переключается на управление давлением на этапе подпрессовки.
«Более высокое давление уплотнения всегда дает детали лучшего качества при разделенном литье.»Ложь
Как только давление уплотнения достигает плато по массе (когда масса детали перестаёт увеличиваться), дополнительное давление лишь добавляет остаточные напряжения, увеличивает время цикла и может привести к облою. Большее давление не означает лучшее.
Вот почему это важно: при традиционном литье вы задаете единое давление впрыска и время. Машина набирает обороты, заполняет полость и подпрессовывает — все одним движением. Если что-то меняется (температура расплава, температура формы, изменение вязкости), вся кривая смещается вместе с этим. Вы получаете более тяжелые изделия в один день, недоливы на следующий, и никто не может сказать почему без месяца сбора данных.
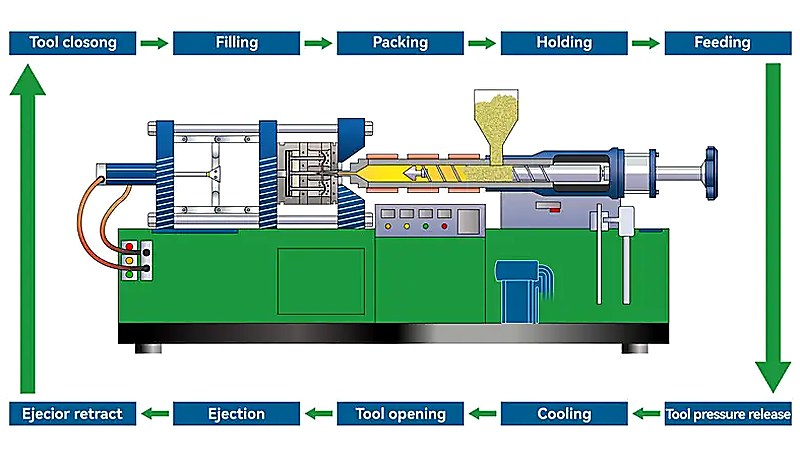
Метод развязанного литья гласит: перестаньте рассматривать цикл как единое событие. Вместо этого заполняйте полость примерно на 95–99% только с использованием управления по скорости. Затем переключитесь на управление по давлению, чтобы уплотнить последние 1–5% материала. Наконец, поддерживайте давление для компенсации усадки во время охлаждения. Каждый этап имеет собственную обратную связь от датчиков, собственную уставку и собственный диапазон допустимых отклонений.
Результат — процесс, который действительно можно валидировать. Вместо «выглядит нормально» вы получаете «время заполнения составляет 1,82 секунды со стандартным отклонением 0,03 секунды на 500 выстрелах». Это язык, на котором говорят инженеры по качеству, и именно поэтому разделенное литье стало де-факто стандартом для любой детали с допуском уже ±0,1 мм.
Чем развязанное литьё отличается от традиционного?
Ключевое отличие — изоляция обратной связи: развязанное литьё даёт каждому этапу одну управляющую переменную, традиционное литьё позволяет им всем отклоняться вместе.
«Развязанное литьё может снизить вариацию массы детали до менее 0,5% по сравнению с 2-5% при традиционном литье.»Правда
Изолируя заполнение, уплотнение и выдержку в независимые этапы, разделенное литье обеспечивает гораздо более высокую стабильность от цикла к циклу, с вариацией веса детали, как правило, ниже 0,5%.
«Развязанное литье устраняет дефекты, вызванные плохим дизайном формы, таким как недостаточное охлаждение или неправильное расположение литника.»Ложь
Разделенное литье — это методология управления процессом, а не исправление конструкции пресс-формы. Плохое охлаждение, неправильные литники или недостаточная вентиляция все равно вызовут проблемы независимо от методологии процесса.
Представьте это как вождение автомобиля. Традиционное литье — это круиз-контроль на холмистой дороге — ваша скорость колеблется, потому что система реагирует на всё сразу. Разделенное литье больше похоже на наличие отдельных органов управления для газа, тормоза и руля. Каждый вход выполняет одну функцию, поэтому вы можете точно настраивать желаемое поведение. В традиционном процессе, если вы измените скорость впрыска, чтобы устранить недолив, вы также измените поведение уплотнения — переменные связаны. В разделенном литье регулировка скорости заполнения влияет только на время заполнения, оставляя профиль давления уплотнения неизменным.
| Параметр | Conventional | Развязанное |
|---|---|---|
| Управление заполнением | Ограничение давлением | Управляемое по скорости |
| Управление уплотнением | Так же, как заполнение | Управляемый давлением, независимый |
| Этап выдержки | Временная догадка | Затвердевание затвора подтверждено данными |
| Изменение веса изделия | 2–5% | <0.5% |
| Время настройки | 30–60 минут | 2–4 hours |
| Документация процесса | Карта параметров | Полный план эксперимента (DOE) с данными Cp/Cpk |
На практике чаще всего я вижу, что цеха, использующие традиционное формование, имеют отличные дни и ужасные дни, и никто не может объяснить разницу. Цеха, использующие развязанное формование, имеют стабильные дни, и когда что-то отклоняется, они могут точно указать, на каком этапе и почему.
Каковы три этапа развязанного литья?
Три стадии: заполнение (управление по скорости), подпрессовка (управление по давлению для компенсации усадки) и выдержка (поддержание давления до запечатывания литника).
«Время запечатывания литника при развязанном формовании определяется путем измерения момента, когда вес детали перестает увеличиваться с увеличением времени подпрессовки.»Правда
Запечатывание литника подтверждается эмпирически путём проведения исследования времени подпрессовки и наблюдения за моментом, когда вес изделия выходит на плато, что указывает на замерзание литника и прекращение поступления материала в полость.
«Традиционное литьё даёт более стабильные результаты, чем литьё с разделёнными стадиями, для коротких производственных серий».Ложь
Хотя литьё с разделёнными стадиями требует больше времени на настройку (2-4 часа против 30-60 минут), сам процесс по своей сути более стабилен. Инвестиции в настройку могут быть не оправданы для очень коротких серий, но традиционное литьё не является более стабильным по каким-либо показателям.
Этап 1: Заполнение (управление скоростью)
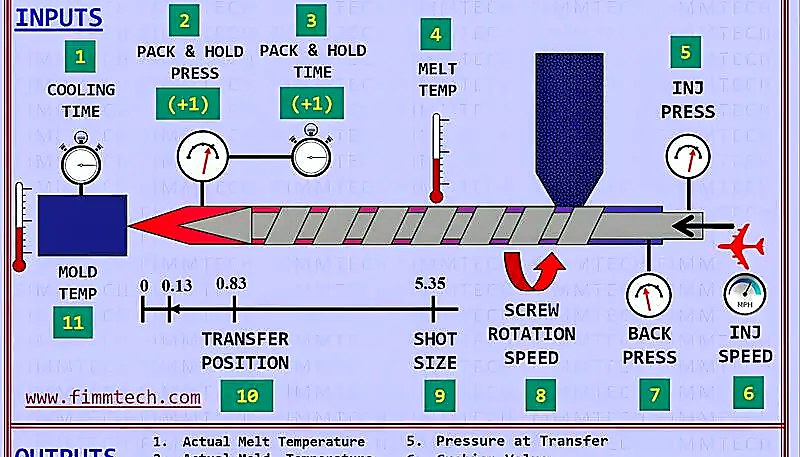
Стадия заполнения проталкивает расплавленный пластик в полость с контролируемой скоростью до тех пор, пока полость не заполнится на 95–99%. Ключевой показатель — время заполнения, обычно 1–5 секунд в зависимости от размера изделия. На этой стадии машина контролирует скорость впрыска, а не давление. Давление — это то, что требуется для поддержания этой скорости.
Зачем останавливаться на 95–99%? Потому что если заполнить до 100% при управлении скоростью, скачок давления в конце заполнения (называемый «перекрытием заполнения и уплотнения») вызывает переуплотнение у впуска и недоуплотнение на фронте потока. Остановившись чуть раньше, вы полностью избегаете этого скачка и плавно переходите к этапу уплотнения.
За чем мы следим: стабильность времени заполнения. Если ваше время заполнения варьируется от выстрела к выстрелу более чем на ±0.05 секунды, что-то не так — обычно это нестабильность температуры расплава или изношенное обратное кольцо в цилиндре.
Стадия 2: Подпрессовка (управление по давлению)
Как только полость заполняется на 95–99%, машина переключается с управления по скорости на управление по давлению в цикле литья под давлением в точке переключения V-P. Это стадия подпрессовки — вы прикладываете заданное давление (обычно 500–1500 бар в зависимости от материала и геометрии изделия), чтобы протолкнуть оставшийся материал в полость и сжать полимерную сеть.
Давление уплотнения должно быть достаточно высоким, чтобы устранить усадки и пустоты, но не настолько, чтобы вызвать облой или чрезмерные остаточные напряжения. Оптимальное значение обычно находят с помощью исследования давления: начните с низкого значения, увеличивайте на 50–100 бар и взвешивайте изделия, пока вес не стабилизируется. Эта стабилизация и есть оптимальное давление уплотнения.
Время подпрессовки определяется запечатыванием литника — моментом, когда литник замерзает и материал больше не может поступать в полость. Это подтверждается взвешиванием изделий при разном времени подпрессовки. Когда вес изделия перестаёт увеличиваться, литник запечатан. Для большинства изделий это занимает 1–8 секунд.
Стадия 3: Выдержка (управление по давлению и времени)
После запечатывания впуска давление выдержки обеспечивает стабильность размеров при охлаждении изделия. Некоторые специалисты объединяют уплотнение и выдержку в один этап (Раздельное II), другие разделяют их (Раздельное III). Практическая разница для большинства изделий невелика, но для оптических линз и медицинских компонентов разделение важно, так как даёт дополнительный параметр для настройки при валидации.
Давление выдержки обычно составляет 20–60% от давления подпрессовки. Его цель — не впрыснуть больше материала (литник запечатан), а поддерживать равномерное распределение давления в полости на ранних стадиях охлаждения, что минимизирует дифференциальную усадку и коробление.
Когда следует использовать развязанное литьё?
Развязанное формование оправдано, когда требования к допускам детали ниже ±0.15 мм, когда вы используете многогнездные формы или когда стоимость брака превышает стоимость расширенной разработки процесса. Если у вашей детали допуск ±0.5 мм и вы используете одногнездную прототипную форму, традиционного формования, вероятно, достаточно — не усложняйте процесс.
Однако в таких ситуациях раздельное формование быстро окупается:
Медицинские изделия: FDA и ISO 13485 требуют валидированных процессов. Развязанное формование предоставляет задокументированные данные Cp/Cpk, которые хотят видеть аудиторы.
Многогнездные формы (4+ гнезда): При традиционном формовании сложно равномерно заполнить все гнёзда. Раздельное заполнение + уплотнение изолирует вариации между гнёздами, что позволяет сбалансировать оснастку.
Шестерни и разъемы с жесткими допусками: Изделия с допусками менее ±0.1 мм требуют такого контроля процесса, которого традиционное литьё просто не может обеспечить стабильно.
Длительные производственные серии (100 тыс.+ изделий): Инвестиции в настройку за 2–4 часа амортизируются почти до нуля на миллионе деталей, а сокращение брака часто окупает настройку уже в первый производственный день.
Смена материала в середине программы: Если вы меняете партию материала или поставщика, развязанный процесс позволяет вам скорректировать затронутый этап без перевалидации всего цикла.
Когда НЕ стоит его использовать: для коротких серий менее 500 деталей, деталей с широкими допусками и ситуаций, когда ваш изготовитель пресс-формы не обеспечил адекватное охлаждение или вентиляцию. Развязанное формование — это методология процесса, и даже хорошо сделанная литьевая форма по-прежнему зависит от целенаправленного Позиция переключения2 если требуется стабильное давление уплотнения.
Как настроить процесс развязанного литья?
Настройка литья с разделёнными стадиями представляет собой пятиэтапную процедуру: температура расплава, скорость заполнения, давление подпрессовки, время запечатывания литника, затем проверка стабильности на 100 выстрелах.
Шаг 1: Оптимизация температуры расплава
Начните с рекомендуемого диапазона температуры расплава от поставщика материала. Проведите исследование температуры расплава: измерьте время заполнения, пиковое давление и внешний вид детали при трех температурах (низкой, средней, высокой). Выберите температуру, которая дает наиболее стабильное время заполнения и наилучшее качество поверхности. Для большинства инженерных пластиков это обычно оказывается в средней или верхней части диапазона поставщика.
Шаг 2: Оптимизация скорости заполнения
После фиксации температуры расплава проведите исследование скорости заполнения. Начните с 10% от максимальной скорости впрыска, увеличивайте с шагом в 10% и записывайте время заполнения и пиковое давление впрыска на каждой скорости. Вы ищете скорость, при которой время заполнения стабилизируется (эффекты инерции уменьшаются), а пиковое давление является приемлемым (не на пределе возможностей машины). Это ваша оптимальная скорость заполнения.
Шаг 3: Определение давления подпрессовки
Установите заполнение на достижение 95–99% объема полости (это можно определить, намеренно делая недолив). Затем начните давление подпрессовки с низкого значения — около 200 бар — и увеличивайте с шагом в 100 бар. Взвешивайте детали на каждом шаге. Когда вес детали перестает увеличиваться, вы нашли свое давление подпрессовки. Для большинства применений оно находится в диапазоне от 600 до 1200 бар.
Шаг 4: Определение времени подпрессовки/выдержки (запечатывание литника)
При вашем оптимальном давлении подпрессовки проведите исследование запечатывания литника. Начните с 1 секунды времени подпрессовки, увеличивайте на 1 секунду и взвешивайте детали. Когда вес стабилизируется на 2–3 последовательных измерениях, ваш литник запечатан. Это время запечатывания литника — ваше минимальное время подпрессовки + выдержки. Добавьте 0.5–1 секунду в качестве запаса безопасности.
Шаг 5: Валидация пробным запуском на 100 выстрелов
Выполните 100 последовательных выстрелов. Зафиксируйте время заполнения, пиковое давление, вес изделия и критические размеры. Рассчитайте Cp и Cpk для ваших критических размеров. Если Cpk ≥ 1.33, у вас стабильный процесс литья под давлением. Если нет, вернитесь к стадии, показывающей наибольший разброс, и проведите повторную оптимизацию.
Имея базу данных по переработке более 400 материалов и сертификаты ISO 9001/13485, мы документируем каждый этап процесса литья под давлением как стандарт для всех программ прецизионного литья. Наши 30+ англоговорящих менеджеров проектов координируют работу напрямую с вашей инженерной командой во время валидации процесса, поэтому нет информационного разрыва между тем, что видит машина, и тем, что получает ваша команда контроля качества.
Каковы наиболее распространённые ошибки при развязанном литье?
На нашем заводе, после наблюдения за сотнями настроек развязанного формования — как успешных, так и неудачных — это те ошибки, которые я вижу снова и снова. Их избегание сэкономит вам недели разочарований.
Ошибка 1: Пропуск исследования только на заполнение. Инженеры часто сразу переходят к давлению уплотнения, потому что стремятся получить качественные изделия. Но без чистого базового заполнения вы строите на песке. Всегда сначала установите скорость и время заполнения без уплотнения. Если не удаётся получить стабильный недолив на 95%, решите эту проблему прежде чем двигаться дальше.
Ошибка 2: Игнорирование обратного клапана. The check ring (non-return valve) in the barrel is the single most underappreciated component in decoupled molding. If it leaks, you lose shot-to-shot consistency in both fill and pack. Test it by measuring cushion consistency over 50 shots. If cushion varies more than ±0.5 mm, replace the check ring before doing anything else.
Mistake 3: Overpacking the part. More pack pressure is not better. Once you hit the weight plateau, additional pressure just adds residual stress, increases cycle time, and can cause flash. Some engineers think “if 800 bar is good, 1000 bar must be better.” It’s not. Trust the data, not your intuition.
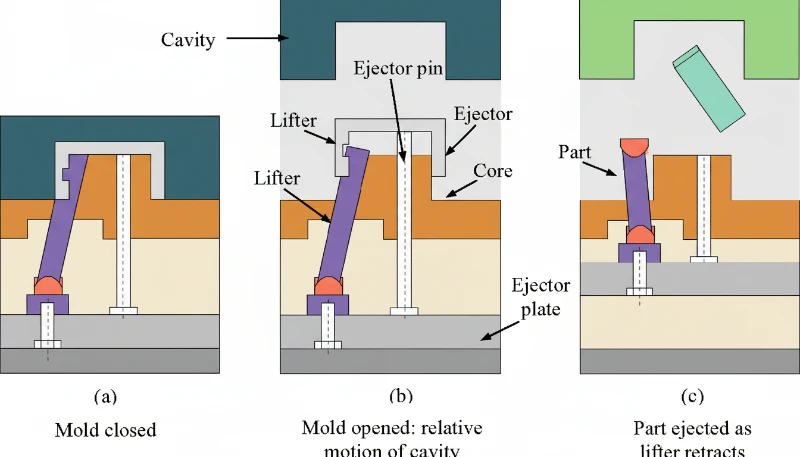
Mistake 4: Using hold pressure that’s too close to pack pressure. If hold pressure is 80–100% of pack pressure, you’re essentially extending the pack stage. This causes overpacking near the gate and can lock the part onto the core, making ejection difficult. A good rule of thumb: hold pressure should be 30–60% of pack pressure.
Mistake 5: Not documenting the process. Decoupled molding without documentation is just expensive conventional molding. Record every parameter, every study result, and every decision. Use a standardized process sheet that includes melt temp, mold temp, fill speed, V-P switchover point, pack pressure, pack time, hold pressure, hold time, and screw speed. Future you will thank present you.
Как конструкция пресс-формы влияет на развязанное литьё?
Mold design is the largest factor in decoupled molding success: poor cooling, wrong gates, or unbalanced runners defeat any process tuning. In our Shanghai factory, we have seen entire decoupled molding programs fail not because of process parameters, but because the tool itself could not support the level of control that scientific molding demands.
Cooling is non-negotiable. Decoupled molding depends on consistent cooling rates to produce consistent shrinkage. If cooling is uneven (thin channels, long distances from the part, or baffle locations that create hot spots), your pack and hold stages will behave differently in different areas of the part. The fix isn’t more process tuning — it’s better cooling design.
Gating strategy matters more than you think. Gate location determines fill pattern, which determines where the last area to fill is, which determines where pack pressure is least effective. In a well-designed decoupled process, the gate should be positioned so the last area to fill is a non-critical, thick section where packing is forgiving. If the last area to fill is a thin-wall section that needs dimensional precision, no amount of process optimization will save you.
Venting prevents false readings. Trapped air burns (dieseling) create local overpacking that looks like a process problem but is actually a mold maintenance issue. Ensure adequate venting at the flow front endpoints — typically 0.015–0.025 mm deep, 6–10 mm wide.
Runner design affects баланс полости3 — the uniformity of fill time across all cavities. In multi-cavity tools, balanced runners are critical. If cavity 1 fills in 1.5 seconds and cavity 4 fills in 2.1 seconds, your V-P switchover point will be wrong for at least one cavity. Runner balance should be within ±3% fill time across all cavities before you start tuning the decoupled process.
Каких результатов можно ожидать от развязанного литья?
Decoupled molding results are measurable: 15–30% Cp improvement, 40–60% scrap reduction, and process transfer cut from days to hours. In our own facility, we have seen Cpk values climb from 0.9 to over 1.6 on tight-tolerance medical components within the first production validation run after switching to a decoupled approach.
| Метрика | Conventional | Развязанное |
|---|---|---|
| Part weight Cpk | 0.8–1.2 | 1.5–3.0 |
| Dimensional Cpk | 0.5–1.0 | 1.33–2.0+ |
| Scrap rate | 3–8% | 0.5–2% |
| Setup-to-first-article time | 1–3 часа | 4–8 часов |
| Process transfer success rate | 40–60% | 85–95% |
“Decoupled molding process parameters transfer across machines with minimal adjustment because they are physics-based, not machine-specific.”Правда
Fill time, pack pressure at the cavity, and gate seal time are material and geometry dependent, not machine dependent. This is why documented decoupled processes transfer at 85-95% success rates compared to 40-60% for conventional processes.
“Decoupled molding eliminates the need for mold maintenance because the process compensates for tooling wear automatically.”Ложь
Decoupled molding optimizes how the machine controls material flow, but it cannot compensate for physical tooling degradation. Worn gates, eroded vents, and damaged cooling channels still require regular mold maintenance. Neglecting tooling upkeep will degrade process consistency regardless of the methodology used.
The biggest ROI comes from process transfer. In conventional molding, moving a mold from one machine to another (or one facility to another) often requires days of re-tuning because the process parameters are machine-specific. In decoupled molding, the parameters are physics-based — fill time, pack pressure at the cavity, gate seal time — so they transfer across machines with minimal adjustment.
This matters enormously if you are sourcing tooling in Asia and running production domestically, or vice versa. A decoupled process documented with Cpk targets at our Shanghai facility can be replicated at your local molder within hours, not days.
Часто задаваемые вопросы о разделенном литье
What Is the Difference Between Decoupled II and Decoupled III Molding?
Decoupled II uses two stages: fill (velocity-controlled) followed by pack + hold (pressure-controlled as one combined stage). Decoupled III separates these into three stages: fill, pack, and hold, each with independent pressure and time settings. Decoupled III provides finer control for optical parts and tight-tolerance medical components.
Is Decoupled Molding the Same as Scientific Molding?
Decoupled molding is a specific technique within the broader scientific molding methodology. Scientific molding encompasses data-driven process development, DOE studies, and statistical process control. Decoupled molding is the core process control strategy that makes scientific molding reproducible.
Do I Need Special Machines for Decoupled Molding?
You need a machine with closed-loop velocity and pressure control, which most modern hydraulic and electric machines manufactured after 2005 provide. The machine must be able to switch accurately from velocity control to pressure control at a defined switchover point. Older machines with open-loop controls are generally not suitable.
How Long Does It Take to Set Up a Decoupled Process?
A complete decoupled process setup — including melt study, fill speed study, pack pressure study, gate seal study, and 100-shot validation — takes 2–4 hours for an experienced process engineer on a straightforward single-cavity tool. Multi-cavity or family molds may take 4–8 hours.
Can Decoupled Molding Reduce Cycle Time?
Decoupled molding itself does not directly reduce cycle time — cooling time is usually the dominant factor. However, by eliminating guesswork and overpacking, it often allows you to reduce pack and hold times to their actual minimums, saving 1–3 seconds per cycle. The real time savings come from fewer rejects and fewer machine adjustments during production.
What Materials Work Best with Decoupled Molding?
All thermoplastic materials respond to decoupled molding. Semi-crystalline materials (PA, POM, PBT) benefit most because their shrinkage behavior is highly sensitive to packing pressure and cooling rate. Amorphous materials (PC, ABS, PMMA) also benefit, particularly for dimensional stability and sink mark prevention. In practice, these materials arrive at the press as plastic pellets — the colorful resin pellets you see in material bins — and the consistency of decoupled process control ensures uniform melting and filling regardless of lot-to-lot pellet variation.
How Do I Validate That My Decoupled Process Is Working?
Run 100 consecutive shots and measure part weight, critical dimensions, and visual defects. Calculate Cpk for each critical dimension — a Cpk ≥ 1.33 indicates a capable process. Also check fill time standard deviation: it should be under ±0.05 seconds for a stable process.
Quick rule: if your part tolerance is under ±0.15 mm, or you’re running more than 100,000 parts, invest the 2–4 hours to set up a decoupled process. The scrap reduction alone usually pays for the setup time within the first production shift. If your tolerance is ±0.5 mm and you’re running 500 parts, conventional molding is fine — spend your engineering hours on something that matters more.
If you’re evaluating whether decoupled molding makes sense for your specific application, свяжитесь с нашей инженерной командой в ZetarMold. With 20+ years of precision injection molding experience, 45 machines from 90T to 1850T, and a team of 8 senior engineers who apply scientific molding daily, we can tell you honestly whether the setup investment is worth it for your part — and if it is, we’ll walk you through the validation data step by step.
-
Научное литье: refers to a systematic injection molding methodology that separates filling, packing, and holding into independently controlled stages, each responding to a single dominant process variable. ↩
-
Позиция переключения: Switchover position refers to the transition point in the injection cycle where machine control switches from velocity-based filling to pressure-based packing, typically set at 95–99% cavity fill. ↩
-
баланс полостиБаланс полостей означает равномерность времени заполнения всех полостей в многогнездной форме, где сбалансированные литники обеспечивают подачу материала в каждую полость с одинаковой скоростью и давлением. ↩


