 Перейти к содержанию

Утяжины — эти надоедливые впадины на поверхности в остальном идеальной формованной детали — один из самых распространенных и заметных дефектов в литье под давлением. Они появляются прямо напротив толстых участков, ребер и бобышек, и это первое, что любой клиент заметит на декоративной поверхности.
В этом руководстве я объясню причины возникновения утяжин при литье под давлением, как предотвратить их через конструкцию и технологию, и что делать, если они уже появились на ваших изделиях. Руководство основано на десятилетиях производственного опыта работы с тысячами комплектов пресс-форм.
Основные выводы
- Утяжины — это поверхностные впадины, вызванные неравномерной усадкой при охлаждении в толстых участках
- Сохраняйте толщину ребра на уровне 50–60% от номинальной стенки — это самое эффективное предотвращение
- Конструкционные исправления в 5–10 раз дешевле, чем постформовые корректировки
- Материалы, наполненные стеклом, значительно уменьшают впадины; рассмотрите смену марки, если это допустимо.
- Технологические корректировки могут уменьшить утяжины на 30–50%, но редко устраняют конструкционно вызванные впадины
Что такое утяжины в литье под давлением?
Утяжины — это локальные впадины или ямки на поверхности формованной детали, обычно появляющиеся напротив таких элементов, как ребра, бобышки, участки толстой стенки или изменения геометрии. Они возникают, когда внутренний материал сжимается больше внешней оболочки при охлаждении, втягивая поверхность внутрь.
«Поддержание толщины основания ребра на уровне 50–60% толщины основной стенки эффективно предотвращает видимые впадины.»Правда
При соотношении 50–60% утяжины почти незаметны на большинстве поверхностей. При превышении 70% они становятся заметными, а при 100% глубокие утяжины практически гарантированы.
«Увеличение давления подпрессовки само по себе может устранить утяжины, вызванные ребрами при толщине стенки 100%.»Ложь
Корректировки процесса могут уменьшить, но не устранить впадины, вызванные конструкцией. Ребра толщиной 100% от стенки создают термические массы, которые гарантируют видимые впадины независимо от давления подпрессовки.
Механизм прост: когда толстый участок пластика охлаждается, внешняя оболочка затвердевает первой, а внутренняя часть остается расплавленной. Когда внутренний материал охлаждается и сжимается, он втягивает уже затвердевшую оболочку внутрь, создавая видимую дефект литья под давлением[1]. Чем больше разница толщин между элементом и окружающей стенкой, тем выраженнее впадина.
Что вызывает впадины при формовании?
Впадины имеют как конструктивные, так и технологические причины. Понимание того, какая из них ответственна в вашем конкретном случае, — первый шаг к их устранению.
Конструкционные причины
Наиболее частая конструктивная причина — чрезмерная толщина материала у рёбер, бобышек или переходов стенок. Когда ребро слишком толстое относительно основной стенки, оно создаёт термическую массу, которая остывает гораздо медленнее окружающей зоны. Материал ребра сжимается при остывании, втягивая противоположную поверхность внутрь.
«Стеклонаполненные материалы демонстрируют значительно меньше утяжин, чем не наполненные марки.»Правда
Наполнители (стекловолокно, минеральные, тальк) уменьшают объемную усадку. Переход от не наполненного к 10–20% стеклонаполненным маркам часто полностью устраняет утяжины, одновременно повышая жесткость.
«Утяжины и пустоты — это разные дефекты с разными первопричинами.»Ложь
У них одинаковая первопричина — неравномерная усадка при охлаждении в толстых участках. Разница в проявлении: утяжины появляются на поверхности, пустоты — внутри, в зависимости от жесткости стенки.
Другие конструкционные причины включают резкие переходы толщины стенки (без постепенного скоса), слишком большие бобышки без отверстия и толстые косынки в местах крепления. Любой элемент, добавляющий значительную локальную толщину относительно номинальной стенки, является потенциальным источником утяжин.
Причины, связанные с процессом
Недостаточное давление подпрессовки — основная технологическая причина утяжин. Во время фазы подпрессовки дополнительный материал вводится в полость для компенсации усадки. Если давление подпрессовки[2] слишком низкое или время подпрессовки слишком короткое, материал в толстых участках продолжает сжиматься без компенсации, создавая утяжины.
Другие технологические факторы включают чрезмерную температуру расплава (что увеличивает общую усадку), недостаточное время охлаждения (выталкивание до полного затвердевания толстых участков) и медленную скорость впрыска (что может привести к раннему затвердеванию у впусков, сокращая эффективную дальность подпрессовки).
Как предотвратить утяжины через конструкцию?
Конструкционное предотвращение всегда более эффективно, чем технологические исправления, потому что оно устраняет первопричину, а не симптом. Вот ключевые конструкционные стратегии, упорядоченные по степени влияния.
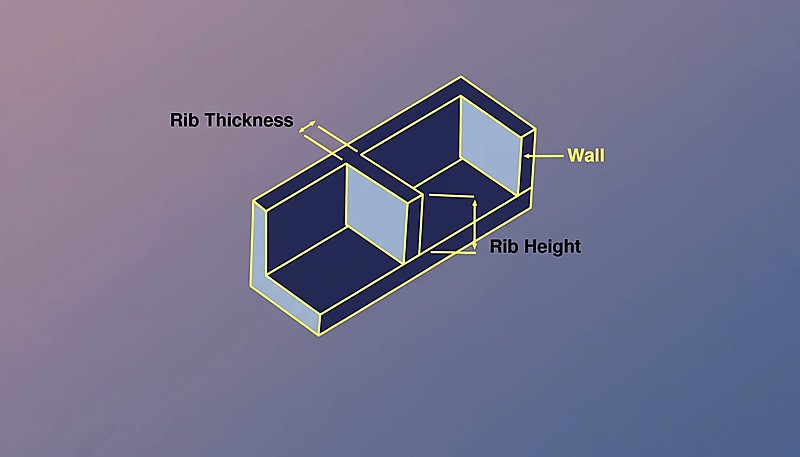
Контроль толщины ребра
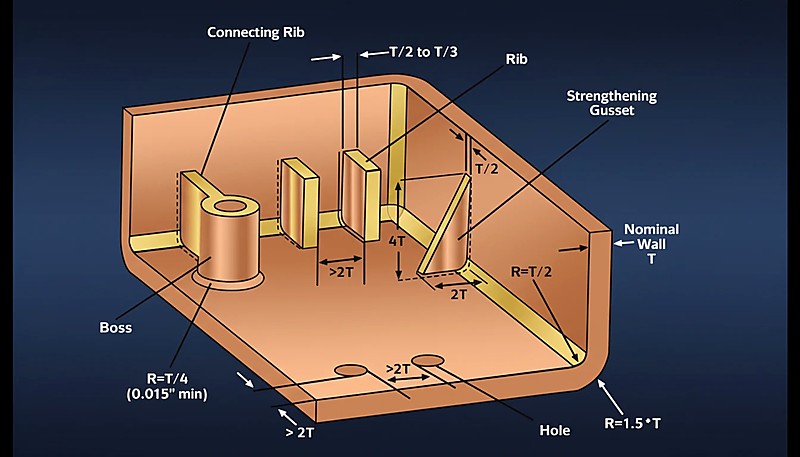
Это самая эффективная конструктивная мера. Толщина основания ребра должна составлять 50–60% толщины основной стенки. При 50% впадины едва заметны на большинстве поверхностей. Выше 70% они становятся заметными. При 100% (когда ребро такое же толстое, как стенка) глубокие впадины на противоположной поверхности практически гарантированы.
Конструкторы часто делают ребра слишком толстыми, думая о структурной жёсткости, а не о технологичности. Решение: используйте несколько тонких рёбер вместо одного толстого. Вы получаете эквивалентную или лучшую жёсткость с минимальным риском впадин.
Выберите толстые участки
Везде, где возможно, делайте толстые участки пустотелыми для сохранения равномерной толщины стенки. Это особенно касается бобышек (с отверстием в центре с помощью штифта), толстых крепежных площадок (добавьте выемку на не декоративной стороне) и конструкционных косынок (используйте треугольное сечение с отверстием в центре).
Используйте постепенные переходы
Когда толщину стенки необходимо изменить, используйте соотношение сужения 3:1. На каждый 1 мм изменения толщины обеспечьте не менее 3 мм плавного перехода. Это распределяет разницу усадки по большей площади, делая любую поверхностную впадину мельче и менее заметной.
Добавляйте текстуру поверхности стратегически
Текстура на декоративной поверхности может эффективно скрывать небольшие утяжины. Средняя или глубокая текстура (VDI 21–27) достаточно нарушает визуальный рисунок, чтобы впадина 0.05–0.10 мм стала незаметной. Это не исправление — это техника маскировки, которая работает, когда конструкционные ограничения препятствуют полному устранению.
Как корректировки процесса уменьшают впадины?
Когда изменения конструкции невозможны — возможно, пресс-форма уже изготовлена или толщину элемента нельзя уменьшить без ущерба для функции — основным инструментом снижения впадин становятся корректировки процесса.
Увеличить давление подпрессовки
Это самое прямое решение в процессе. Увеличение давления подпрессовки (удержания) заставляет больше материала поступать в толстые сечения на фазе компенсации, уменьшая объёмную усадку, вызывающую впадины. Ограничение: чрезмерное давление подпрессовки может привести к облою, повышенным остаточным напряжениям и росту размеров за пределами допуска.
Увеличить время уплотнения
Подпрессовка должна продолжаться до тех пор, пока канал не затвердеет. Если подпрессовка прекращается до затвердевания канала, материал вытекает обратно из полости, и толстый участок сжимается без контроля. Контролируйте время затвердевания канала с помощью датчиков давления и установите время подпрессовки, чтобы оно соответствовало ему.
Снижение температуры расплава
Более низкие температуры расплава означают меньшее общее сжатие. Однако это должно быть уравновешено качеством заполнения — если температура слишком низкая, вы увидите неполное заполнение, высокое давление впрыска и плохую поверхность. Уменьшение на 5–10°C от стандартной температуры расплава обычно является безопасным диапазоном для уменьшения утяжки.
Оптимизация охлаждения
Более быстрый и равномерный охлаждение сокращает временной промежуток, в котором образуется утяжка. Это означает оптимизацию расположения каналов охлаждения рядом с толстыми участками, использование вставок из бериллиевой меди для локального отвода тепла и обеспечение достаточной скорости потока охлаждающей жидкости. Опытные специалисты по формованию регулярно добавляют локальные решения охлаждения при запуске формы для устранения точек утяжки.
| Регулировка | Impact | Risk |
|---|---|---|
| Увеличить давление подпрессовки | Высокий | Облой, остаточные напряжения |
| Увеличить время уплотнения | Средний и высокий | Увеличить время цикла |
| Уменьшить температуру расплава | Средний | Неполное заполнение, плохая поверхность |
| Уменьшить температуру формы | Средний | Видимость линии спая, следы потока |
| Снизить скорость впрыска | Low-Medium | Увеличение цикла, задержка потока |
Какие материалы наиболее подвержены образованию утяжин?
Выбор материала значительно влияет на видимость утяжин. Аморфные материалы (ABS, PC, PMMA, PS) проявляют утяжины более легко, поскольку они имеют более высокую усадку в форме в переходных зонах от толстого к тонкому, а их прозрачные или глянцевые поверхности делают даже небольшие впадины заметными.
Частично кристаллические материалы (PP, PE, Nylon, POM) несколько более терпимы, потому что они обычно сжимаются более равномерно, и их типичные поверхности менее заметны. Однако они все же проявляют утяжку на полированных поверхностях.
Наполненные материалы — с стекловолокном, минеральными или тальковыми наполнителями — демонстрируют значительно меньшие утяжины, поскольку наполнители снижают объемную усадку[3]. Если ваше применение допускает армированный материал, это один из самых эффективных способов минимизировать утяжку без изменения конструкции детали.
| Тип материала | Видимость утяжин | Рекомендация по конструкции |
|---|---|---|
| Аморфные (ABS, PC, PMMA) | Высокий | Строгое правило ребра 50–60% |
| Полукристаллические (ПП, нейлон, ПОМ) | Средний | Стандартное правило ребра 60% |
| Сорта со стеклянным наполнителем | Низкий | Допустимо до 70% |
Когда утяжка является проблемой, переход от неармированного материала к марке с 10–20% стекловолокна часто полностью устраняет утяжку, одновременно улучшая стабильность размеров и жесткость.
Можно ли устранить впадины после изготовления пресс-формы?
Да, но варианты значительно сокращаются, и затраты возрастают. Вот иерархия исправлений, от самых дешевых до самых дорогих.
- Оптимизация процесса: Корректировать давление уплотнения, время уплотнения, температуру расплава и охлаждение. Стоимость: время машины для испытаний. Эффективность: умеренная для небольших утяжин.
- Газовое вспомогательное или пенное формование: Для толстых участков газовое вспомогательное формование вводит азот в толстый элемент, сохраняя качество поверхности при одновременном создании пустоты внутри. Требуется модификация формы для газовых штифтов. Стоимость: умеренная. Эффективность: высокая для локальных толстых участков.
- Модификация формы — удаление стали: Уменьшите толщину ребра или сделайте толстые участки тонкими, удалив металл из полости формы. Это самый эффективный способ исправления, но требует повторной обработки. Стоимость: умеренная или высокая, зависит от сложности полости.
- Модификация формы — добавление стали: Если необходимо увеличить толщину стенки в какой-то области для компенсации, это требует сварки и повторной обработки. Стоимость: высокая. Риск: целостность сварки в производственных формах.
Ключевое понимание всех этих подходов: всегда дешевле предотвратить утяжины на этапе проектирования, чем исправлять их после изготовления формы.
Как измерять и оценивать утяжины?
Определение утяжин важно для установления критериев приемки и отслеживания улучшений процесса. Существует три распространенных метода.
Визуальный контроль — самый простой метод. Держите деталь на расстоянии вытянутой руки под угловым светом и ищите впадины. Если вы можете увидеть их на расстоянии 30 см при стандартном освещении, они будут заметны вашим клиентам. Это метод прошел/не прошел, не количественный.
Профилометрия поверхности использует контактный или оптический профилометр для измерения точной глубины и ширины впадины. Типичные критерии приемки: максимальная глубина 0,05 мм для косметических поверхностей и 0,10 мм для не косметических.
Ультразвуковое измерение толщины стенки в месте утяжки показывает, уменьшилась толщина стенки за пределы допуска. Это полезно для проверка качества[4] между усадкой (поверхностное углубление при сохранённой толщине стенки) и пустотами (фактическое отсутствие материала внутри стенки).
Что следует проверить для предотвращения впадин?
Используйте этот контрольный список до и во время ввода пресс-формы в эксплуатацию, чтобы держать усадочные раковины под контролем.
| Check Item | Критерии прохождения |
|---|---|
| Все ребра ≤60% толщины стенки | ✓ |
| Бобышки выполнены с равномерной стенкой | ✓ |
| Переходы стенок используют конусность 3:1 | ✓ |
| Давление уплотнения оптимизировано | ✓ |
| Время уплотнения ≥ время затвердевания литника | ✓ |
| Указана косметическая текстура поверхности | ✓ или Н/Д |
| Выбор материала проверен на усадку | ✓ |
Тщательный обзор технологичности конструкции (DFM), проверяющий каждый из вышеперечисленных пунктов, — это самый экономически эффективный способ устранить усадочные раковины до их появления, потому что самое дешёвое исправление усадочной раковины — это то, которое никогда не потребуется.
Часто задаваемые вопросы о впадинах?
Всегда ли видны усадочные раковины?
Не всегда. Усадки менее 0,02 мм обычно незаметны, даже на глянцевых поверхностях. На текстурированных поверхностях (VDI 21+) усадки до 0,05 мм могут быть скрыты. Ключевой фактор — сочетание глубины и качества поверхности — полированные, глянцевые поверхности чётко показывают даже углубления в 0,02 мм.
Можно ли устранить утяжки после формования?
Нерентабельно. В отличие от облоя или заусенцев, усадочные раковины являются объёмными — материал сжался ниже требуемого уровня поверхности. Окрашивание может частично замаскировать незначительные раковины, но не устранит их. Единственное надёжное решение — устранение первопричины через изменения конструкции или технологии обработки.
В чём разница между утяжками и порами?
Утяжки — это поверхностные углубления; поры — внутренние полости. У них одна общая причина (дифференциальная усадка при охлаждении в толстых сечениях), но проявляются они по-разному. В тонкостенных деталях обычно видны утяжки, потому что тонкий внешний слой втягивается внутрь. В очень толстых деталях усадка создаёт внутренние поры, так как внешний слой достаточно жёсткий, чтобы сопротивляться втягиванию.
Влияет ли местоположение литника на образование усадочных раковин?
Да. Местоположение литника определяет путь потока и эффективность уплотнения. Литник, расположенный далеко от толстого сечения, означает, что давление уплотнения падает до достижения этого участка, увеличивая риск усадки. В идеале литники должны располагаться рядом с самым толстым сечением, чтобы максимизировать компенсацию уплотнения именно там, где это наиболее необходимо.
Как толщина стенки влияет на глубину усадочной раковины?
Более толстые номинальные стенки создают менее глубокие усадочные раковины при том же соотношении толщин рёбер, потому что больше материала поглощает разницу усадки. И наоборот, тонкостенные детали (менее 1,5 мм) чрезвычайно чувствительны даже к небольшим увеличениям толщины рёбер — ребро толщиной 1,0 мм на стенке 1,5 мм будет заметно проседать.
Эффективно ли газовое вспомогательное литьё под давлением для предотвращения усадки?
Очень эффективно, особенно для толстых сечений, которые нельзя перепроектировать. Газовое вспомогательное формование создаёт полость внутри толстых элементов, сохраняя качество поверхности. Это увеличивает стоимость и сложность как пресс-формы, так и процесса, но это самый надёжный способ устранить усадку в структурных рёбрах и больших бобышках без уменьшения их размеров.
Bottom line: Поддерживайте толщину рёбер на уровне 50–60% от номинальной стенки, сохраняйте равномерную толщину и устраняйте усадку на этапе проектирования — а не после изготовления пресс-формы. Профилактика в конструкции всегда дешевле, чем технологические исправления или модификации пресс-формы.
{
“@context”: “https://schema.org”,
“@type”: “FAQPage”,
“mainEntity”: [
{
“@type”: “Question”,
“name”: “Всегда ли видны усадочные раковины?”,
“acceptedAnswer”: {
“@type”: “Answer”,
“text”: “Не всегда. Утяжки менее 0,02 мм обычно незаметны, даже на глянцевых поверхностях. На текстурированных поверхностях (VDI 21+) утяжки до 0,05 мм могут быть скрыты. Ключевой фактор — сочетание глубины и отделки поверхности: полированные, глянцевые поверхности чётко показывают даже углубления в 0,02 мм.”
}
},
{
“@type”: “Question”,
“name”: “Можно ли устранить утяжки после формования?”,
“acceptedAnswer”: {
“@type”: “Answer”,
“text”: “Не экономично. В отличие от облоя или заусенцев, утяжки являются объёмными — материал сжался ниже требуемого уровня поверхности.
Окрашивание может частично замаскировать незначительные раковины, но не устранит их. Единственное надёжное решение — устранение первопричины через изменения конструкции или технологии обработки.”
}
},
{
“@type”: “Question”,
“name”: “В чём разница между утяжками и порами?”,
“acceptedAnswer”: {
“@type”: “Answer”,
“text”: “Утяжки — это поверхностные впадины; пустоты — внутренние полости. У них общая первопричина (различная усадка при охлаждении в толстых сечениях), но проявляются они по-разному. В тонкостенных деталях обычно наблюдаются утяжки, потому что тонкая внешняя оболочка втягивается внутрь. В очень толстых деталях усадка создаёт внутренние пустоты, так как внешняя оболочка достаточно жёсткая, чтобы сопротивляться втягиванию.
”
}
},
{
“@type”: “Question”,
“name”: “Влияет ли расположение литника на утяжки?”,
“acceptedAnswer”: {
“@type”: “Answer”,
“text”: “Да. Расположение литника определяет путь течения и эффективность подпрессовки. Литник, удалённый от толстого сечения, означает, что давление подпрессовки падает до достижения этого сечения, что повышает риск утяжек.
В идеале литники следует располагать возле самого толстого сечения, чтобы максимально усилить компенсацию усадки именно там, где это наиболее необходимо.”
}
},
{
“@type”: “Question”,
“name”: “Как толщина стенки влияет на глубину утяжек?”,
“acceptedAnswer”: {
“@type”: “Answer”,
“text”: “Более толстые номинальные стенки дают менее глубокие утяжки при том же соотношении толщин рёбер, потому что больше материала поглощает разницу усадки. И наоборот, тонкостенные детали (менее 1,5 мм) чрезвычайно чувствительны даже к небольшим увеличениям толщины рёбер — ребро толщиной 1,0 мм на стенке 1,5 мм даст заметную утяжку.”
}
},
{
“@type”: “Question”,
“name”: “Эффективно ли газовое литьё под давлением для предотвращения утяжек?”,
“acceptedAnswer”: {
“@type”: “Answer”,
“text”: “Очень эффективно, особенно для толстых сечений, которые нельзя перепроектировать.
Газовое вспомогательное формование позволяет создавать полости внутри толстых элементов, сохраняя качество поверхности. Это увеличивает стоимость и сложность как пресс-формы, так и процесса, но является наиболее надежным способом устранения утяжек в структурных ребрах и крупных бобышках без уменьшения их размеров.”
}
}
]
}
Утяжки можно предотвратить, если дизайн и обработка работают согласованно. Если вы сталкиваетесь с устойчивыми утяжками на ваших литьевых деталях, свяжитесь с нашей инженерной командой в ZetarMold. Мы работаем на 45 машинах (90T–1850T) из Шанхая, с 8 старшими инженерами, специализирующимися на устранении дефектов. Наш анализ технологичности конструкции выявляет склонные к утяжкам элементы до начала обработки стали.
-
Образование утяжин — BASF, «Конструкция детали и формы», справочник по технологии пластиков, 2023. ↩
-
Влияние давления дожатия — Autodesk, «Руководство по проектированию Moldflow», 2024. ↩
-
Данные об усадке материала — «Выбор пластиковых материалов», Society of Plastics Engineers, 2025. ↩
-
Измерение дефектов — «Контроль качества литья под давлением», Plastics Technology, 2024. ↩


