 Saltar para o conteúdo

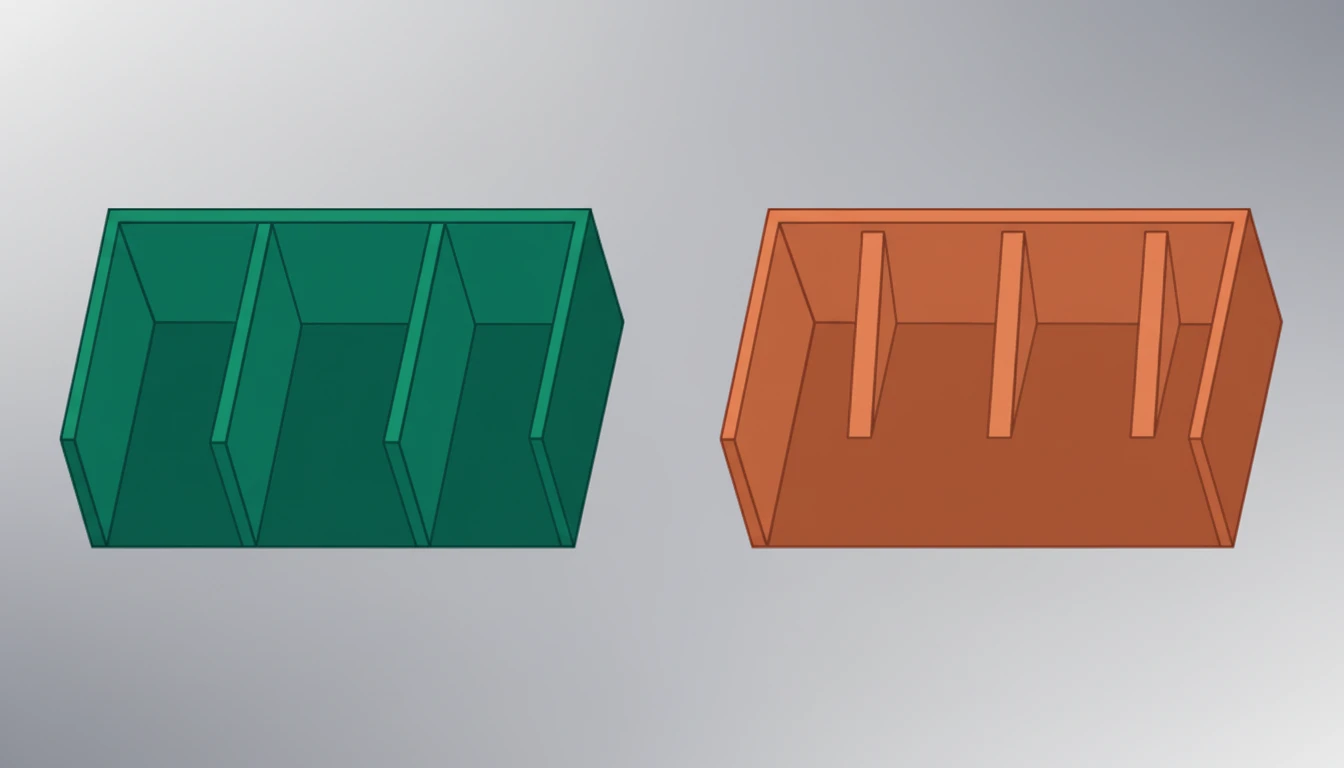
Ribs provide structural integrity without the cycle time and material cost penalties associated with increasing overall wall thickness. However, poor rib design leads to cosmetic defects like sink marks and warping. The “Golden Rule” of rib design—keeping rib thickness between 40% and 60% of the nominal wall thickness—is the primary lever for balancing structural performance (Quality) with cooling time and material usage (Cost).
What Are Injection Molded Ribs and Why Are They Critical?
Em molde de injeçãoing, Costeletas are thin, structural wall-like features protruding from the nominal wall of a part, designed to increase stiffness and load-bearing capacity. They function by increasing the Area Moment of Inertia (AMI) of a section, effectively stiffening the part against bending loads.
For manufacturers and engineers, ribs represent a critical trade-off zone. Instead of thickening an entire part wall—which exponentially increases material usage and Tempo de ciclo (the total time required to complete one molding cycle)—designers use ribs to achieve similar strength with less mass. However, if not designed within specific geometric constraints, ribs become the primary source of Marcas de pia (depressions on the surface opposite the rib) and flow hesitation, compromising both aesthetics and structural reliability.
Ribs allow for increased part stiffness with minimal weight addition compared to thickening the entire wall.Verdadeiro
Ribs increase the moment of inertia to resist bending loads while maintaining a thin nominal wall, saving material and cooling time.
To maximize strength, ribs should always be designed to be the same thickness as the main wall.Falso
Ribs equal to the wall thickness cause differential cooling, resulting in severe sink marks and internal voids. Ribs should generally be 40-60% of the wall thickness.
What Are the Key Parameters for Cost-Effective Rib Design?
Optimizing ribs requires adhering to strict geometric ratios derived from industry standards (e.g., SPE, ISO guidelines). Deviating from these parameters typically results in higher costs due to scrap rates (defects) or extended processing times.
| Parâmetro | Símbolo | Gama recomendada | Impact on Cost | Impact on Quality |
|---|---|---|---|---|
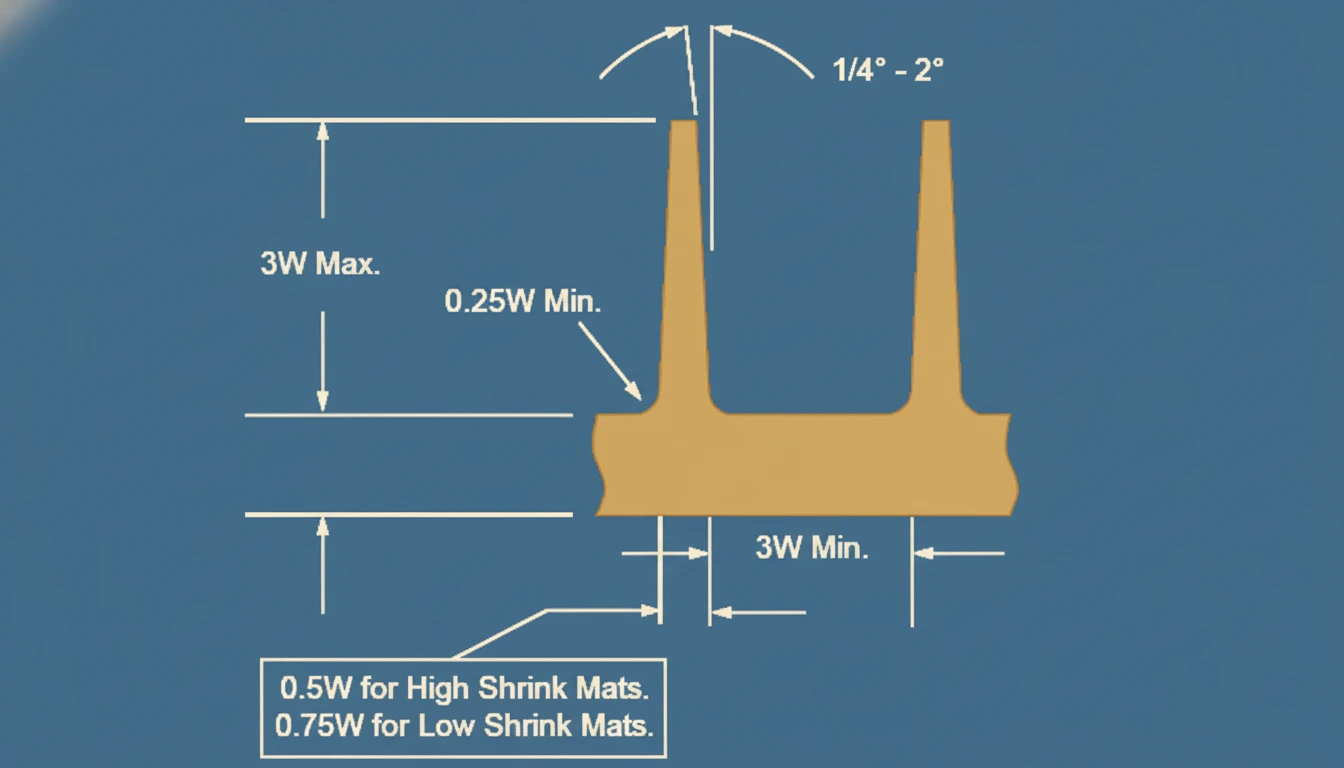
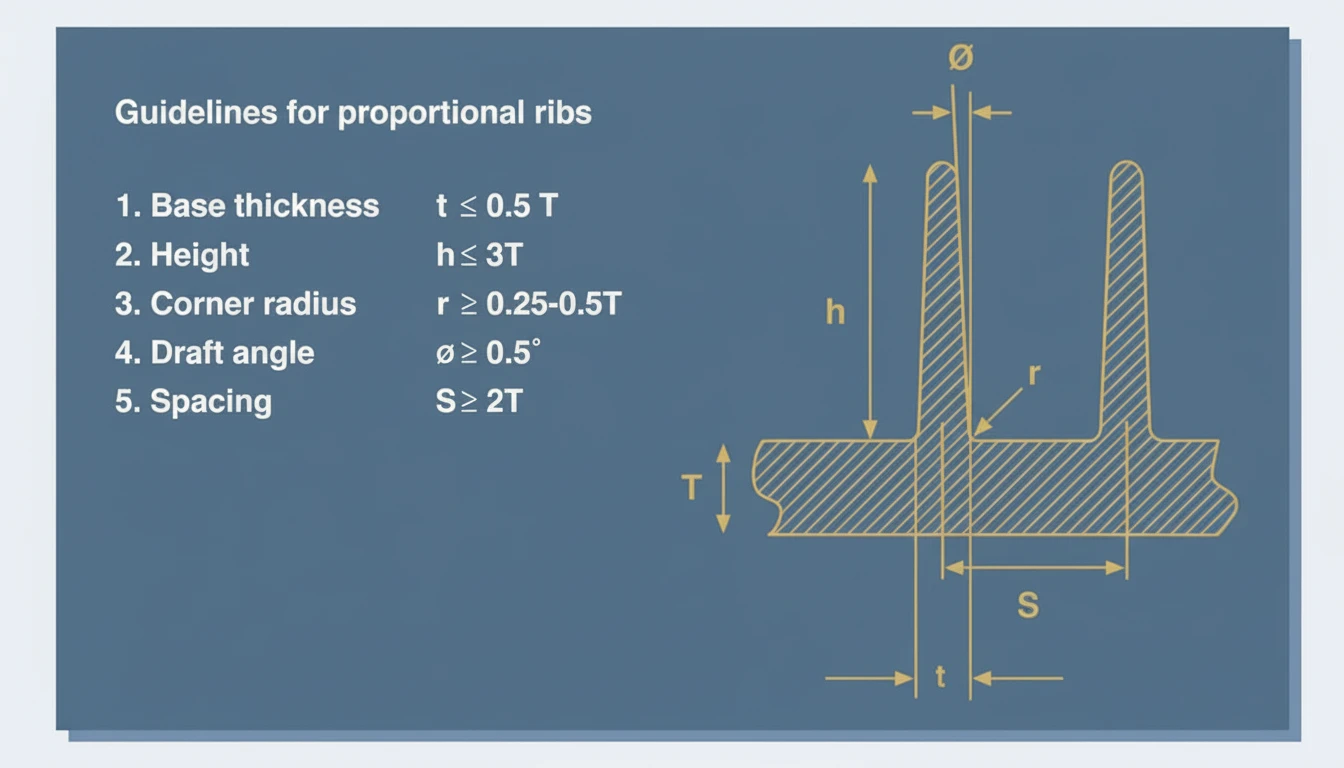
| Rib Root Thickness | w | 40% – 60% of Nominal Wall (t) | High: Thicker ribs increase cooling time (cycle cost). | Critical: >60% causes marcas de afundamento1; <40% may cause filling issues. |
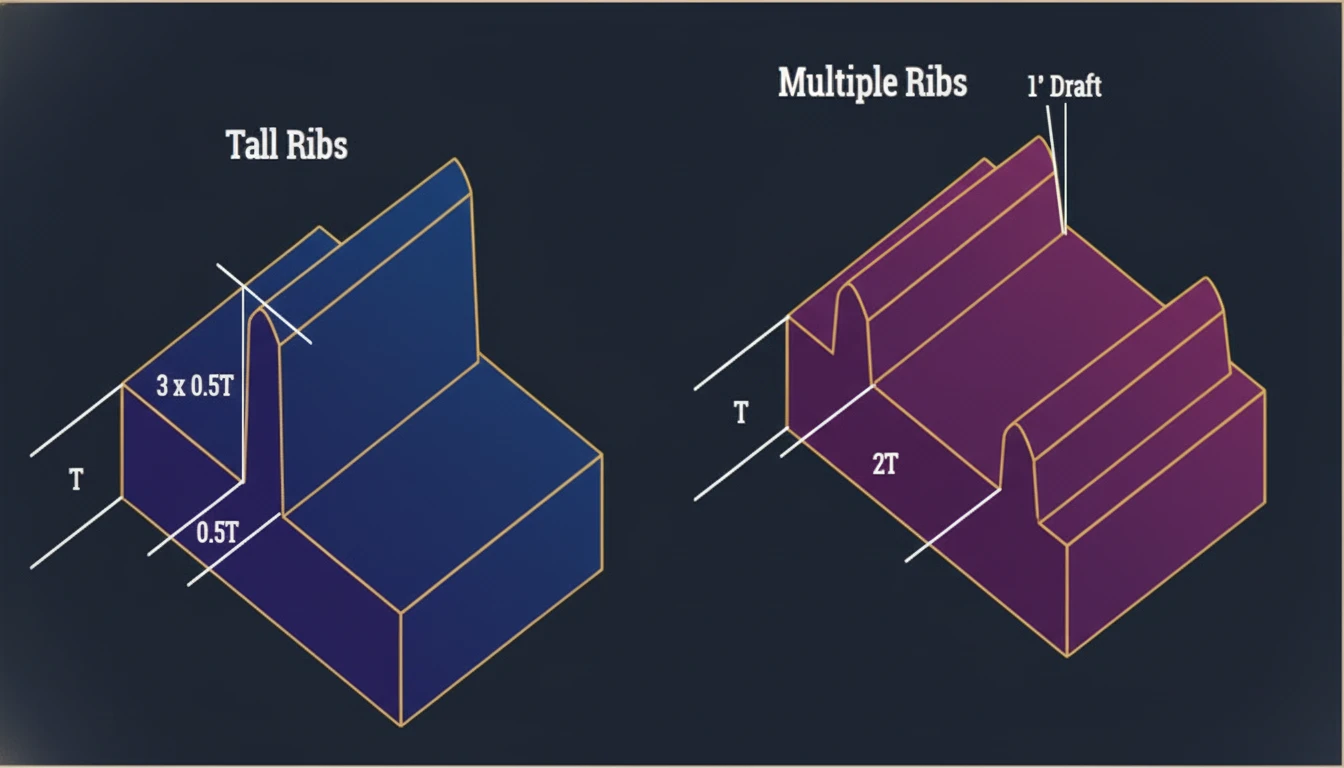
| Altura da costela | H | ≤ 3 × Nominal Wall (t) | Medium: Excessively deep ribs require expensive EDM tooling. | High: Tall ribs are prone to gas traps and sticking in the mold. |
| Ângulo de inclinação | α | 0.5° – 1.5° (minimum) | Low: Standard machining feature. | High: Low draft causes ejection stress and drag marks (scuffing). |
| Raio de base | R | 0.25% – 0.5% of Nominal Wall (t) | Low: Standard machining. | Medium: Reduces stress concentrations; too large causes sink. |
| Spacing | S | ≥ 2 × Nominal Wall (t) | Medium: Tight spacing creates "hot spots" in the mold. | Medium: Improves cooling uniformity; prevents thermal warping. |

What Are the Advantages and Disadvantages of Using Ribs?
Understanding the trade-offs is essential for technical buyers and plant managers when evaluating part designs for manufacturability (DFM).
| Advantages (Value Engineering) | Disadvantages (Process Risks) |
|---|---|
| Material Reduction: Uses significantly less resin than increasing overall wall thickness. | Sink Mark Potential: The intersection of the rib and wall creates a thick mass that shrinks more, causing visible surface depressions. |
| Cycle Time Optimization: Thinner ribs cool faster than thick walls, reducing machine time charges. | Complexidade do molde: Requires detailed machining (often EDM) in the cavity steel, slightly increasing initial tooling costs. |
| Warpage Control: Strategic rib placement can disrupt stress patterns and flatten large parts. | Flow Hesitation: Thin ribs may be difficult to fill, especially with high-viscosity materials like Polycarbonate (PC). |
| Não, costelas geralmente Ribs can sometimes serve as flow leaders to direct plastic to hard-to-fill areas. | Venting Issues: Deep ribs can trap air (diesel effect), causing burn marks if not properly vented. |
Glass-filled materials allow for slightly thicker ribs compared to unfilled materials without visible sink marks.Verdadeiro
Glass fibers reduce the overall shrinkage rate of the material, providing slightly more leeway in rib-to-wall thickness ratios before sink marks become visible.
The most cost-effective way to fix a warping part is to simply increase the height of existing ribs.Falso
Increasing height without checking draft and ejection forces can cause part sticking and cycle delays. Often, adding gussets or changing rib patterns (e.g., honeycomb) is more effective.
Where Are Ribs Most Commonly Applied?
- Automotive Housings: Under-hood components using Polyamide 66 (PA66) require ribs for stiffness under thermal load without heavy walls.
- Eletrónica de consumo: Laptop chassis and phone cases use micro-ribs to support internal components and prevent crushing.
- Structural Containers: Crates and pallets utilize cross-hatch ribbing to support heavy loads while minimizing resin weight.
- Crush Ribs: Small, deformable ribs used in assembly to ensure a tight interference fit between mating parts (e.g., a bearing sitting in a plastic housing).
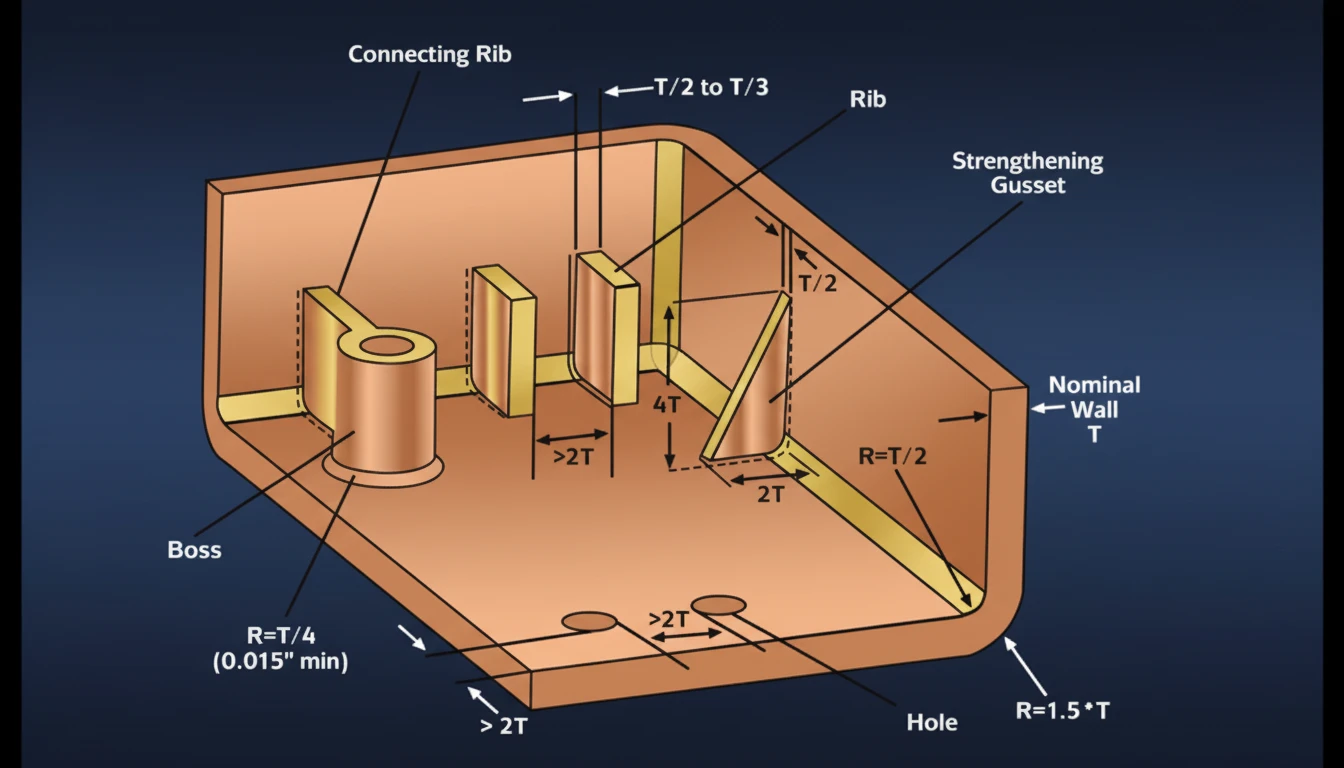
- Boss Support: Gusset ribs connect screw bosses to the main wall to prevent the boss from breaking under torque.
What Is the Stepwise Process for Designing Optimized Ribs?
To ensure the design meets both cost targets (efficiency) and quality standards (zero defects), follow this workflow:
-
Define Load Path and Stiffness Requirements
Analyze where the force will be applied. Orient ribs in the direction of the bending forces for maximum Moment of Inertia. -
Establish Nominal Wall Thickness (t)
Select the minimum wall thickness required for the part’s general function. This value (t) becomes the baseline for all rib calculations. -
Calculate Rib Root Thickness
Apply the standard formula: Rib Thickness = 0.4 × t to 0.6 × t.- Nota: For high-gloss aesthetic parts (e.g., ABS consumer goods), aim for 0.4 (40%). For structural internal parts (e.g., Glass-filled Nylon), you may push to 0.6 ($60\%$).
-
Apply Draft Angles
Add a minimum of 0.5° draft per side. Ensure that adding draft does not reduce the thickness at the top of the rib below 1.0mm, which could cause filling issues (short shots). -
Add Base Radii
Include a radius of 0.25 × t at the rib base.- Why? Sharp corners create stress concentrations2 leading to part failure.
-
Perform Moldflow Simulation
Before cutting steel, run a simulation to check for:- Volumetric Shrinkage: To predict sink marks.
- Air Traps: To ensure the ribs can vent.
-
Tooling Strategy (Steel Safe)
Cut the ribs slightly thinner in the mold (add steel) initially. It is cheaper to remove steel (making the rib thicker) later if filling issues occur than to weld steel back in.
Unidirectional ribs provide the highest stiffness-to-weight ratio for parts subjected to bending in a single known direction.Verdadeiro
Aligning ribs parallel to the bending stress maximizes the moment of inertia for that specific load vector effectively.
Cross-hatching ribs is purely for aesthetic purposes and adds unnecessary weight.Falso
Cross-hatching (grid patterns) provides torsional stiffness and prevents warping in multiple directions, essential for large flat surfaces.
FAQ: Balancing Cost and Quality in Rib Design
Q1: Can I use ribs to hide sink marks?
A: No, ribs usually O software de simulação permite que os engenheiros visualizem padrões de enchimento e potenciais defeitos antes de investirem em ferramentas físicas dispendiosas. sink marks if they are too thick. However, styling lines or texture can be placed on the opposite side of the wall to mask the visual appearance of sink marks caused by ribs.
Q2: How does rib height affect mold cost?
A: Extremely deep ribs (>3x wall thickness) often require Electric Discharge Machining (EDM) rather than standard CNC milling. EDM is slower and more expensive. Deep ribs also require better polishing to prevent ejection sticking.
Q3: What is the difference between a Rib and a Gusset?
A: A rib is generally a standalone wall used for stiffness. A gusset is a triangular support feature specifically designed to support a standing feature, like a screw boss or a tall vertical wall, preventing it from deflecting.
Q4: Why are "Crush Ribs" designed to be deformed?
A: Crush ribs are intentionally small, pointed ribs designed to deform (crush) when a metal insert or mating part is pressed into place. They provide a cheap, tolerant interference fit without requiring high-precision tolerances on the plastic part.
Q5: How does material selection impact rib design?
A: Materiais amorfos (PC, ABS, PS) are more prone to stress cracking and sink marks; keep ribs thinner ($40-50\%$). Materiais semi-cristalinos (PE, PP, PA) have higher shrinkage rates but flow better; they can sometimes tolerate slightly thicker ribs, but differential shrinkage causing warpage is a higher risk.
Resumo
Balancing cost and quality in plastic rib design relies on adhering to the 40-60% thickness rule relative to the nominal wall. Proper execution increases part stiffness and reduces material usage (Cost benefit) without introducing sink marks or warpage (Quality assurance). By incorporating proper draft angles, radii, and utilizing simulation tools like Moldflow3, os fabricantes podem conseguir componentes estruturais robustos que são tanto económicos para moldar quanto mecânicamente sólidos. Veja o nosso Injection Mold Complete Guide for a comprehensive overview. See our Supplier Sourcing Guide for a comprehensive overview.
-
Sink marks are depressions caused by localized shrinkage at thick cross-sections; understanding their formation is key to cosmetic quality control. ↩
-
Stress concentrations occur at sharp geometric changes; adding radii distributes load and prevents catastrophic part failure under stress. ↩
-
Simulation software allows engineers to visualize filling patterns and potential defects before investing in expensive physical tooling. ↩
Need a Quote for Your Injection Molding Project?
Get competitive pricing, DFM feedback, and production timeline from ZetarMold’s engineering team.


