 콘텐츠로 건너뛰기

- Injection molding melts thermoplastic pellets, injects the melt into a closed mold, cools the part, and ejects a finished plastic component.
- The process is best for repeatable 3D plastic parts with controlled dimensions, surface finish, ribs, bosses, clips, and complex features.
- The four practical controls are mold design, material selection, melt and mold temperature, and cycle-time balance.
- Most project failures come from weak DFM, poor cooling layout, wrong resin grade, or unrealistic tolerance expectations.
- A buyer should evaluate injection molding by part geometry, annual volume, tooling budget, material risk, and quality requirements.
What Is Injection Molding?
사출 성형1 is a manufacturing process that turns molten plastic into repeatable 3D parts inside a closed mold. Plastic pellets are heated in a barrel, pushed forward by a screw, injected into a cavity, cooled under control, and ejected as a finished component.
For a full process baseline, use our injection molding complete guide. This page explains the working sequence in plain language so engineers, buyers, and founders can decide whether a part should be molded, redesigned, prototyped, or made with another process.
At ZetarMold, our factory in Shanghai runs 47 injection molding machines from 90T to 1850T. Our engineers review wall thickness, gate location, material flow, cooling layout, and annual volume before recommending production tooling.
Injection molding is not just a machine action. It is a controlled system that connects part design, resin behavior, tooling steel, cooling, machine repeatability, and inspection. If one of these elements is weak, the molded part can show flash, sink marks, short shots, warpage, or unstable dimensions.
How Does Injection Molding Work Step by Step?
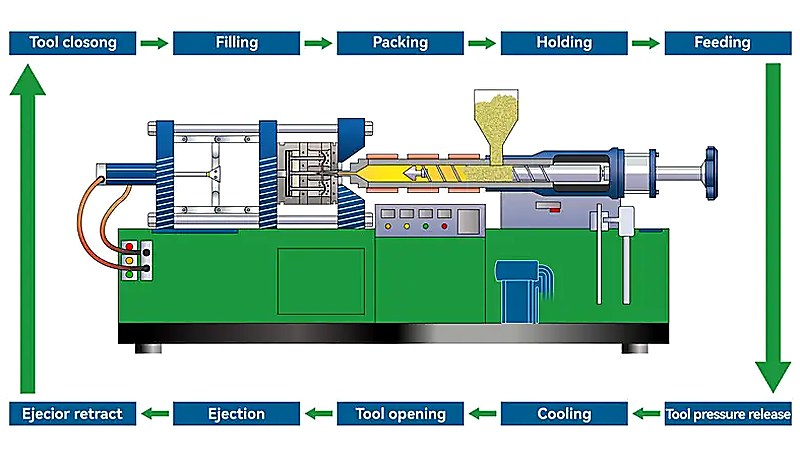
Injection molding is a repeatable cycle: clamp the mold, inject the melt, hold pressure, cool the plastic, open the mold, and eject the part. Each cycle may take a few seconds for a small thin-wall part or more than a minute for a thick engineering component.
The machine first closes the mold with enough clamping force to resist injection pressure. Pellets enter the heated barrel, where the rotating screw melts and mixes the material. The 스크류 사출 성형기 then pushes a measured shot through the nozzle, sprue, runner, and gate into the cavity.
During packing and holding, extra pressure compensates for plastic shrinkage as the material cools. Cooling channels remove heat from the mold so the part can become stiff enough for ejection. If cooling is uneven, the part may warp even when the cavity shape is correct.
“Injection molding is a cyclic process, not a continuous process.”True
A molded part is made shot by shot. The mold closes, fills, packs, cools, opens, and ejects before the next cycle starts. This is different from extrusion, which pushes material through a die continuously.
“The mold only gives the part its shape; process settings do not matter.”False
Mold geometry matters, but melt temperature, injection speed, hold pressure, cooling time, and material drying also determine final quality. A good mold can still produce bad parts if the process window is unstable.
The ejected part is then inspected, trimmed if needed, and packed or sent to secondary operations. The best production plans define the acceptable cycle time, inspection points, and cosmetic standards before tooling starts, not after defects appear.
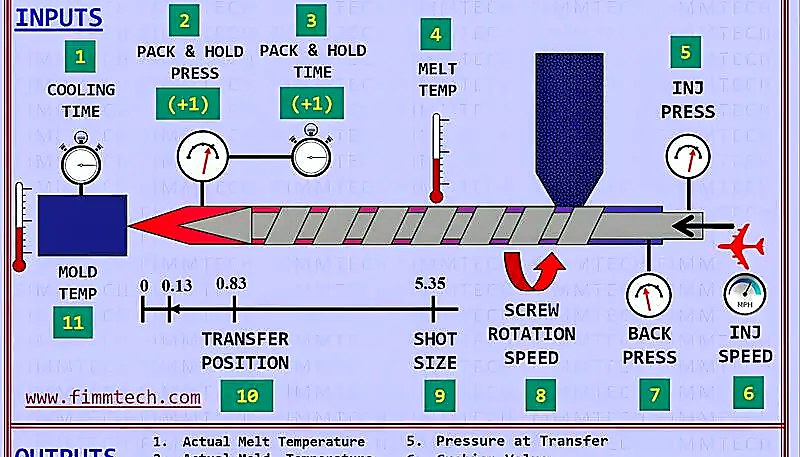
A stable process window is normally built during sampling. The team adjusts fill speed, transfer position, hold pressure, hold time, barrel temperature, mold temperature, and cooling time until the part fills completely without flash, burn marks, excessive stress, or unacceptable dimensions. Once that window is documented, production operators can repeat the same settings and know when a drift needs correction.
For buyers, the important lesson is simple: the mold and the machine must be evaluated together. A part can fail because the tool has poor venting, but it can also fail because the selected 사출 성형기 has the wrong shot size, weak plasticizing capacity, or unstable temperature control. Good suppliers check both sides before promising a production plan.
What Parts Are Best Suited for Injection Molding?
The best injection molded parts are repeatable plastic components with 3D geometry, consistent wall sections, and enough volume to justify tooling. Housings, brackets, caps, connectors, gears, medical device parts, and automotive clips are common examples.
Injection molding is strong when the part needs integrated ribs, bosses, snap fits, threads, inserts, living hinges, or cosmetic surfaces. It is weaker when the part is very long, has only a constant cross-section, or changes frequently during early product development.
Part geometry must respect molding rules. Wall thickness should be as uniform as possible, ribs should not be too thick, sharp internal corners should be radiused, and draft angles should be added so the part can leave the mold. These rules reduce sink, stress, drag marks, and ejection damage.
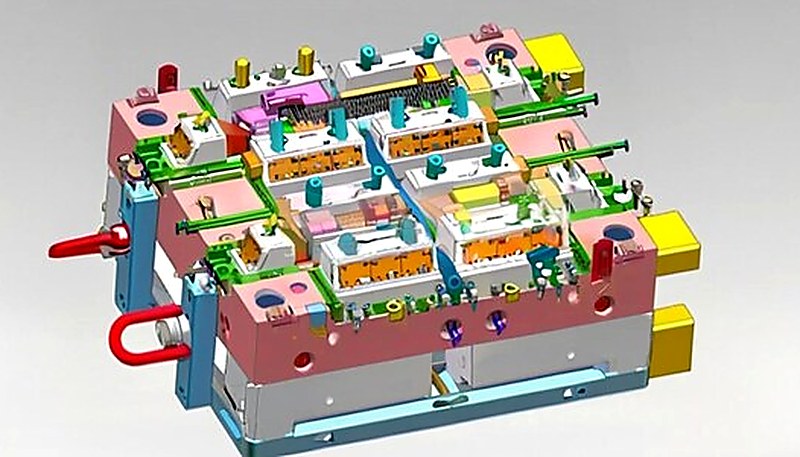
For tooling-specific decisions, compare your design against the 사출 금형 완벽 가이드. That guide explains mold structure, gate choices, cooling design, ejector layout, and tooling tradeoffs in more detail.
Which Materials Can Be Injection Molded?
The best materials are 열가소성 플라스틱2 grades that match the part’s strength, heat, chemical, cosmetic, and compliance needs. Most thermoplastic families can be injection molded if the grade is selected for the required strength, heat resistance, chemical exposure, color, and regulatory needs. Common options include ABS, PP, PE, PC, PA, POM, PMMA, TPU, PEEK, and flame-retardant engineering blends.
Material selection affects tool design. A resin with high shrinkage needs different cavity compensation than a resin with low shrinkage. A glass-filled grade may require stronger tooling surfaces and better venting. A transparent part needs stricter polishing, flow control, and gate placement than a hidden structural bracket.
Moisture-sensitive materials such as nylon, PC, PBT, and PET must be dried correctly before molding. If drying is ignored, molded parts can show bubbles, silver streaks, lower strength, or unstable dimensions. Material preparation is therefore part of the process, not a separate detail.
How Do Cost, Tooling, and Cycle Time Affect the Decision?
The cost decision is driven by tooling investment, part volume, material price, machine tonnage, and 사출 성형 생산 시간. Tooling can be expensive, but it creates repeatability when the same part must be produced thousands or millions of times.
Cycle time matters because every second repeats across the full production run. A 5-second saving may look small in a sample trial, but it can change annual capacity and unit cost when the mold runs every day. Cooling is often the largest part of the cycle, so cooling layout deserves early engineering attention.
“Cooling time often controls the economics of injection molding.”True
For many parts, cooling takes more time than injection and ejection. Better cooling design can reduce cycle time, stabilize dimensions, and lower cost per part.
“The lowest mold quote is usually the lowest total cost.”False
A cheap mold can become expensive if it causes flash, short life, slow cycles, poor cooling, frequent repairs, or high scrap. Total cost should include mold life, cycle time, maintenance, and quality risk.
Buyers should ask for DFM feedback before approving tool steel. The DFM review should flag undercuts, wall-thickness risk, cosmetic gate marks, tolerance conflicts, resin shrinkage, and ejection risk. For dimensional issues, mold shrinkage3 should be estimated before the first cut of steel. For broader process context, Britannica describes injection molding as a manufacturing technique4.
What Quality Problems Should Buyers Watch For?
일반적인 품질 문제는 충전 불량, 플래시, 싱크 마크, 용접선, 번 마크, 변형, 색상 변화 및 부품 파손입니다. 이러한 문제 대부분은 부품 설계, 금형 설계, 원료 준비 또는 공정 조건 관리에서 발생할 수 있습니다.
충전 불량은 캐비티가 완전히 충전되지 않을 때 발생합니다. 플래시는 플라스틱이 파팅 라인 또는 인서트 주변으로 누출될 때 나타납니다. 싱크 마크는 일반적으로 느리게 냉각되는 두꺼운 부분에서 발생합니다. 변형은 불균일한 수축, 불균형 냉각 또는 내부 응력으로 인해 발생합니다.
검사는 부품 기능과 일치해야 합니다. 숨겨진 브racket은 치수 및 강도 검사가 필요할 수 있으며, 보이는 커버는 더 엄격한 색상, 광택, 질감 및 스크래치 요구 사항이 필요할 수 있습니다. 의료 또는 전자 부품은 추적성, 제어된 포장 및 재료 인증서도 필요할 수 있습니다.
RFQ 준비 시 3D 파일, 2D 도면, 원료 목표, 연간 생산량, 표면 마무리 요구 사항, 색상 요구 사항, 허용 오차 노트 및 예상 사용 환경을 제공하십시오. 이러한 입력 정보 중 하나라도 누락되면 협력사는 추측해야 하고 추측은 비용 및 품질 위험을 초래합니다.
실용적인 검사 계획은 치수, 기능 치수, 외관 표면 및 비중심 영역을 분리해야 합니다. 이는 간단한 특징에 대한 과도한 검사를 방지하면서 스냅 피트, 밀폐면, 조립 구멍 및 보이는 표면에 대한 엄격한 제어를 유지합니다. 반복 주문 시 동일한 계획은 또한 기억에 의존하지 않고 승인된 샘플과 새로운 생산 배치를 비교하는 데 도움이 됩니다.
문서화는 첫 샘플과 마찬가지로 중요합니다. 승인된 재료 등급, 색상 기준, 도면 개정판, 샘플 승인 날짜, 측정 방법 및 포장 요구 사항을 한 곳에 보관하십시오. 금형이 수리되거나 다른 프레스로 이동될 때 이러한 기록은 공정의 무음 변화 위험을 줄이고 원인 분석을 더 빠르게 합니다.

What Should Buyers Do Before Starting a Mold?
금형 제작 시작 전 부품 형상, 원료, 허용 오차, 표면 마무리 및 생산량이 일치하는지 확인하는 것이 가장 좋은 다음 단계입니다. 이러한 입력 정보가 안정적이면 사출 성형은 대규모로 반복 가능한 품질을 제공할 수 있습니다. 이러한 입력 정보가 계속 변경되는 경우 프로토타입 금형 또는 설계 반복이 더 안전할 수 있습니다.
초기 RFQ 단계에서 가격만 요구하지 않고 위험 피드백을 요청하십시오. 유용한 협력사는 벽 두께 문제, 게이트 옵션, 파팅 라인 위치, 이젝션 문제, 냉각 전략, 샘플 타임라인 및 검사 계획을 설명해야 합니다. 이러한 논의는 공학적 세부 사항 없이 빠른 견적보다 더 가치 있을 수 있습니다.
새로운 플라스틱 부품을 준비하는 경우, ZetarMold은 귀하의 3D 파일, 원료 목표, 연간 생산량 및 품질 요구 사항을 검토하고 실용적인 금형 및 성형 경로를 제안할 수 있습니다. 도면 및 예상 생산량으로 견적을 요청하여 공학 팀이 DFM 노트, 비용 동인 및 생산 일정으로 응답할 수 있도록 하십시오.
강철 금형 결정 전, 미래의 공학적 변경 처리 방법도 결정하십시오. 벽 두께, 리브, 클립 또는 나사 boss의 작은 변경은 유동, 수축, 냉각 및 이젝션에 영향을 미칠 수 있습니다. 명확한 개정 절차는 협력사가 승인된 샘플을 보호하고 변경 비용을 정직하게 견적하며 생산 중 기존 및 새로운 요구 사항을 혼동하지 않도록 돕습니다. 이는 또한 샘플 승인에서 반복 생산으로 프로젝트가 이동할 때 구매, 공학 및 품질 팀이 혼란 없이 일치하게 합니다.
자주 묻는 질문
사출 성형은 대량 생산만을 위한 것입니까?
아니요. 사출 성형은 중간에서 대량 생산에 가장 경제적이지만, 부품에 생산 등급의 재료, 정확한 기하학적 구조 또는 현실적인 기능 테스트가 필요한 경우 프로토타입 및 소량 생산용 금형도 합리적일 수 있습니다.
How long does an injection molding cycle take?
일반적인 사이클은 10초 미만에서 60초 이상까지 다양할 수 있습니다. 정확한 시간은 부품 두께, 수지, 냉각 설계, 기계 크기, 이젝션 방법 및 품질 요구 사항에 따라 달라집니다.
사출 성형에서 가장 큰 비용은 무엇인가요?
금형은 일반적으로 가장 큰 선행 비용입니다. 제품 수명 동안 재료비, 사이클 타임, 불량률, 기계 톤수, 인건비, 검사 및 유지보수도 총 비용에 영향을 미칩니다.
하나의 금형으로 여러 부품을 동시에 만들 수 있나요?
예. 멀티 캐비티 금형은 한 주기당 여러 개의 동일한 부품을 생산할 수 있고, 패밀리 금형은 관련 부품들을 만들 수 있습니다. 설계는 충전, 냉각, 이젝션의 균형을 유지해야 합니다.
사출 성형 견적에는 어떤 파일이 필요한가요?
일반적으로 공급업체는 3D CAD 파일, 2D 도면, 재료 요구사항, 연간 생산량, 표면 마감, 색상, 공차 노트, 그리고 조립 또는 테스트 요구사항이 필요합니다.
사출 성형 결함을 어떻게 줄일 수 있을까요?
DFM으로 시작하고 벽 두께를 일정하게 유지하며 적절한 원료를 선택하고 균형 잡힌 게이트와 냉각을 설계하며 습기에 민감한 재료를 건조하고 샘플링 중 공정 조건을 검증하십시오.


