 Vai al contenuto

- Injection molding melts thermoplastic pellets, injects the melt into a closed mold, cools the part, and ejects a finished plastic component.
- The process is best for repeatable 3D plastic parts with controlled dimensions, surface finish, ribs, bosses, clips, and complex features.
- The four practical controls are mold design, material selection, melt and mold temperature, and cycle-time balance.
- Most project failures come from weak DFM, poor cooling layout, wrong resin grade, or unrealistic tolerance expectations.
- A buyer should evaluate injection molding by part geometry, annual volume, tooling budget, material risk, and quality requirements.
What Is Injection Molding?
Stampaggio a iniezione1 is a manufacturing process that turns molten plastic into repeatable 3D parts inside a closed mold. Plastic pellets are heated in a barrel, pushed forward by a screw, injected into a cavity, cooled under control, and ejected as a finished component.
For a full process baseline, use our guida completa allo stampaggio a iniezione. This page explains the working sequence in plain language so engineers, buyers, and founders can decide whether a part should be molded, redesigned, prototyped, or made with another process.
At ZetarMold, our factory in Shanghai runs 47 injection molding machines from 90T to 1850T. Our engineers review wall thickness, gate location, material flow, cooling layout, and annual volume before recommending production tooling.
Injection molding is not just a machine action. It is a controlled system that connects part design, resin behavior, tooling steel, cooling, machine repeatability, and inspection. If one of these elements is weak, the molded part can show flash, sink marks, short shots, warpage, or unstable dimensions.
How Does Injection Molding Work Step by Step?
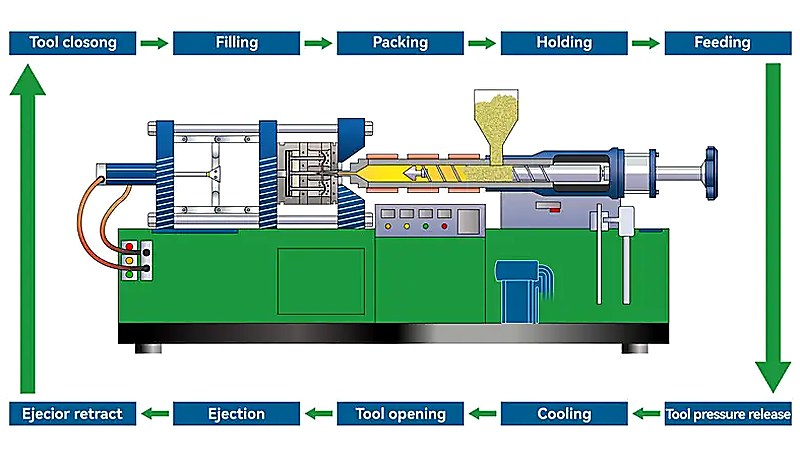
Injection molding is a repeatable cycle: clamp the mold, inject the melt, hold pressure, cool the plastic, open the mold, and eject the part. Each cycle may take a few seconds for a small thin-wall part or more than a minute for a thick engineering component.
The machine first closes the mold with enough clamping force to resist injection pressure. Pellets enter the heated barrel, where the rotating screw melts and mixes the material. The macchina per lo stampaggio a iniezione a vite then pushes a measured shot through the nozzle, sprue, runner, and gate into the cavity.
During packing and holding, extra pressure compensates for plastic shrinkage as the material cools. Cooling channels remove heat from the mold so the part can become stiff enough for ejection. If cooling is uneven, the part may warp even when the cavity shape is correct.
“Injection molding is a cyclic process, not a continuous process.”Vero
A molded part is made shot by shot. The mold closes, fills, packs, cools, opens, and ejects before the next cycle starts. This is different from extrusion, which pushes material through a die continuously.
“The mold only gives the part its shape; process settings do not matter.”Falso
Mold geometry matters, but melt temperature, injection speed, hold pressure, cooling time, and material drying also determine final quality. A good mold can still produce bad parts if the process window is unstable.
The ejected part is then inspected, trimmed if needed, and packed or sent to secondary operations. The best production plans define the acceptable cycle time, inspection points, and cosmetic standards before tooling starts, not after defects appear.
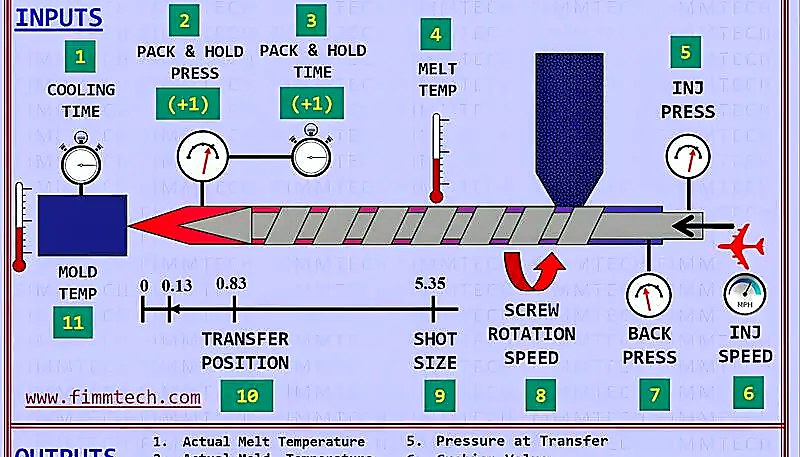
A stable process window is normally built during sampling. The team adjusts fill speed, transfer position, hold pressure, hold time, barrel temperature, mold temperature, and cooling time until the part fills completely without flash, burn marks, excessive stress, or unacceptable dimensions. Once that window is documented, production operators can repeat the same settings and know when a drift needs correction.
For buyers, the important lesson is simple: the mold and the machine must be evaluated together. A part can fail because the tool has poor venting, but it can also fail because the selected macchina per lo stampaggio a iniezione has the wrong shot size, weak plasticizing capacity, or unstable temperature control. Good suppliers check both sides before promising a production plan.
What Parts Are Best Suited for Injection Molding?
The best injection molded parts are repeatable plastic components with 3D geometry, consistent wall sections, and enough volume to justify tooling. Housings, brackets, caps, connectors, gears, medical device parts, and automotive clips are common examples.
Injection molding is strong when the part needs integrated ribs, bosses, snap fits, threads, inserts, living hinges, or cosmetic surfaces. It is weaker when the part is very long, has only a constant cross-section, or changes frequently during early product development.
Part geometry must respect molding rules. Wall thickness should be as uniform as possible, ribs should not be too thick, sharp internal corners should be radiused, and draft angles should be added so the part can leave the mold. These rules reduce sink, stress, drag marks, and ejection damage.
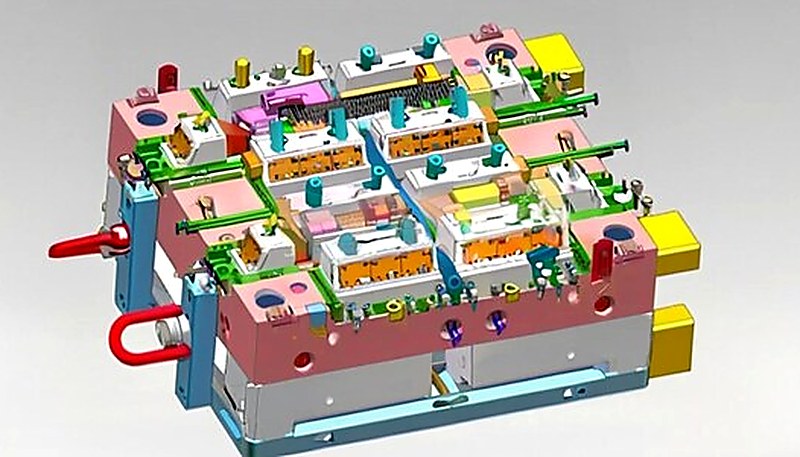
For tooling-specific decisions, compare your design against the guida completa dello stampo per iniezione. That guide explains mold structure, gate choices, cooling design, ejector layout, and tooling tradeoffs in more detail.
Which Materials Can Be Injection Molded?
The best materials are termoplastico2 grades that match the part’s strength, heat, chemical, cosmetic, and compliance needs. Most thermoplastic families can be injection molded if the grade is selected for the required strength, heat resistance, chemical exposure, color, and regulatory needs. Common options include ABS, PP, PE, PC, PA, POM, PMMA, TPU, PEEK, and flame-retardant engineering blends.
Material selection affects tool design. A resin with high shrinkage needs different cavity compensation than a resin with low shrinkage. A glass-filled grade may require stronger tooling surfaces and better venting. A transparent part needs stricter polishing, flow control, and gate placement than a hidden structural bracket.
Moisture-sensitive materials such as nylon, PC, PBT, and PET must be dried correctly before molding. If drying is ignored, molded parts can show bubbles, silver streaks, lower strength, or unstable dimensions. Material preparation is therefore part of the process, not a separate detail.
How Do Cost, Tooling, and Cycle Time Affect the Decision?
The cost decision is driven by tooling investment, part volume, material price, machine tonnage, and tempi di produzione dello stampaggio a iniezione. Tooling can be expensive, but it creates repeatability when the same part must be produced thousands or millions of times.
Cycle time matters because every second repeats across the full production run. A 5-second saving may look small in a sample trial, but it can change annual capacity and unit cost when the mold runs every day. Cooling is often the largest part of the cycle, so cooling layout deserves early engineering attention.
“Cooling time often controls the economics of injection molding.”Vero
For many parts, cooling takes more time than injection and ejection. Better cooling design can reduce cycle time, stabilize dimensions, and lower cost per part.
“The lowest mold quote is usually the lowest total cost.”Falso
A cheap mold can become expensive if it causes flash, short life, slow cycles, poor cooling, frequent repairs, or high scrap. Total cost should include mold life, cycle time, maintenance, and quality risk.
Buyers should ask for DFM feedback before approving tool steel. The DFM review should flag undercuts, wall-thickness risk, cosmetic gate marks, tolerance conflicts, resin shrinkage, and ejection risk. For dimensional issues, mold shrinkage3 should be estimated before the first cut of steel. For broader process context, Britannica describes injection molding as a manufacturing technique4.
What Quality Problems Should Buyers Watch For?
Problemi di qualità comuni sono short shots, flash, sink marks, weld lines, burn marks, warpage, variazione di colore e parti brittle. Molti di questi problemi possono essere tracciati a design della parte, design dello stampo, preparazione della resina o controllo del processo.
Short shots avvengono quando la cavità non si riempie completamente. Flash appare quando la plastica scappa alla linea di separazione o intorno agli inserti. Sink marks generalmente arrivano da sezioni thick che si raffreddano lentamente. Warpage è causato da ritiro non uniforme, raffreddamento non bilanciato o stress interno.
L'inspection dovrebbe corrispondere alla funzione della parte. Un bracket nascosto potrebbe necessitare controlli dimensionali e di forza, mentre un cover visibile potrebbe necessitare richieste più strette di colore, lucentezza, texture e graffi. Una parte medical o elettronica potrebbe anche necessitare tracciabilità, packaging controllato e certificati del materiale.
Per la preparazione della RFQ, inviare un file 3D, un disegno 2D, la resina target, il volume annuale, la richiesta di finitura superficiale, la richiesta di colore, note sulle tolleranze e l'ambiente di utilizzo previsto. Se uno di questi input manca, il fornitore deve supporre, e le supposizioni creano rischio di costo e qualità.
Un piano di inspection pratico dovrebbe separare dimensioni critiche, dimensioni funzionali, superfici cosmetiche e aree non critiche. Questo previene over-inspection su feature semplici mentre mantiene un controllo stretto su snap fits, facce di sealing, hole di assemblaggio e superfici visibili. Per ordini ripetuti, il stesso piano aiuta anche a comparare nuovi batch di produzione contro il sample approvato invece di affidarsi alla memoria.
La documentazione è importante quanto il primo sample. Mantieni la grade del materiale approvato, lo standard di colore, la revisione del disegno, la data di approvazione del sample, il metodo di misurazione e la richiesta di packaging in un posto. Quando un stampo è riparato o spostato su un altro press, questi record riducono il rischio di drift silenzioso del processo e rendono l'analisi root-cause più veloce.

What Should Buyers Do Before Starting a Mold?
Il miglior passo successivo è confermare che la geometria della parte, la resina, le tolleranze, la finitura superficiale e il volume di produzione siano allineati prima che inizi la costruzione dello stampo. Se questi input sono stabili, lo stampaggio a iniezione può fornire qualità ripetibile su larga scala. Se questi input sono ancora in cambiamento, un prototipo dello stampo o iterazioni di design possono essere più sicuri.
Usa la fase iniziale della RFQ per richiedere feedback sui rischi, non solo un prezzo. Un fornitore utile dovrebbe spiegare i problemi dello spessore delle pareti, le opzioni degli ingressi, la posizione della linea di separazione, le preoccupazioni sull'estrazione, la strategia di raffreddamento, la timeline del sample e il piano di inspection. Questa discussione è spesso più preziosa che una quotazione rapida senza dettagli ingegneristici.
Se stai preparando una nuova parte plastica, ZetarMold può revisionare il tuo file 3D, la resina target, il volume annuale e le richieste di qualità, poi suggerire un percorso pratico per lo stampo e lo stampaggio. Richiedi una quotazione con disegni e volumi previsti così il team ingegneristico può rispondere con note DFM, driver di costo e timing di produzione.
Prima di impegnarsi con lo stampo, decidere anche come saranno gestite le future modifiche ingegneristiche. Piccole modifiche al spessore delle pareti, nervature, clip o boss per viti possono influenzare il flusso, il ritiro, il raffreddamento e l'estrazione. Un processo di revisione chiaro aiuta il fornitore a proteggere il sample approvato, quotare i costi delle modifiche in modo trasparente e evitare di mescolare vecchie e nuove richieste durante la produzione. Questo mantiene anche purchasing, engineering e quality teams allineati quando il progetto passa dall'approvazione del sample alla produzione ripetuta senza confusione.
Domande frequenti
Lo stampaggio ad iniezione è solo per la produzione di grandi volumi?
No. Lo stampaggio a iniezione è più economico per volumi medi e alti, ma anche gli stampi per prototipi e bassi volumi possono avere senso quando il componente richiede materiale di qualità produttiva, geometria precisa o test funzionali realistici.
How long does an injection molding cycle take?
Un ciclo tipico può variare da meno di 10 secondi a più di 60 secondi. Il tempo preciso dipende dalla spessore della parte, dalla resina, dal design di raffreddamento, dalla dimensione della macchina, dal metodo di estrazione e dalle requisiti di qualità.
Qual è il costo maggiore nello stampaggio a iniezione?
Lo stampo è solitamente il costo iniziale più elevato. Durante la vita del prodotto, anche il costo del materiale, il tempo di ciclo, il tasso di scarto, la potenza della pressa, la manodopera, l'ispezione e la manutenzione influiscono sul costo totale.
È possibile che uno stampo produca più parti contemporaneamente?
Sì. Uno stampo a più cavità può produrre diverse parti identiche per ciclo, mentre uno stampo familiare può produrre parti correlate. Il progetto deve mantenere equilibrati il riempimento, il raffreddamento e l'espulsione.
Quali file sono necessari per un preventivo di stampaggio a iniezione?
Un fornitore normalmente necessita di un file CAD 3D, un disegno 2D, i requisiti del materiale, il volume annuale, la finitura superficiale, il colore, le note di tolleranza e qualsiasi requisito di assemblaggio o test.
Come ridurre i difetti nella stampa a iniezione?
Comincia con la DFM, mantieni una consistenza uniforme dello spessore delle pareti, scegli la resina appropriata, progetta ingressi e sistemi di raffreddamento bilanciati, asciuga i materiali sensibili all'umidità e valida il processo durante la fase di sampling.
-
stampaggio a iniezione: Un processo di produzione ciclico che inietta plastica fusa in una cavità di stampo chiusa per produrre parti 3D ripetibili. ↩
-
termoplastico: Un polimero che si ammorbisce quando viene caldo e si indurisce quando viene freddo, permettendo di essere processato ripetutamente in condizioni controllate. ↩
-
mold shrinkage: La riduzione dimensionale che avviene quando la plastica fusa si raffredda e solidifica dentro o dopo lasciare lo stampo. ↩
-
manufacturing technique: Un metodo di produzione selezionato per ripetibilità, comportamento del materiale e geometria della parte, piuttosto che per una singola produzione di prototipo. ↩


