 コンテンツへスキップ

Your tooling quote just came back 70% higher than expected because the part needs two colors. Your boss wants to know if that premium is justified. In most cases, yes — but only if the part genuinely requires ツーショット成形1, and not every dual-color part does.
Two-color injection molding produces a single part with two distinct materials or colors in one machine cycle, eliminating secondary assembly. This guide covers the process mechanics, material selection, design rules, and cost structure so you can make the call with confidence.
- Two-shot molding uses two injection units and a rotating mold to produce dual-material parts in one cycle.
- Substrate and overmold materials must be chemically compatible — TPE over PP bonds well; TPE over POM does not.
- Tooling costs 60–80% more than single-shot molds due to dual-cavity design and precision alignment.
- Parts with soft-grip surfaces, multi-color aesthetics, or integrated seals benefit most.
- If your part can be assembled from two separate pieces, overmolding may be a cheaper alternative.
What Is Two-Color Injection Molding?
Two-color injection molding is a process that injects two materials into a single mold to produce one permanently bonded part in one machine cycle. Also called two-shot molding, it uses a specialized machine with two independent injection units.
Unlike painting, pad printing, or assembling separate components, the two materials fuse during molding. The result is a part where the boundary between colors or materials is seamless — no glue line, no mechanical fastener, no secondary operation. The bond is permanent because the second material is injected while the first is still warm enough for molecular fusion.
There are two primary methods: rotary and core-back. In rotary molding, a turntable rotates the mold 180 degrees between the first and second shot. In core-back molding, a sliding insert retracts to expose the second cavity area without rotating the mold. Both methods keep the first-shot part inside the mold throughout the entire cycle, which is why positional accuracy stays tight.
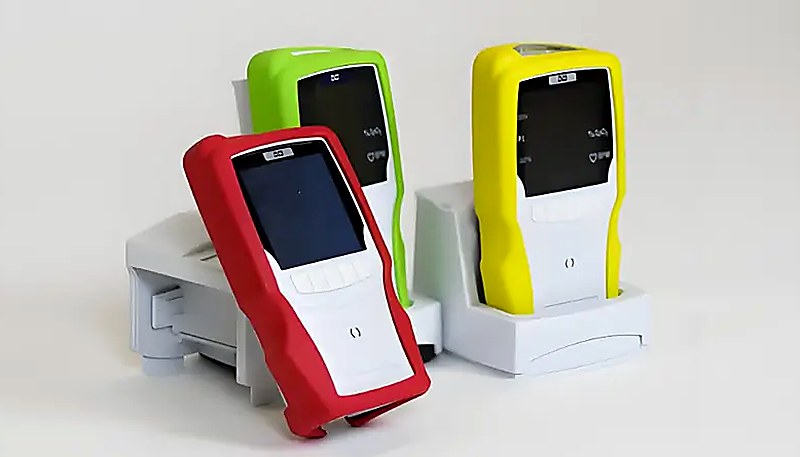
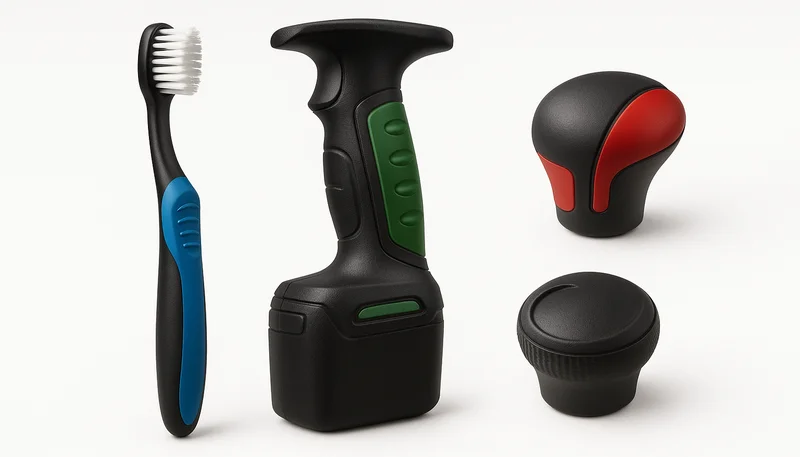
Common applications read like a list of things you touch every day: toothbrushes with soft rubber grips, keyboard keys with legends that never fade, automotive interior trim with integrated soft-touch zones, and medical device housings with color-coded function zones. The underlying 射出成形プロセス is the same as single-shot — the difference is entirely in the machine configuration and mold design.
How Does the Two-Shot Molding Process Work?
The two-shot molding process is a cycle where two injection units fill a rotating or sliding mold to create a bonded dual-material part. The entire process happens without opening the mold or removing the substrate2.
In the rotary method, the mold has two matching cavity halves mounted on a rotating platen. Step one: the first injection unit fills cavity A with the substrate material. Step two: the platen rotates 180 degrees, moving the cooled substrate into alignment with cavity B. Step three: the second injection unit fills cavity B with the second material or color around the substrate. Step four: the mold opens and the finished part ejects.
The core-back method works differently. Instead of rotating, a sliding insert retracts to expose the second cavity area. This method is more compact and often faster for symmetrical parts, but it limits the design freedom compared to rotary because the two cavity areas share the same mold half.
Cycle time is not double that of single-shot molding — that is a common misconception. Because the second shot begins while the first-shot material is still cooling, the total cycle is typically only 1.2 to 1.5 times longer than a single-shot cycle. The machine runs both injection units in overlapping phases, so throughput is surprisingly competitive for high-volume production runs.
Machine requirements are specific: you need a two-color machine with two barrels, a rotating platen or sliding mechanism, and enough clamping force to handle both cavities simultaneously. These machines cost significantly more than standard single-barrel units, which is one reason two-shot molding carries a cost premium over conventional overmolding.
In practice, the choice between rotary and core-back depends on part geometry. Parts with rotational symmetry — round buttons, cylindrical handles — work well with rotary. Flat or elongated parts with a two-tone stripe or band often suit core-back better because the mold slides linearly rather than rotating.
What Materials Work Best for Two-Color Molding?
PP+ティーピーイー3, ABS+TPE, and PC+TPU are the most reliable material pairs for two-color molding because they bond chemically. Without chemical compatibility, the two materials will delaminate under stress, regardless of how well the mold is designed.
Bonding happens through two mechanisms. Chemical bonding occurs when compatible polymers fuse at the molecular level during the second shot — the melt temperature of the second material partially remelts the substrate surface. Mechanical bonding uses physical interlocks: undercuts, through-holes, or textured surfaces that lock the second material in place even when chemical bonding is weak.
Material selection is not just about hardness and color. Melt temperature matters because the second-shot material must be hot enough to bond but not so hot that it deforms the first shot. Shrinkage rates should be similar — a mismatch causes warping at the bond line. Processing windows must overlap: if one material needs 280 degrees Celsius and the other degrades above 240 degrees, you have a fundamental problem.
In our experience running two-shot production, the most common material failure mode is not a complete bond break — it is a slow delamination that shows up after hundreds of thermal cycles. This typically happens when the substrate and overmold have a melt temperature gap of more than 40 degrees Celsius, causing incomplete fusion at the interface.
| 基材 | Overmold Material | 結合タイプ | Bond Quality |
|---|---|---|---|
| PP | TPE (SEBSベース) | 化学的 | 素晴らしい |
| ABS | TPE (SEBSベース) | 化学的 | グッド |
| PC | TPU | 化学的 | グッド |
| PA6 (Nylon) | TPE (SEBSベース) | 化学的 | グッド |
| PC/ABS | ティーピーイー | 化学的 | グッド |
| POM (Acetal) | ティーピーイー | Mechanical only | 貧しい |
| Same base resin | Same resin, different color | Melt fusion | 素晴らしい |
The bottom line: start with PP+TPE or ABS+TPE if you have no specific engineering requirement driving your material choice. These are the most forgiving, widely available, and cost-effective pairs for two-shot production, and most material suppliers stock them in a range of durometers and colors. If your application demands higher temperature resistance or chemical resistance, PC+TPU or PA6+TPE are the next step up. POM is a last resort for two-shot — it barely bonds to anything chemically and almost always requires mechanical interlocks designed into the part geometry. When in doubt, request compatibility data sheets from your material supplier specifically rated for multi-shot overmolding applications.
When Should You Choose Two-Color Injection Molding?
Two-color molding is the best choice for parts needing permanent bonding, soft-grip surfaces, or multi-color aesthetics without post-assembly. Not every dual-color part justifies the tooling premium, and understanding where the line falls saves budget.
The strongest case for two-shot is production volume. At 10,000 units and above, the elimination of secondary assembly — gluing, ultrasonic welding, or snap-fitting two separate pieces — usually offsets the higher tooling cost. Below that volume, the math rarely works unless the part has a regulatory requirement for permanent bonding, such as in medical devices or food-contact applications.
Automotive interior components are a textbook use case. A gear shift knob needs a hard plastic core for structural rigidity and a soft outer surface for grip. Painting or applying a rubber sleeve does not survive 100,000 cycles of daily use. Two-shot molding bonds the materials permanently, and the result outlasts the vehicle. We have seen this pattern repeat across center console buttons, door handle surrounds, and dashboard trim — anywhere a soft-touch surface meets a rigid structural requirement.
Consumer electronics use two-shot molding for both aesthetic and functional reasons. A power tool housing where the brand name is a different color, molded directly into the body surface — no label to peel off, no paint to scratch. Keyboard keys with legends that are molded into the plastic rather than printed on the surface. These parts see heavy handling, and the two-shot approach ensures the visual and tactile elements never degrade.
The insert molding process achieves similar integration but for a different purpose — embedding metal inserts or electronic components into plastic rather than bonding two plastic materials. Both processes eliminate secondary assembly, but insert molding is about material-type integration while two-shot is about plastic-on-plastic bonding.
When not to use two-shot: if you only need color differentiation and the part has no functional requirement for two materials, pad printing or painting is cheaper at any volume. If the two sections of your part have very different structural requirements — one section needs transparent PC and the other needs glass-filled nylon — the processing temperature gap may be too wide for a reliable bond in a single machine.
“Two-color molding produces a permanently bonded part — chemically compatible materials fuse at the molecular level during the second shot.”真
When the second material is injected at the right melt temperature, it partially remelts the substrate surface at the contact area, creating a bond that is often stronger than adhesive-based or mechanical alternatives. This is why material compatibility is the single most important design decision in any two-shot project.
“Any two thermoplastics can be combined in two-color injection molding.”偽
Chemical incompatibility causes delamination. POM and TPE, for example, have almost no chemical affinity — the bond is purely mechanical and fails under peel stress. Always verify material compatibility data sheets with your supplier before committing to tooling.
Material compatibility is not a binary yes-or-no question — it exists on a spectrum. Some material pairs achieve excellent chemical bonds with no special preparation. Others require surface treatments, primer coatings, or mechanical interlock features to achieve adequate bond strength. The cost of these secondary bonding strategies adds up quickly, which is why material selection should be finalized before mold design begins, not after. Changing materials mid-project on a two-shot mold is far more expensive than on a single-shot mold because both cavity sets may need modification.
“Two-shot mold tooling typically costs 60 to 80 percent more than a comparable single-cavity mold.”真
The mold must contain two complete cavity sets with precision alignment, a rotating platen or sliding core mechanism, and separate runner systems for each material. This complexity increases steel volume, machining hours, and engineering design time significantly.
“The total cycle time for two-color molding is exactly double that of single-shot molding.”偽
Because the second injection begins while the first-shot material is still in its cooling phase, the actual cycle time increase is only 20 to 50 percent. Both injection units operate in overlapping phases, making throughput better than most engineers expect.
What Are the Critical Design Rules for Two-Shot Parts?
Two-shot design rules are straightforward: half a millimeter minimum bond overlap, shut-off angles at 3-5 degrees, wall thickness under 4 mm. Violate any of these and the part will fail at the bond line.
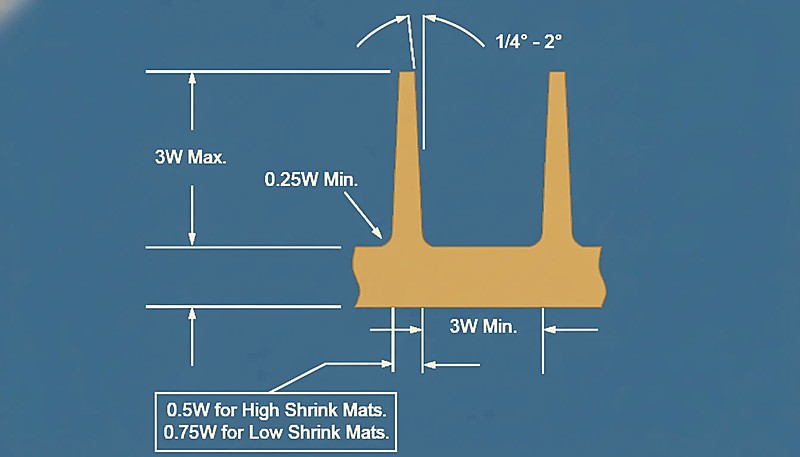
Bond overlap is the area where the second material extends over the substrate edge. Too little overlap and the second material peels away under stress. We recommend a minimum of 0.5 mm, but 1.0 mm is safer for parts that experience thermal cycling, impact loading, or repeated flexing at the bond line.
Shut-off design is critical. The shut-off is the surface where the mold creates a seal between the first-shot cavity and the second-shot cavity. If the angle is too shallow, flash occurs — the second material leaks into the first-shot area. If the angle is too steep, the mold wears quickly and the seal degrades over production runs. Three to five degrees is the industry standard, and most experienced 金型設計 engineers will flag anything outside that range during DFM review.
Wall thickness matters more in two-shot molding than in single-shot because two different materials cool at different rates. If both walls exceed 4 mm, differential shrinkage causes warping at the bond line. If the second-shot wall is thinner than 0.8 mm, short shots become a persistent production problem — the TPE or TPU solidifies before it fills the cavity completely.
Gate placement also deserves careful attention. The gate for the second shot should be positioned so that the melt flows across the bond surface evenly. Uneven flow creates cold spots where the bond is weak. In practice, this means the second-shot gate is usually on the opposite side from the first-shot gate, giving the material a long, even flow path across the substrate surface.
Draft angles need to account for both materials. The substrate requires the standard 1 to 2 degrees of draft per side. The overmold area needs at least 0.5 degrees of draft to release cleanly from the mold after the second shot. If the part has undercuts specifically designed for mechanical bonding, make sure the undercut depth does not exceed 0.3 mm or the overmold material will tear during ejection.
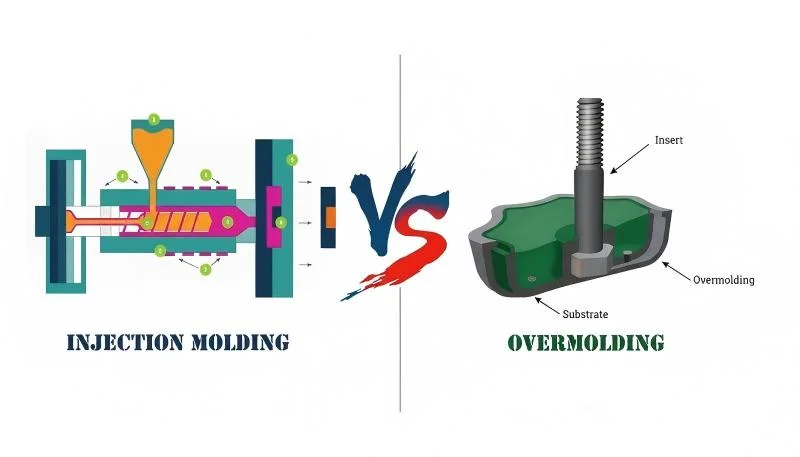
Two-Color Molding vs. Overmolding: Which Process Do You Need?
Two-color molding is faster and cheaper per part at high volumes; overmolding is more flexible at lower volumes. Both produce bonded dual-material parts, but the process economics differ fundamentally.
| ファクター | Two-Color Molding | オーバーモールディング |
|---|---|---|
| Machines required | 1 (two-shot machine) | 2 (or 1, two setups) |
| Tooling cost | 60–80% higher | Lower (two simpler molds) |
| Cycle time per part | 1.2–1.5x single shot | 2x single shot (two cycles) |
| Per-part cost (high vol) | 低い | より高い |
| Per-part cost (low vol) | より高い | 低い |
| Bond quality | 化学的 + 機械的 | 化学的 + 機械的 |
| Tolerance control | Tighter (one setup) | Wider (two setups) |
| Volume threshold | Above 10,000 units | Any volume |
The decision comes down to volume and tolerance requirements. Above 10,000 units, two-color molding is almost always cheaper per part because you eliminate the labor and handling of a second molding cycle. The machine cost is higher per hour, but the cycle time advantage compounds fast. Below that threshold, overmolding with two simpler molds and standard machines is the safer financial bet.
Tolerance is the other deciding factor. Two-color molding keeps positional accuracy within plus or minus 0.05 mm because the part stays in one setup. Overmolding requires removing and repositioning the substrate — each handling step introduces alignment variation. For medical devices and precision electronics where the bond line must be visually invisible and functionally hermetic, two-shot is the clear choice.
ZetarMold added 3 dedicated two-color injection molding machines to our Shanghai facility in 2024. Our plant runs 47 injection molding machines with clamping forces ranging from 90T to 1850T, backed by 8 senior mold engineers averaging over 10 years of experience. We handle two-shot mold design, DFM review, and T1 sampling entirely in-house, with 400+ qualified materials and ISO 9001 / 13485 certification.
How Much Does Two-Shot Mold Tooling Cost?
A standard two-shot mold costs $20,000 to $80,000, which is 2 to 4 times more than a comparable single-shot mold at $5,000 to $30,000. The premium covers dual-cavity design, a rotating mechanism, and separate runner systems for each material.
Lead time for a two-shot mold is typically 6 to 10 weeks from finalized 3D data to T1 samples, compared to 4 to 6 weeks for a standard single-shot mold. The extra time goes into alignment verification — both cavities must match perfectly at the shut-off line, or the bond shows visible misalignment on every single part produced.
よくある質問
よくある質問
What is the difference between two-color molding and overmolding?
Two-color molding runs both materials in a single machine cycle using one two-shot machine equipped with a rotating or sliding mold mechanism. Overmolding uses two separate molding cycles — the substrate is molded first, removed from the machine, then placed into a second mold for the overmold layer. Two-color molding is faster and more precise at high volumes because the part never leaves the mold. Overmolding is more flexible and cost-effective at lower volumes since it uses standard single-barrel machines and two simpler molds.
How many units do I need to justify two-shot molding?
The typical breakeven point is 8,000 to 15,000 units, depending on part complexity and the specific material pair selected. Below that range, the 60 to 80 percent tooling premium does not amortize quickly enough to justify the investment. Above 20,000 units, two-shot molding is almost always the lower-cost option per part because it eliminates secondary handling labor and reduces cycle time by running both shots in a single clamp cycle. For very high volumes above 100,000 units, the per-part savings become substantial.
Can two-color molding use two completely different materials?
Yes, but only if the two materials are chemically compatible for bonding or the part includes mechanical interlocks such as undercuts, through-holes, or textured surface patterns. Common compatible pairs include PP with TPE, ABS with TPE, and PC with TPU — these achieve strong chemical bonds because the second-shot melt temperature partially remelts the substrate surface at the contact zone. Incompatible pairs like POM with TPE rely solely on mechanical bonding features and carry a significantly higher risk of delamination under stress or thermal cycling.
二色金型の典型的な納期は?
二色金型工具は通常、最終3D設計データから初T1サンプル部品まで6〜10週間かかり、標準単射金型の4〜6週間と比較されます。追加時間は二つのキャビティセット間の位置確認、一貫した結合を達成するための順次射出パラメータテスト、生産条件下での遮断シール完全性検証に費やされます。複雑な多キャビティ二色金型は公差が厳しい場合、部品形状複雑性とキャビティ数により12週間まで延長できます。
どの射出成形機でも二色部品を成形できますか?
いいえ、二色成形は標準的な単一バレル射出成形機ではできません。二つの独立した射出ユニットを持つ専用機が必要です。つまり、二つの別々のバレル、二つのスクリュー、およびクランプセクションに組み込まれた回転プラテンまたはスライディングコア機構です。標準機は一つの射出ユニットしか持たず、二射部品を生産できません。これらの専用二色成形機は高い時間稼働率を持ち、二色プロジェクト全体の部品生産コストに考慮する必要があります。
オーバーモールド材料の最小肉厚は?
第二射のオーバーモールド材料(TPEまたはTPU)の最小肉厚は0.8 mmとすべきです。薄すぎると材料が完全にキャビティを充填する前に固化するショートショットのリスクがあり、基材表面を不完全に覆う結果となります。基材材料については、標準的な射出成形の肉厚ルールが適用されます:1.0 mmが絶対最小値であり、ほとんどのエンジニアリング熱可塑性プラスチック用途では2.0〜3.0 mmが実用的な設計範囲です。いずれの材料でも4 mmを超えると、接着ラインでの収縮差のリスクが高まります。
二色部品の公差はどの程度厳密にできますか?
二色部品は結合線で±0.05mmの公差を維持できます。これは両材料が単一機セットアップで成形され、射間の取り扱いや再配置がないためです。これはオーバーモールドよりも大幅に厳密で、基材を第二金型に装入し位置精度が装入治具の精度に完全に依存します。結合線から離れた重要な寸法では、二色部品は標準単射射出成形と同等の公差を達成し、通常±0.02〜0.05mmです。
医療機器に二色成形は適していますか?
はい、二色成形は医療機器製造において、色分けされた注射器、ソフトグリップ手術器具のハンドル、二硬度シール、診断機器の筐体などの部品に広く使用されています。二つの材料間の永久的な化学結合により、滅菌環境で劣化する可能性のある接着剤や機械的固定具による汚染リスクが排除されます。単一セットアップの成形プロセスはまた、より厳密な寸法公差を生み出し、FDA規制要件とISO 13485品質管理システム認証基準を満たすのに役立ちます。
二色成形とオーバーモールドの選択は、金型予算、部品単価、製品品質を全生産期間に影響する決定です。誤ると、十分に活用しない金型に過剰支払いするか、数百万部品で累積する公差問題に悩むことになります。
簡単なルール:15,000個以上で公差が厳しい場合は二色成形。10,000個以下または形状が単純な場合はオーバーモールド。中間の場合、金型サプライヤーと数字を確認しデータで決定します。
ZetarMoldは上海の施設で専用の二色成形機を含む47台の射出成形機を稼働しています。8人の上級金型エンジニアが社内でDFMレビュー、金型設計、初品検査を担当します。400以上の認定材料とISO 9001 / 13485認証を備え、48時間以内に二色プロジェクトを評価し詳細な見積もりを提供できます。 二色成形プロジェクトの見積もりを取得.
-
ツーショット成形: Two-shot molding refers to an injection molding process where two different materials or colors are injected sequentially into the same mold to produce a single bonded part. ↩
-
substrate: In multi-material molding, the substrate refers to the first-shot rigid material that forms the structural base of the part, onto which the second material is overmolded. ↩
-
ティーピーイー: A thermoplastic elastomer (TPE) is a class of copolymers that exhibit rubber-like elasticity at room temperature but can be melted and processed like conventional thermoplastics. ↩


