 Vai al contenuto

You quoted an IML project and the mold cost came back 30–40% higher than standard tooling. Your customer wants to know why. The honest answer: in-mold labeling bonds a pre-printed film inside the mold during every injection cycle, and each added step — film preparation, robot placement, cavity vacuum, and tie layer1 attivazione — aggiunge costi e complessità. Ma quando il volume di produzione giustifica l'investimento, l'IML elimina completamente la decorazione secondaria e produce grafiche che resistono a lavastoviglie, solventi e anni di esposizione ai raggi UV senza scollarsi. Questa guida illustra l'intero processo di stampaggio a iniezione IML, dalla selezione del film alla prevenzione dei difetti, basandosi su ciò che abbiamo visto gestendo la produzione IML presso lo stabilimento ZetarMold di Shanghai.
- IML bonds the label during molding — no post-mold decoration needed.
- Film cost and robot integration add 20–40% to per-part price at low volumes.
- Polypropylene is the dominant IML substrate; PC and ABS require special tie layers.
- Static placement and vacuum in the mold cavity prevent label shifting during fill.
- IML outperforms pad printing and heat transfer labels on durability by a wide margin.
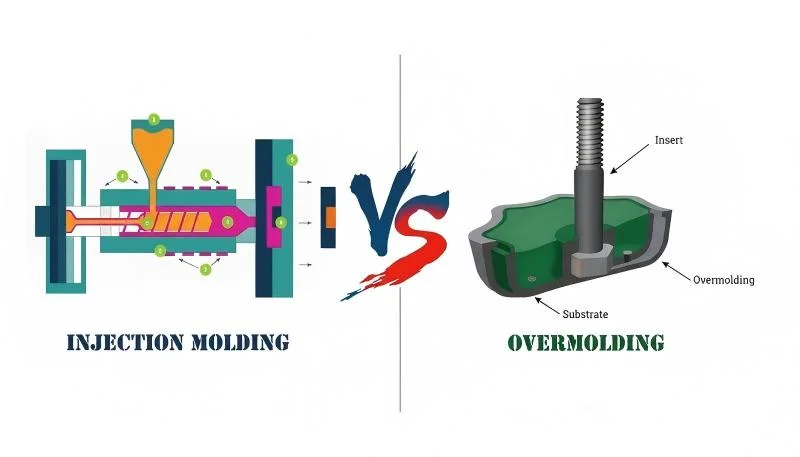
What Is IML Injection Molding?
IML injection molding is a process where a pre-printed polymer film is placed inside the mold cavity before each shot. During injection, the molten plastic melts the back layer of the film, fusing label and substrate into a single part. There is no adhesive, no secondary printing, and no post-process lamination. The graphic becomes integral to the wall of the part.
The technology originated in the food-packaging industry for margarine tubs and dairy cups in the 1990s. Since then it has expanded into consumer electronics, automotive interior trim, medical device housings, and cosmetic containers. If you have peeled a label off a butter tub and noticed the print was embedded in the plastic wall, that was IML.
Compared with traditional stampaggio a iniezione followed by tampografia2 or heat-transfer labeling, IML produces a permanent, scratch-resistant surface in a single cycle. The trade-off is higher upfront tooling cost and tighter process control. At ZetarMold, we run IML on multi-cavity molds for consumer-product clients who need 100,000+ units per run — the volume where per-part economics start to favor IML over secondary decoration.
“IML bonds the label and substrate into a single, inseparable part without any adhesive.”Vero
La resina fusa attiva lo strato legante sulla superficie posteriore del film, creando un legame chimico più forte di qualsiasi strato adesivo. L'etichetta non può scollarsi, formare bolle o separarsi in condizioni d'uso normali.
“IML labels can be removed and replaced after molding if the artwork has errors.”Falso
Once the tie layer bonds to the injected substrate during the molding cycle, the label is permanent. There is no way to remove or replace it without destroying the part. This is why label artwork must be approved and proofed before any production run.
How Does the IML Process Work Step by Step?
The IML process adds two steps before injection and modifies the clamping sequence compared to standard molding. Here is the full breakdown of what happens inside the machine every cycle, from film loading to part ejection.
Step 1: Film Printing and Die-Cutting
The decoration is first gravure- or flexo-printed onto a multilayer film in roll form. A typical IML film stack consists of a printable top layer (usually PP or PET), an ink layer, a barrier layer in some food-grade applications, and a tie layer on the back that bonds to the molten resin. After printing, the film is die-cut into individual labels sized to the cavity geometry. Tolerances on label dimensions are typically ±0.15 mm — too loose and the label gaps show, too tight and the label wrinkles during cavity placement.
Step 2: Robot Placement Inside the Mold
Before each shot, a side-entry or top-entry robot picks up a die-cut label, applies an electrostatic charge3 to it, and inserts it into the open mold. The static charge pins the film flat against the cavity wall. Some molds supplement this with vacuum channels — small holes behind the cavity surface that pull the label flush. Without proper static or vacuum, the label can shift or wrinkle when melt rushes in.
Step 3: Mold Close and Injection
The mold closes and the injection unit fills the cavity. The melt temperature (typically 200–240 °C for PP-based IML) activates the tie layer, which bonds to the substrate within seconds. Injection speed is critical: too fast and the melt front displaces the label; too slow and the tie layer does not fully activate, leaving delamination risk.
Step 4: Packing, Cooling, and Ejection
After cavity fill, holding pressure packs additional material to compensate for shrinkage. The cooling phase solidifies both substrate and the label-to-part bond. Cycle times for IML parts run 10–25% longer than standard injection because the film acts as a slight thermal insulator, slowing heat extraction from the cavity wall. Once cooled, the mold opens and the robot extracts the finished, decorated part.
In practice, the entire label-placement-to-part-ejection sequence takes 1.5–3 seconds longer than a standard cycle on the same mold. On a high-speed packaging line running 8-cavity molds at 8-second cycles, that penalty adds up. But the key economic insight is that you eliminate the entire post-mold decoration step — pad printing, drying, inspection, and rework — which typically adds 3–5 days and $0.03–0.08 per part.
| Parametro | Standard IM | IML IM |
|---|---|---|
| Cycle time (PP, 500 g part) | 12–15 s | 14–18 s |
| Mold cost premium | Baseline | +25–40% |
| Per-part decoration cost | $0.03–0.08 (pad print) | $0.01–0.04 (IML film) |
| Label durability | Aumentare la temperatura di fusione di 5–10 °C; prolungare il tempo di mantenimento | 10+ years (integrated) |
| Automation level | Standard robot | Label robot + part robot |

What Materials and Films Work with IML?
Material compatibility is the single biggest constraint in IML. The substrate resin and the film must bond chemically through the tie layer, which means the film’s back layer needs to be formulated for the specific polymer family you are molding. Getting this wrong results in delamination — the most frustrating IML defect because it often does not show up until weeks after production, during thermal cycling or drop testing.
Polypropylene (PP) — The Default Choice
Over 70% of IML production worldwide runs on PP. The reasons are straightforward: PP bonds reliably to PP-based IML films without exotic tie-layer chemistry, it is inexpensive, and it dominates food-packaging applications where IML is most prevalent. If your part can be designed in PP, IML is straightforward and the film cost stays low — typically $0.005–0.015 per label depending on size and print complexity.
Polystyrene (PS) and ABS
PS and ABS require dedicated film formulations with modified tie layers. The bond is achievable but less forgiving — processing windows for melt temperature and injection speed are narrower. We have run ABS IML housings for electronics clients, but every project needed film-sample trials before committing to production tooling. Expect an additional 2–4 weeks of material qualification compared to PP-based IML.
Polycarbonate (PC) and Engineering Resins
PC IML is possible but uncommon because the high processing temperature (280–320 °C) can degrade standard IML films. Specialty high-temperature films exist, but they cost 2–3× more than PP-grade film. Unless the application demands PC’s impact strength and transparency, it is usually more practical to mold the part in a lower-temperature resin and accept the design trade-offs.
At our Shanghai facility, we run 47 injection molding machines from 90T to 1850T and maintain a 400+ materials library for IML trials on PP, ABS, and engineering substrates. With 20+ years of injection molding experience and 8 senior engineers, we have seen most material-film combinations fail at least once — and we know how to avoid the common pitfalls.
What Makes an IML Mold Different from a Standard Mold?
Uno stampo IML è uno stampo standard modificato con canali per il vuoto, gate riposizionati ed espulsione dal lato del nucleo. Queste caratteristiche prevengono lo spostamento dell'etichetta, le grinze e i danni da perforazione durante la produzione.
Vacuum Channels Behind the Cavity
Most production IML molds include a network of small vacuum holes (0.3–0.5 mm diameter) behind the label-side cavity surface. These holes connect to a vacuum circuit that holds the film flat during mold close and injection. Without vacuum assist, static charge alone may fail at high injection speeds or on large-area labels. The vacuum channels add machining time and cost to the cavity insert — this is a significant portion of the 25–40% mold cost premium we mentioned earlier.
Modified Gate Location and Geometry
The gate position must direct melt flow so it sweeps across the label from one edge to the other without creating a fold or wrinkle. In a standard mold, gate placement optimizes for fill pattern and weld-line location. In an IML mold, gate placement also needs to avoid jetting melt directly onto the label face, which causes visible burn marks or label displacement. The gate vestige location matters too — it should land on a non-decorated surface whenever possible so the mark does not interrupt the printed graphic.
Ejection System Clearance
Ejector pins cannot pass through the label area. If pins punch through the film, they leave visible marks and break the label-to-part bond. This constraint forces the mold designer to route all ejection through the core side (non-labeled side) or use stripper plates and air-blast ejection. The design is solvable but requires deliberate planning during the progettazione di stampi a iniezione phase. We have seen projects where this constraint required a complete redesign of the ejection system after the initial mold trial — an expensive lesson in why IML mold design should involve the decoration supplier from the start.
“IML molds require vacuum channels and modified ejection to avoid damaging the label during production.”Vero
Vacuum channels hold the label flat against the cavity wall during injection, while ejection must be routed through the non-labeled side to prevent pin marks through the film. Both features are standard requirements in any production IML mold.
“You can convert a standard production mold to IML by simply adding a label robot to the machine.”Falso
A standard mold lacks the vacuum channels, gate positioning, and ejection-system modifications needed for reliable IML. Attempting IML on an unmodified mold leads to high scrap rates from label shifting, wrinkles, and pin-through damage. Conversion is technically possible but often costs nearly as much as building a new IML mold.
These three mold differences — vacuum channels, gate geometry, and ejection routing — are not negotiable. If your mold maker proposes skipping any of them to reduce tooling cost, push back. We have seen too many projects where the initial savings on tooling were wiped out by scrap rates exceeding 15% during production.
With our monthly capacity of 100+ mold sets and a team of 8 senior engineers overseeing every IML tool design, we build these features in from day one because the rework cost of adding them later is always higher than doing it right the first time. Our 120+ production workers and 30+ English-speaking project managers mean that communication about mold modifications does not get lost in translation — a surprisingly common problem when supplier sourcing happens without dedicated international business teams.
One additional consideration that many first-time IML buyers overlook: mold maintenance frequency. The vacuum channels in an IML mold are small (0.3–0.5 mm) and can clog with resin residue over time, especially when running filled or glass-reinforced materials. Plan for more frequent cavity cleaning — typically every 50,000–100,000 shots depending on the resin. This is not a design flaw; it is the expected maintenance cost of running a precision IML tool.
What Process Parameters Matter Most in IML?
I quattro parametri più importanti sono la velocità di iniezione, la temperatura del fuso, la pressione di mantenimento e la temperatura dello stampo. Anche piccole deviazioni al di fuori della finestra di processo causano difetti come avvallamenti, bave e segni di bruciatura sull'etichetta.
Injection Speed and Fill Profile
Injection speed is the parameter most likely to cause label defects. Too fast and the melt front pushes the label off the cavity wall; too slow and the tie layer does not fully melt, leaving a weak bond. Most IML processes use a multi-stage fill profile: slower at the start to establish flow across the label, then ramping up once the melt front has stabilized. We typically target 60–80% of the standard fill speed for the first 30% of the shot, then increase to full speed.
Temperatura di fusione
Melt temperature must be high enough to activate the tie layer without degrading the film’s printed surface. For PP IML, we run 210–230 °C. Exceeding 240 °C risks ghosting — a faint image transfer from the ink onto the cavity surface that contaminates subsequent parts. Ghosting is one of those defects that does not show up on the first 50 shots but progressively builds with each cycle, so monitoring cavity cleanliness during a production run is essential.
Holding Pressure and Time
Holding pressure ensures the label stays compressed against the cavity wall while the tie layer solidifies. Too little pressure and the label can delaminate at the edges; too much and the pressure can force melt through the film at thin sections. We generally run 60–80% of standard holding pressure for IML, with a slightly longer hold time to compensate. The key metric is edge adhesion — if you can peel the label at the corner with your fingernail, the hold pressure was insufficient.
Temperatura dello stampo
The cavity side (label side) should run 5–10 °C cooler than standard to protect the film’s surface gloss. The core side runs at normal temperature. This differential helps the label bond without sacrificing overall cycle time. On our production floor, we find that maintaining this temperature split consistently across a multi-cavity mold is one of the most impactful process controls for reducing IML scrap.
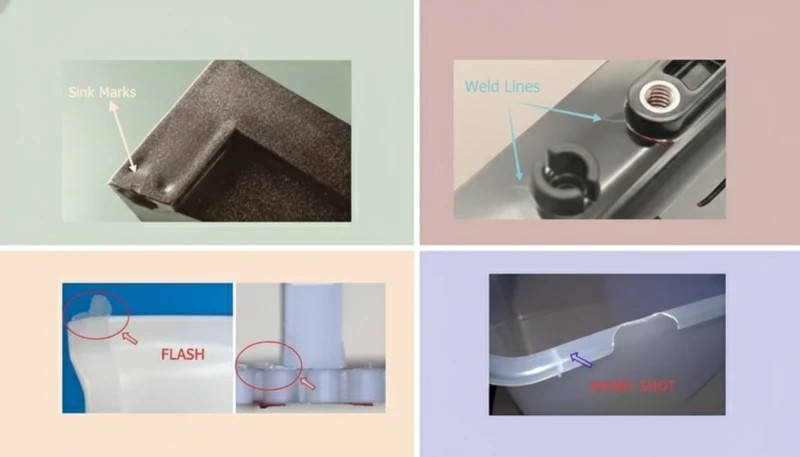
What Are the Most Common IML Defects and How Do You Prevent Them?
I difetti comuni dell'IML includono grinze, spostamenti, delaminazione dei bordi, ghosting e segni di bruciatura, tutti causati da problemi di posizionamento, flusso o legame. Ecco ciò che vediamo sul piano di produzione e come risolvere ciascuno.

| Difetto | Root Cause | Fix |
|---|---|---|
| Label wrinkle | Excess film or slow vacuum engagement | Tighten label die-cut tolerance to ±0.1 mm; verify vacuum timing |
| Label shift / offset | Insufficient static charge or high injection speed | Increase static voltage; reduce initial fill speed |
| Delamination at edges | Tie layer not fully activated | Raise melt temperature 5–10 °C; extend hold time |
| Diagramma che mostra il processo di etichettatura in stampo in quattro fasi per lo stampaggio a iniezione, con il risultato di un prodotto in plastica etichettato. | Melt temperature too high | Reduce melt temp below 240 °C for PP |
| Burn mark on label face | Gate aimed directly at label | Relocate gate or add flow deflector |
| Air trap under label | Vacuum holes blocked or insufficient | Add vacuum holes near air-trap location |
Nel nostro stabilimento di Shanghai, rileviamo la maggior parte dei difetti IML nella fase di ispezione in corso utilizzando il nostro flusso di lavoro di qualità a 6 fasi (dall'IQC all'OQC). In base ai nostri sistemi ISO 9001 e ISO 13485, ogni produzione IML viene sottoposta a ispezione del primo articolo prima del rilascio del lotto.
I difetti sopra elencati rappresentano circa il 90% degli scarti IML. La maggior parte può essere eliminata nelle prime tre serie di produzione regolando la velocità di iniezione, i tempi del vuoto e la posizione del gate.
Frequently Asked Questions About IML Injection Molding?
What is the difference between IML and IMD?
L'IML (etichettatura in stampo) posiziona una pellicola prestampata all'interno della cavità dello stampo, legandola al substrato durante l'iniezione. L'IMD (decorazione in stampo) è la categoria più ampia che include l'IML più tecniche come la verniciatura in stampo e lo stampaggio con inserimento di pellicola, dove la decorazione potrebbe non legarsi completamente al pezzo.
How much does IML tooling cost compared to standard molds?
L'attrezzatura IML costa tipicamente il 25-40% in più rispetto a uno stampo standard di dimensioni equivalenti. Il sovrapprezzo copre i canali del vuoto, le caratteristiche di registrazione dell'etichetta e un sistema automatizzato di gestione delle etichette. Il costo iniziale più elevato viene compensato dall'eliminazione del lavoro di decorazione post-stampaggio in volumi elevati.
Is IML food-safe and recyclable?
Sì. L'IML a base di PP è ampiamente utilizzato negli imballaggi a contatto diretto con gli alimenti e rispetta la FDA 21 CFR e il Regolamento UE 10/2011. Poiché l'etichetta e il contenitore sono dello stesso polipropilene, il pezzo finito è completamente riciclabile nei normali flussi di rifiuti di PP senza separazione dell'etichetta.
Can I change the label design without changing the mold?
Sì — questo è uno dei maggiori vantaggi operativi dell'IML. Poiché la cavità dello stampo non cambia, è sufficiente ordinare un nuovo lotto di etichette fustellate con il disegno aggiornato. I tempi e i costi di setup sono minimi rispetto ai cambi delle lastre per serigrafia o stampa a tampone.
Qual è il volume di produzione minimo affinché l'IML sia conveniente?
L'IML diventa conveniente a partire da circa 50.000 a 100.000 unità per lotto di produzione. Al di sotto di questa soglia, il sovrapprezzo per l'attrezzatura e il costo per film-etichetta non vengono compensati dai risparmi derivanti dall'eliminazione della decorazione secondaria. Se il tuo volume annuo è inferiore a 50.000 pezzi, la stampa a tampone o l'etichettatura a trasferimento termico offrono tipicamente un costo totale inferiore per pezzo decorato. Tuttavia, per l'elettronica di consumo e gli imballaggi premium, dove l'aspetto del marchio giustifica un costo unitario più elevato, l'IML può comunque avere senso a volumi più bassi.
-
tie layer: Uno strato legante è un adesivo coestruso all'interno di un film IML multistrato che lega chimicamente la superficie decorativa alla resina del substrato iniettata. ↩
-
tampografia: La stampa a tampone è un processo di decorazione secondaria che trasferisce l'inchiostro da una lastra incisa sulla superficie di un pezzo utilizzando un tampone in silicone, comunemente usato per loghi e testi su parti stampate a iniezione. ↩
-
electrostatic charge: La carica elettrostatica si riferisce alla tensione statica applicata a un film IML per farlo aderire alla superficie metallica dello stampo durante l'inserimento robotizzato, prevenendo lo spostamento durante il riempimento della cavità. ↩


