 콘텐츠로 건너뛰기

사출 금형 및 완성품 배압1. Most molders treat it as an afterthought, setting it once and forgetting it. That’s a mistake that costs you parts, time, and money. Back pressure is one of the most underrated parameters in 사출 성형2, yet it directly controls melt quality, degassing, and material mixing. Get it wrong, and you’ll chase defects all day.
I’ve witnessed production lines running at 60% efficiency simply because operators didn’t understand the relationship between back pressure and melt preparation. One automotive supplier I worked with was rejecting 12% of their ABS dashboard components due to silver streaking – a $40,000 monthly loss that disappeared when we increased back pressure from 80 to 120 PSI. The physics is straightforward: controlled resistance during screw recovery creates the shear heating3 and mixing action needed for homogeneous melt preparation. Without it, you’re essentially injecting inconsistent material into your 사출 금형, hoping for consistent results.
- Back pressure is the hydraulic resistance on the screw during recovery, typically 50–300 PSI.
- Proper back pressure eliminates air bubbles, improves color dispersion, and ensures shot-to-shot consistency.
- Too high back pressure causes thermal degradation, longer cycles, and equipment wear.
- Start at 100 PSI and adjust in 20 PSI increments while monitoring part quality.
What Is Back Pressure in Injection Molding?
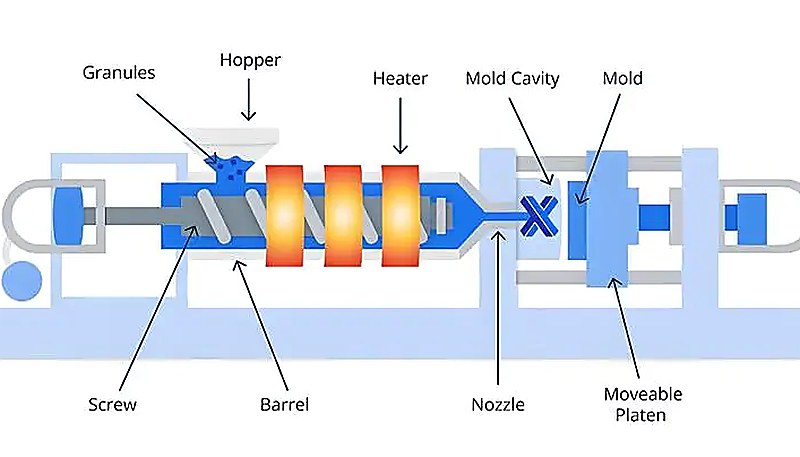
Back pressure is the hydraulic resistance applied to slow screw recovery, typically ranging from 50-200 PSI for most thermoplastics. Think of it as a brake on your screw during the plasticating phase. When the screw rotates and retracts to prepare the next shot, back pressure creates resistance that forces the molten plastic to work harder as it moves forward in the barrel. This resistance serves multiple purposes: it improves melt homogeneity, removes trapped air and moisture, and ensures consistent material density. The mechanism works through your machine’s hydraulic system – a pressure valve restricts oil flow from the injection cylinder, creating resistance against the screw’s natural tendency to retract quickly under the pressure of incoming molten plastic.
If you are comparing vendors or planning procurement, our injection molding supplier sourcing guide covers RFQ prep, qualification, and commercial risk checks.
더 넓은 관점을 위해 우리의 injection molding complete guide 프로세스 기본 원리, 재료 행동 및 생산 결정을 포함합니다.
Without adequate back pressure, your plastic flows too easily during screw recovery, leading to poor mixing and trapped volatiles. I’ve measured melt temperatures with pyrometer guns showing 15-20°F variations across the shot when back pressure drops below optimal levels. The system works through hydraulic pressure applied to the injection cylinder, which pushes against the screw’s natural tendency to retract quickly. Most modern injection molding machines allow you to set back pressure independently from injection pressure, giving you precise control over melt preparation. You’ll find back pressure settings on every machine’s control panel, usually measured in bar, PSI, or percentage of system pressure.
European machines typically display values in bar (1 bar = 14.5 PSI), while North American equipment uses PSI directly. The key is understanding that back pressure creates controlled shear heating – typically adding 10-25°F to your melt temperature depending on screw speed and material viscosity.
Why Does Back Pressure Matter for Part Quality?
백 프레셔는 용융물의 균질성, 탈기, 사출 일관성을 제어하기 때문에 제품 품질에 필수적입니다. 백 프레셔 하에서 스크류가 회전하면 전단 가열로 플라스틱이 균일하게 용융되는 동시에 공기와 수분이 공급 호를 통해 배출됩니다. 이 물리적 현상은 점성 소산 — 기계적 에너지가 열 에너지로 전환되어 백 프레셔가 100 PSI 증가할 때마다 용융 온도가 8-12°F 상승하는 것을 포함합니다. 이러한 제어된 가열은 폴리카보네이트와 같은 재료에서 균일한 온도 분포가 광학적 왜곡을 방지하기 때문에 중요합니다. 충분한 백 프레셔가 없으면 불균일한 용융, 갇힌 기체, 줄무늬나 스프레이 마크로 나타나는 불량한 색상 혼합이 발생합니다.
백 프레셔의 주요 품질 영향은 결함 방지입니다: 적절한 설정은 기포를 제거하고 색상 분산을 개선하며 사출 간 밀도 일관성을 보장합니다. 저는 성형업체들이 온도와 속도를 조절하면서 몇 주 동안 사출 성형 결함으로 고생하는 것을 봤는데, 실제 문제는 수분이 용융물에 남도록 하는 부적절한 백 프레셔였습니다. 이 압력은 또한 스크류가 너무 빨리 후퇴하는 것을 방지하여 사출 크기를 일관되게 유지하게 해주는데, 이는 배럴 내 밀도 변동을 일으킬 수 있습니다. 나일론이나 PET처럼 수분을 흡수하는 재료의 경우, 적절한 백 프레셔는 기포나 표면 결함을 일으킬 수 있는 수증기를 제거하는 데 중요합니다.
You’ll notice the difference immediately in your parts’ surface finish and dimensional consistency when back pressure is optimized correctly. The improvement in surface gloss alone can eliminate secondary operations like polishing or painting in many applications.
“Higher back pressure always improves part quality”True
False. While adequate back pressure improves melt quality, excessive back pressure can cause material degradation, longer cycle times, and increased wear on your screw and barrel. The key is finding the optimal range for each material.
“Back pressure settings remain constant throughout production”False
False. Back pressure may need adjustment based on material lot variations, ambient humidity changes, or production requirements. Experienced molders monitor and adjust back pressure as needed to maintain consistent part quality.
The degassing effect of proper back pressure cannot be overstated. When plastic pellets melt, they release trapped air, moisture, and volatile compounds that must be evacuated before injection. Back pressure creates a pumping action that forces these gases backward through the feed section and out the hopper. Without adequate pressure, these volatiles remain in the melt and show up as silver streaking, bubbles, or weak weld lines in your finished parts. I’ve documented cases where increasing back pressure by just 40 PSI eliminated 90% of surface blemishes on clear polycarbonate lenses.
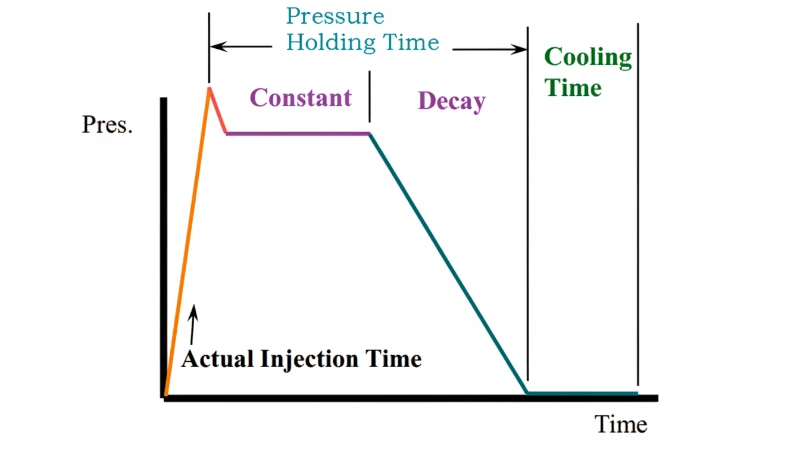
The key is creating enough shear to homogenize the melt while maintaining sufficient residence time for gas evacuation – typically 15-30 seconds total screw recovery time depending on shot size.
How Does Back Pressure Affect Different Materials?
각 재료는 서로 다른 백 프레셔가 필요합니다: 흡습성 플라스틱은 100-200 PSI가 필요하고, 비흡습성 재료는 50-80 PSI가 필요합니다. 비극성이며 내습성이 있는 폴리프로필렌과 폴리에틸렌은 최소한의 백 프레셔가 필요합니다 — 보통 50-80 PSI입니다. 이 재료들은 용융 시 상대적으로 낮은 점도를 가지며 과도한 전단 없이 쉽게 혼합됩니다. 압력이 너무 높으면 이 재료들이 열분해되고 불필요하게 사이클 시간이 길어집니다. 저는 PP 자동차 범퍼가 백 프레셔가 120 PSI를 초과했을 때 열분해로 갈색 줄무늬가 생기는 것을 본 적이 있습니다 — 재료가 추가적인 전단 가열을 견디지 못했기 때문입니다.
백 프레셔 요구 사항은 재료 유형에 따라 극적으로 다릅니다: 나일론과 PET와 같은 흡습성 플라스틱은 적절한 수분 제거를 위해 150-200 PSI가 필요하는 반면, PP와 같은 비흡습성 재료는 50-80 PSI만 필요합니다. 나일론, PET, 폴리카보네이트는 공기 중 수분을 흡수합니다 — 나일론은 습한 조건에서 무게 기준 최대 3%까지 흡수할 수 있습니다 — 그리고 플라스틱 가공 중 그 수증기를 배출시키기 위해 지속적인 높은 압력이 필요합니다. 저는 수천 개의 나일론 부품을 성형해 왔고, 불충분한 백 프레셔는 항상 수증기 기포로 인한 은색 줄무늬로 나타납니다. PET는 특히 민감합니다 — 0.02%의 수분 함량만으로도 IV(점도 지수) 분해와 흐릿한 부품이 발생합니다.
Glass-filled materials present another challenge entirely – they need moderate back pressure (100-150 PSI) to ensure proper fiber distribution, but too much pressure can break the fibers and reduce mechanical properties. I’ve tested 30% glass-filled nylon samples where excessive back pressure (above 180 PSI) reduced the average fiber length from 200 microns to 85 microns, cutting tensile strength by 25%. The key is providing enough mixing action to distribute fibers evenly without the excessive shear that causes breakage. Engineering plastics like POM and PPS require careful balance; enough pressure to ensure homogeneity but not so much that you cause thermal degradation.
POM is particularly tricky because it can depolymerize at high temperatures, releasing formaldehyde gas that creates surface defects and dimensional instability.
재생 수지 vs. 신규 수지 설정
Post-consumer PET, for example, may require 180-220 PSI compared to 150-180 PSI for virgin material. The contamination level and thermal history affect processing requirements significantly. I’ve processed recycled ABS that needed 140 PSI back pressure versus 100 PSI for virgin material from the same supplier. The key is understanding your specific material grade and adjusting accordingly. Material data sheets rarely specify optimal back pressure settings, so you need to develop this knowledge through systematic testing and documentation of what works for each application.
| 재료 유형 | Recommended Back Pressure (PSI) | Key Considerations |
|---|---|---|
| PP/PE | 50-80 | Low pressure to avoid degradation |
| 나일론(PA) | 150-200 | High pressure for moisture removal |
| 폴리카보네이트(PC) | 120-180 | Moderate-high for degassing |
| Glass-filled | 100-150 | Balance mixing with fiber integrity |
| PET | 150-200 | High pressure essential for clarity |
| POM | 80-120 | Moderate to prevent degradation |

What Back Pressure Settings Should You Use?
사출 성형에서의 백 프레셔: 완벽 가이드 | ZetarMold
재료별 시작 설정값
These aren’t magic numbers, but they’ll get you close enough to fine-tune from there. Monitor your parts for surface defects, color mixing, and dimensional consistency as you adjust. The sweet spot is where you achieve good melt quality without excessive cycle time or material degradation. I always recommend molding sample parts at three pressure levels: your starting point, 30 PSI higher, and 30 PSI lower. Compare surface finish, color uniformity, and check for silver streaking or bubbles. The optimal setting usually becomes obvious when you examine parts side by side under good lighting.
Don’t forget to consider your screw design when setting initial values – barrier screws typically need 20-30% less back pressure than conventional screws for the same mixing quality. A barrier screw’s design inherently provides better mixing through its geometry, so excessive back pressure just adds unnecessary cycle time. Also factor in your material’s moisture content and processing temperature. Dried nylon might only need 120 PSI back pressure, while material straight from the bag could require 180 PSI to achieve the same melt quality. Ambient humidity affects hygroscopic materials significantly – I’ve seen nylon parts require 40 PSI higher back pressure during summer months compared to winter processing with the same material lot.
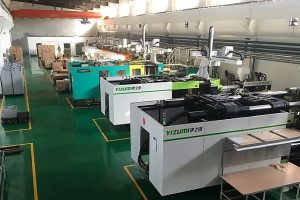
ZetarMold의 상하이 시설에서는 저희의 8명의 수석 엔지니어들이 90톤에서 1850톤 용량까지의 47대의 사출 성형기에서 백 프레셔 설정을 최적화했습니다. 매월 100개 이상의 금형 세트를 생산하면서 400종 이상의 다양한 플라스틱 등급에 대한 재료별 백 프레셔 프로파일을 개발했습니다. 저희 경험에 따르면 적절한 백 프레셔 최적화는 불량률을 최대 3%까지 줄이면서 사이클 효율을 향상시킬 수 있으며, 이것이 저희 120명 이상의 생산 작업자들이 생산 런 전반에 걸쳐 이러한 설정을 모니터링하고 조정하도록 훈련받는 이유입니다.
What Happens When Back Pressure Is Too High or Too Low?
백 압력이 너무 낮으면 기포 발생과 불량한 혼합이 일어나고, 압력이 너무 높으면 분해와 긴 사이클 시간을 초래합니다. 낮은 압력 문제는 빠르게 나타나며, 은색 줄무늬, 색상 변동, 치수 불일치가 관찰됩니다. 스크류가 너무 빨리 후퇴하여 공급 목부에서 용융체로 공기가 유입됩니다. 이는 폴리프로필렌과 같은 저점도 재료에서 특히 문제가 되며, 부적절한 백 압력은 2-3% 샷 간 중량 변동을 유발할 수 있습니다. 수분과 휘발성 물질도 적절히 제거되지 않아 표면 결함과 내부 공극이 발생합니다.
30-50 PSI로 백 프레셔를 높이는 것이 기포 문제를 해결하는 이유
In one memorable case, a medical device manufacturer was rejecting 8% of their polysulfone components due to microscopic voids detected by X-ray inspection. The root cause was insufficient back pressure – only 70 PSI when the material needed 140 PSI for proper degassing. The voids were concentrated near the gate area where air entrapment is most likely to occur during rapid screw recovery. Low back pressure also affects color consistency dramatically. Without adequate mixing, colorant distribution becomes uneven, creating visible streaks or mottled appearance that’s particularly noticeable in light colors or transparent materials.
On the flip side, excessive back pressure creates its own set of problems that are often more subtle but equally damaging. Material residence time increases significantly, leading to thermal degradation especially with heat-sensitive polymers like PVC or POM. Your cycle times extend unnecessarily – I’ve seen cases where reducing back pressure from 200 to 140 PSI cut cycle times by 12% without affecting part quality. This translates to substantial productivity gains over millions of cycles. Worst case scenario, you can damage your screw and barrel from excessive wear, particularly with abrasive glass-filled materials. The increased shear stress accelerates wear on screw flights and barrel surfaces, potentially requiring premature replacement that costs $15,000-40,000 depending on screw size.
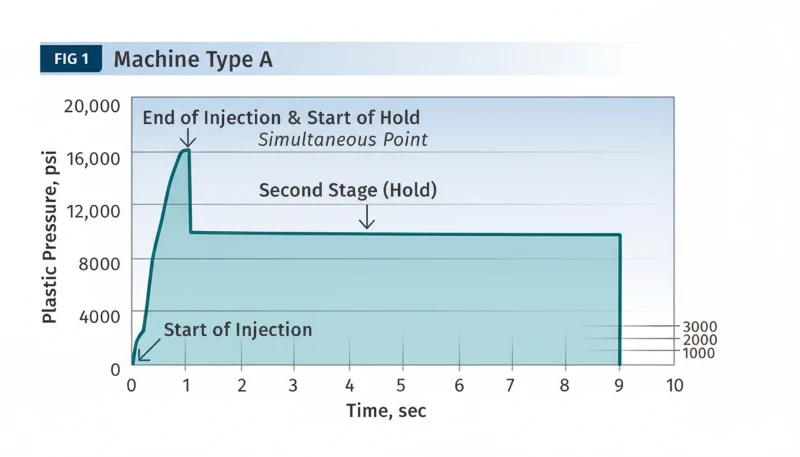
The material can also overheat from excessive shear, causing color changes or property degradation that may not be immediately visible. I’ve documented cases where ABS automotive parts showed excellent appearance initially but failed impact testing after six months due to molecular weight degradation from excessive back pressure during processing. The parts looked perfect but had reduced ductility that led to brittle failure under stress. Finding the optimal balance requires understanding your specific application and material requirements. Temperature measurements with handheld pyrometers can help identify when shear heating becomes excessive – melt temperatures shouldn’t increase more than 20-25°F from screw rotation alone.
“Back pressure affects shot-to-shot consistency”True
True. Proper back pressure ensures consistent melt density and screw recovery, leading to more uniform shot weights and part dimensions. Inconsistent back pressure is a common cause of part weight variations.
“Back pressure only affects the plasticating phase”False
False. While back pressure is applied during plasticating, its effects carry through to injection and packing phases by influencing melt temperature, homogeneity, and gas content, which all impact final part quality.
How Do You Optimize Back Pressure for Production?
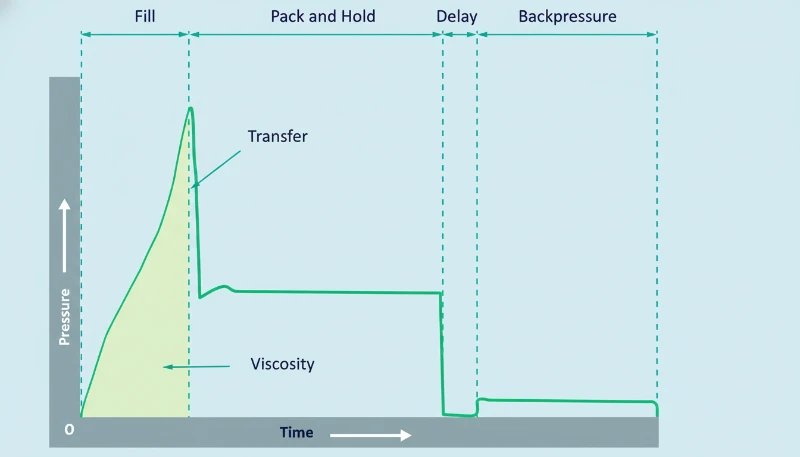
Monitor melt quality, cycle time, and part defects while adjusting back pressure in 20-30 PSI increments during production trials. Start by establishing baseline settings during initial molding trials, then fine-tune based on actual part performance. I always recommend doing a designed experiment: mold parts at three different back pressure levels while keeping everything else constant.
For example, if you start at 120 PSI, test at 90, 120, and 150 PSI while maintaining identical temperatures, speeds, and pressures. Measure shot weights across 20-30 cycles at each setting – coefficient of variation should be less than 0.5% for acceptable consistency. Check for surface defects, evaluate dimensional consistency, and document any changes in cycle time.
The optimal setting usually becomes obvious when you compare parts side by side under fluorescent lighting where defects are most visible.
Pay close attention to your screw recovery time and melt temperature during optimization. Recovery time should remain within your overall cycle time requirements – there’s no point achieving perfect melt quality if it kills your productivity. Use a contact pyrometer or infrared gun to measure melt temperature at the nozzle during startup. Properly optimized back pressure typically increases melt temperature by 10-20°F compared to minimal pressure settings. If temperatures rise above material processing guidelines, you risk degradation even with good surface appearance. Document your settings for each material and mold combination meticulously. What works for one job won’t necessarily work for another, even with the same base resin from different suppliers or lot numbers.
Consider seasonal variations in your optimization process – ambient humidity affects hygroscopic materials significantly, requiring back pressure adjustments throughout the year. I maintain detailed records showing nylon 66 applications requiring 140 PSI during winter months versus 170 PSI in summer humidity. Material suppliers rarely mention this, but it’s critical for consistent quality. Regular maintenance schedules also affect optimization requirements. Worn screws or barrels with increased clearances may require 20-40 PSI higher back pressure to achieve the same melt quality as new equipment. I recommend re-evaluating back pressure settings after any major maintenance or screw replacement, as the processing characteristics can change significantly with new hardware.
사출 성형에서 백 프레셔에 관한 자주 묻는 질문
자주 묻는 질문
What’s the typical back pressure range for injection molding?
Most thermoplastics use 50-200 PSI back pressure depending on material type. Non-hygroscopic materials like PP need 50-80 PSI, while moisture-sensitive materials like nylon require 150-200 PSI. Start with 100 PSI as a baseline for most applications. Non-hygroscopic materials like PP and PE typically run at 50-80 PSI, while engineering plastics such as polycarbonate and nylon often require 120-200 PSI. Always start with the lower end of the recommended range and increase incrementally while monitoring for surface defects and dimensional consistency.
How does back pressure affect cycle time?
Higher back pressure increases screw recovery time proportionally, extending overall cycle time. A 50% increase in back pressure typically adds 10-20% to recovery time. Balance melt quality needs against production efficiency requirements. For example, increasing back pressure from 100 to 150 PSI on a typical 2.5-inch screw processing ABS can extend recovery time from 8 seconds to 12 seconds. This additional time translates directly into longer cycle times and reduced throughput. The key is balancing melt quality against production efficiency for each specific application.
Can back pressure eliminate air bubbles completely?
Proper back pressure significantly reduces air bubbles by improving degassing during plasticating. However, bubbles can also result from mold design, injection speed, or material moisture content. Back pressure is one tool in a comprehensive solution. Trapped air in the melt can also originate from poor venting in the mold, insufficient drying of hygroscopic materials, or excessive injection speeds. A systematic approach—checking material moisture, mold venting, and back pressure together—usually yields the best results for eliminating voids and bubbles. Proper venting in the mold combined with adequate back pressure during screw recovery addresses the majority of void-related defects in production environments.
Should back pressure change between materials?
Absolutely – different materials require different back pressure settings based on viscosity, moisture sensitivity, and thermal stability. Hygroscopic materials need higher pressure, while heat-sensitive polymers require careful balance to avoid degradation. For instance, PP requires only 50-80 PSI while PA66 may need 150-200 PSI for proper degassing. Switching between materials on the same machine always requires back pressure adjustment along with temperature changes. Documenting material-specific settings saves significant setup time in multi-material production environments. Always verify and adjust process parameters when changing materials to maintain consistent quality standards across different production runs.
What happens to back pressure with worn screws?
Worn screws typically require higher back pressure to achieve the same melt quality and mixing. The reduced flight depth and clearances affect plasticating efficiency, necessitating pressure adjustments to compensate for wear. As screw flights wear down, the clearance between screw and barrel increases, reducing the shear and mixing efficiency during plasticating. This means operators must compensate by increasing back pressure—typically 20-40 PSI higher than new equipment settings—to maintain the same melt homogeneity and part quality standards. Regular screw and barrel inspection using micrometer measurements helps predict when compensating pressure adjustments will no longer suffice.
How do you know if back pressure is optimized?
Optimal back pressure produces consistent shot weights, good surface finish, proper color mixing, and minimal defects. Parts should show no silver streaking, air bubbles, or color variations while maintaining reasonable cycle times. One effective method is molding parts at three pressure levels (low, baseline, high) and comparing them side by side under controlled lighting. Measure shot weight consistency across 20-30 cycles at each setting. The optimal back pressure produces the best surface quality with the shortest acceptable recovery time. Track your defect rates and cycle times systematically to quantify the improvement from each adjustment.
Does screw design affect back pressure requirements?
Yes – barrier screws and mixing screws typically need less back pressure than conventional screws. The enhanced mixing capability means lower pressure can achieve similar melt quality and homogeneity. Barrier screws provide better melting efficiency through their mixing section geometry, reducing the need for high back pressure to achieve uniform melt. A conventional general-purpose screw might need 150 PSI for the same mixing quality that a barrier screw achieves at 100 PSI, making screw selection an important factor in process optimization.
Can back pressure fix poor color mixing?
Higher back pressure improves color mixing by increasing shear and residence time in the barrel. However, severe mixing issues may also require screw modifications, longer cycle times, or masterbatch adjustments beyond pressure alone. In our production experience, increasing back pressure from 80 to 140 PSI improved color uniformity scores by 40% on automotive interior parts using masterbatch colorants. However, if mixing issues persist after pressure optimization, consider evaluating your screw design, colorant concentration, or switching to a pre-colored material for more consistent results.




 EN
EN  ES
ES  FR
FR  DE
DE  PT
PT  AR
AR  RU
RU  JA
JA  KO
KO  IT
IT  NL
NL  TR
TR  PL
PL 