 Skip to content
Precision-Polishing Mold Steel Solutions
Enhance injection mold performance with ZetarMold precision polishing solutions. Discover expert techniques for superior mold steel finishes!

Resources for Precision-Polishing Injection Mold Steel Solutions
What is Precision-Polishing for Injection Mold Steel?
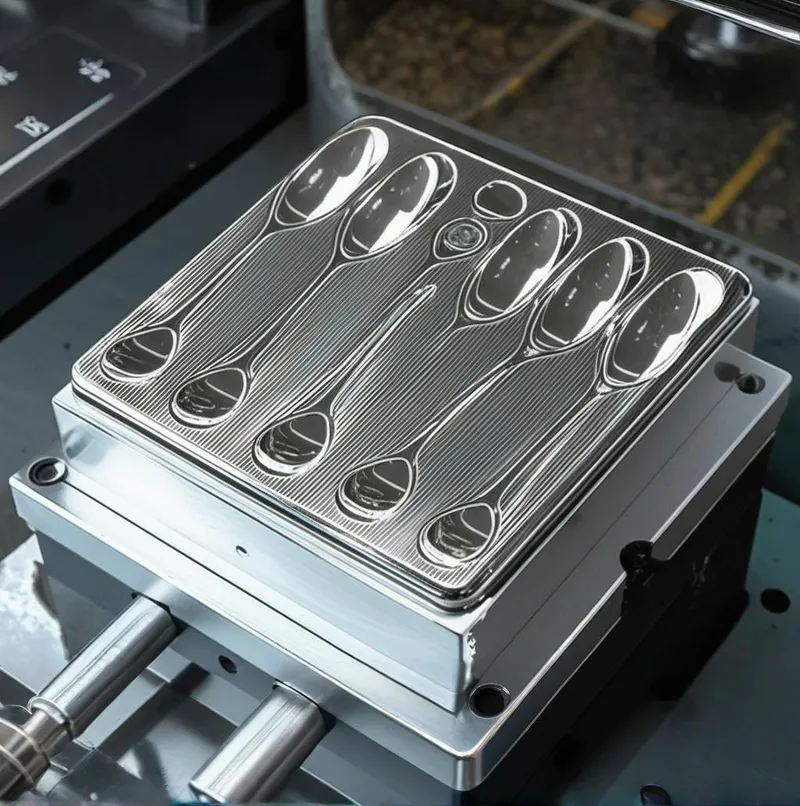
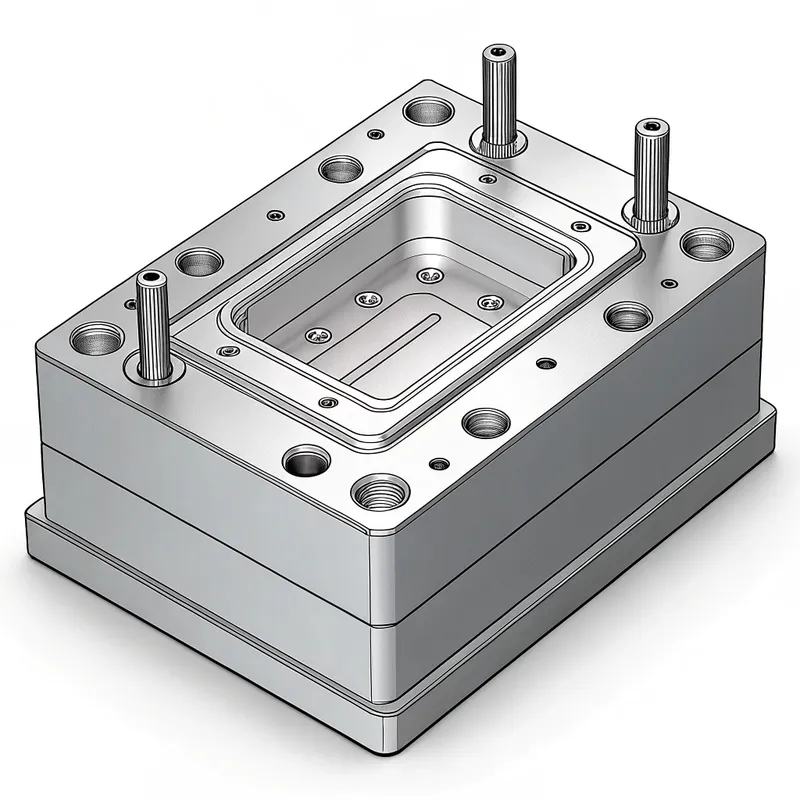
Precision-Polishing for Injection Mold Steel refers to a series of meticulous mechanical and/or chemical-mechanical surface finishing operations performed on the cavity, core, and other functional surfaces of an injection mold made from tool steel. The primary goal is to achieve a specific, highly refined surface texture, typically a mirror-like finish or a precisely controlled matte or textured surface, as dictated by the end-product requirements.
Full Technical Name: Precision Surface Finishing of Injection Mold Tool Steels.
Common Aliases: Mold Polishing, Tool Polishing, Cavity Polishing, Mirror Finishing (for high-gloss).
1. Core Principles:
① Progressive Material Removal: Polishing involves the sequential removal of microscopic layers of steel using progressively finer abrasives. Each step removes the scratches and surface imperfections left by the previous, coarser step.
② Surface Integrity: The process aims to enhance the steel's surface integrity by removing machining marks, EDM recast layers, and other defects, leading to a homogenous and smooth surface.
③ Dimensional Accuracy: While material is removed, precision polishing must maintain the critical dimensions and geometric tolerances of the mold.
④ Achieving Specified Finish: The ultimate objective is to meet a predefined surface finish standard, such as those set by the Society of the Plastics Industry (SPI), or custom specifications.
2. Basic Concepts:
① Mold Steel: Specialized tool steels (e.g., P20, H13, S7, 420SS) are used for injection molds due to their hardness, toughness, wear resistance, and polishability. The choice of steel significantly impacts the achievable polish level and effort required.
② Surface Roughness (Ra, Rz): Quantifiable measures of surface texture. Ra (Roughness Average) is the arithmetic average of the absolute values of the profile height deviations from the mean line. Lower Ra values indicate smoother surfaces.
③ Gloss Units (GU): A measure of specular reflection (shininess) of a surface.
④ Abrasives: Materials like diamond compounds, aluminum oxide, silicon carbide, and specialized lapping stones are used in various grit sizes.
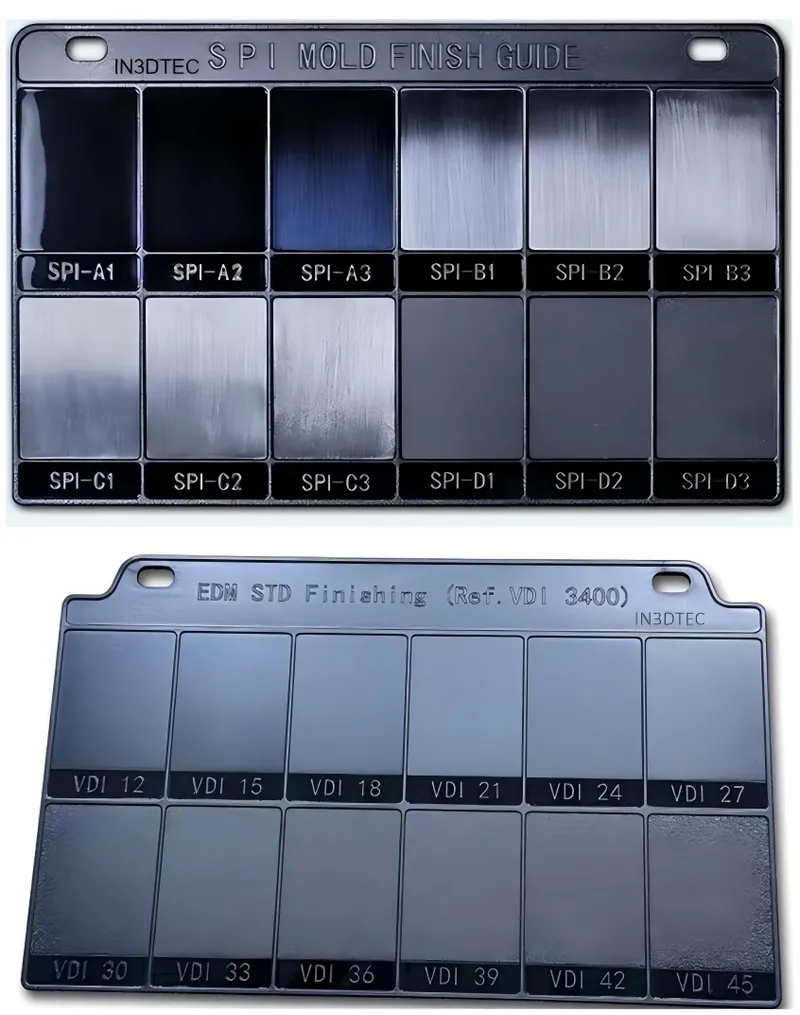
⑤ SPI Finish Standards: Industry-accepted guidelines (A-1 to D-3) classifying mold surface finishes from high-gloss mirror to matte/blasted.
The Crucial Role of Polishing in Injection Molding Success
Precision polishing is not just about making the mold shiny; it plays a multifaceted role:
1. Part Aesthetics:
The mold surface finish is directly replicated onto the plastic part. A high-gloss mold produces a high-gloss part, critical for consumer electronics, automotive interiors, and premium packaging.
2. Part Release (Ejection):
Smoother mold surfaces reduce friction, facilitating easier ejection of the plastic part. This can decrease cycle times, reduce part stress, and minimize the need for mold release agents.
3. Mold Durability & Lifespan:
A well-polished surface is often more resistant to corrosion and wear, especially if residual stresses from machining are removed. It can also prevent premature fouling from plastic residue.
4. Optical Clarity:
For transparent parts like lenses or light pipes, an exceptionally high-quality polish (SPI A-1 or better) is essential to achieve optical clarity and prevent light scattering.
5. Flow Characteristics:
A highly polished surface can influence the flow of molten plastic within the mold cavity, though this is often a secondary effect compared to gate design and melt temperature.
6. Cleaning and Maintenance:
Smoother surfaces are easier to clean and less prone to material buildup.
Classifications and Types of Mold Polishes
Mold polishes can be classified based on several criteria:
1. Based on Achieved Surface Finish (e.g., SPI Standards):
• SPI A-1 (Grade #3 Diamond Buff): Highest gloss, mirror-like, optically clear. Achieved with 0-1 micron diamond buff. (e.g., for lenses, high-end reflectors).
• SPI A-2 (Grade #6 Diamond Buff): High gloss, fine mirror. Achieved with 2-3 micron diamond buff. (e.g., for high-quality cosmetic parts).
• SPI A-3 (Grade #15 Diamond Buff): Medium gloss, fine reflective. Achieved with 3-5 micron diamond buff.
• SPI B-1 (600 Grit Paper): Semi-gloss, fine satin. No visible scratches.
• SPI B-2 (400 Grit Paper): Semi-gloss, medium satin.
• SPI B-3 (320 Grit Paper): Semi-gloss, coarse satin.
• SPI C-1 (600 Grit Stone): Matte finish, fine stone.
• SPI C-2 (400 Grit Stone): Matte finish, medium stone.
• SPI C-3 (320 Grit Stone): Matte finish, coarse stone.
• SPI D-1 (Dry Blast #11 Glass Bead): Dull matte, fine blast.
• SPI D-2 (Dry Blast #240 Oxide): Dull matte, medium blast.
• SPI D-3 (Dry Blast #24 Oxide): Dull matte, coarse blast.
• (Note: Other standards like VDI (German) also exist, particularly for textured surfaces).
2. Based on Polishing Method:
• Manual Polishing: Highly skilled technicians use hand tools (stones, lapping sticks, felt bobs, cloths) with abrasive compounds. Offers precision and control for complex geometries.
• Machine-Assisted Polishing: Uses powered tools like rotary polishers, ultrasonic polishers, or lapping machines to speed up the process, especially for larger or simpler surfaces. Often combined with manual touch-ups.
• Automated Polishing (Robotic): Emerging for high-volume or repetitive polishing tasks, but still faces challenges with complex 3D surfaces.
3. Based on Purpose/Application:
• Optical Polish: Extreme clarity, minimal defects (SPI A-1 or custom specs for optical parts).
• Cosmetic High-Gloss Polish: For visually appealing consumer products (typically SPI A-2 to B-1).
• Functional Polish: Aimed at improving release or wear resistance, may not require high gloss (e.g., SPI B or C grades).
• Pre-Texture Polish: A specific smooth finish (e.g., SPI C-1) required before applying chemical etching or laser texturing.
• Matte/Satin Finish: Intentionally non-reflective, often achieved with fine abrasives or blasting.
Key Industries and Applications Demanding Precision Polishing
Various industries rely heavily on precision-polished molds:
1. Automotive:
Headlight lenses, taillight covers, interior trim components (dashboard, consoles with high-gloss finishes), chrome-plated lookalike parts.
2. Consumer Electronics:
Housings for smartphones, laptops, televisions, home appliances requiring sleek, high-gloss surfaces.
3. Medical Devices:
Optically clear components (cuvettes, diagnostic disposables), housings for medical equipment, implantable devices (where surface smoothness is critical for biocompatibility).
4. Optics & Photonics:
Lenses, prisms, light guides, optical fibers where SPI A-1 or even custom superfinishes are mandatory.
5. Packaging:
High-end cosmetic containers, transparent food packaging, caps and closures with premium finishes.
6. Aerospace:
Interior components, transparent canopies, components requiring high fatigue resistance.
7. Toys:
High-gloss, visually appealing plastic toys.
Advantages of Investing in High-Quality Mold Polishing
The benefits extend far beyond aesthetics:
1. Superior Part Quality:
Direct replication of the mold surface ensures flawless, defect-free plastic parts.
2. Enhanced Product Appeal:
High-gloss or perfectly textured surfaces significantly improve the perceived value and marketability of products.
3. Improved Mold Release:
Reduced friction allows parts to eject easily, minimizing stress on the part and mold, and potentially reducing cycle times.
4. Reduced Scrap Rates:
Fewer defects like drag marks, flow lines, or surface imperfections on molded parts.
5. Increased Mold Lifespan:
A properly polished surface can be more resistant to wear, corrosion, and residue buildup, extending the operational life of the tool.
6. Lower Maintenance Costs:
Easier-to-clean molds reduce downtime and maintenance effort.
7. Consistency in Production:
Ensures part-to-part consistency in surface finish over long production runs.
8. Enables Advanced Designs:
Allows for the molding of optically clear parts or intricate details that would be impossible with poorly finished molds.
Potential Drawbacks and Challenges of Precision Polishing
While highly beneficial, precision polishing also presents challenges:
1. Cost:
It is a labor-intensive and skill-dependent process, adding significantly to the mold manufacturing cost, especially for higher SPI A-level finishes.
2. Lead Time:
Polishing, particularly to high standards, can add considerable time to the mold delivery schedule.
3. Risk of Over-Polishing or Errors:
Incorrect techniques can lead to dimensional inaccuracies (e.g., rounded edges, dished surfaces), altered geometry, or "orange peel" effects.
4. Skill Dependency:
Achieving top-quality finishes requires highly experienced and skilled polishers. There is a shortage of such expertise.
5. Material Limitations:
Not all mold steels polish equally well. Some steels are inherently more difficult to polish to a high gloss due to their microstructure (e.g., large carbides, inclusions).
6. Maintaining Sharp Edges/Details:
It's challenging to achieve a high polish while perfectly preserving sharp corners or intricate details without specialized techniques.
7. Subjectivity:
While standards like SPI exist, there can still be some subjectivity in assessing polish quality, especially at the highest levels.
Expert Guide to Precision Mold Polishing
Unlock superior part quality with our expert guide to precision-polishing injection mold steel.
Resources for Precision-Polishing Injection Mold Steel Solutions
Comparing Mold Steel Polishability: A Key Factor
The choice of mold steel profoundly impacts the ease and quality of polishing:
1. Highly Polishable Steels (e.g., 420 Stainless Steel, Stavax ESR, S136, NAK80): These steels are specifically designed or processed (e.g., Electro-Slag Remelting – ESR) for high purity, fine microstructure, and uniform hardness, making them ideal for SPI A-1 finishes and optical applications. NAK80 is a precipitation-hardening steel known for excellent polishability and no need for post-weld heat treatment.
2. Good Polishability Steels (e.g., H13, P20 modified, S7): Common workhorse steels. H13, when properly heat-treated, can achieve good SPI A-2/A-3 finishes. P20 is typically used for B or C finishes but modified grades can achieve higher. S7 is tough and can be polished well.
3. Moderate/Difficult to Polish Steels (e.g., Standard P20, some tool steels with large carbides or lower purity): May be limited to SPI B or C finishes. Achieving high gloss can be very challenging and time-consuming.
Factors in steel affecting polishability:
① Cleanliness: Fewer inclusions (sulfides, oxides, silicates) mean fewer pits and defects during polishing. ESR or VAR (Vacuum Arc Remelting) processes improve cleanliness.
② Homogeneity & Microstructure: Fine, uniform grain structure and well-distributed small carbides are crucial. Large, non-uniformly distributed carbides can “pull out” during polishing, leaving pits.
③ Hardness: Generally, harder steels (within their working range) polish better to a higher gloss, but also require more effort. Consistent hardness is vital.
④ Heat Treatment Response: Proper heat treatment is critical to achieve the desired hardness and microstructure for optimal polishing.
Key Characteristics of a Precision-Polished Mold Surface
A high-quality polished surface is defined by several measurable and observational characteristics:
1. Low Surface Roughness (Ra, Rz, Sa):
Typically, SPI A-1 might require Ra < 0.005 µm (or 5 nm). Sa (areal average roughness) is becoming more common for 3D surfaces.
2. High Gloss / Reflectivity:
Measured in Gloss Units (GU) using a gloss meter. Values depend on the angle of measurement (e.g., 20°, 60°, 85°).
3. Absence of Defects:
No visible scratches, pits, "orange peel," waviness, haziness, comets, sleeks, or buff marks under specified magnification.
4. Clarity / Lack of Haze:
For optical polishes, high light transmission and minimal scattering are essential.
5. Sharpness of Detail:
Preservation of fine details and sharp edges as per the mold design.
6. Uniformity:
Consistent finish across the entire polished surface, including complex geometries.
7. Directionality (Lay):
For some finishes (e.g., brushed), a specific directional pattern is desired. For mirror polishes, no lay should be visible.
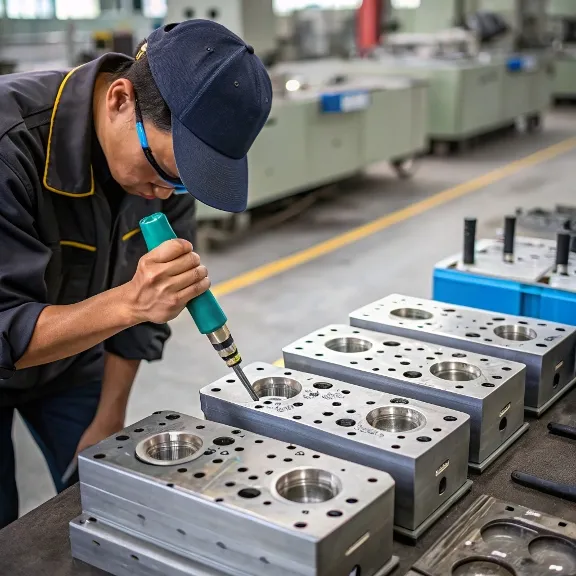
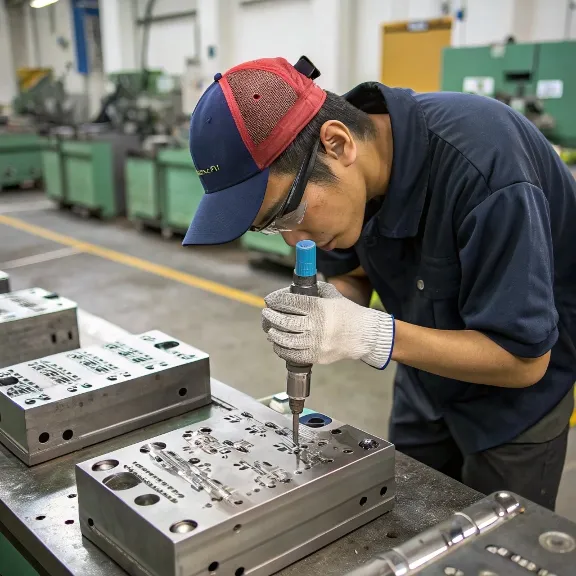
The Core Process: Step-by-Step to a Flawless Finish
Achieving a precision polish is a meticulous, multi-stage process:
1. Preparation & Pre-Machining Inspection:
• Ensure the mold surface is properly machined (milled, ground, or EDM’d) with minimal subsurface damage.
• Remove any EDM recast layer (hard, brittle layer) completely, typically by stoning or light milling. This is crucial as the recast layer will not polish well and can chip.
• Inspect for deep machining marks, nicks, or defects that need to be removed before polishing begins.
• Verify steel type and hardness.
2. Rough Stoning / Grinding (Coarse Abrasive Stage):
• Objective: Remove machining marks, EDM recast, and establish initial flatness/geometry.
• Tools & Abrasives: Coarse grit abrasive stones (e.g., 120-320 grit aluminum oxide or silicon carbide), grinding tools.
• Technique: Work in a consistent pattern, often crisscross, ensuring all previous marks are removed. Use appropriate lubricant/coolant.
3. Semi-Finishing Stoning / Lapping (Medium Abrasive Stage):
• Objective: Remove scratches from the rough stoning stage and further refine the surface.
• Tools & Abrasives: Medium grit stones (e.g., 400-800 grit), abrasive papers/cloths mounted on lapping sticks, diamond files.
• Technique: Continue with progressively finer grits, changing the polishing direction with each grit change to ensure previous marks are fully removed. Meticulous cleaning between grit stages is vital to prevent carry-over of coarser particles.
4. Fine Finishing / Pre-Polishing (Fine Abrasive Stage):
• Objective: Prepare the surface for final mirror polishing by removing all visible scratches from previous stages.
• Tools & Abrasives: Fine grit stones (e.g., 1000-1200 grit), very fine abrasive papers (e.g., up to 2000-5000 grit), fine diamond compounds (e.g., 45 to 15 micron) applied with lapping sticks (wood, brass, cast iron) or hard felt bobs.
• Technique: Extreme cleanliness is paramount. Direction of polishing is critical.
5. Mirror Polishing / Buffing (Diamond Polishing Stage):
• Objective: Achieve the final desired gloss level (e.g., SPI A-1, A-2, A-3).
• Tools & Abrasives: Diamond compounds/pastes (e.g., 15 micron down to 0.25 micron or finer), applied with felt bobs, cotton wool, soft wood laps, or specialized polishing cloths. Rotary tools, ultrasonic polishers, or manual methods are used.
• Technique: Light pressure, specific motion patterns. Each diamond grit size must completely remove the marks of the previous, coarser diamond. The polishing medium (felt, wood) must be softer than the steel to avoid embedding abrasives.
6. Final Cleaning and Inspection:
• Thoroughly clean the mold surface to remove all polishing residues.
• Inspect under appropriate lighting (e.g., diffuse, directional) and magnification to verify the finish meets specifications (SPI standard, visual samples, gloss meter readings).
Key Considerations in Precision Mold Polishing Operations
Numerous factors influence the outcome of polishing:
1. Mold Steel Selection & Quality:
As discussed, cleaner, more homogenous steels with fine microstructures polish best.
2. Heat Treatment:
Proper, uniform heat treatment to the correct hardness is critical. Soft spots or inconsistent hardness will result in uneven polishing. Stress relieving after rough machining can also be beneficial.
3. Pre-Polishing Surface Condition:
The quality of the initial machined or EDM surface significantly impacts the effort and time required for polishing. A good EDM finish with minimal recast layer is preferred.
4. Abrasive Selection & Sequence:
Using the correct sequence of abrasive types and grit sizes is fundamental. Skipping grits leads to deeper scratches that are hard to remove.
5. Lubrication/Coolants:
Proper lubricants (e.g., mineral spirits, specialized polishing oils) help carry away swarf, prevent loading of abrasives, and cool the surface.
6. Polishing Tools & Holders:
The choice of lapping sticks (wood, brass, steel, hard felt), bobs, and powered tools (rotary, reciprocating, ultrasonic) depends on the geometry and stage of polishing.
7. Technician Skill & Experience:
This is arguably the most critical factor, especially for manual polishing of complex shapes to high SPI A-levels. It requires patience, a keen eye, and a "feel" for the process.
8. Cleanliness & Contamination Control:
A speck of coarser grit carried over to a finer stage can ruin hours of work. Dedicated tools and immaculate cleanliness are essential.
9. Pressure and Speed:
Applying the correct pressure and tool speed is crucial. Excessive pressure or speed can generate heat, cause "orange peel," or pull out carbides.
10. Polishing Direction:
Changing polishing direction (e.g., 45-90 degrees) between grit stages helps identify and remove previous scratch patterns effectively.
11. Edge and Detail Preservation:
Special care is needed to avoid rounding sharp edges or washing out fine details. Techniques like using harder lapping materials near edges or masking can help.
Choosing the Right Mold Steel for Optimal Polishability
1. For SPI A-1 (Optical/Lens Quality):
• 420 Stainless Steel (ESR/VAR): Excellent choice, corrosion-resistant.
• S136 / Stavax ESR: Premium grade stainless, very high purity.
• NAK80: Precipitation hardening, very good polishability, good weldability without re-hardening.
• HPM38 (equivalent to S136): Another high-quality stainless option.
2. For SPI A-2 / A-3 (High Gloss Cosmetic):
• H13 (ESR/VAR): Good if perfectly heat-treated and clean.
• Modified P20 grades: Some proprietary P20-type steels offer improved polishability.
3. For SPI B Finishes (Semi-Gloss):
• P20 (Pre-hardened): Standard choice, cost-effective.
• H13, S7: Also suitable.
4. For SPI C & D Finishes (Matte/Textured):
• Most tool steels can achieve these finishes, as the final surface is often stoned or blasted rather than highly polished. Focus is more on durability and machinability.
Common Mold Polishing Defects: Causes and Solutions
| Defect | Description | Common Causes | Solutions |
|---|---|---|---|
| Scratches | Lines or grooves on the surface. | Coarse grit contamination, skipping grits, damaged polishing tools, incorrect pressure, insufficient previous step. | Re-polish starting from a grit fine enough to remove the scratch but coarse enough to be efficient. Improve cleanliness. Check tools. Ensure previous step is complete. |
| Pits / Pinholes | Small indentations or holes in the surface. | Inclusions in steel, carbides pulled out, corrosion, EDM arc pits not fully removed. | Use cleaner steel (ESR/VAR). Lighter polishing pressure. Ensure full EDM recast removal. Sometimes pits are inherent to steel quality. |
| Orange Peel | Wavy, dimpled texture resembling an orange skin. | Excessive pressure/speed with rotary tools, soft buffing wheels on soft steel, overheating the surface, poor heat treat. | Use lighter pressure, slower speeds, harder buffing wheels or lapping sticks. Ensure proper steel hardness and stress relief. Coolant. |
| Haze / Cloudiness | Milky or cloudy appearance, lack of clarity on mirror finishes. | Fine scratches not fully removed, residue from polishing compounds, improper cleaning, moisture. | Re-polish with final diamond stages carefully. Thorough cleaning with appropriate solvents. Ensure surface is dry. |
| Comet Tails | A scratch with a "tail" of finer scratches or disturbed material. | A larger abrasive particle being dragged across the surface, embedding itself and then breaking down. | Improve cleanliness rigorously. Filter lubricants. Re-polish affected area. |
| Rolled Edges | Rounded corners or edges where sharpness was intended. | Excessive pressure near edges, soft lapping tools, polishing motion over the edge. | Use harder lapping tools near edges, mask edges, polish away from edges or parallel to them. Reduce pressure. |
| Waviness / Ripples | Undulating, uneven surface. | Uneven stoning, incorrect use of power tools, non-rigid tool setup, attempting to remove too much material too quickly. | Ensure flat stoning with appropriate tools. Use rigid setups. Remove material gradually. Skill and consistent technique. |
| Buff Marks / Swirls | Circular or arc-shaped fine scratches from final buffing. | Too much pressure during buffing, contaminated buff, wrong buffing compound, too fast a speed. | Lighter pressure, clean/new buffs, correct compound, slower speed. Final pass by hand if needed. |

How to Choose the Right Injection Speed?
Key Takeaways – Injection speed (fill1 rate) is one of the most critical process parameters in injection molding—too slow causes short shots, weld2 line weakness, and surface blemishes; too fast
What are the Essential Design Guidelines for MUD Inserts?
Key Takeaways – MUD (Master Unit Die) inserts are interchangeable cavity blocks that fit into a standardized master frame, reducing tooling cost by 40–70% compared to dedicated full molds for

What are the benefits of using metal injection molding
Key Takeaways – Metal injection molding (MIM1) combines the geometric complexity of plastic injection molding with the mechanical properties of wrought or cast metal parts, achieving densities above 95% of
Optimization Solutions Provided For Free
- Provide Design Feedback and Optimization Solutions
- Optimize Structure and Reduce Mold Costs
- Talk Directly With Engineers One-On-One

