 コンテンツへスキップ

Your production parts keep failing dimensional checks, and your molder keeps blaming “material variation.” After 20 years of running injection molds, I can tell you: the problem usually isn’t the material — it’s the process control method. 射出成形 is deceptively repeatable until it isn’t, and conventional molding leaves you with a process that drifts with every humidity swing and resin lot change.
Decoupled injection molding (often called Decoupled Molding™ or Scientific molding1) separates filling, packing, and holding into independent, measurable stages. Instead of one long pressure curve that nobody can reproduce, you get three tuned parameters that you can validate with data. This article breaks down exactly how it works, when it’s worth the setup effort, and what mistakes I’ve watched engineers make when they try it for the first time.
- Decoupled molding splits fill, pack, and hold into three independently controlled stages.
- It reduces part weight variation to under 0.5% — compared to 2–5% with conventional molding.
- Setup takes longer but production Cp/Cpk values typically exceed 1.33.
- Best suited for tight-tolerance parts, medical devices, and multi-cavity tools.
- Requires a machine with closed-loop injection velocity and pressure control.
What Is Decoupled Injection Molding?
Decoupled injection molding is a process methodology that separates each molding cycle into independently controlled fill, pack, and hold stages.
““Decoupled molding uses velocity control during the fill stage and switches to pressure control for packing.””真
This is the fundamental principle of decoupled molding: fill is velocity-controlled to reach 95-99% cavity fill, then the machine switches to pressure control for the pack stage.
““Higher pack pressure always produces better quality parts in decoupled molding.””偽
Once pack pressure reaches the weight plateau (where part weight stops increasing), additional pressure only adds residual stress, increases cycle time, and can cause flash. More pressure is not better.
Here’s why it matters: in conventional molding, you set a single injection pressure and time. The machine ramps up, fills the cavity, and packs it — all in one motion. If anything changes (melt temperature, mold temperature, viscosity shift), the entire curve shifts with it. You get heavier parts one day, short shots the next, and nobody can tell you why without a month of data logging.
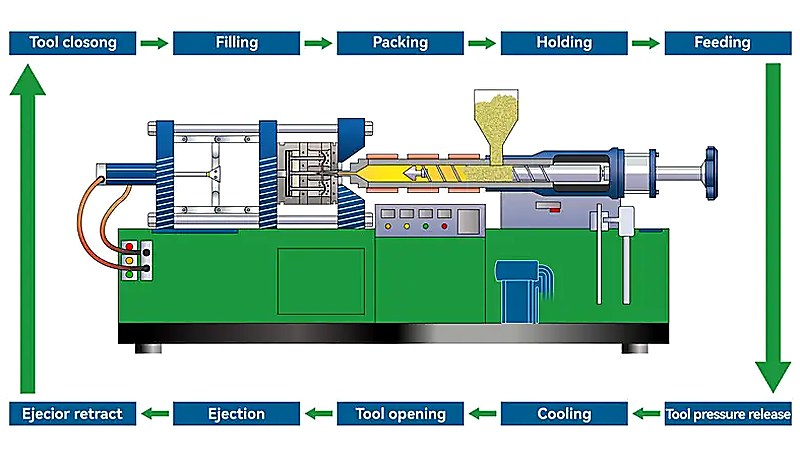
Decoupled molding says: stop treating the cycle as one event. Instead, fill the cavity to roughly 95–99% using velocity control only. Then switch to pressure control to pack the last 1–5% of material. Finally, hold pressure to compensate for shrinkage during cooling. Each stage has its own sensor feedback, its own set point, and its own window of acceptable variation.
The result is a process you can actually validate. Instead of “it looks okay,” you get “fill time is 1.82 seconds with 0.03 seconds standard deviation across 500 shots.” That’s the language quality engineers speak, and it’s why decoupled molding has become the de facto standard for any part that has a tolerance tighter than ±0.1 mm.
How Does Decoupled Molding Differ from Conventional Molding?
The core difference is feedback isolation: decoupled molding gives each stage one control variable, conventional molding lets them all drift together.
““Decoupled molding can reduce part weight variation to under 0.5% compared to 2-5% with conventional molding.””真
By isolating fill, pack, and hold into independent stages, decoupled molding achieves much tighter shot-to-shot consistency, with part weight variation typically below 0.5%.
““Decoupled molding fixes defects caused by poor mold design, such as inadequate cooling or improper gate location.””偽
Decoupled molding is a process control methodology, not a mold design fix. Poor cooling, improper gating, or inadequate venting will still cause problems regardless of process methodology.
Think of it like driving a car. Conventional molding is cruise control on a hilly road — your speed fluctuates because the system is reacting to everything at once. Decoupled molding is more like having separate controls for throttle, braking, and steering. Each input does one thing, so you can actually tune the behavior you want. In a conventional process, if you change injection speed to fix a short shot, you also change packing behavior — the variables are coupled. In decoupled molding, adjusting fill speed only affects fill time, leaving your pack pressure profile untouched.
| パラメータ | Conventional | Decoupled |
|---|---|---|
| Fill control | Pressure-limited | Velocity-controlled |
| Pack control | Same as fill | Pressure-controlled, independent |
| Hold stage | Timed guess | Gate seal confirmed by data |
| Part weight variation | 2–5% | <0.5% |
| Setup time | 30–60 minutes | 2–4 hours |
| Process documentation | Parameter sheet | Full DOE with Cp/Cpk data |
In practice, what I see most often is that shops running conventional molding have great days and terrible days, and nobody can explain the difference. Shops running decoupled molding have consistent days, and when something drifts, they can point to exactly which stage and why.
What Are the Three Stages of Decoupled Molding?
The three stages are fill (velocity-controlled), pack (pressure-controlled for shrinkage), and hold (maintains pressure until gate seal).
““The gate seal time in decoupled molding is determined by measuring when part weight stops increasing with additional pack time.””真
Gate seal is confirmed empirically by running a pack time study and observing when part weight plateaus, indicating the gate has frozen and no more material can enter the cavity.
““Conventional molding produces more consistent results than decoupled molding for short production runs.””偽
While decoupled molding requires more setup time (2-4 hours vs 30-60 minutes), the process itself is inherently more consistent. The setup investment may not be justified for very short runs, but conventional molding is not more consistent by any measure.
Stage 1: Fill (Velocity-Controlled)
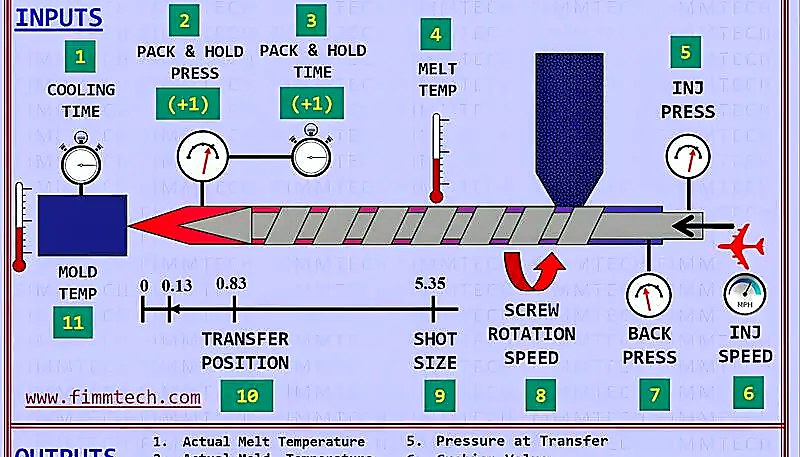
The fill stage pushes molten plastic into the cavity at a controlled velocity until the cavity is 95–99% full. The key metric is fill time — typically 1–5 seconds depending on part size. During this stage, the machine controls injection speed, not pressure. The pressure is whatever it takes to maintain that speed.
Why stop at 95–99%? Because if you fill to 100% under velocity control, the pressure spike at the end of fill (called “fill pack overlap”) causes overpacking near the gate and underpacking at the flow front. By stopping just short, you avoid this spike entirely and transition smoothly to the pack stage.
What we watch: fill time consistency. If your fill time varies more than ±0.05 seconds shot to shot, something is wrong — usually melt temperature inconsistency or a degraded check ring in the barrel.
Stage 2: Pack (Pressure-Controlled)
Once the cavity reaches 95–99% full, the machine switches from velocity control to pressure control during the injection molding cycle at the V-P switchover point. This is the pack stage — you apply a set pressure (typically 500–1500 bar depending on material and part geometry) to push the remaining material into the cavity and compress the polymer network.
Pack pressure needs to be high enough to eliminate sinks and voids but not so high that you flash the mold or induce excessive residual stress. The sweet spot is usually found through a pressure study: start low, increment by 50–100 bar, and weigh parts until the weight plateaus. That plateau is your optimal pack pressure.
Pack time is determined by gate seal — the point where the gate freezes and no more material can enter the cavity. You confirm this by weighing parts at different pack times. When part weight stops increasing, the gate is sealed. On most parts, this takes 1–8 seconds.
Stage 3: Hold (Pressure and Time Controlled)
After the gate seals, hold pressure maintains dimensional stability while the part cools. Some practitioners combine pack and hold into a single stage (Decoupled II), while others keep them separate (Decoupled III). The practical difference is minor for most parts, but for optical lenses and medical components, the separation matters because it gives you one more knob to turn during validation.
Hold pressure is typically 20–60% of pack pressure. The purpose is not to push more material in (the gate is sealed) but to maintain uniform pressure distribution in the cavity during the early stages of cooling, which minimizes differential shrinkage and warpage.
When Should You Use Decoupled Molding?
Decoupled molding is justified when part tolerance requirements fall below ±0.15 mm, when you’re running multi-cavity tools, or when the cost of scrap exceeds the cost of extended process development. If your part has ±0.5 mm tolerance and you’re running a single-cavity prototype mold, conventional molding is probably fine — don’t over-engineer the process.
But for these situations, decoupled molding pays for itself quickly:
医療機器: FDA and ISO 13485 require validated processes. Decoupled molding gives you the documented Cp/Cpk data that auditors want to see.
Multi-cavity tools (4+ cavities): Conventional molding struggles to fill all cavities uniformly. Decoupled fill + pack isolates cavity-to-cavity variation so you can balance the tool.
Tight-tolerance gears and connectors: Parts with tolerances under ±0.1 mm demand process control that conventional molding simply cannot deliver consistently.
Long production runs (100K+ parts): The 2–4 hour setup investment amortizes to nearly zero across a million parts, and the scrap reduction often pays for the setup within the first production day.
Material changes mid-program: If you switch resin lots or suppliers, a decoupled process lets you adjust the affected stage without requalifying the entire cycle.
When NOT to use it: short-run jobs under 500 parts, parts with wide open tolerances, and situations where your mold maker hasn’t provided adequate cooling or venting. Decoupled molding is a process methodology, and even a well-built 射出成形金型 still depends on a deliberate Switchover position2 if you want pack pressure to stay stable.
How Do You Set Up a Decoupled Molding Process?
A decoupled molding setup is a five-step procedure: melt temperature, fill speed, pack pressure, gate seal time, then 100-shot capability validation.
Step 1: Optimize Melt Temperature
Start with the material supplier’s recommended melt temperature range. Run a melt temperature study: measure fill time, peak pressure, and part appearance at three temperatures (low, middle, high). Pick the temperature that gives the most stable fill time and best surface finish. For most engineering resins, this ends up being in the middle-to-upper range of the supplier’s window.
Step 2: Optimize Fill Speed
With melt temperature locked, run a fill speed study. Start at 10% of maximum injection speed, increase by 10% increments, and record fill time and peak injection pressure at each speed. You’re looking for the speed where fill time levels off (inertia effects diminish) and peak pressure is reasonable (not maxing out the machine). This is your optimal fill speed.
Step 3: Determine Pack Pressure
Set fill to reach 95–99% of the cavity (you can determine this by intentionally short-shotting). Then start pack pressure at a low value — around 200 bar — and increase in 100 bar increments. Weigh parts at each step. When part weight stops increasing, you’ve found your pack pressure. Most applications land between 600 and 1200 bar.
Step 4: Determine Pack/Hold Time (Gate Seal)
At your optimal pack pressure, run a gate seal study. Start with 1 second of pack time, increase by 1 second, and weigh parts. When weight plateaus for 2–3 consecutive readings, your gate is sealed. That gate seal time is your minimum pack + hold time. Add 0.5–1 second as a safety margin.
Step 5: Validate with 100-Shot Run
Run 100 consecutive shots. Record fill time, peak pressure, part weight, and critical dimensions. Calculate Cp and Cpk on your critical dimensions. If Cpk ≥ 1.33, you have a capable injection molding process. If not, go back to the stage that shows the most variation and re-optimize.
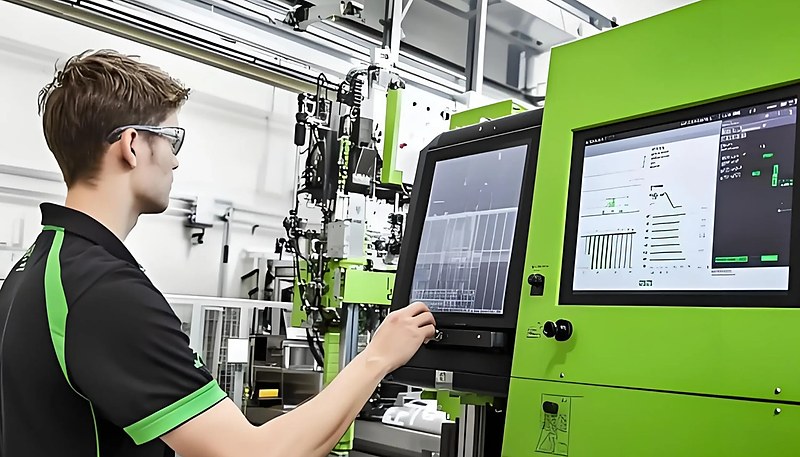
With 400+ materials in our processing database and ISO 9001/13485 certification, we document each step of the injection molding process as standard for all precision molding programs. Our 30+ English-speaking project managers coordinate directly with your engineering team during process validation, so there is no information gap between what the machine sees and what your quality team receives.
What Are the Most Common Decoupled Molding Mistakes?
In our factory, after watching hundreds of decoupled molding setups — both successful and failed — these are the mistakes I see repeatedly. Avoiding them will save you weeks of frustration.
Mistake 1: Skipping the fill-only study. Engineers often jump straight to packing pressure because they’re eager to make good parts. But without a clean fill-only baseline, you’re building on sand. Always establish your fill speed and fill time first, with no packing. If you can’t get a consistent 95% short shot, fix that problem before moving on.
Mistake 2: Ignoring the check ring. The check ring (non-return valve) in the barrel is the single most underappreciated component in decoupled molding. If it leaks, you lose shot-to-shot consistency in both fill and pack. Test it by measuring cushion consistency over 50 shots. If cushion varies more than ±0.5 mm, replace the check ring before doing anything else.
Mistake 3: Overpacking the part. More pack pressure is not better. Once you hit the weight plateau, additional pressure just adds residual stress, increases cycle time, and can cause flash. Some engineers think “if 800 bar is good, 1000 bar must be better.” It’s not. Trust the data, not your intuition.
Mistake 4: Using hold pressure that’s too close to pack pressure. If hold pressure is 80–100% of pack pressure, you’re essentially extending the pack stage. This causes overpacking near the gate and can lock the part onto the core, making ejection difficult. A good rule of thumb: hold pressure should be 30–60% of pack pressure.
Mistake 5: Not documenting the process. Decoupled molding without documentation is just expensive conventional molding. Record every parameter, every study result, and every decision. Use a standardized process sheet that includes melt temp, mold temp, fill speed, V-P switchover point, pack pressure, pack time, hold pressure, hold time, and screw speed. Future you will thank present you.
How Does Mold Design Affect Decoupled Molding?
Mold design is the largest factor in decoupled molding success: poor cooling, wrong gates, or unbalanced runners defeat any process tuning. In our Shanghai factory, we have seen entire decoupled molding programs fail not because of process parameters, but because the tool itself could not support the level of control that scientific molding demands.
Cooling is non-negotiable. Decoupled molding depends on consistent cooling rates to produce consistent shrinkage. If cooling is uneven (thin channels, long distances from the part, or baffle locations that create hot spots), your pack and hold stages will behave differently in different areas of the part. The fix isn’t more process tuning — it’s better cooling design.
Gating strategy matters more than you think. Gate location determines fill pattern, which determines where the last area to fill is, which determines where pack pressure is least effective. In a well-designed decoupled process, the gate should be positioned so the last area to fill is a non-critical, thick section where packing is forgiving. If the last area to fill is a thin-wall section that needs dimensional precision, no amount of process optimization will save you.
Venting prevents false readings. Trapped air burns (dieseling) create local overpacking that looks like a process problem but is actually a mold maintenance issue. Ensure adequate venting at the flow front endpoints — typically 0.015–0.025 mm deep, 6–10 mm wide.
Runner design affects 空洞バランス3 — the uniformity of fill time across all cavities. In multi-cavity tools, balanced runners are critical. If cavity 1 fills in 1.5 seconds and cavity 4 fills in 2.1 seconds, your V-P switchover point will be wrong for at least one cavity. Runner balance should be within ±3% fill time across all cavities before you start tuning the decoupled process.
What Results Can You Expect from Decoupled Molding?
Decoupled molding results are measurable: 15–30% Cp improvement, 40–60% scrap reduction, and process transfer cut from days to hours. In our own facility, we have seen Cpk values climb from 0.9 to over 1.6 on tight-tolerance medical components within the first production validation run after switching to a decoupled approach.
| メートル | Conventional | Decoupled |
|---|---|---|
| Part weight Cpk | 0.8–1.2 | 1.5–3.0 |
| Dimensional Cpk | 0.5–1.0 | 1.33–2.0+ |
| スクラップ率 | 3–8% | 0.5–2% |
| Setup-to-first-article time | 1–3 時間 | 4~8時間 |
| Process transfer success rate | 40–60% | 85–95% |
“Decoupled molding process parameters transfer across machines with minimal adjustment because they are physics-based, not machine-specific.”真
Fill time, pack pressure at the cavity, and gate seal time are material and geometry dependent, not machine dependent. This is why documented decoupled processes transfer at 85-95% success rates compared to 40-60% for conventional processes.
“Decoupled molding eliminates the need for mold maintenance because the process compensates for tooling wear automatically.”偽
Decoupled molding optimizes how the machine controls material flow, but it cannot compensate for physical tooling degradation. Worn gates, eroded vents, and damaged cooling channels still require regular mold maintenance. Neglecting tooling upkeep will degrade process consistency regardless of the methodology used.
The biggest ROI comes from process transfer. In conventional molding, moving a mold from one machine to another (or one facility to another) often requires days of re-tuning because the process parameters are machine-specific. In decoupled molding, the parameters are physics-based — fill time, pack pressure at the cavity, gate seal time — so they transfer across machines with minimal adjustment.
This matters enormously if you are sourcing tooling in Asia and running production domestically, or vice versa. A decoupled process documented with Cpk targets at our Shanghai facility can be replicated at your local molder within hours, not days.
Frequently Asked Questions About Decoupled Molding
What Is the Difference Between Decoupled II and Decoupled III Molding?
Decoupled II uses two stages: fill (velocity-controlled) followed by pack + hold (pressure-controlled as one combined stage). Decoupled III separates these into three stages: fill, pack, and hold, each with independent pressure and time settings. Decoupled III provides finer control for optical parts and tight-tolerance medical components.
Is Decoupled Molding the Same as Scientific Molding?
Decoupled molding is a specific technique within the broader scientific molding methodology. Scientific molding encompasses data-driven process development, DOE studies, and statistical process control. Decoupled molding is the core process control strategy that makes scientific molding reproducible.
Do I Need Special Machines for Decoupled Molding?
You need a machine with closed-loop velocity and pressure control, which most modern hydraulic and electric machines manufactured after 2005 provide. The machine must be able to switch accurately from velocity control to pressure control at a defined switchover point. Older machines with open-loop controls are generally not suitable.
How Long Does It Take to Set Up a Decoupled Process?
A complete decoupled process setup — including melt study, fill speed study, pack pressure study, gate seal study, and 100-shot validation — takes 2–4 hours for an experienced process engineer on a straightforward single-cavity tool. Multi-cavity or family molds may take 4–8 hours.
Can Decoupled Molding Reduce Cycle Time?
Decoupled molding itself does not directly reduce cycle time — cooling time is usually the dominant factor. However, by eliminating guesswork and overpacking, it often allows you to reduce pack and hold times to their actual minimums, saving 1–3 seconds per cycle. The real time savings come from fewer rejects and fewer machine adjustments during production.
What Materials Work Best with Decoupled Molding?
All thermoplastic materials respond to decoupled molding. Semi-crystalline materials (PA, POM, PBT) benefit most because their shrinkage behavior is highly sensitive to packing pressure and cooling rate. Amorphous materials (PC, ABS, PMMA) also benefit, particularly for dimensional stability and sink mark prevention. In practice, these materials arrive at the press as plastic pellets — the colorful resin pellets you see in material bins — and the consistency of decoupled process control ensures uniform melting and filling regardless of lot-to-lot pellet variation.
How Do I Validate That My Decoupled Process Is Working?
Run 100 consecutive shots and measure part weight, critical dimensions, and visual defects. Calculate Cpk for each critical dimension — a Cpk ≥ 1.33 indicates a capable process. Also check fill time standard deviation: it should be under ±0.05 seconds for a stable process.
Quick rule: if your part tolerance is under ±0.15 mm, or you’re running more than 100,000 parts, invest the 2–4 hours to set up a decoupled process. The scrap reduction alone usually pays for the setup time within the first production shift. If your tolerance is ±0.5 mm and you’re running 500 parts, conventional molding is fine — spend your engineering hours on something that matters more.
If you’re evaluating whether decoupled molding makes sense for your specific application, ZetarMoldのエンジニアリングチームにご連絡ください. With 20+ years of precision injection molding experience, 45 machines from 90T to 1850T, and a team of 8 senior engineers who apply scientific molding daily, we can tell you honestly whether the setup investment is worth it for your part — and if it is, we’ll walk you through the validation data step by step.
-
Scientific molding: refers to a systematic injection molding methodology that separates filling, packing, and holding into independently controlled stages, each responding to a single dominant process variable. ↩
-
Switchover position: Switchover position refers to the transition point in the injection cycle where machine control switches from velocity-based filling to pressure-based packing, typically set at 95–99% cavity fill. ↩
-
空洞バランスキャビティバランスとは、マルチキャビティ金型においてすべてのキャビティの充填時間が均一であることを指し、バランスの取れたランナーは各キャビティが同じ速度と圧力で材料を受け取ることを保証します。 ↩


