 Skip to content

What Are Injection Molded Ribs and Bosses?
Les bosses fixent les cartes de circuits imprimés à l'intérieur des boîtiers électroniques à l'aide de vis auto-taraudeuses ou d'inserts. La hauteur de la bosse, le trou pilote et les nervures de support doivent correspondre à la charge de la vis, au couple d'assemblage et à la durée de vie, afin que la carte reste stable après une utilisation répétée. boss1es are the main categories or options explained in this section. To design effective plastic parts, engineers must distinguish between structural reinforcement and assembly features. Ribs, bosses, gussets, and wall transitions may look small in CAD, but they decide stiffness, sink risk, screw strength, cooling balance, and mold access. If you are comparing vendors, use these checks with our guide d'approvisionnement de fournisseur de moulage par injection before tooling approval. This DFM2 step helps prevent late mold changes.
- Ribs increase stiffness without adding bulk; bosses enable screws, inserts, and alignment.
- Both features must stay within 40–60% of nominal wall thickness to avoid sink marks, voids, and warpage.
- Standalone bosses need gusset (support rib) connections to distribute torque loads into the surrounding wall.
- A thorough DFM review of rib and boss geometry before tool cutting prevents costly mold modifications.
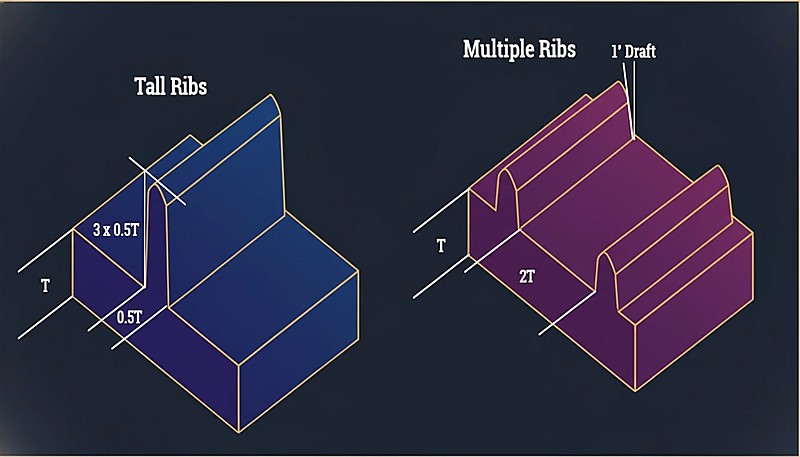
Côtes are thin, wall-like protrusions that extend from the nominal wall. Their primary function is to increase part stiffness without increasing the whole wall thickness. They are useful behind flat panels, covers, housings, and load-bearing areas where the part needs more rigidity. Good rib design controls rib thickness3, height, draft, root radius, and spacing so the feature adds strength without creating sink marks on the opposite surface. For broader design context, use our conception de moules d'injection guide.
Patrons are cylindrical projections, usually hollow, designed to support screws, inserts, locating pins, or assembly features. A boss must have enough wall around the screw or insert while still avoiding thick material buildup at the base. Strong boss design often uses ribs or gussets to transfer load into nearby walls. This prevents cracking during screw installation and reduces distortion around cosmetic surfaces. These details also affect the wider moulage par injection processus.
« Les bossages qui ne sont pas reliés à la paroi latérale doivent toujours être soutenus par des goussets (nervures de support) à la base. »Vrai
Standalone bosses are prone to bending or breaking under torque; gussets distribute the load into the floor of the part and improve material flow.
« Il est acceptable de concevoir un bossage avec la même épaisseur de paroi que le boîtier principal pour garantir une force de retenue de vis maximale. »Faux
Making boss walls equal to the nominal wall creates a massive thick section at the base, guaranteeing sink marks and voids. Boss walls should be roughly 60% of the nominal wall.
How Do Ribs and Bosses Compare in Key Design Parameters?
While their functions differ, the geometric rules for both are derived from uniform wall thickness, stable cooling, and predictable filling. Ribs and bosses should be reviewed together because a boss often needs rib support, and a rib can change local flow, cooling, and ejection behavior near the boss base.
| Feature Parameter | Rib Design Rules | Boss Design Rules |
|---|---|---|
| Primary Function | Structural Stiffness, Warpage Control | Mechanical Assembly, Alignment |
| Geometry | Linear, Plate-like | Cylindrical (Tubular) |
| Épaisseur de la base | 40% – 60% of Nominal Wall (t) | 60% of Nominal Wall (t) |
| Height Constraint | ≤ 3 × Nominal Wall (t) | ≤ 2.5 × Outer Diameter (typical) |
| Angle de tirant d'eau | 0.5° – 1.5° per side | 0.5° exterior; 0.25° interior (to grip screws) |
| Spacing | ≥ 2 × Nominal Wall (t) between ribs | ≥ 2 × Nominal Wall (t) from sidewalls |
| Common Defect | Sink Marks (surface depression) | Weld Lines 2 (structural weakness) |
What Are the Advantages and Disadvantages?
Rib advantages are stiffness, material efficiency, and faster cooling, while boss advantages are fastening, locating, and insert support. The disadvantage is that both features create local thickness changes, so poor geometry can cause sink marks, trapped gas, cracking, or longer cooling. Review the two features together, because a boss may need rib support and a rib may affect the cosmetic face or local flow path.
Ribs: Structural Reinforcement
| Rib Advantages | Rib Disadvantages |
|---|---|
| Material Efficiency: Increases part strength significantly with minimal resin usage compared to thick walls. | Cosmetic Risk: The intersection of the rib and wall is a prime location for sink marks on Class-A surfaces. |
| Cycle Speed: Thin ribs cool quickly, keeping cycle times low. | Venting: Deep ribs can trap gas (diesel effect), leading to burns if not vented properly. |
| Flow Leading: Can act as flow runners to help fill thin sections of the mold. | Ejection Issues: Low draft on ribs leads to parts sticking in the mold or drag marks. |
Bosses: Assembly Interface
| Boss Advantages | Boss Disadvantages |
|---|---|
| Enables screw fastening, press-fit inserts, and alignment without secondary operations. | Thick base sections can cause visible sink marks on cosmetic surfaces. |
| Integrates directly into the mold, so no post-molding machining is needed for assembly holes. | Incorrect ID or wall thickness leads to boss cracking during screw installation. |
| Can be combined with gussets and ribs to spread fastener loads into the surrounding structure. | Requires careful draft, radii, and coring to eject cleanly and avoid sticking. |
« Relier un bossage à une paroi latérale avec une nervure fine élimine les sections de matériau épaisses tout en maintenant la stabilité. »Vrai
This technique ties the boss to the structure for strength without creating a heavy cross-section that would cause sink marks.
« Les bossages aveugles (bossages qui ne traversent pas la pièce) ne nécessitent pas d’angles de dépouille sur le diamètre intérieur. »Faux
All vertical steel surfaces in injection molding require draft for ejection. A zero-draft core pin creates a vacuum and friction, causing the pin to seize or break during ejection.
When Should You Apply Each Feature?
Ribs are best for stiffness without thick walls, while bosses are best for screws, inserts, pins, and alignment. Use ribs when the part needs bending resistance, flatness, or load distribution. Use bosses when the product architecture needs a fastening point or locating datum. When both functions overlap, connect bosses with thin gussets instead of adding solid plastic around the base.
Application Scenarios for Ribs
Large flat surfaces: Use ribs to prevent oil-canning on automotive door panels, appliance housings, and thin covers. Keep rib bases controlled so the cosmetic face does not show sink, read-through, or flow hesitation. This is important when the outside surface is textured, painted, or visible to the customer.
Load-bearing floors: Add ribs under trays, containers, brackets, or pallets where the part must resist bending. The rib direction should follow the load path, not just fill empty space in the CAD model. Designers should confirm that rib height and spacing still allow stable filling and mold release.
Impact zones: Place ribs behind bumper covers, protective cases, and tool housings to spread impact energy. Avoid isolated thick intersections because they can create stress concentration and molding defects. For impact parts, rib continuity, radius, and material toughness should be reviewed together.
Warpage correction: Use balanced rib patterns to equalize stiffness and cooling shrinkage. Cross ribs can help, but the design still needs draft, radii, and spacing that allow stable filling and ejection. Unbalanced ribs can make a flat surface worse instead of better.
Application Scenarios for Bosses
PCB mounting: Bosses secure printed circuit boards inside electronic enclosures using self-tapping screws or inserts. The boss height, pilot hole, and support ribs should match screw load, assembly torque, and service life so the board remains stable after repeated use.
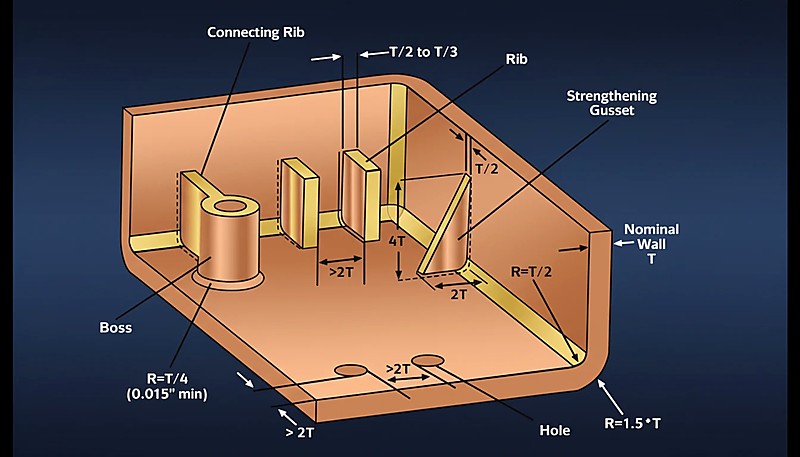
Diagramme illustrant les caractéristiques de conception d'un composant moulé par injection plastique, incluant les nervures, les goussets et le bossage avec des mesures détaillées. Bosses help mate the top and bottom halves of clamshell housings such as controllers, chargers, and remote controls. Good layout keeps screw force away from thin cosmetic walls and leaves enough room for core pins, ejectors, and cooling.
Insert installation: Bosses can hold brass threaded inserts for parts that require repeated disassembly, such as battery compartments or service covers. The boss needs enough material for heat staking or ultrasonic insertion, but excessive thickness can still cause sink and long cooling.
Alignment: Non-threaded bosses or pins help mating parts line up before fastening. This reduces assembly friction and prevents screws from being used as alignment tools, which can crack plastic. Clearance, draft, and tolerance stack-up should be checked with the mating part.
In our Shanghai factory, our engineers with 20+ years of experience use 47 injection molding machines (90T-1850T) to review rib thickness ratios, boss support structures, and sink-mark risk before mold steel is cut. We recommend documenting each rib and boss correction in the DFM report so buyers can compare geometry risk, not just price.
How Do You Integrate Ribs and Bosses Step by Step?
Rib and boss integration is a staged DFM workflow. First locate every screw, insert, and alignment boss, then dimension each boss from fastener data, place ribs along the bending direction, connect unsupported bosses to walls with gussets, and finally review intersections for sink, draft, venting, ejection, and tool-access risk before steel cutting.
Identify assembly points first.
Determine where screws, inserts, PCB standoffs, or locating pins are needed. Place bosses at those coordinates, then check whether the boss is too close to a corner, shutoff, ejector, or cosmetic wall that could limit cooling or tool access. Mark high-load locations before adding ribs.
Dimension the bosses.
Set the inner diameter from the fastener or insert supplier data, then size the outer diameter and boss wall to avoid cracking and sink. Check screw engagement depth, pilot hole tolerance, draft, and whether the boss needs coring at the base. Confirm the screw torque range before T1.
« Les intersections entre nervures et bossages nécessitent une revue de fabrication avant outillage. »Vrai
The highest-risk area is often where a boss base, rib root, cosmetic wall, and screw load meet. Checking this intersection before steel cutting reduces sink, cracking, and rework.
« Une nervure plus épaisse améliore toujours une pièce plastique. »Faux
A thicker rib can increase sink marks, cooling imbalance, and warpage. Multiple moderate ribs with correct draft and spacing are usually safer than one heavy rib.
Determine structural needs second.
Analyze where the part will flex or carry load. Place ribs perpendicular to the bending direction and keep rib root thickness near the material-safe range. Use multiple moderate ribs instead of one thick rib when cosmetic risk is high. Check flow length and gate location at the same time.
Integrate and support with gussets.
A standalone boss is weak. Connect it to the nearest wall or floor using thin gussets or ribs. Avoid filling the full gap with solid plastic because that creates thick sections, slow cooling, and visible sink on the opposite surface. Use rib support only where it improves load transfer.
Manage intersections and mold access.
Where ribs meet bosses or walls, add radii of at least 0.25 times wall thickness when the material and tool design allow it. Confirm draft, venting, polishing access, ejection direction, and whether lifters or slides are required. If you need DFM feedback on rib and boss geometry, request a quote from ZetarMold before tool cutting.
What Questions Do Buyers Ask About Rib and Boss Design?
-
boss: A boss is a raised feature commonly used for screws, inserts, fastening, or locating functions in molded parts. ↩
-
Entreprises de Moulage par Injection en Inde : Pourquoi les Grands Acheteurs Choisissent ZetarMold - DFM refers to review checks whether a plastic part design can be molded reliably before tooling investment. ↩
-
rib thickness: rib thickness refers to is usually limited as a percentage of nominal wall thickness to reduce sink and uneven cooling. ↩
Questions fréquemment posées
What is the difference between ribs and bosses in plastic design?
Ribs reinforce plastic walls, covers, and floors so a part becomes stiffer without making the entire wall thicker. Bosses support screws, threaded inserts, locating pins, or assembly features. Ribs mainly solve structural stiffness problems, while bosses mainly solve fastening and alignment problems. Both need wall-thickness control because thick rib roots or boss bases can cause sink, voids, warpage, and long cooling cycles. In a good design review, the supplier checks how the two features interact instead of judging each feature alone.
Should ribs or bosses be designed first?
Bosses are often placed first when screw locations, insert positions, PCB supports, or assembly constraints are fixed by the product architecture. Ribs are then added to support those bosses, connect load paths, and stiffen nearby surfaces. If the part is mostly structural, rib layout may start earlier. The safest workflow is to define assembly loads, locate bosses, add rib support, then review thickness, draft, radius, and mold access. This order reduces rework when the tooling engineer starts steel design and reviews cooling access.
How thick should ribs be compared with the main wall?
A practical starting point is to keep rib thickness around 50% to 60% of the nominal wall thickness for many injection molded plastics. Thicker ribs can create sink marks because the rib root cools more slowly than the surrounding wall. The final value depends on resin shrinkage, surface requirements, tool steel condition, and flow length, so DFM should confirm the ratio against the selected material. If the outer face is cosmetic, conservative rib sizing is usually safer for production and later quality approval.
Why do bosses crack during screw installation?
Bosses often crack when the inner diameter is too small, the outer diameter is too thin, the screw creates too much hoop stress, or the boss lacks rib or gusset support. Brittle materials, sharp internal corners, and poor insert installation temperature can make the problem worse. A better design uses the correct pilot hole, enough wall around the screw, rounded transitions, proper draft, and support ribs that spread load. Trial assembly should confirm torque, pull-out strength, and repeatability before approval.
How should buyers review rib and boss design with suppliers?
Buyers should ask the supplier to review rib thickness, boss diameter, screw engagement, insert method, sink-mark risk, draft, texture, ejection marks, and mold steel access before tool cutting. They should provide assembly loads, screw type, material grade, tolerance requirements, and cosmetic surface priorities. A capable supplier should return DFM comments explaining which ribs or bosses need adjustment, not just a price quote. This makes supplier capability easier to compare before the order is placed and before steel cost is committed.
What is coring out and why does it matter for bosses?
Coring out means removing unnecessary material from the base of a boss or thick section to reduce the volume of plastic that must cool. This helps prevent sink marks on the opposite cosmetic surface and shortens cycle time. A cored boss still needs enough wall thickness for screw engagement or insert retention, so the core diameter must be calculated relative to the fastener size and material strength. DFM review should verify that the cored geometry still meets pull-out and torque requirements while avoiding sink.


