

You just got a quote for a soft-grip tool handle that needs a rigid inner body and a rubbery outer layer. The supplier says it needs “overmolding.” Your boss wants to know what that means, how long it takes, and whether the two layers will actually stay together after a year of use. This article answers all three — and gives you a material compatibility cheat sheet you can bring to your next DFM review.
- Overmolding bonds a second material over a substrate in one or two shots
- Material compatibility determines bond strength and long-term durability
- Tool design must account for shrink differentials and shut-off surfaces
- Typical lead time is 25–45 days for a two-shot mold
- TPE over ABS and PC over ABS are the most common combinations
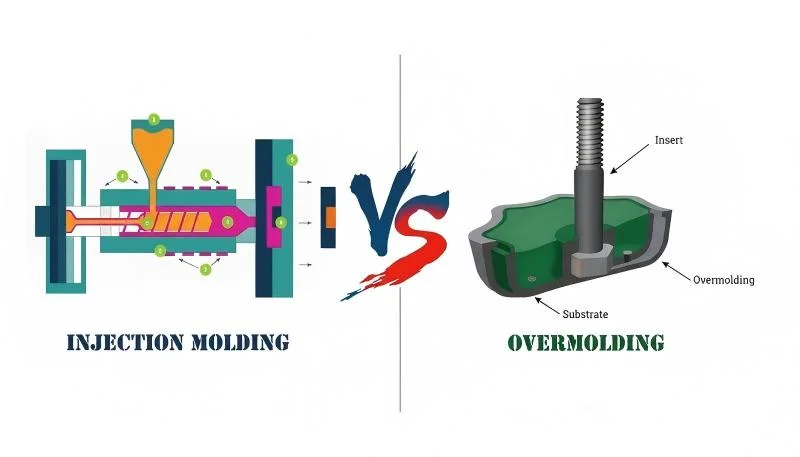
What Is Overmolding and How Does It Differ from Insert Molding?
Üst kalıplama1 is a two-step injection molding process where a second material is molded directly over a previously formed substrate2 part. The result is a single multi-material component — think of a toothbrush with a rigid plastic body and a soft rubber grip, or a power drill housing with vibration-dampening overmold. The key distinction from ekleme kalıplama3 is that overmolding bonds plastic-to-plastic, while insert molding typically encapsulates a metal component like a threaded brass insert.
There are two primary methods: two-shot molding (rotary or shuttle mold on a single press) and pick-and-place molding (substrate molded first, manually or robotically transferred to a second mold). Two-shot is faster and more repeatable; pick-and-place is cheaper to tool but slower per cycle.
What Materials Work Best for Overmolding?
Material selection is the single most important decision in any overmolding project. The bond between substrate and overmold either works chemically (molecules interdiffuse at the interface) or mechanically (undercuts, grooves, and surface texture lock the layers together). s are stronger and more reliable; mechanical bonds are a fallback when chemistry does not cooperate.
The most common pairings include over ABS, TPE over PP, PC over ABS, and SEBS over PA6. For a chemical bond to form, the two materials need compatible polarity and similar melt temperatures — typically within 30°C of each other. If the substrate is polyolefin (PP, PE), you need a polyolefin-based TPE. If the substrate is engineering resin (ABS, PC, PA), you need a styrenic or TPU-based elastomer.
We have run overmolding trials on more than 400 materials at our Shanghai facility, and the pattern is consistent: when suppliers claim their TPE “bonds to everything,” it usually bonds well to two or three substrates and poorly to the rest. Always request a bond test sample before committing to production tooling.
“Shorter lead times always result in lower quality molded parts.”Doğru
Lead time and quality are not directly correlated. A well-planned project with clear DFM criteria, responsive buyer feedback, and experienced toolmakers can deliver both fast turnaround and high quality. Quality problems come from poor process control, not from speed.
“The injection molding process is too complex to standardize lead time estimates.”Yanlış
While each project is unique, the phases (DFM, tooling, sampling, production) are well-defined and predictable. Experienced suppliers provide accurate lead time estimates based on mold complexity, material availability, and current scheduling.
| Substrate | Overmold | Bond Type | Uygulama |
|---|---|---|---|
| ABS | TPE (Styrenic) | Chemical | Power tool grips |
| PP | TPE-V | Chemical | Sealed containers |
| PC | TPE or TPU | Chemical | Tıbbi cihazlar |
| PA6 / PA66 | SEBS | Chemical | Auto connectors |
| PC/ABS | TPE | Chemical | Laptop housings |
| Any rigid | Incompatible soft | Mechanical | Low-cost goods |
How Do You Design a Part for Overmolding?
Good overmolding design starts with the interface — the surface where the two materials meet. If you are relying on chemical bonding, the substrate surface must be clean, free of mold release, and still warm when the second shot is injected. If you are relying on mechanical bonding, you need undercuts, T-slots, or perforations that the overmold material can flow into and lock behind.
Wall thickness matters more in overmolding than in single-shot molding. The overmold layer is typically 1.5–3 mm thick. Go below 1 mm and you get short shots; go above 4 mm and you get sink marks and excessively long cooling times. The substrate wall should be at least 1.5 mm to resist the injection pressure of the second shot without deforming.
Shut-off surfaces — the areas where the mold closes against the substrate to seal the cavity for the second shot — need at least 0.5 mm of interference. Too little and you get flash on the substrate; too much and you crush the substrate during mold closing. In practice, we specify 0.8–1.0 mm shut-off for most TPE-over-ABS parts.
What Are the Tooling Considerations for Overmolding?
Overmolding tooling is more complex than single-shot tooling because you are managing two cavities (or one cavity with a moving core) and aligning them precisely. In a two-shot rotary mold, the mold base rotates 180° between shots; the core side stays attached to the part while the cavity side swaps. This requires a precision rotary mechanism and typically adds 30–50% to the mold cost compared to a single-cavity equivalent.
compensation is critical. The substrate shrinks after the first shot, and the overmold layer shrinks after the second shot. If the substrate shrinks 0.6% (ABS) and the overmold shrinks 1.8% (TPE), the cavity dimensions must account for both independently. We have seen parts fail dimensional inspection because the mold was cut to nominal dimensions without shrink compensation for the overmold layer.
For pick-and-place tooling, the second mold needs locators that reference the substrate’s geometry precisely — typically pin locators or edge-reference surfaces with ±0.05 mm positional accuracy. The substrate must be fully cooled before transfer; placing a warm substrate into the second mold can cause distortion under clamping pressure.

What Is the Typical Lead Time for an Overmolding Project?
A two-shot overmolding mold typically takes 30–45 days to build, compared to 20–30 days for a standard single-shot mold. The extra time comes from the rotary mechanism, additional cavity work, and the need to test and validate both shots independently before running them together. Pick-and-place molds can be faster (25–35 days) since each mold is simpler, but cycle time per part is longer.
“A chemical bond between substrate and overmold is typically stronger than a mechanical bond.”Doğru
Chemical bonding occurs at the molecular level through polymer chain interdiffusion, producing joint strengths that can exceed 80% of the weaker material’s tensile strength. Mechanical interlocks rely on physical geometry and are limited by the undercut strength of the overmold material.
“Overmolding always requires two separate molds and two separate machines.”Yanlış
Two-shot (rotary or shuttle) molding uses a single machine with two injection units and one mold that rotates or slides between shots. This is more common in production overmolding than using two separate machines, as it reduces handling, improves alignment, and cuts cycle time.
Sampling adds another 5–10 days. You need to verify the substrate shot, then the overmold shot, then run bond testing (peel test, pull test) and dimensional inspection on the finished part. At our Shanghai facility, we produce 100+ molds per month and typically turn around overmolding samples within 15 working days of tooling completion, assuming standard materials are in stock.
Flash is a tooling issue. The shut-off clearance is too large, or the injection pressure for the second shot is too high. Reducing pressure helps, but if you go too low you risk short shots. The fix is usually to recut the shut-off surface with tighter clearance (0.02–0.05 mm gap) and run a higher viscosity overmold grade if available.
Short shots in the overmold are typically caused by inadequate venting or a flow path that is too long and thin. Adding vent slots (0.01–0.02 mm deep) at the end of fill and increasing the overmold wall thickness to at least 1.5 mm usually resolves this. In our experience, about 30% of first-shot overmolding trials need a vent adjustment before achieving full fill.
What Does a Real Overmolding Production Setup Look Like?
In a production environment, overmolding runs on either a two-shot press (one machine, two barrels, rotary platen) or two standard presses with robotic transfer. The two-shot setup is more capital-intensive but delivers 20–40% lower per-part cost at volume because there is no handling time between shots. A typical two-shot press costs 1.5–2x the price of a standard press of the same tonnage.
Cycle times for overmolding are naturally longer than single-shot molding because you are running two injection cycles sequentially. A typical TPE-over-ABS cycle runs 25–40 seconds total (10–15s for the substrate, 15–25s including the overmold shot and cooling). Compare this to 10–20 seconds for a single-shot ABS part of similar size.
Quality control for overmolded parts requires additional checks beyond standard dimensional inspection. Peel testing (ASTM D903) validates bond strength — typically requiring 2–5 N/mm for consumer products and 5–10 N/mm for automotive applications. Environmental testing (thermal cycling, humidity aging) ensures the bond survives real-world conditions. We run these tests as part of our standard 6-step QC process for all overmolding projects.

Frequently Asked Questions About Overmolding
What is the difference between overmolding and two-shot molding?
Overmolding is the general process of molding one material over another. Two-shot molding is a specific type of overmolding where both materials are injected on the same machine using a rotary or shuttle mold. All two-shot molding is overmolding, but not all overmolding uses two-shot technology. Pick-and-place overmolding uses two separate molds and often two separate machines, which costs less to tool but runs slower in production. The choice between them depends on your annual volume, part complexity, and available press equipment at your supplier.
How much does an overmolding mold cost?
An overmolding mold typically costs between $15,000 and $80,000 depending on part size, cavity count, and whether it uses rotary or pick-and-place design. A two-shot rotary mold is 30–50% more expensive than a single-cavity equivalent because it requires a precision rotary mechanism and dual cavities. Pick-and-place tooling uses two separate molds that are individually simpler and cheaper, but production is slower. For a medium-complexity consumer product handle, expect roughly $25,000–$40,000 for two-shot tooling. Budget an additional 10-15% for design revisions during the sampling phase, as overmolding molds typically require one or two rounds of adjustment before production approval.
“Most injection molding delays are caused by kalıp imalatı problems.”Doğru
In practice, the majority of delays come from slow buyer feedback during DFM review and sample approval, not from mold manufacturing. A responsive buyer can shave 1–2 weeks off the total timeline.
“All injection molding factories can deliver the same lead time for equivalent projects.”Yanlış
Lead time depends on factory-specific factors: number of machines, scheduling flexibility, in-house tooling capability, and communication speed. A factory with 45 machines and in-house tooling can schedule faster than one with 10 machines that outsources mold making.
Can you overmold metal inserts?
Molding over metal inserts is technically insert molding, not overmolding. However, the processes are often combined in practice — a metal insert is loaded into the first shot, then a soft TPE or TPU material is overmolded on top. This combined approach is common in electronic connectors, medical device handles, and threaded fasteners where a brass or steel insert needs a soft-grip exterior layer for ergonomics, vibration damping, or environmental sealing around the metal-plastic interface. The key design consideration is ensuring adequate plastic wall thickness around the insert (minimum 1.5 mm) to prevent sink marks and stress concentration that could lead to cracking under load.
What is the minimum order quantity for overmolding?
Most injection molding factories set a minimum of 3,000–5,000 units for overmolding due to setup time and material waste during changeover. At lower volumes, the per-part tooling amortization makes overmolding uneconomical compared to gluing or mechanical assembly of separate components. Some suppliers will accommodate smaller batches of 500–2,000 units, but expect a significant unit price premium. For prototype quantities under 500, consider 3D printing with flexible filament or silicone casting instead of injection overmolding. The actual MOQ also depends on the minimum order quantity for raw materials, particularly for custom-colored TPE grades that may have supplier minimums of 500 kg or more per color.
How do you test overmolding bond strength?
The standard test is a 180-degree or 90-degree peel test per ASTM D903, measuring the force required to separate the overmold from the substrate in newtons per millimeter. Acceptable bond strength varies by application: 2–5 N/mm for consumer products, 5–10 N/mm for automotive, and 10+ N/mm for medical devices subjected to repeated sterilization cycles. Cross-hatch adhesion testing per ASTM D3359 provides a quick qualitative check, while thermal cycling (-40°C to +85°C) validates long-term environmental durability. Pull-off testing per ASTM D4541 is another option for flat-bonded interfaces where peel geometry is not feasible. Document all test results with photos for your quality records.
Can different colored materials be used in overmolding?
Yes, each material is injected from a separate barrel so they can be independently colored. Two-shot molding is commonly used for two-color branding, such as a company logo inlaid in a contrasting color, as well as functional soft-touch surfaces on consumer electronics. Color matching between the two materials typically requires separate Pantone approvals for each resin system, because the same pigment code looks different in a translucent TPE versus an opaque ABS substrate. Masterbatch suppliers can provide pre-matched color pellets for both materials simultaneously.
What shrink rate should be used for the overmold layer?
The overmold material shrink rate determines cavity sizing independently from the substrate and must be obtained from the material supplier datasheet. TPE grades typically shrink 1.0–2.0%, TPU shrinks 0.5–1.5%, and silicone-based elastomers shrink 2.0–3.5%. Always use the specific supplier values rather than generic reference tables — inaccurate shrink compensation is one of the most common causes of dimensional failure in overmolded parts, and the error compounds when both layers shrink in different directions around a complex geometry. When prototyping with a new overmold material, run a shrinkage study using a standard test bar mold before cutting production tooling to confirm the datasheet values match actual molding conditions.
-
overmolding: Overmolding is a two-shot injection molding process where a second material is molded over a pre-formed substrate to create a multi-material part with enhanced functionality or ergonomics. ↩
-
substrate: The substrate refers to the first-shot or base component in an overmolding process, typically a rigid plastic part onto which a softer or different material layer is applied. ↩
-
insert molding: Insert molding is an injection molding process where a pre-placed component (typically metal) is encapsulated in plastic during a single molding cycle, creating an integrated assembly. ↩


