 Skip to content

- Injection molding melts thermoplastic pellets, injects the melt into a closed mold, cools the part, and ejects a finished plastic component.
- The process is best for repeatable 3D plastic parts with controlled dimensions, surface finish, ribs, bosses, clips, and complex features.
- The four practical controls are mold design, material selection, melt and mold temperature, and cycle-time balance.
- Most project failures come from weak DFM, poor cooling layout, wrong resin grade, or unrealistic tolerance expectations.
- A buyer should evaluate injection molding by part geometry, annual volume, tooling budget, material risk, and quality requirements.
What Is Injection Molding?
Injection molding1 is a manufacturing process that turns molten plastic into repeatable 3D parts inside a closed mold. Plastic pellets are heated in a barrel, pushed forward by a screw, injected into a cavity, cooled under control, and ejected as a finished component.
For a full process baseline, use our injection molding complete guide. This page explains the working sequence in plain language so engineers, buyers, and founders can decide whether a part should be molded, redesigned, prototyped, or made with another process.
At ZetarMold, our factory in Shanghai runs 47 injection molding machines from 90T to 1850T. Our engineers review wall thickness, gate location, material flow, cooling layout, and annual volume before recommending production tooling.
Injection molding is not just a machine action. It is a controlled system that connects part design, resin behavior, tooling steel, cooling, machine repeatability, and inspection. If one of these elements is weak, the molded part can show flash, sink marks, short shots, warpage, or unstable dimensions.
How Does Injection Molding Work Step by Step?
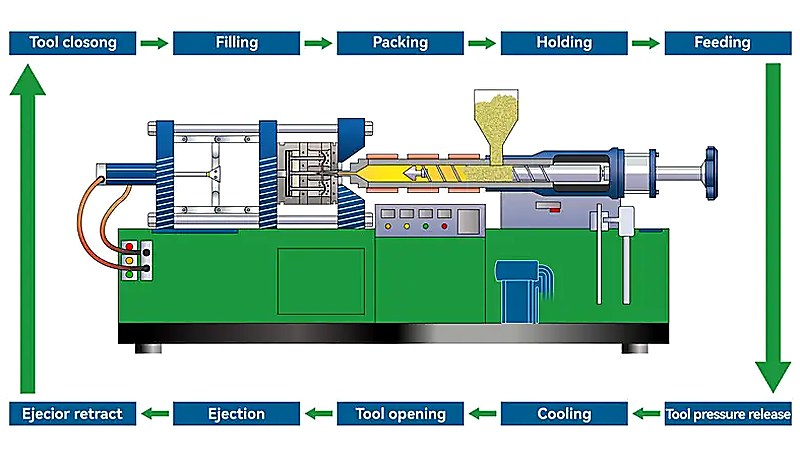
Injection molding is a repeatable cycle: clamp the mold, inject the melt, hold pressure, cool the plastic, open the mold, and eject the part. Each cycle may take a few seconds for a small thin-wall part or more than a minute for a thick engineering component.
The machine first closes the mold with enough clamping force to resist injection pressure. Pellets enter the heated barrel, where the rotating screw melts and mixes the material. The screw injection molding machine then pushes a measured shot through the nozzle, sprue, runner, and gate into the cavity.
During packing and holding, extra pressure compensates for plastic shrinkage as the material cools. Cooling channels remove heat from the mold so the part can become stiff enough for ejection. If cooling is uneven, the part may warp even when the cavity shape is correct.
“Injection molding is a cyclic process, not a continuous process.”True
A molded part is made shot by shot. The mold closes, fills, packs, cools, opens, and ejects before the next cycle starts. This is different from extrusion, which pushes material through a die continuously.
“The mold only gives the part its shape; process settings do not matter.”False
Mold geometry matters, but melt temperature, injection speed, hold pressure, cooling time, and material drying also determine final quality. A good mold can still produce bad parts if the process window is unstable.
The ejected part is then inspected, trimmed if needed, and packed or sent to secondary operations. The best production plans define the acceptable cycle time, inspection points, and cosmetic standards before tooling starts, not after defects appear.
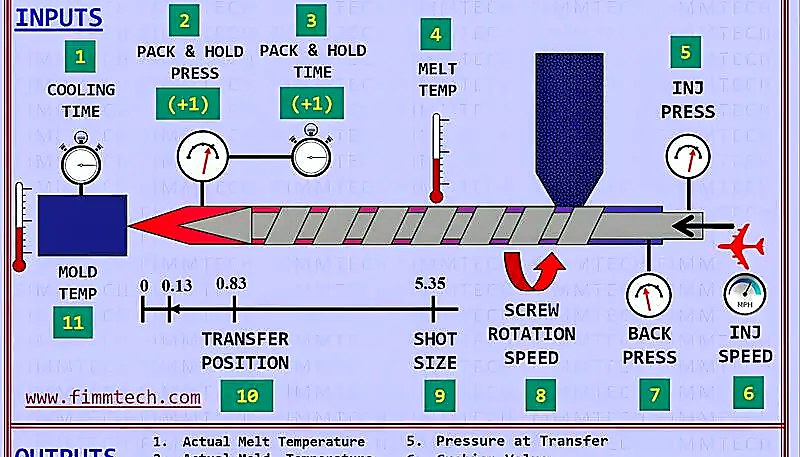
A stable process window is normally built during sampling. The team adjusts fill speed, transfer position, hold pressure, hold time, barrel temperature, mold temperature, and cooling time until the part fills completely without flash, burn marks, excessive stress, or unacceptable dimensions. Once that window is documented, production operators can repeat the same settings and know when a drift needs correction.
For buyers, the important lesson is simple: the mold and the machine must be evaluated together. A part can fail because the tool has poor venting, but it can also fail because the selected injection molding machine has the wrong shot size, weak plasticizing capacity, or unstable temperature control. Good suppliers check both sides before promising a production plan.
What Parts Are Best Suited for Injection Molding?
The best injection molded parts are repeatable plastic components with 3D geometry, consistent wall sections, and enough volume to justify tooling. Housings, brackets, caps, connectors, gears, medical device parts, and automotive clips are common examples.
Injection molding is strong when the part needs integrated ribs, bosses, snap fits, threads, inserts, living hinges, or cosmetic surfaces. It is weaker when the part is very long, has only a constant cross-section, or changes frequently during early product development.
Part geometry must respect molding rules. Wall thickness should be as uniform as possible, ribs should not be too thick, sharp internal corners should be radiused, and draft angles should be added so the part can leave the mold. These rules reduce sink, stress, drag marks, and ejection damage.
For tooling-specific decisions, compare your design against the injection mold complete guide. That guide explains mold structure, gate choices, cooling design, ejector layout, and tooling tradeoffs in more detail.
Which Materials Can Be Injection Molded?
The best materials are thermoplastic2 grades that match the part’s strength, heat, chemical, cosmetic, and compliance needs. Most thermoplastic families can be injection molded if the grade is selected for the required strength, heat resistance, chemical exposure, color, and regulatory needs. Common options include ABS, PP, PE, PC, PA, POM, PMMA, TPU, PEEK, and flame-retardant engineering blends.
Material selection affects tool design. A resin with high shrinkage needs different cavity compensation than a resin with low shrinkage. A glass-filled grade may require stronger tooling surfaces and better venting. A transparent part needs stricter polishing, flow control, and gate placement than a hidden structural bracket.
Moisture-sensitive materials such as nylon, PC, PBT, and PET must be dried correctly before molding. If drying is ignored, molded parts can show bubbles, silver streaks, lower strength, or unstable dimensions. Material preparation is therefore part of the process, not a separate detail.
How Do Cost, Tooling, and Cycle Time Affect the Decision?
The cost decision is driven by tooling investment, part volume, material price, machine tonnage, and injection molding production time. Tooling can be expensive, but it creates repeatability when the same part must be produced thousands or millions of times.
Cycle time matters because every second repeats across the full production run. A 5-second saving may look small in a sample trial, but it can change annual capacity and unit cost when the mold runs every day. Cooling is often the largest part of the cycle, so cooling layout deserves early engineering attention.
“Cooling time often controls the economics of injection molding.”True
For many parts, cooling takes more time than injection and ejection. Better cooling design can reduce cycle time, stabilize dimensions, and lower cost per part.
“The lowest mold quote is usually the lowest total cost.”False
A cheap mold can become expensive if it causes flash, short life, slow cycles, poor cooling, frequent repairs, or high scrap. Total cost should include mold life, cycle time, maintenance, and quality risk.
Buyers should ask for DFM feedback before approving tool steel. The DFM review should flag undercuts, wall-thickness risk, cosmetic gate marks, tolerance conflicts, resin shrinkage, and ejection risk. For dimensional issues, mold shrinkage3 should be estimated before the first cut of steel. For broader process context, Britannica describes injection molding as a manufacturing technique4.
What Quality Problems Should Buyers Watch For?
Common quality problems are short shots, flash, sink marks, weld lines, burn marks, warpage, color variation, and brittle parts. Most of these problems can be traced to part design, mold design, resin preparation, or process-window control.
Short shots occur when the cavity does not fill completely. Flash appears when plastic escapes at the parting line or around inserts. Sink marks usually come from thick sections that cool slowly. Warpage is caused by uneven shrinkage, unbalanced cooling, or internal stress.
Inspection should match the part function. A hidden bracket may need dimensional and strength checks, while a visible cover may need stricter color, gloss, texture, and scratch requirements. A medical or electronics part may also need traceability, controlled packaging, and material certificates.
For RFQ preparation, send a 3D file, 2D drawing, resin target, annual volume, surface finish requirement, color requirement, tolerance notes, and expected use environment. If any of these inputs are missing, the supplier must guess, and guesses create cost and quality risk.
A practical inspection plan should separate critical dimensions, functional dimensions, cosmetic surfaces, and non-critical areas. This prevents over-inspection on simple features while keeping tight control on snap fits, sealing faces, assembly holes, and visible surfaces. For repeat orders, the same plan also helps compare new production batches against the approved sample instead of relying on memory.
Documentation matters as much as the first sample. Keep the approved material grade, color standard, drawing revision, sample approval date, measurement method, and packaging requirement in one place. When a mold is repaired or moved to another press, these records reduce the risk of silent process drift and make root-cause analysis faster.

What Should Buyers Do Before Starting a Mold?
The best next step is to confirm that the part geometry, resin, tolerance, surface finish, and production volume are aligned before tooling begins. If those inputs are stable, injection molding can deliver repeatable quality at scale. If those inputs are still changing, prototype tooling or design iteration may be safer.
Use the early RFQ stage to ask for risk feedback, not only a price. A useful supplier should explain wall-thickness issues, gate options, parting line location, ejection concerns, cooling strategy, sample timeline, and inspection plan. That discussion is often more valuable than a fast quote with no engineering detail.
If you are preparing a new plastic part, ZetarMold can review your 3D file, resin target, annual volume, and quality requirements, then suggest a practical tooling and molding path. Request a quote with drawings and expected volumes so the engineering team can respond with DFM notes, cost drivers, and production timing.
Before committing to steel, also decide how future engineering changes will be handled. Small changes to wall thickness, ribs, clips, or screw bosses can affect flow, shrinkage, cooling, and ejection. A clear revision process helps the supplier protect the approved sample, quote change costs honestly, and avoid mixing old and new requirements during production. This also keeps purchasing, engineering, and quality teams aligned when the project moves from sample approval to repeat production without confusion.
Frequently Asked Questions
Is injection molding only for high-volume production?
No. Injection molding is most economical at medium and high volume, but prototype and low-volume molds can also make sense when the part needs production-grade material, accurate geometry, or realistic functional testing.
How long does an injection molding cycle take?
A typical cycle can range from under 10 seconds to more than 60 seconds. The exact time depends on part thickness, resin, cooling design, machine size, ejection method, and quality requirements.
What is the biggest cost in injection molding?
The mold is usually the largest upfront cost. Over the product life, material cost, cycle time, scrap rate, machine tonnage, labor, inspection, and maintenance also affect total cost.
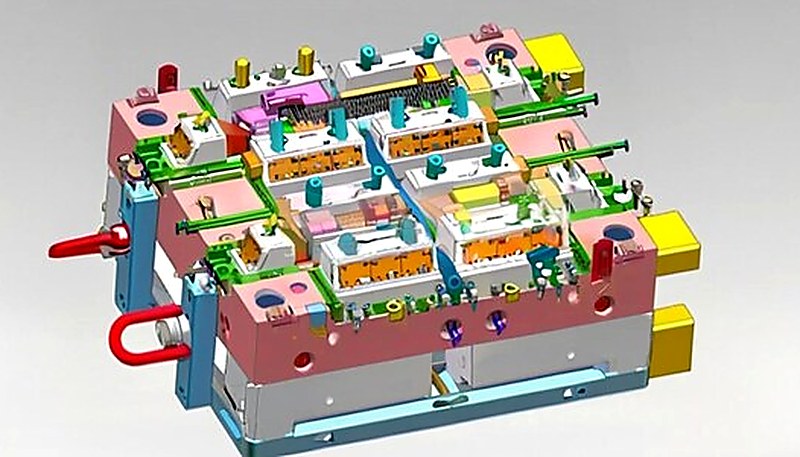
Can one mold make multiple parts at the same time?
Yes. A multi-cavity mold can make several identical parts per cycle, and a family mold can make related parts. The design must keep filling, cooling, and ejection balanced.
What files are needed for an injection molding quote?
A supplier normally needs a 3D CAD file, 2D drawing, material requirement, annual volume, surface finish, color, tolerance notes, and any assembly or testing requirements.
How do I reduce injection molding defects?
Start with DFM, keep wall thickness consistent, choose the right resin, design balanced gates and cooling, dry moisture-sensitive materials, and validate the process window during sampling.
-
injection molding: A cyclic manufacturing process that injects molten plastic into a closed mold cavity to produce repeatable 3D parts. ↩
-
thermoplastic: A polymer that softens when heated and hardens when cooled, allowing it to be processed repeatedly under controlled conditions. ↩
-
mold shrinkage: The dimensional reduction that happens as molten plastic cools and solidifies inside or after leaving the mold. ↩
-
manufacturing technique: A production method selected for repeatability, material behavior, and part geometry rather than for a single prototype run. ↩


