

A MUD injection mold — short for Master Unit Die — is a modular tooling system that lets you swap out cavity inserts in minutes instead of replacing an entire mold. One universal base stays bolted in the press; you slide in a different insert set for each part design. If you run multi-part families or frequent changeovers on your injection molding line, this system can cut your tooling cost by 40–60% and reduce changeover time from hours to under 15 minutes. This guide covers how MUD systems work, when they make economic sense, and what to watch out for.
- MUD systems use a universal base with interchangeable insert sets
- Changeover drops from 2–4 hours to 10–15 minutes per swap
- Total tooling investment drops 40–60% for multi-part families
- Best for low-to-mid volume production of 3+ part variants
- Size and cavity-count limitations rule out high-volume commodity parts
What Is a MUD Injection Mold and How Does It Work?
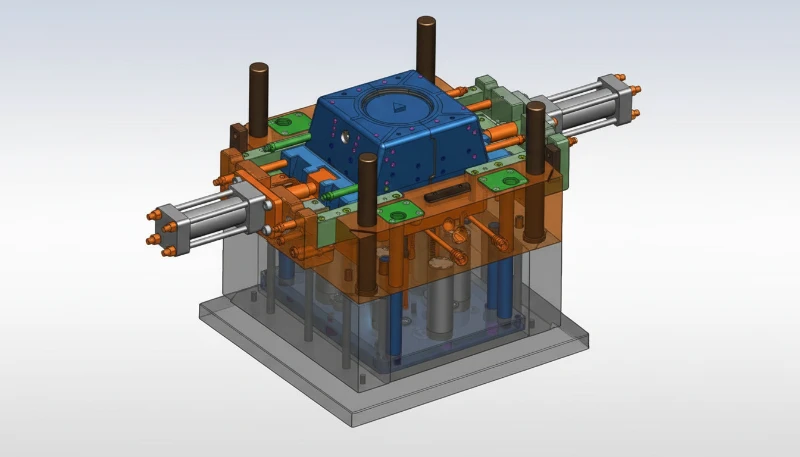
A MUD injection mold is a standardized modular injection mold system built around one core idea: separate the expensive, heavy plastic mold base1 from the part-specific cavity geometry. The base — containing ejector plates, guide pins, cooling circuits, and the clamping interface — stays in the machine. The insert set2 — a lightweight block carrying the core, cavity, and runner — slides in and locks with a few bolts or a quick-lock mechanism. This separation is what makes the system so efficient for shops running multiple part numbers on shared presses.
Think of it like a cordless drill. You buy one drill (the base) and a set of bits (the inserts). You don’t buy a new drill every time you need a different screw. In molding terms, a single MUD base might cost $8,000–$15,000, while each insert set runs $2,000–$6,000. Compare that to $15,000–$40,000 for each standalone production mold, and the economics click fast when you have three or more part variants to produce on the same machine.
The most common MUD (Master Unit Die) standards come from DME (now part of Milacron) and Progressive Components. Their bases use standardized pocket dimensions — you pick a frame size (e.g., 6×6, 8×8, 10×10 inches) and every insert for that frame slides into the same pocket. This means your toolroom only needs to machine the insert, not the entire mold assembly. The runner, gates, cooling channels, and ejector pattern are all designed to mate with the pre-machined base interface.
In practice, the changeover procedure looks like this: stop the machine, crack open the four to six retaining bolts, slide the old insert out, wipe the pocket clean, slide the new insert in, torque the bolts, and restart. No crane, no alignment fixtures, no recalibrating ejector stroke heights. A trained operator handles it solo in 10–15 minutes — approaching SMED process3 territory. Compare that to the two-to-four-hour ordeal of swapping a full conventional mold — rigging out a 1,500-pound steel block with a hoist, aligning it on the platen, reconnecting cooling hoses, and dialing in process parameters from scratch.
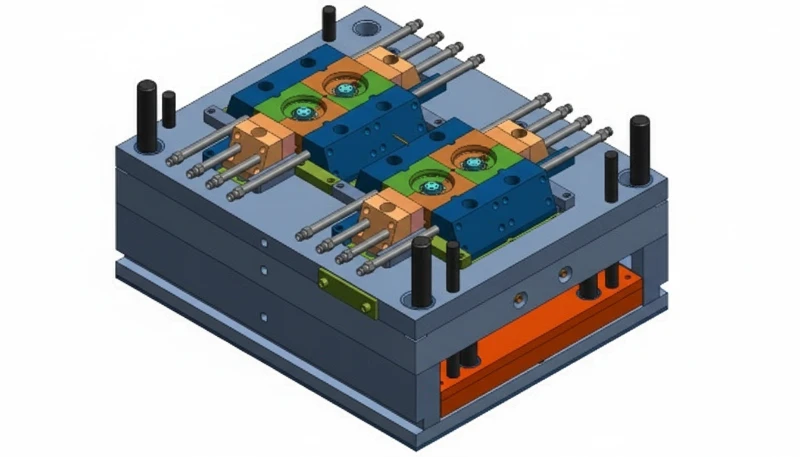
The insert-to-base interface is where most of the engineering intelligence lives. Dowel pins ensure repeatable alignment to within ±0.001 inches. The ejector system in the base pushes through transfer pins that thread into the insert — so you don’t need to set up ejector stroke each time. Cooling circuits connect via quick-disconnect fittings, and the base’s main runner often feeds directly into a sub-runner machined into the insert.
“A single MUD base can serve dozens of different insert sets over its service life.”Doğru
Because the base handles clamping, ejection, and cooling infrastructure, only the cavity and core block changes between parts. One base commonly supports 10–30+ distinct insert designs over its 5–10 year service life.
“MUD inserts produce lower-quality parts than full production molds.”Yanlış
Part quality is determined by the cavity steel grade, machining precision, and process parameters — not by whether the mold is modular. A well-built MUD insert delivers identical dimensional accuracy, surface finish, and structural properties.
Why Do Manufacturers Choose MUD Systems Over Standard Molds?
The decision almost always comes down to three numbers: how many part variants you run, how often you switch between them, and how many units you need per run. If you’re molding one part at 500,000 units a month on a dedicated press, a conventional mold is the right call. But if you’re running five different caps, clips, or housings on the same press — each needing 5,000–50,000 units per batch — a MUD system4 wins on every metric that matters to your bottom line.
The biggest advantage is changeover speed (the total changeover time5. Swapping a conventional mold means unbolting the entire unit from the press, rigging it out with a crane or hoist, bringing in the new mold, aligning it, and re-establishing all process parameters from scratch. That’s 2–4 hours of downtime minimum — time your press sits idle and unproductive. A MUD insert swap takes 10–15 minutes, dramatically reducing changeover time). Over a month of daily changeovers, that’s 40–80 hours of recovered press time. At $100–$200 per machine hour, the financial impact is substantial and immediate.
Then there’s tooling cost. Instead of buying five complete molds at $25,000 each ($125,000 total), you buy one MUD base ($12,000) and five insert sets ($4,000 each = $20,000). Total investment: $32,000 versus $125,000 — a 74% reduction. The math only improves as you add more variants. Even at three part numbers, you’re already saving 30–40% on tooling.
Storage and handling improve dramatically too. A full production mold for a mid-size part might weigh 500–2,000 lbs and require a forklift to move. A MUD insert for the same part weighs 20–80 lbs — one person can carry it to the press on a shelf cart. Your tool crib stays organized with labeled bins instead of pallet racks loaded with multi-ton steel blocks. And you eliminate the safety risk associated with rigging heavy molds in and out of presses.
Lead time is another factor that often gets overlooked. Machining a full production mold takes 6–12 weeks. Machining an insert set (same cavity geometry, no base work) takes 2–4 weeks. If you need to add a new part variant to an existing MUD-based production cell, your time-to-first-article drops by 50–70%. That responsiveness matters when your customer changes specifications or adds new SKUs mid-program.
What Are the Key Components of a MUD Mold System?
Understanding the anatomy of a MUD system helps you spec the right frame and inserts for your application. The system splits cleanly into two groups: the stationary base components that serve every part, and the removable insert components that are unique to each part design. Getting this split right during initial engineering determines how smoothly your changeovers run for years to come.
The base plate (sometimes called the mold frame or master unit) includes the A-side and B-side mounting plates, guide pin bushings, the ejector plate assembly, and the main cooling circuit manifolds. It bolts directly to the press platens and typically never comes out unless you’re doing annual maintenance. Most shops keep a few bases permanently installed on their most frequently changed-over machines, dedicating specific presses to MUD-based production cells.
The insert set contains the core, cavity, runner or stub runner connecting to the base’s main channel, sub-gates or direct gates, and localized cooling channels. The insert locks into the base pocket using dowel pins for alignment and either socket-head cap screws or quick-lock clamps for retention. Good insert design accounts for thermal expansion differences between the insert steel and the base, ensuring the pocket fit stays consistent across operating temperatures.

The ejector interface deserves special attention. The base holds the master ejector plate with its stroke mechanism. The insert has transfer pins that thread through clearance holes in the base plate and push on the part during ejection. When you design a new insert, you specify which ejector pin positions in the base will be active for that part — unused positions get blanked off with set screws. This shared ejector system is one of the MUD platform’s most elegant engineering features.
| Bileşen | Konum | Shared? | Cost Range |
|---|---|---|---|
| Mounting plates | Base | Yes | $3,000–$6,000 |
| Ejector plate assembly | Base | Yes | $1,500–$3,000 |
| Guide pins and bushings | Base | Yes | $500–$1,000 |
| Cooling manifold | Base | Yes | $800–$1,500 |
| Core and cavity blocks | Insert | Hayır | $1,500–$4,000 |
| Runner and gate system | Insert | Hayır | $300–$800 |
| Insert cooling loops | Insert | Hayır | $200–$600 |
How Much Time and Money Can a MUD System Actually Save?
Let’s put real numbers on the comparison. Consider a shop running six different plastic brackets on a 200-ton press. Each bracket needs a 10,000-unit production run, and the shop cycles through all six every month. The table below shows how conventional molds compare to a MUD approach across the metrics that directly affect profitability.
The upfront tooling investment tells the first part of the story. Six standalone molds at $22,000 each comes to $132,000. A MUD approach requires one base ($12,000) plus six insert sets ($3,500 each = $21,000), totaling $33,000. That’s a $99,000 difference before you run a single cycle. But the savings don’t stop at purchase price — they accumulate every month through reduced downtime.
| Metrik | Conventional | MUD System |
|---|---|---|
| Tooling investment | 6 × $22K = $132K | $12K base + 6 × $3.5K = $33K |
| Changeover downtime | 2.5 hours each | 15 minutes each |
| Monthly downtime (6 swaps) | 15 hours | 1.5 hours |
| Annual press-time saved | - | 162 hours |
| Revenue from saved time | - | $16K–$32K/year |
| Storage footprint | 6 pallet positions | 1 base + 6 small bins |
ZetarMold Factory Data: Our Shanghai facility operates 45 injection molding machines (90T–1850T) with in-house mold manufacturing capability. For clients with multi-part families, we frequently recommend MUD-based tooling strategies to reduce upfront investment while maintaining production flexibility. Our 8 senior engineers, each with 10+ years of experience, handle insert design and base specification as part of the DFM review process.
The break-even point typically sits at three part variants. With one or two parts, the MUD base cost doesn’t amortize enough to beat standalone molds. At three variants, savings reach 30–40%. By six variants, the savings climb to 60–75%. The curve flattens after that, but it never goes negative — every additional variant added to the MUD family continues to reduce per-part tooling cost.
Another cost factor that’s easy to miss: insert refurbishment. When a cavity surface wears out, you refurbish or replace just the insert — typically $500–$2,000. Refurbishing a conventional mold cavity often means welding and re-machining the entire A-side or B-side plate, which can cost $3,000–$8,000 and take the mold out of service for a week. MUD inserts go to the toolroom bench while the press keeps running other inserts.
When Does a MUD Injection Mold Make Sense — and When Doesn’t It?
MUD systems are not a universal solution. They excel in specific scenarios and struggle in others. Based on two decades of injection molding experience at our facility, here’s a practical decision framework that goes beyond the sales pitch.
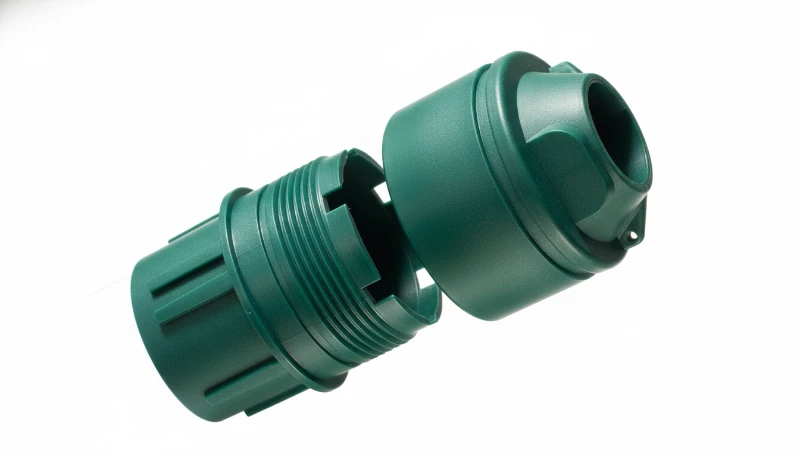
Choose MUD when: you run 3+ part variants on the same press; your per-variant volumes are 1,000–100,000 units per batch; your parts fit within standard MUD frame sizes (up to roughly 10×10 inches); your wall stocks and cooling needs are moderate; and your changeover frequency is daily or weekly. If you’re a medical device manufacturer running five different connector housings, or an automotive tier-one producing a family of bracket variants, MUD is likely your most cost-effective tooling strategy.
Skip MUD when: you run one part at high volume (500,000+ units/month) on a dedicated press; your part is large (>10 inches in any dimension); you need 16+ cavities per shot; your part requires unscrewing cores, lifters, or complex side actions that won’t fit in the insert pocket; or you’re molding abrasive glass-filled materials that wear through insert faces faster than the ROI justifies. In these cases, a conventional production mold with full customization freedom is the better investment.
There’s also a middle ground worth mentioning: hybrid setups where you use MUD inserts for simpler part variants and dedicated molds for complex ones, all running on the same press cell. This approach gives you the cost savings on the easy parts while avoiding the engineering compromises on the difficult ones. It requires careful upfront planning, but it’s a strategy we’ve seen work well for OEMs with diverse product portfolios.
“MUD inserts can be stored on a shelf and swapped by one person without rigging equipment.”Doğru
Insert sets weigh 20–80 lbs versus 500–2,000 lbs for full molds. One operator handles the swap on a bench-height cart, eliminating cranes, hoists, and the associated safety protocols required for full mold changes.
“You need a special injection molding machine to run MUD molds.”Yanlış
MUD bases mount to standard press platens using the same clamping slots and bolt patterns as conventional molds. Any machine that fits the base dimensions and tonnage requirements will accept the system without modification.
What Materials and Part Designs Work Best with MUD Molds?
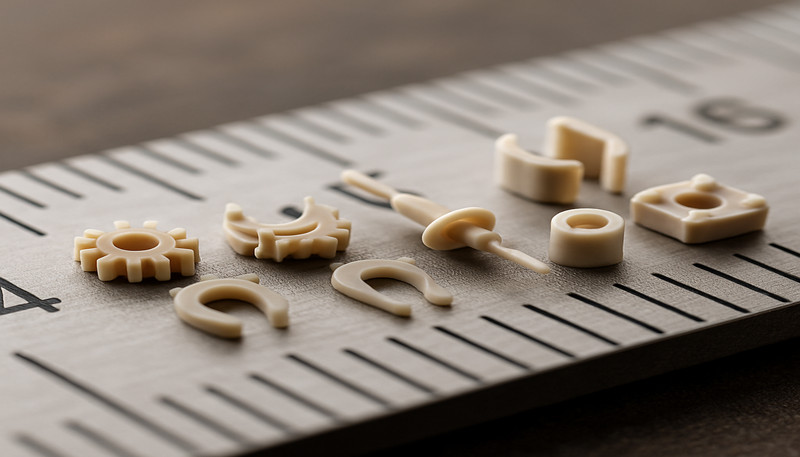
Most thermoplastics mold perfectly well in MUD inserts — ABS, polypropylene, nylon (PA6 and PA66), POM, HDPE, polycarbonate, and TPE are all routine production materials. The constraint isn’t the material type; it’s whether the part geometry and production parameters fit within the insert pocket’s thermal and mechanical limits. Let’s walk through the key design considerations that determine whether a part is a good candidate for MUD tooling.
Wall thickness is the primary design consideration. MUD inserts have less thermal mass than full mold blocks, which means they heat up and cool down faster during each cycle. For thin-wall parts (under 1.5mm), this can actually be an advantage — faster cycle times and quicker process stabilization. For thick-wall parts (over 4mm), the reduced cooling capacity may extend cycle times by 10–20% compared to a dedicated mold with heavy, optimized cooling channels. Your process engineer should model the thermal budget before committing.
Undercuts, internal threads, and multi-slide actions are possible in MUD inserts but require careful planning. The insert pocket has fixed boundary dimensions, so complex side-action mechanisms need to fit within that envelope. If you’re designing a part with two or more external undercuts that require lifters, make sure the lifter travel distance fits within the insert’s side wall thickness. When it doesn’t fit, a conventional mold is the right tool for that specific part.
Surface finish requirements also factor into the decision. MUD inserts accept the same polished, textured, or EDM finishes as conventional cavities. The insert steel grade (P20, H13, S7, or hardened stainless) determines finish longevity — harder steels maintain mirror finishes longer, which matters for optical or cosmetic parts. There’s no finish quality penalty for using the modular approach.
How Do You Maintain a MUD Quick-Change System?
Maintenance on a MUD system is simpler than on a conventional mold because the base and inserts are separate wear zones with different service intervals. The base — ejector pins, guide bushings, and cooling manifolds — needs standard annual service: clean and lubricate guide pins, check ejector pin wear, flush cooling circuits to remove scale and biological growth. This is a straightforward 2–4 hour job done once a year, and it doesn’t require removing the base from the press.
Insert maintenance follows the same rules as any mold cavity: clean vents after each production run, polish worn cavity surfaces, check gate wear (especially for glass-filled materials), and replace cavity steel when dimensional drift exceeds tolerance. The key advantage of the MUD architecture is that you can pull an insert and service it on a bench while the base stays in the press running a different insert. Production continues uninterrupted while maintenance happens in parallel.
One often-overlooked maintenance task: inspect the pocket mating surfaces on both the base and insert before every swap. Every insert change creates an opportunity for flash-causing gaps between the insert and base pocket. Dirt, plastic residue, or dings on the mating surfaces will show up as flash on your next run. A quick wipe-down with a lint-free cloth and visual inspection takes 30 seconds and prevents hours of scrap parts.
ZetarMold Factory Data: With 120+ production staff and 400+ material specifications in our database, we support MUD-based tooling across a wide range of thermoplastic applications. Our in-house mold manufacturing facility produces both standard and custom MUD insert sets, with a monthly capacity exceeding 100 sets of molds.
The bottom line on MUD maintenance: treat the base like a machine component with annual service intervals, and treat each insert like its own small mold with per-run inspection and periodic refurbishment cycles. The modular architecture means you never have to choose between maintaining a tool and keeping the press running — a significant operational advantage that conventional molds simply cannot match.
What Should You Ask Your Molder Before Choosing MUD Tooling?
Not every molder has deep experience with MUD systems, and the design-to-production workflow has a few extra steps compared to conventional tooling. Here are the questions that separate a smooth MUD project from an expensive learning curve. Asking these upfront will save you time, money, and frustration.
1. Do you design inserts in-house? The molder or their tooling partner needs to understand how the insert interfaces with the specific MUD base — pocket clearances, ejector pin placement, runner handoff geometry, and cooling circuit connections. Off-the-shelf insert blanks exist for simple geometries, but most production inserts require custom CAD/CAM work specific to the MUD standard being used. An in-house design team means faster iterations and better DFM feedback.
2. What frame sizes do you stock? If the molder already has MUD bases in common sizes (e.g., DME 6×6 or 8×8), your upfront cost drops further because you’re only paying for inserts. If they need to purchase a base for your project, factor that into the first project’s budget — it’s a one-time cost that pays for itself by the third or fourth insert set.
3. How do you handle insert changeovers? A molder experienced with MUD will have documented changeover procedures, dedicated tooling benches, and a labeled storage system for inactive inserts. Ask to see their process. If they treat insert swaps casually without a checklist or dedicated tools, that’s a red flag for quality consistency.
4. Can I see sample inserts and parts? Request photos or physical samples of existing MUD projects. The insert machining quality, surface finish, and flash control on sample parts predict what you’ll receive on your own project. Pay attention to the parting line cleanliness and gate vestige — both reveal the insert’s build quality.
-
plastic mold base: A plastic mold base is a universal frame that stays bolted in the injection molding press and contains the ejector plates, guide pins, and shared cooling infrastructure. ↩
-
insert set: An insert set is a removable cavity and core assembly that contains the part-forming geometry, runner, and localized cooling for one specific part design. ↩
-
SMED process: SMED is a lean manufacturing methodology (Single-Minute Exchange of Die) that aims to reduce equipment changeover times to under ten minutes. ↩
-
MUD system: MUD refers to Master Unit Die, a standardized modular mold system where a universal base stays in the press and interchangeable insert sets slide in for different parts. ↩
-
changeover time: Changeover time refers to the total time required to swap from producing one part to another, including mold or insert removal, installation, and process stabilization. ↩
Frequently Asked Questions About MUD Injection Mold Systems
What does MUD stand for in injection molding?
MUD stands for Master Unit Die. It is a standardized modular mold system where a universal base plate stays permanently bolted in the press and interchangeable cavity insert sets slide in for different part designs. The system was originally developed by DME (Detroit Mold Engineering) and is now supported by multiple tooling component manufacturers including Progressive Components. The MUD concept has been an industry standard for over 40 years and is widely used across automotive, medical, consumer electronics, and industrial applications.
How much does a MUD injection mold cost?
A MUD base costs $8,000–$15,000 depending on the frame size, guide pin configuration, and cooling manifold features. Individual insert sets run $2,000–$6,000 each, depending on cavity complexity, steel grade selection, and the number of cavities per insert. For a typical multi-part project with one base and four insert sets, total tooling investment ranges from $16,000–$39,000. This compares to $60,000–$120,000 for four standalone production molds of equivalent quality. The cost advantage increases with every additional part variant added to the MUD tooling family.
How fast is a MUD insert changeover?
A trained operator can swap a MUD insert in 10–15 minutes using standard hand tools. This compares to 2–4 hours for a full conventional mold change on the same press. The time savings come from not needing to unbolt the mold from the press platens, re-rig with a crane or hoist, re-align the clamping surfaces, or recalibrate the ejector stroke. Over a month of daily changeovers, MUD saves 40–80 hours of press downtime — a significant revenue recovery for any molding operation.
Can MUD molds produce the same quality as regular production molds?
Yes, absolutely. Part quality is determined by the cavity machining precision, steel grade selection, and process parameters — not by whether the mold uses a modular or monolithic architecture. MUD inserts machined to the same tolerances and polished to the same surface finish specifications as conventional mold cavities will produce parts with identical dimensional accuracy, cosmetic surface quality, and structural integrity. The only practical difference is that MUD inserts with less thermal mass may require slightly adjusted cooling times for thick-wall parts to achieve optimal dimensional stability.
What is the maximum part size for a MUD mold system?
Most standard MUD frames accommodate parts up to approximately 8×8 inches (200×200mm) in the largest commonly available commercial frame sizes. Some manufacturers offer custom frames up to 10×10 inches or larger, but beyond that threshold the cost and complexity advantages of the MUD system diminish significantly compared to a conventional mold. For parts larger than about 10 inches in any dimension, the insert becomes too heavy for easy manual handling and the pocket machining cost approaches that of a standalone mold base.
Is MUD tooling suitable for medical or automotive production parts?
MUD tooling is widely used in both medical and automotive manufacturing, particularly for multi-variant product families such as connector housings, sensor covers, switch bezels, and bracket assemblies. The critical requirement is that the insert steel selection, cavity finish specification, and process documentation meet the industry’s validation and traceability standards. Many validated MUD insert sets are currently in production at ISO 13485 certified medical device facilities and IATF 16949 certified automotive plants worldwide. The modular approach actually simplifies validation because each insert can be qualified independently.
How long does a MUD insert last before it needs replacement?
Insert lifespan depends primarily on the thermoplastic material being molded and the steel grade selected for the cavity surfaces. P20 inserts molding unfilled polypropylene can exceed 500,000 cycles before requiring refurbishment. H13 or S7 inserts molding abrasive glass-filled nylon typically deliver 100,000–200,000 cycles before needing surface rework or cavity replacement. The modular MUD design means you can refurbish or replace a single worn insert without removing the base from the press or disrupting production of other part variants in the same tooling family.
Can I convert my existing conventional molds into a MUD system?
In most cases, existing conventional molds cannot be directly converted because the cavity geometry, runner layout, cooling circuits, and ejection patterns are designed as an integrated unit. However, if you have 3D CAD data for the part, a tooling engineer can redesign the cavity into a MUD insert format by re-engineering the runner, cooling, and ejection interfaces to match the MUD base specifications. This redesign process typically costs less than building an entirely new conventional mold and achieves the same end result of a modular, quick-change tooling setup.


")

