 Vai al contenuto

La progettazione CAD deve tenere conto sia delle tolleranze di stampa che del ritiro in colata.
– Common 3D printing methods for casting molds include SLA for investment casting patterns, binder jetting for sand molds, and FDM for sacrificial patterns.
– 3D printed sand molds can produce metal castings with surface finish of Ra 6–12 μm and dimensional accuracy of ±0.3–0.5 mm.
– This technology is most cost-effective for prototypes, short runs (1–100 pieces), and complex geometries that would require expensive traditional tooling.
What Is 3D Printed Metal Casting and How Does It Work?
3D printed metal casting combines additive manufacturing with traditional casting processes. Instead of spending weeks making wooden patterns or machining metal mold tooling, engineers 3D print the mold or pattern directly from a CAD file. The 3D printed piece then serves as the mold, core, or sacrificial pattern for pouring molten metal.
At ZetarMold, we use this approach primarily for prototype metal parts and bridge production when customers need functional metal components before committing to permanent tooling. The technology works for aluminum, bronze, iron, steel, and even titanium castings — essentially any metal that can be traditionally cast.
Which 3D Printing Methods Are Used for Casting Molds?
Several 3D printing technologies1 serve the casting industry, each suited to different applications.
| 3D Printing Method | What It Produces | Casting Process | Il migliore per | Precisione |
|---|---|---|---|---|
| SLA (Stereolithography) | Wax-like burnout patterns | Investment casting | Small, detailed parts | ±0.1–0.2 mm |
| Binder Jetting (sand) | Sand molds and cores directly | Sand casting | Large parts, complex cores | ±0.3–0.5 mm |
| FDM/FFF (PLA/ABS) | Sacrificial patterns | Investment casting | Larger patterns, lower cost | ±0.2–0.5 mm |
| SLS (Nylon/Wax) | Durable patterns | Sand/investment casting | Reusable patterns, short runs | ±0.15–0.3 mm |
| DMLS/SLM (Metal) | Metal mold inserts | Die casting, injection | Production tooling with conformal cooling | ±0.05–0.1 mm |
“3D printed casting molds can only produce rough, low-quality metal parts.”Falso
3D printed investment casting patterns from SLA printers achieve surface finishes of Ra 1.6–3.2 μm on the final metal part — comparable to traditional investment casting. Binder-jet sand molds produce Ra 6–12 μm, which is standard for sand casting. The casting quality depends on the printing resolution and post-processing, not the fact that it was 3D printed.
“Binder jetting can 3D print a complete sand mold — including internal cores — in a single build, eliminating core assembly entirely.”Vero
Binder jetting sand printers (like ExOne and voxeljet systems) build the mold and all internal cores as one integrated piece. This eliminates the traditional multi-step process of making separate core boxes, shooting sand cores, and assembling them into the mold — saving days of labor and reducing dimensional error from core assembly.
How Do You Design a CAD Model for 3D Printed Casting?
Designing for 3D printed casting requires understanding both the printing process and the casting process. The CAD model must account for shrinkage in two stages: first when the mold material is printed, and second when the molten metal solidifies.
80–90%
- Draft angles — For sand casting molds, add 1–3° draft2 on vertical surfaces (same as traditional). For investment casting with burnout patterns, zero draft is possible since the pattern is destroyed.
- Spessore della parete — Minimum 3–4 mm for sand mold walls, 0.5–1.0 mm for SLA burnout patterns. Metal casting minimum wall depends on the alloy: 2 mm for aluminum, 3 mm for steel.
- Shrinkage allowance — Add 1.0–1.6% for aluminum, 2.0–2.5% for steel, 1.5–2.0% for bronze to the pattern dimensions.
- Gating system — Design the sprue, runners, and risers into the 3D model. For binder-jet sand molds, integrate the gating directly into the print.
- Fillets and radii — Minimum 2 mm internal radii to prevent hot tears in the casting and reduce stress concentrations.
What Is the Step-by-Step Process for 3D Printed Sand Casting?
The binder jetting sand casting workflow is the most common industrial application of 3D printed casting molds. Here is the complete process.

Step 1: CAD preparation (2–4 hours)
- Design the part with casting allowances (shrinkage, machining stock)
- Design the mold halves (cope and drag) around the part
- Add gating system (sprue, runners, gates, risers)
- Integrate cores for internal features
Step 2: 3D printing (4–24 hours depending on size)
- Slice the mold/core design and send to the binder jetting printer
- Print layers of sand bonded with furan or phenolic resin binder
- Typical layer thickness: 0.28–0.4 mm
Step 3: Post-processing (1–4 hours)
- Remove loose sand from cavities and channels
- Apply refractory coating if needed for surface finish
- Assemble mold halves (for multi-part molds)
Step 4: Metal pouring (1–2 hours including heat-up)
- Melt metal to required temperature (660°C for aluminum, 1,500°C+ for steel)
- Pour into the 3D printed sand mold through the gating system
- Allow solidification (minutes to hours depending on size)
Step 5: Finishing (2–8 hours)
- Break away the sand mold (shake-out)
- Cut off gating system
- Blast, grind, and machine as needed
- Inspect dimensions and quality
What Are the Cost and Time Advantages of 3D Printed Molds?
The business case for 3D printed casting molds centers on eliminating traditional tooling lead time and cost for small quantities.
| Fattore | Traditional Pattern/Tooling | 3D Printed Mold | Savings |
|---|---|---|---|
| Lead time (prototype) | 4–8 weeks | 3–7 days | 80–90% |
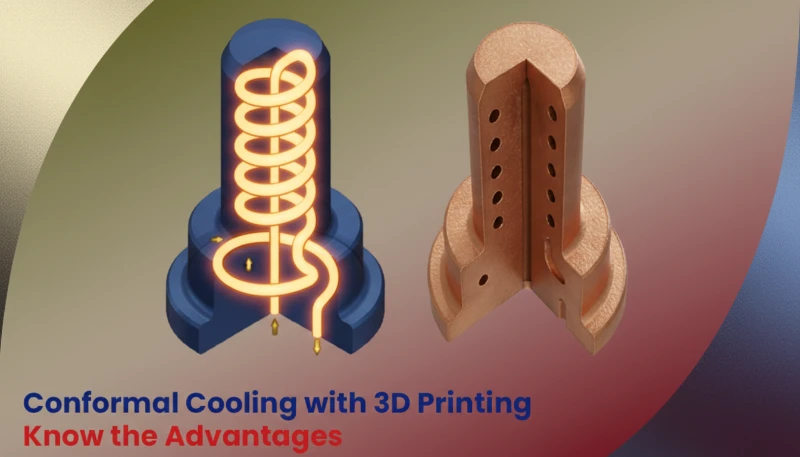
| Il raffreddamento conforme utilizza canali di raffreddamento che seguono il contorno della geometria del pezzo — tipicamente prodotti mediante sinterizzazione laser diretta di metalli (DMLS) — per ottenere un'estrazione di calore più uniforme e rapida rispetto alle linee di raffreddamento tradizionali a foratura rettilinea negli stampi per iniezione. | $2,000–$20,000 | $200–$2,000 | 70–90% |
| Design iteration | 2–4 weeks per revision | 1–3 days per revision | 80–90% |
| Complex cores | $5,000–$50,000 (core boxes) | Integrated in print ($0 extra) | 90–100% |
| Break-even quantity | - | - | 1–100 parts (3D); 100+ (traditional) |
The crossover point where traditional tooling becomes cheaper is typically 50–200 parts, depending on complexity. For quantities above this, the per-part cost of 3D printed molds exceeds that of reusable metal tooling.
What Are the Limitations and When Should You Choose Traditional Tooling?
3D printed casting molds are not universally superior. Understanding the limitations ensures you choose the right approach for each project.
- Surface finish — 3D printed sand molds produce Ra 6–12 μm surfaces (vs. Ra 3–6 μm for machined metal molds). Secondary machining may be needed for critical surfaces.
- Dimensional accuracy — ±0.3–0.5 mm for binder-jet sand casting vs. ±0.1–0.2 mm for precision investment casting or die casting.
- Volume di produzione — Each 3D printed sand mold is consumed in a single pour. For 1,000+ parts, traditional reusable tooling is far more economical.
- Size limitations — Binder jetting build volumes are typically 800 × 500 × 400 mm (though large-format machines reach 4,000 × 2,000 × 1,000 mm).
- Mold strength — 3D printed sand molds have lower green strength than traditionally rammed molds. Very large pours may require reinforcement.
“3D printed molds will replace all traditional casting tooling within a few years.”Falso
3D printed molds are excellent for prototyping and short runs (1–100 parts), but traditional tooling remains far more economical for medium to high volumes. A reusable metal die casting mold can produce 100,000+ parts; a 3D printed sand mold is consumed in a single pour. The technologies are complementary, not competitive.
“3D printed sand molds are particularly valuable for casting parts with complex internal passages that would require multiple traditional cores.”Vero
Traditional sand casting of parts with complex internal channels (like manifolds or heat exchangers) requires assembling 5–20 separate sand cores, each made from its own core box. 3D printing integrates all cores into a single mold, eliminating core boxes, assembly labor, and core shift errors. This is where 3D printing delivers the highest ROI.
For injection molding tooling specifically, conformal cooling3 channels 3D printed in steel (DMLS/SLM) are increasingly used in production molds, delivering 25–40% cycle time reduction. This represents a different but related application where 3D printing enhances rather than replaces traditional mold making.
Looking to accelerate your metal part development? Contact ZetarMold for rapid prototyping services including 3D printed casting molds and injection mold tooling.
FAQ

What metals can be cast using 3D printed molds?
3D printed sand molds can cast aluminum, bronze, brass, cast iron, carbon steel, stainless steel, and many specialty alloys. Investment casting patterns (SLA/FDM) can produce castings in virtually any pourable alloy, including titanium and nickel-based superalloys. The mold material is not in contact with the solidified metal, so alloy selection is unrestricted.
How accurate are castings from 3D printed molds compared to CNC machined parts?
3D printed sand castings achieve ±0.3–0.5 mm, and 3D printed investment castings reach ±0.1–0.2 mm. CNC machining typically achieves ±0.01–0.05 mm. For near-net-shape parts where only critical surfaces need machining, 3D printed castings reduce machining time by 50–70%.
How long does a 3D printed sand mold take to produce?
Depending on size, a binder jetting sand mold prints in 4–24 hours. Adding design time (2–4 hours), post-processing (1–4 hours), and metal pouring, the total time from CAD file to finished metal casting is typically 2–5 days. Compare this to 4–8 weeks for traditional pattern-making.
Can 3D printed molds be reused?
Sand molds and investment casting patterns are consumed during casting — each is single-use. However, SLS nylon patterns can be reused 5–20 times for sand casting before wear degrades accuracy. 3D printed metal mold inserts (DMLS) are permanent and can last tens of thousands of cycles.
What is the maximum size of a 3D printed casting mold?
Standard binder jetting machines build up to 800 × 500 × 400 mm. Large-format machines (voxeljet VX4000) can print sand molds up to 4,000 × 2,000 × 1,000 mm — large enough for automotive engine blocks and industrial pump housings. Multi-part mold assembly extends the size further.
Sintesi
3D printing has transformed the economics of metal casting for prototypes and short production runs. By eliminating weeks of traditional pattern-making, it compresses the development cycle from months to days and reduces prototype tooling costs by 70–90%. The technology works best for complex geometries, small quantities (1–100 parts), and rapid design iterations. For higher volumes, traditional tooling remains the economical choice. At ZetarMold, we help customers select the optimal approach — whether 3D printed casting molds for rapid prototyping or precision injection mold tooling for mass production.
-
Rapid prototyping encompasses a family of additive manufacturing technologies (SLA, SLS, FDM, binder jetting) that build three-dimensional objects layer by layer directly from digital CAD data, without the need for part-specific tooling. ↩
-
Draft angle is a slight taper (typically 1–3°) applied to vertical walls of a mold cavity or pattern that allows the casting or molded part to release cleanly during extraction. ↩
-
Conformal cooling uses cooling channels that follow the contour of the part geometry — typically produced by direct metal laser sintering (DMLS) — to achieve more uniform and faster heat extraction than conventional straight-drilled cooling lines in injection molds. ↩


