 Vai al contenuto

Injection molding is a manufacturing process that forces molten plastic into a mold cavity to create finished parts. It’s the backbone of modern plastic manufacturing, responsible for everything from your smartphone case to automotive dashboards. After two decades in this industry, I’ve seen countless newcomers overwhelmed by the technical jargon and complex variables. But here’s the truth: once you understand the fundamentals, injection molding becomes surprisingly logical. This guide will walk you through everything you need to know to get started, backed by real factory experience and practical insights that textbooks don’t teach.
- Injection molding produces over 30% of all plastic products worldwide by injecting molten material into precision molds.
- The process follows 6 key steps: clamping, injection, dwelling, cooling, mold opening, and ejection.
- Material selection is the #1 decision affecting part quality — common choices include PP, ABS, PC, and nylon.
- Mold design determines roughly 70% of final part quality, making DFM review critical before tooling.
- Typical mold costs range from $3,000 for simple designs to over $100,000 for complex multi-cavity tools.
What Is Injection Molding and Why Does It Matter in Modern Manufacturing?
Injection molding and why does it matter in modern manufacturing is defined by the function, constraints, and tradeoffs explained in this section. If you are comparing vendors or planning procurement, our injection molding supplier sourcing guide covers RFQ prep, qualification, and commercial risk checks.
stampaggio a iniezione1 is a manufacturing process that produces plastic parts by injecting molten material into a mold cavity under high pressure and temperature. It’s not just another manufacturing method — it’s the dominant force in plastic production, accounting for over 30% of all plastic products worldwide. Walk around your home or office, and you’ll find injection molded parts everywhere: computer keyboards, bottle caps, medical devices, toy blocks, and automotive components. The process excels at producing complex geometries with tight tolerances, making it indispensable for precision parts that require consistent quality across millions of units.
Industries like automotive, electronics, medical devices, consumer goods, and packaging rely heavily on injection molding because it delivers the perfect combination of design flexibility, material variety, and cost efficiency at scale. The technique dates back to 1872 when John Wesley Hyatt patented the first injection molding machine, but the modern process really took off in the 1940s with the development of better plastics and hydraulic machinery. Today’s global injection molding market exceeds $350 billion annually, driven by everything from smartphone manufacturing to electric vehicle components. What makes this process so dominant isn’t just its versatility — it’s the economics.
Once you’ve invested in the mold tooling, the per-part cost becomes incredibly low, making it ideal for high-volume production runs where you need thousands or millions of identical parts.

How Does the Plastic Injection Molding Process Work Step by Step?
This section is about es the plastic injection molding process work step by step and its impact on cost, quality, timing, or sourcing risk. The injection molding process follows six sequential steps — clamping, injection, dwelling, cooling, mold opening, and ejection — to transform raw plastic pellets into finished parts.
The injection molding process follows six distinct steps that repeat in a continuous cycle. (1) Clamping: The mold closes under immense pressure — typically 25-40 tons per square inch of projected part area — creating a sealed cavity ready for injection. (2) Injection: A reciprocating screw pushes molten plastic from the heated barrel through the nozzle and into the mold cavity. Barrel temperatures range from 150°C for materials like polyethylene up to 320°C for high-performance plastics like PEEK. The injection happens fast — usually within 0.5-2 seconds depending on part size. (3) Dwelling (Pack and Hold): Additional pressure is applied to compensate for material shrinkage as the plastic cools, ensuring the cavity stays completely filled.
This phase typically lasts 2-5 seconds. (4) Cooling: The part solidifies inside the mold as heat transfers to the mold’s cooling channels. This is usually the longest phase, often 60-80% of total tempo di ciclo2. Wall thickness directly impacts cooling time — every additional millimeter roughly doubles the cooling requirement. (5) Mold Opening: The clamping unit retracts, separating the mold halves and exposing the solidified part. (6) Ejection: Ejector pins push the part out of the mold cavity, and the finished part drops into a collection bin or onto a conveyor. The entire cycle repeats automatically, with modern machines capable of cycle times ranging from 10 seconds for simple parts to several minutes for large, thick-walled components.
In our Shanghai factory, we run 47 injection molding machines ranging from 90T to 1850T — giving us the flexibility to produce everything from tiny precision clips to large automotive panels under one roof.
“The cooling phase typically accounts for the largest portion of the injection molding cycle time.”Vero
Cooling represents 50–70% of the total cycle time in most injection molding operations. This is why mold designers invest heavily in optimized cooling channel layouts — even small reductions in cooling time directly increase production output and reduce per-part cost.
“Injection molding can only process thermoplastic materials.”Falso
While thermoplastics dominate injection molding, thermosetting polymers can also be processed using specialized injection molding machines. The key difference is that thermosets undergo chemical cross-linking and cannot be remelted, while thermoplastics can be melted and reformed multiple times.
What Are the Key Components of an Injection Molding Machine?
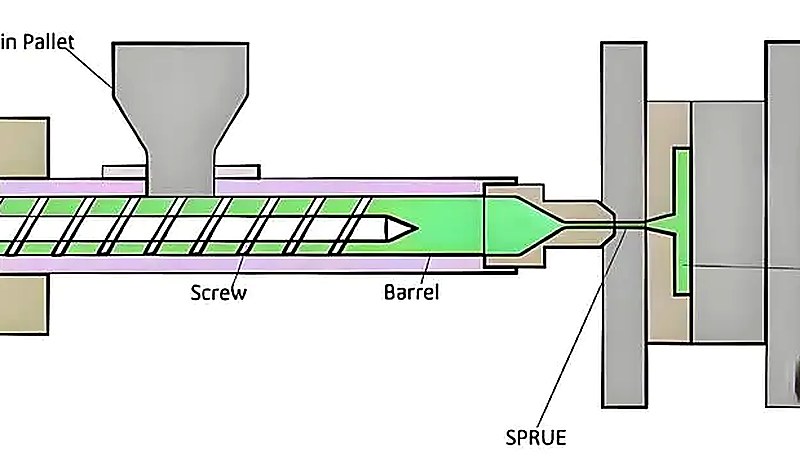
The key components of an injection molding machine are the main categories or options explained in this section. An injection molding machine consists of three primary systems: the injection unit (hopper, barrel, screw, nozzle), the clamping unit, and the mold itself.
An injection molding machine consists of two main units: the injection unit and the clamping unit. The injection unit starts with the hopper, which stores and feeds plastic pellets into the system via gravity. Below that sits the barrel, a heated cylinder containing the reciprocating screw — the heart of the injection system. This screw serves dual purposes: it rotates to melt and mix the plastic, then slides forward like a plunger to inject the molten material. The screw’s L/D ratio (length to diameter) typically ranges from 18:1 to 24:1, with longer screws providing better mixing but requiring more energy.
Heater bands wrapped around the barrel maintain precise temperature zones — usually 3-5 zones from feed throat to nozzle — allowing for optimal material processing. The nozzle connects the barrel to the mold, creating a seal that prevents material leakage during injection. The clamping unit holds and operates the mold itself, which consists of two halves: the stationary side (containing the sprue bushing) and the moving side (containing the ejector system). Clamping systems use either toggle mechanisms for speed and energy efficiency, or straight hydraulic systems for maximum force and precision. The ejector system includes ejector pins, return pins, and ejector plates that work together to push finished parts from the mold cavity.
Shot size — the maximum volume of material the machine can inject in one cycle — determines what part sizes you can produce, typically ranging from a few grams on small machines up to several kilograms on large industrial units.
What Plastic Materials Are Commonly Used in Injection Molding?
This section is about plastic materials are commonly used in injection molding and its impact on cost, quality, timing, or sourcing risk. The most commonly injection-molded thermoplastics include polypropylene (PP), ABS, polycarbonate (PC), nylon (PA), and polyethylene (PE) — each selected for specific mechanical and thermal properties.
Injection molding primarily uses thermoplastics — materials that soften when heated and harden when cooled, allowing for repeated processing cycles. Unlike thermosets which cure permanently and can’t be remelted, thermoplastics offer the flexibility essential for injection molding. The most common materials each serve specific applications based on their properties. Polypropylene (PP) dominates due to its chemical resistance and low cost, making it perfect for food containers, automotive interior parts, and medical devices. ABS combines strength with easy processing, explaining why it’s the go-to choice for computer housings, toys, and automotive trim. Polycarbonate (PC) offers exceptional impact strength and optical clarity, ideal for safety glasses, phone cases, and automotive headlight lenses.
Polyamide (Nylon) provides superior wear resistance and strength, making it essential for gears, bearings, and structural components. Polyethylene (PE) comes in various densities for applications from grocery bags to fuel tanks. Polyoxymethylene (POM) delivers precision and dimensional stability for mechanical parts like zippers and gears. Polybutylene terephthalate (PBT) offers excellent electrical properties for connectors and switches. At the high-performance end, PEEK withstands extreme temperatures and chemicals, commanding premium prices for aerospace and medical implant applications. Material selection is the single most critical decision affecting part quality, performance, and cost — get this wrong, and even perfect processing won’t save your project.
Each material has its own processing temperature range, mold shrinkage characteristics, and mechanical properties that must align with your part’s requirements and operating environment.
Over 20+ years, we’ve processed more than 400 plastic materials — and material selection is the single decision that makes or breaks a project. Our engineers can recommend the right resin based on your part’s mechanical, thermal, and chemical requirements.
How Do You Design an Effective Mold for Injection Molding?
This section is about design an effective mold for injection molding and its impact on cost, quality, timing, or sourcing risk. Effective mold design balances gate placement, cooling channel layout, draft angles, and wall thickness uniformity — decisions that determine roughly 70% of final part quality.
Design dello stampo determines roughly 70% of your part quality, making it the foundation of successful injection molding. The most common mold types are two-plate molds (simple, cost-effective), three-plate molds (better gate flexibility), and hot runner systems (eliminate waste, faster cycles). Gate selection and placement critically affect part quality — edge gates work well for flat parts, sub-gates minimize gate marks on visible surfaces, direct gates handle thick sections, and hot-tip gates eliminate manual gate removal. Draft angles of 1-3 degrees are essential on all vertical surfaces to allow easy part ejection; without proper draft, you’ll damage parts or wear out ejector systems.
Wall thickness uniformity prevents sink marks and warpage — maintain consistent thickness around 60-80% of nominal wall thickness, and transition gradually between different thicknesses. Cooling channel design directly impacts cycle time and part quality. Channels should maintain 8-12mm diameter, stay within 40mm of any molded surface, and follow the part contour as closely as possible. Cooling time often represents 60-80% of total cycle time, so efficient cooling design dramatically improves productivity. Venting prevents burn marks and short shots by allowing trapped air to escape — vent depths of 0.025-0.075mm along parting lines and at flow fronts are typically sufficient.
The most effective stampo a iniezione3 design requires understanding how molten plastic flows through the mold cavity, considering factors like injection pressure drop, shear heating, and material orientation. Experienced mold makers know that seemingly minor design details — like the radius on a sharp corner or the depth of a texture — can make the difference between a trouble-free production run and constant quality headaches.

With our in-house mold manufacturing facility producing 100+ mold sets per month, we’ve seen firsthand how mold design decisions ripple through the entire production run — from cycle time to defect rates.
“A multi-cavity mold can produce dozens of identical parts in a single injection cycle.”Vero
Multi-cavity molds are standard in high-volume production. Depending on part size and machine capacity, molds with 8, 16, 32, or even 64 cavities can produce identical parts simultaneously, dramatically reducing per-part cycle time and manufacturing cost.
“Thicker walls always produce stronger injection molded parts.”Falso
Excessively thick walls actually cause sink marks, voids, and longer cooling times — often resulting in weaker parts. Engineers typically aim for uniform wall thickness between 1.5mm and 4mm, using ribs and gussets to add strength without increasing wall thickness.
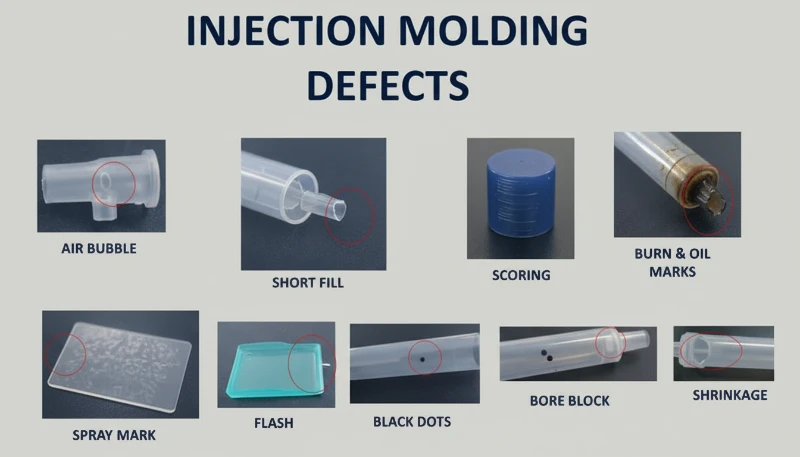
What Are the Most Common Injection Molding Defects and How Do You Prevent Them?
The most common injection molding defects are short shots, flash, sink marks, warpage, weld lines, jetting, and burn marks. Every injection molding defect has a root cause, and knowing these patterns saves time and money during production troubleshooting. Short shots appear as incomplete parts where plastic didn’t fill the entire cavity — usually caused by insufficient injection pressure, low melt temperature, or inadequate venting. Increase injection pressure by 10-15% or raise barrel temperature by 10-20°C to improve flow. Flash occurs when excess material squeezes out along parting lines, typically from worn molds, insufficient clamping pressure, or excessive injection pressure.
Check that clamping force exceeds 2-5 tons per square inch of projected part area. Sink marks create visible depressions on part surfaces when wall thickness exceeds 4mm without proper rib design or when cooling isn’t uniform.
Reduce wall thickness to under 3mm or add ribs to maintain structural strength. Warpage causes parts to twist or bend after ejection, usually from uneven cooling, residual stress, or asymmetric part geometry. Balance cooling channels and gate locations to ensure uniform heat removal. Weld lines form visible marks where two plastic flow fronts meet, weakening the part at that location. Optimize gate placement to control flow patterns and increase melt temperature by 15-25°C to improve weld line strength.
Jetting creates snake-like surface defects when high-velocity plastic creates turbulent flow through gates. Reduce injection speed initially, then ramp up gradually during cavity filling.
Burn marks appear as black or brown discoloration from overheating due to excessive injection speed, trapped air, or poor venting. Reduce injection speed and improve mold venting with 0.025mm deep vents along parting lines. Understanding these defect patterns helps you diagnose problems quickly instead of adjusting random parameters hoping for improvement.
How Much Does Injection Molding Cost for a New Project?
This section is about much does injection molding cost for a new project and its impact on cost, quality, timing, or sourcing risk. Injection molding costs split into upfront mold tooling ($3,000–$100,000+) and per-part production ($0.10–$5.00), with total cost-effectiveness depending on production volume.
Injection molding costs break down into two main categories: upfront mold investment and ongoing per-part production costs. Mold costs range dramatically based on complexity — simple single-cavity molds start around $3,000-$8,000, while complex multi-cavity production molds with hot runners can exceed $100,000. Family molds (multiple different parts in one mold) typically cost 60-70% of what separate molds would cost. Per-part costs depend on material expense (typically $0.50-$3.00 per pound), cycle time (affecting labor and machine costs), and production volume. A simple part might cost $0.05-$0.20 each in high volumes, while complex parts with expensive materials can reach $5-$20 per piece.
The volume break-even point where injection molding becomes cost-effective compared to other processes typically falls around 1,000-5,000 parts, depending on part complexity and size. Beyond 10,000 parts, injection molding usually dominates economically. Total cost of ownership (TCO) includes mold maintenance, material handling, quality control, and potential design changes. Smart buyers consider the complete picture: a $20,000 mold that runs trouble-free for 500,000 parts often costs less than a $8,000 mold requiring constant maintenance and producing 10% scrap rates. Geographic location significantly impacts costs — domestic molding offers faster communication and shorter lead times but typically costs 2-3x more than overseas production.
The key is matching your volume, timeline, and quality requirements to the right manufacturing approach rather than simply chasing the lowest initial quote.
How Do You Start Your First Injection Molding Project?
This section is about start your first injection molding project and its impact on cost, quality, timing, or sourcing risk. Starting an injection molding project requires seven steps: define requirements, select material, find a supplier, prototype, review DFM, run T1 sampling, then enter production.
Starting your first injection molding project successfully requires following a proven sequence that prevents costly mistakes. (1) Define requirements clearly: specify dimensions, tolerances, material properties, production volume, and delivery timeline. Vague requirements lead to expensive misunderstandings later. (2) Material selection comes next — consider mechanical properties, chemical resistance, temperature requirements, and regulatory compliance. Don’t just pick the cheapest option; material changes after mold completion are expensive. (3) Find a qualified supplier through referrals, industry directories, or trade shows. Look for injection molding complete guide experience in your industry, appropriate machine sizes, and quality certifications like ISO 9001.
(4) Create prototypes using 3D printing or soft aluminum tooling to validate design and fit before committing to production molds.
This step catches 80% of design issues early when they’re cheap to fix. (5) Conduct a thorough design for manufacturability (DFM) review with your molder’s engineers. They’ll identify potential molding challenges, suggest design improvements, and optimize the part for injection molding. (6) T1 sampling involves producing first articles from the production mold to verify dimensions, appearance, and performance. Plan for 2-3 sampling rounds to fine-tune the process. (7) Production approval and launch should include documented process parameters, quality control procedures, and packaging specifications. When choosing between domestic and overseas manufacturing, consider total project costs including tooling, shipping, communication overhead, and inventory carrying costs. Domestic suppliers excel for prototypes, small volumes, and complex projects requiring frequent communication.
Overseas suppliers work well for large volumes, simple parts, and cost-sensitive projects where you can afford longer development cycles and inventory investment.
-
injection molding: injection molding refers to a manufacturing process that produces parts by injecting molten material into a mold. ↩
-
cycle time: cycle time refers to the total time required to complete one injection molding cycle, from mold closing to part ejection. ↩
-
injection mold: injection mold refers to a custom-designed metal tool used in injection molding to form molten plastic into the desired shape. ↩
Domande frequenti
What is the minimum production volume for injection molding to be cost-effective?
Injection molding becomes cost-effective at around 1,000–5,000 units for simple parts, but the real break-even depends on part complexity and mold cost. For complex parts with expensive molds, you may need 10,000+ units. At volumes under 500, consider 3D printing or urethane casting as alternatives. The key is calculating total cost per part including mold amortization — if that number works for your budget, you’re ready for production. For small-batch production under 500 units, 3D printing or urethane casting may offer better economics with zero tooling investment. Many companies start with a prototype phase using additive manufacturing, then transition to injection molding once demand stabilizes and volumes justify the upfront tooling cost.
How long does it take to build an injection mold?
A standard two-plate mold takes 4–6 weeks. Complex molds with side actions, hot runners, or tight tolerances can take 8–12 weeks. At ZetarMold, our in-house mold manufacturing facility produces 100+ mold sets per month, and we can expedite simple molds to 2–3 weeks for urgent projects. The timeline depends on mold complexity, material hardness, and the number of cavities. The timeline also includes design review iterations, material procurement for the mold base and cores, and initial sampling. Rush orders are possible but come with premium pricing and increased risk of design issues that could require costly modifications later.
What is the typical cycle time in injection molding?
Cycle times range from 5 seconds for small, thin-wall parts to over 60 seconds for large, thick-wall parts. The cooling phase typically accounts for 50–70% of the total cycle time. Wall thickness is the biggest driver — doubling wall thickness can quadruple cooling time. Experienced molders optimize gate placement, cooling channel design, and melt temperature to minimize cycle time without sacrificing quality. For high-volume commodity parts like bottle caps, optimized systems achieve cycle times under 3 seconds. Multi-cavity molds and hot runner systems help maximize output per cycle, making cycle time optimization one of the most impactful levers for reducing per-part manufacturing costs.
Can injection molding produce transparent parts?
Yes — transparent parts are commonly molded using PMMA (acrylic), PC (polycarbonate), and clear ABS. The key challenges are eliminating flow marks, weld lines, and internal stresses that cause haze. Mold surface finish must be polished to SPI A-1 or A-2 standard, and processing parameters (especially melt temperature and injection speed) must be tightly controlled. Medical and optical applications require the highest clarity standards. Post-molding processes like vapor polishing or flame treating can further improve optical clarity on specific materials. Designers should also consider that transparent parts show every defect — gate marks, weld lines, and sink marks are far more visible than in opaque materials.
What is the difference between hot runner and cold runner molds?
Hot runner molds use heated channels to keep plastic molten between the nozzle and cavity, eliminating runner waste and reducing cycle time — ideal for high-volume production. Cold runner molds have unheated channels that produce solidified runners which must be separated and often reground. Hot runner tooling costs 30–50% more upfront but saves material and cycle time at scale. For runs under 100,000 parts, cold runner is usually the more economical choice. Hybrid systems also exist, combining hot and cold runner elements to balance cost and efficiency. The choice significantly impacts material waste, cycle consistency, and part quality — making it one of the most important mold design decisions alongside gate placement and cooling strategy.
How precise can injection molded parts be?
Standard injection molding achieves tolerances of ±0.1mm (±0.005″) for dimensions under 25mm. With precision molding and process optimization, tolerances can reach ±0.025mm for critical features. Factors affecting precision include material shrinkage (typically 0.5–2.5%), mold accuracy, and process consistency. Tight-tolerance parts require more expensive tooling, in-process monitoring, and often statistical process control (SPC) during production. Consistency across production runs matters as much as absolute accuracy. Process monitoring with cavity pressure sensors and statistical process control helps maintain tight tolerances throughout multi-thousand-unit production runs, catching drift before it produces out-of-spec parts.
What certifications should I look for in an injection molding supplier?
At minimum, look for ISO 9001 (quality management). For medical parts, ISO 13485 is mandatory. Automotive suppliers should have IATF 16949. Environmental certifications like ISO 14001 and ISO 45001 indicate responsible manufacturing practices. Always request current certificates and audit reports. A qualified supplier should also provide material certifications (COAs), dimensional inspection reports, and process capability data (Cpk values) for critical dimensions. Beyond certifications, evaluate a supplier’s track record with similar parts, their engineering capabilities for design support, and their willingness to provide transparency into their process. Factory audits, sample inspections, and reference checks from existing customers provide more insight than certificates alone.
Ready to start your injection molding project? Our engineering team at ZetarMold has 20+ years of experience, 47 machines from 90T to 1850T, and expertise in 400+ materials. Get a free DFM review and competitive quote — we’ll help you avoid costly mistakes before they happen.


