Injection molding is a manufacturing process used to make plastic parts. The process involves injecting molten plastic into a mold, which is then cooled and hardened to form the desired shape. In this blog post, we will discuss the steps of injection molding in detail.

What is injection molding?
Injection molding is also known as injection molding, which is an injection and molding method.
The advantages of the injection molding method are fast production speed, high efficiency, automatic operation, variety of colors, simple to complex shapes, large to small sizes, and accurate product dimensions.
The products of injection molding are easy to be renewed and can be made into complex-shaped parts, so injection molding is suitable for mass production and complex-shaped products.
At a certain mold temperature, the plastic material is completely molten by screw mixing, injected into the mold cavity with high pressure, and then cured by cooling to obtain the molded product.
This method is suitable for the mass production of complex-shaped parts and is one of the important processing methods.

What is the injection molding process?
Injection molding is the process of using the thermophysical properties of plastics to add materials from the hopper into the barrel, which is heated by the heating ring outside the barrel to melt the materials.
The material is gradually plasticized, melted, and homogenized by the dual action of external heating and screw shearing.
When the screw rotates, the material is pushed to the head of the screw under the action of the friction and shear force of the screw groove, which has been molten. At the same time, the screw recedes under the counteraction of the material, so that the screw head forms a storage space to complete the plasticizing process.
Then, the screw injects the molten material in the storage space into the mold cavities through the nozzle at high speed and high pressure under the action of the piston thrust of the injection cylinder.
After the molten material in the cavity is pressurized, cooled, and cured, the mold is opened under the action of the mold closing mechanism, and the shaped product is ejected from the mold by the ejector device.
Simply speaking, injection molding is divided into three stages: melt plasticization, injection molding, and cooling and shaping.

The four elements of injection molding
Injection molding machine
Plastic raw materials
Molding conditions
Injection molding machine operation flow
Auxiliary work – mold closing – seat into – injection – holding pressure – cooling (melt glue pumping) – seatback – mold opening – eject – take the product – top back – injection molding machine cycle process

The injection molding process steps
1. Clamping
After confirming that there is no foreign matter in the mold or the insert is installed in place without loosening, close the front safety door and start to close the mold. Clamping Before the mould is injected with material, both halves of the mould have to be closed. They are closed by a clamping unit.
When the moving mold and the fixed mold are close to each other, the power ejection system and hot runner systems of the mold closing mechanism will be automatically changed to low pressure and low speed (test closing pressure), and then switch to high pressure to lock the mold when it is confirmed that there is no foreign matter in the mold and the insert is not loose.
2. Seating in
This action is generally only available at the beginning of the trial mold or when special materials are injected. During normal production, most of the injection seats are fixed.
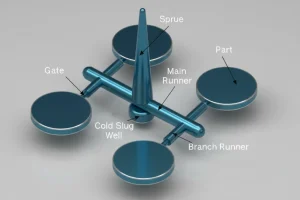
After confirming that the mold has reached the required locking level, the injection seat is moved forward so that the nozzle fits the mold gate and connects the nozzle-mold runner-mold cavity channel.
3. Injection
After confirming the nozzle and mold, the screw applies pressure to the molten material and injects the molten material at the front of the barrel into the mold cavity at high pressure and high speed, finally filling the cavity with molten material.
Injection filling is the first step in the whole injection cycle, and the time is counted from the start of the injection process when the mold is closed until the mold cavity is filled to about 95%.
Theoretically, the shorter the filling time, the higher the molding efficiency, but in practice, the molding time or injection speed is subject to many conditions.

4. Holding pressure
After the molten material is filled with the mold cavity, the screw still maintains a certain pressure on the molten material to prevent the molten material in the mold cavity from backflowing and to replenish the molten material inside the mold cavity due to the cooling process and shrinkage of the material required to ensure the denseness of the product, dimensional accuracy, good mechanical properties, the screw moves forward in a small amount when holding pressure.
The role of the holding pressure stage is to continuously apply pressure to compact the melt and increase the density of the plastic (densification) to compensate for the shrinkage behavior of the plastic.
During the holding pressure, the backpressure is high because the mold cavity is already filled with plastic. In the process of holding pressure compaction, the injection molding machine screw can only slowly move forward for a small movement, and the flow rate of plastic is also slower, which is called holding pressure flow.
As the plastic is cooled and cured by the mold wall, the viscosity of the melt increases quickly, so the resistance in the mold cavity is great.
At the later stage of holding pressure, the density of the material continues to increase and the molded part is gradually formed. The holding pressure stage should continue until the gate is cured and sealed, at which time the cavity pressure of the holding pressure stage reaches the highest value.

5. Cooling (melt glue extraction)
When the holding pressure is carried out until the melt in the open mold cavity loses the possibility of flowing back from the gate (i.e. the gate is solidified), then the pressure can be removed. The product continues to cool, the screw rotates, and the plastic pellets that fall from the hopper into the barrel are conveyed forward with the screw rotation.
In this conveying process, the material is gradually compacted, in the barrel screw outside the heating and screw friction heat, the material is gradually molten plasticized finally viscous flow state, and establish a certain pressure so that the screw in the rotation of the same time back.
When the screw recedes to the metering valve, the screw stops plasticizing and prepares the material for the next injection unit. Adjusting the back pressure makes the material denser, excludes water and low molecular substances, and plasticizes more evenly.
Move backward for a distance when the plasticizing rotation is stopped to reduce the front-end melt pressure and to prevent material saliva at the nozzle. Melt pumping and product cooling are simultaneous, and generally, this injection time does not exceed the product cooling time.
In injection molding molds, the design of the cooling system is very important. This is because the molded plastic products can only be cooled and cured to a certain rigidity, and the deformation of plastic products due to external forces can be avoided after demolding.
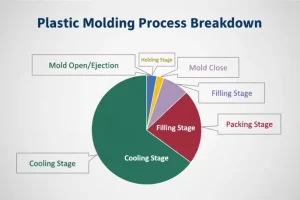
Since cooling time accounts for about 70% to 80% of the entire molding cycle, a well-designed cooling system can significantly reduce molding time, increase injection molding productivity and reduce costs.
Improperly designed cooling systems will make the molding time longer and increase the cost; uneven cooling will further cause warping and deformation of plastic products.
6. Seat backing
After the screw plasticizing metering, sometimes to make the nozzle does not form cold material, the nozzle needs to be removed from the mold, it will be used for the seatback action.
This action is used in conjunction with the melt action, there are three types of melt: fixed melt, before they melt, after the melt, usually use fixed melt, and before the melt.
7. Cooling
Product cooling and screw plasticization in time is usually overlapping, generally, cooling time is longer than the melting time.
The product must be cooled to below the glass transition temperature of the material before opening the mold so that the product will not be deformed when it is ejected.
8. Mold opening
The product is opened in time after sufficient cooling to shorten the molding cycle and improve production efficiency.
The initial high pressure and low speed of mold opening make the product out of the fixed mold, followed by medium injection pressure and high speed, turning to low pressure and low speed before the termination of mold opening to prevent impact, and terminating the mold opening action when the distance of mold opening is enough for the product to be ejected and taken out.
9. Ejecting
When the confirmation of mold opening is in place, the ejector mechanism action ejects the product out of the mold.
10. Take out the product
In semi-automatic, the sprues and all products are taken out manually by the operator; in fully automatic, the sprues and products or product sprues are taken out by a robot and fall reliably and automatically.
11. Ejector retreat
When the product is released from the mold, the ejector rod pin is retracted to the original position.

How to estimate the injection molding cycle time?
The above standard steps of the injection molding cycle can be repeated to produce products in a batch cycle.
If the product structure is not special, the injection time is about 6 seconds, the holding time is 10 seconds, the cooling time is 25 seconds, the opening time plus the ejecting time is 3 seconds, and the robotic pickup time is 3 seconds, and if the manual pickup time is 6 seconds.


