 Skip to content
Stereolithography (SLA) 3D Printing Services
Unlock precision with Stereolithography (SLA) 3D printing. Discover quality and innovation today.
The Complete Guide to Stereolithography (SLA) 3D Printing
What is SLA 3D Printing and Why Does It Matter?
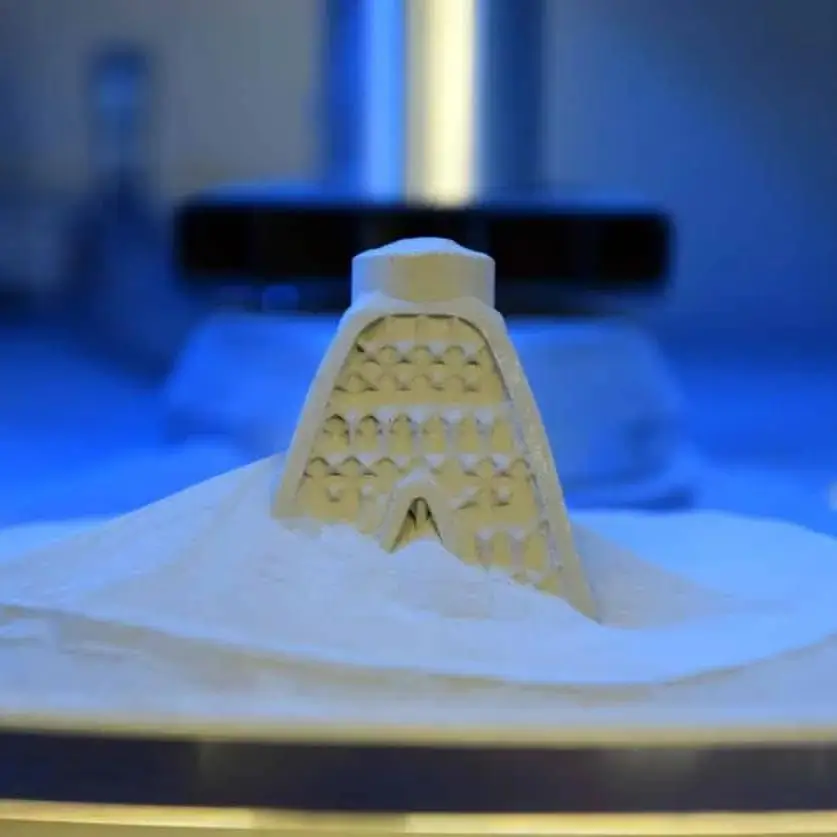
Stereolithography, commonly known as SLA, is a powerful additive manufacturing process that belongs to the vat photopolymerization family. Invented by Chuck Hull in the 1980s, it was the very first commercialized 3D printing technology, laying the groundwork for the entire industry. The core principle of SLA involves using a concentrated beam of ultraviolet (UV) light, typically a laser, to selectively cure and solidify a liquid photopolymer resin layer by layer, building a three-dimensional object from a digital design.
At its heart, SLA is a photochemical process. It starts with a vat of liquid, UV-sensitive photopolymer resin. A UV laser, precisely guided by a system of mirrors called galvanometers, traces the cross-sectional geometry of a single layer of a 3D model onto the surface of this resin. The focused UV energy triggers a chemical reaction—polymerization—instantly turning the liquid resin into a solid plastic. After one layer is complete, the build platform moves by a minuscule amount, and the process repeats until the entire object is formed. This method is what allows SLA to produce parts with a level of detail and surface quality that many other technologies cannot match.
Why SLA is a Cornerstone of Modern Manufacturing?
SLA matters because it sets the industry standard for high-fidelity prototypes and parts. Its ability to produce features as small as a few dozen microns with an incredibly smooth, almost injection-molded-like surface finish makes it indispensable for applications where aesthetics and fine details are paramount.
From medical devices to consumer electronics, SLA has become a critical tool for innovation. It accelerates the product development cycle by enabling rapid iteration. A designer can have a physical part in hand within hours or days, rather than weeks or months. This rapid feedback loop allows for better, more refined products to reach the market faster. Its versatility in materials, including biocompatible, castable, and high-temperature options, has opened up new possibilities in fields like dentistry, jewelry, and specialized engineering, solidifying its position as a vital, not just a historical, technology.
- Visual Prototypes: It allows designers and engineers to create realistic “look and feel” models that accurately represent the final product’s appearance.
- Form and Fit Testing: The high accuracy of SLA ensures that parts can be used for verifying assembly clearances and mechanical interfaces before committing to expensive tooling.
- Complex Geometries: SLA can create intricate internal channels, complex organic shapes, and delicate features that are impossible to produce with traditional subtractive methods like CNC machining.
How Does SLA 3D Printing Work Step by Step?
Understanding the SLA process is key to appreciating its capabilities. The journey from a digital file to a physical object is a meticulous, highly controlled sequence of events.
Step 1: 3D Model Preparation and Slicing:
The process begins with a 3D digital model, typically created in Computer-Aided Design (CAD) software. File Format and Slicing:
- Exporting the Model: The CAD model is exported in a 3D-printable file format, most commonly STL (Standard Tessellation Language) or OBJ. This format represents the 3D model’s surface as a mesh of triangles.
- Slicing Software: The STL file is then imported into specialized “slicing” software. This software digitally “slices” the model into hundreds or thousands of thin, horizontal layers.
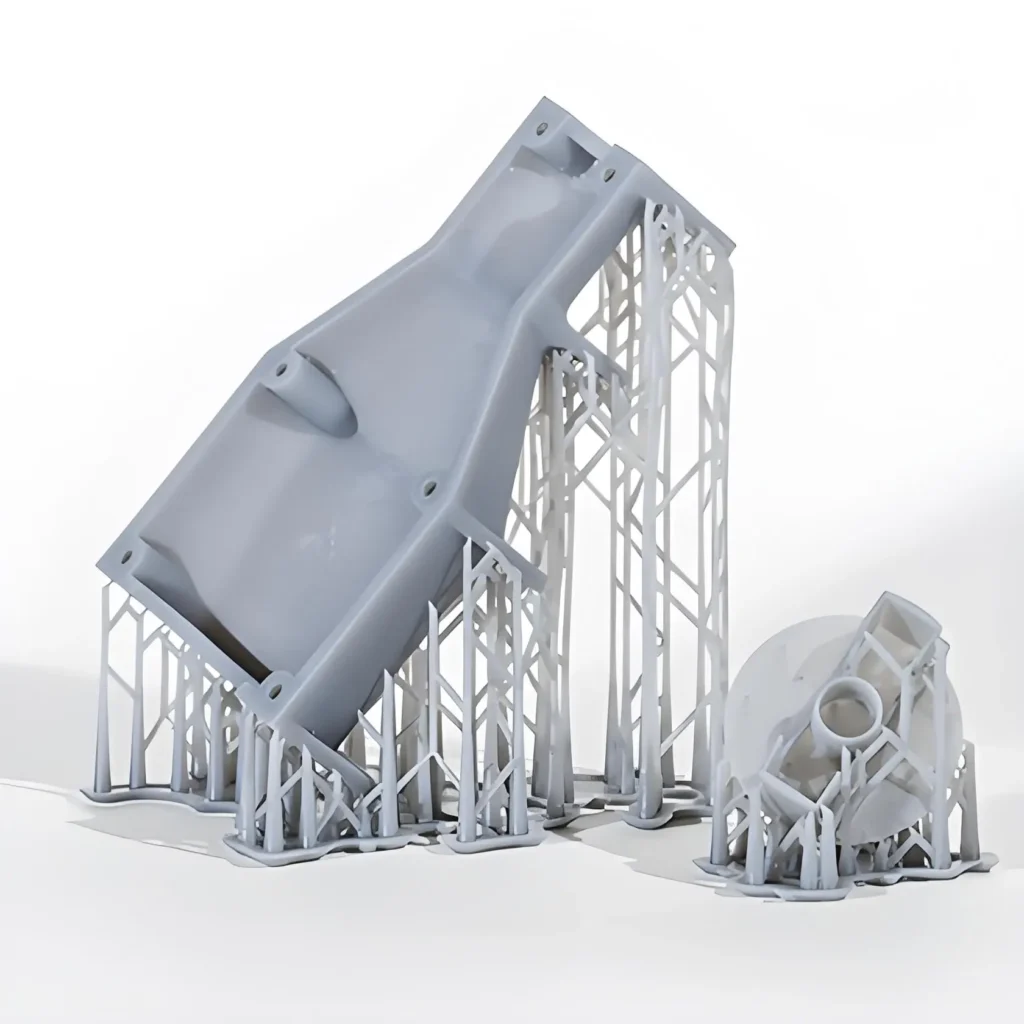
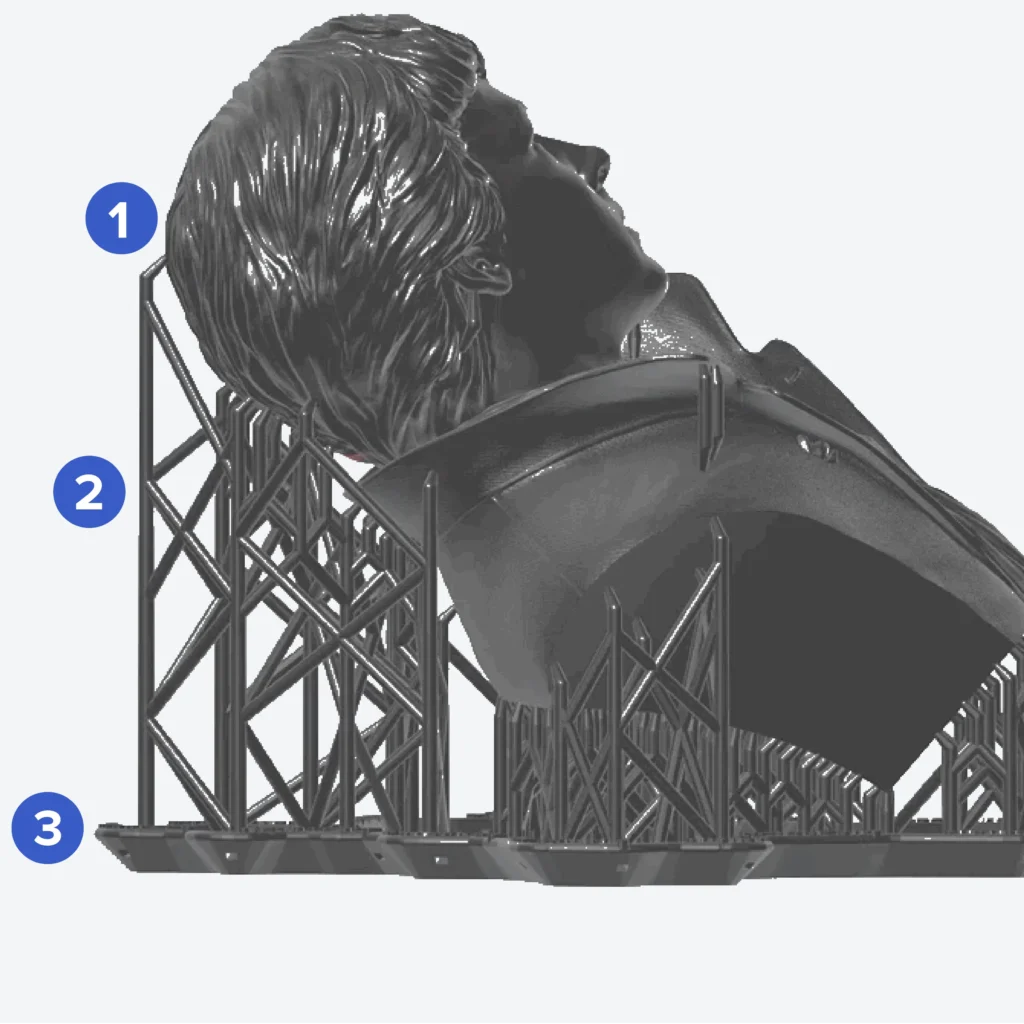
- Orientation and Supports: In this stage, the operator or designer orients the part within the virtual build volume to optimize for print time, surface quality, and strength. The software then automatically generates necessary support structures—thin, lattice-like stilts that anchor the part to the build platform and support overhangs and islands to prevent them from drooping or detaching during the print.
Step 2: Machine Setup and Material Preparation:
Before the print can begin, the SLA machine must be prepared. Pre-Print Checklist:
- Resin Vat: The resin tank, or vat, is filled with the chosen liquid photopolymer resin. It’s crucial to ensure there are no bubbles or cured particles from previous prints.
- Build Platform: The build platform is securely installed and precisely calibrated to ensure it is perfectly level and at the correct starting height relative to the resin surface.
- File Upload: The sliced file, now containing the layer-by-layer instructions (G-code), is sent to the 3D printer.
Step 3: The Layer-by-Layer Curing Cycle:
This is the core of the SLA printing process, repeated for each layer of the object. The Printing Loop:
- Initial Layer Adhesion: The build platform lowers into the resin vat, leaving a space equal to the layer height (typically 25-100 microns) between the platform and the bottom of the vat.
- Laser Curing: The high-precision UV laser is activated. Directed by computer-controlled galvanometers, it rapidly scans the cross-section of the first layer, solidifying the resin it touches.
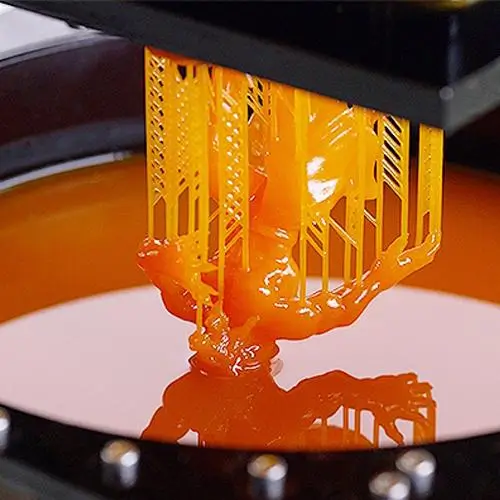
- Platform Movement: Once the layer is fully cured, the build platform moves upwards (in most modern “inverted” SLA systems), peeling the newly formed solid layer away from the bottom of the vat.
- Resin Recoating: A recoater blade or mechanism sweeps across the vat to ensure a fresh, smooth, and consistent layer of liquid resin is ready for the next pass.
- Repetition: The build platform lowers again, and the laser cures the next layer, fusing it to the one below. This cycle continues until the part is complete.
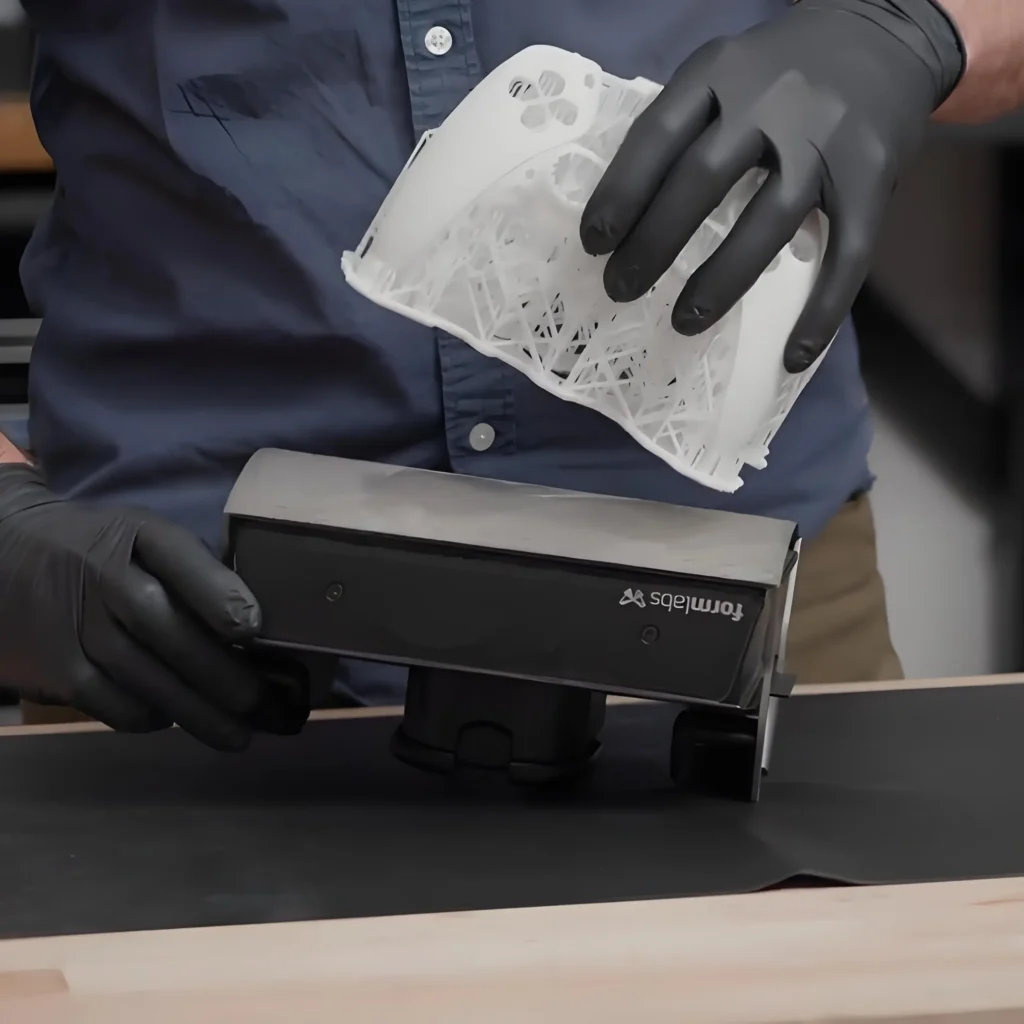
Step 4: Part Removal and Initial Cleaning:
Once the final layer is printed, the build platform rises out of the resin vat, revealing the finished part, which is now referred to as a “green” part. It is still coated in uncured liquid resin and has not yet reached its final mechanical properties. The operator carefully detaches the part and its support structures from the build platform, ready for the essential post-processing workflow.
What Materials Are Used in SLA Printing?
The versatility of SLA is largely defined by its wide range of photopolymer resins. These are thermosetting polymers, meaning that once cured, they cannot be melted back into a liquid form. Each type of resin is formulated with specific additives to achieve distinct mechanical, thermal, and visual properties.
1. Understanding Photopolymer Resins:
SLA resins are complex chemical mixtures. The primary components are:
- Monomers and Oligomers: The fundamental building blocks of the plastic.
- Photoinitiators: Molecules that absorb UV light and kickstart the polymerization reaction.
- Additives: Fillers, pigments, and other chemicals that modify the properties of the final material (e.g., toughness, flexibility, color, heat resistance).
2. Common Types of SLA Resins and Their Applications:
① Standard Resins:
- Properties: These are the general-purpose workhorses of SLA. They offer extremely high resolution, a very smooth surface finish, and are excellent for capturing fine details. However, they tend to be relatively brittle and have low impact strength and thermal resistance.
- Applications: Ideal for visual prototypes, concept models, art, figurines, and parts where aesthetics are more important than mechanical performance.
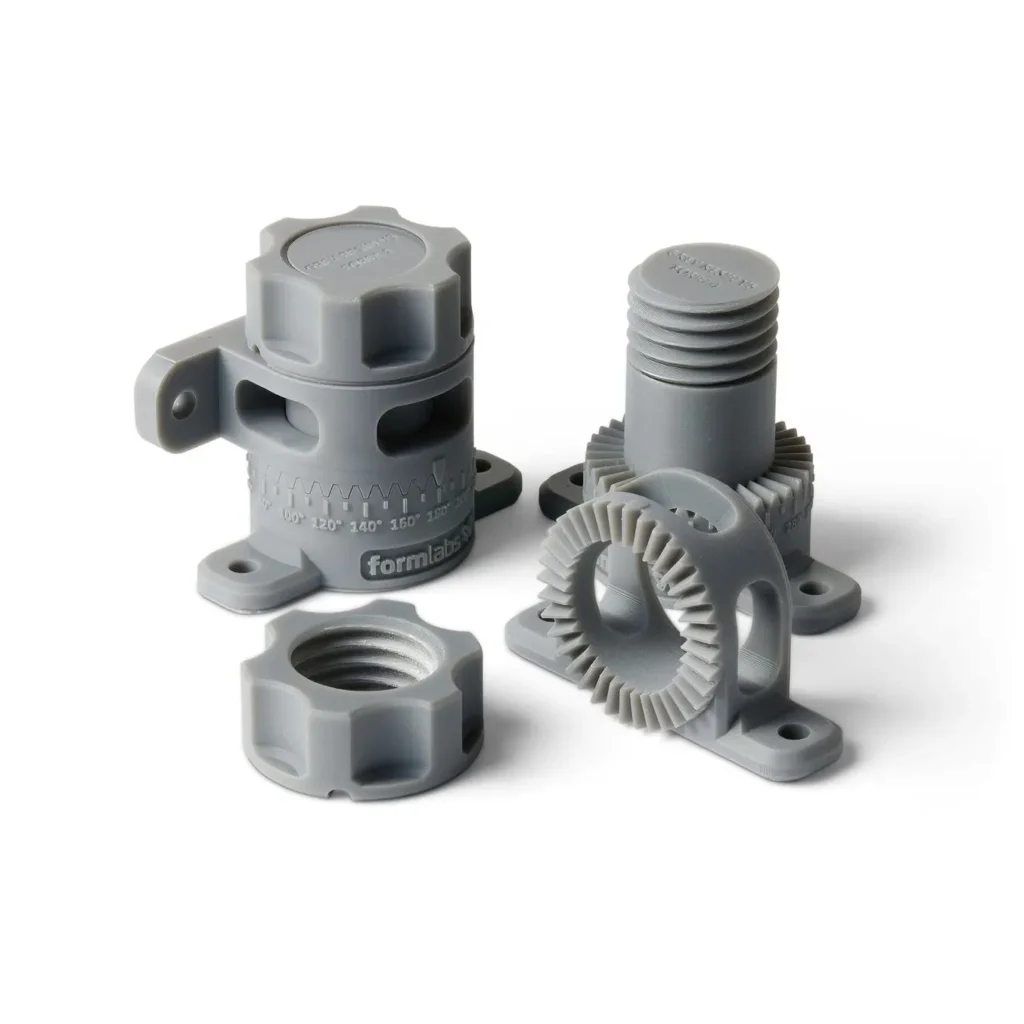
② Engineering Resins (Tough & Durable):
- Properties: Formulated to simulate common engineering thermoplastics like ABS and PP. These resins offer a superior balance of strength, stiffness, and impact resistance. “Tough” resins are designed to withstand stress and strain, while “Durable” resins offer high wear resistance and flexibility.
- Applications: Functional prototypes, jigs and fixtures, snap-fit enclosures, and end-use parts that require robust mechanical performance.
③ Flexible and Elastic Resins:
- Properties: These materials mimic the properties of rubber or silicone, with varying degrees of flexibility and elasticity measured by Shore hardness (e.g., 50A, 80A). They can be repeatedly bent, stretched, and compressed.
- Applications: Gaskets, seals, soft-touch grips, wearables, anatomical models for surgical simulation, and prototyping of elastomeric products.
④ Castable Resins:
- Properties: This specialized resin is designed with a high wax content. The key property is its clean “burnout” during the investment casting process—it turns into ash and gas with minimal residue when heated in a kiln. This leaves a perfect cavity in the investment mold.
- Applications: The go-to material for the jewelry industry (creating master patterns for rings, pendants) and dentistry (patterns for crowns and bridges).
⑤ High-Temperature Resins:
- Properties: These resins are engineered to exhibit a high Heat Deflection Temperature (HDT), which is the temperature at which a material begins to deform under a specific load. They can withstand temperatures well over 200°C (392°F) after post-curing.
- Applications: Prototyping injection molds (for short runs), hot air and fluid flow testing fixtures, heat-resistant components, and mounts for lighting and electronics.
⑥ Biocompatible and Medical Resins:
- Properties: Developed for medical and dental applications, these resins are certified for biocompatibility (e.g., ISO 10993) for skin or mucosal membrane contact. They are resistant to sterilization methods like autoclaving.
- Applications: Custom surgical guides, hearing aids, dental models, splints, and other patient-specific medical devices. Strict adherence to manufacturing and post-processing protocols is required.
⑦ Ceramic-Filled Resins:
- Properties: These are composite materials where the polymer resin is filled with ceramic particles. This results in parts that are exceptionally stiff, thermally stable, and have a smooth, matte finish. They are, however, more brittle than other engineering resins.
- Applications: Parts requiring extreme rigidity and thermal stability where brittleness is not a concern, such as wind tunnel models and specialized fixtures.
What Are the Key Advantages of SLA 3D Printing?
SLA’s enduring popularity is due to a unique set of advantages that make it the optimal choice for a wide range of applications.
1. Unmatched Precision and Fine Detail:
The fundamental advantage of SLA lies in its resolution. The laser spot size used in SLA printers is extremely small (often 80-140 microns in diameter), allowing it to draw incredibly fine features and sharp edges. This precision is unmatched by most other printing technologies, particularly FDM, making SLA the gold standard for parts with intricate details.
2. Exceptional Surface Finish:
Because SLA builds parts by curing a liquid, the resulting surfaces are exceptionally smooth and non-porous. The layer transitions are often invisible to the naked eye, giving the final part an appearance similar to one produced by injection molding. This eliminates the need for extensive post-processing to achieve a high-quality finish, saving time and labor.
3. Material Versatility for Specialized Applications:
As detailed in the materials section, the breadth of available SLA resins is a significant advantage. The ability to choose from materials that are tough, flexible, castable, heat-resistant, or biocompatible means that SLA can be used not just for prototyping but for a vast array of functional, end-use applications across diverse industries.
4. Watertight and Isotropic Parts:
The chemical bonding process between layers in SLA creates fully dense, watertight parts right off the printer. Furthermore, this strong chemical bond results in parts that are largely isotropic, meaning their mechanical properties (like tensile strength) are consistent along all three axes (X, Y, and Z). This is a stark contrast to FDM, where parts are anisotropic and significantly weaker along the Z-axis (between layers). This isotropy makes SLA parts more reliable for mechanical applications.
5. Accelerated Product Development Cycles:
For creating a single, high-fidelity prototype, SLA is remarkably fast. It can turn a complex digital design into a tangible object overnight. This speed enables design teams to perform rapid iterations—printing a part, testing it, making design changes, and printing the next version in a continuous loop. This drastically shortens the development timeline, reduces the risk of costly tooling errors, and ultimately leads to better products.
What Are the Limitations or Challenges of SLA Printing?
While powerful, SLA is not without its challenges. A realistic understanding of its limitations is crucial for successful implementation.
1. Higher Material and Operational Costs:
Photopolymer resins are significantly more expensive than the thermoplastic filaments used in FDM printing. The cost per kilogram can be 3 to 10 times higher. Additionally, the machinery itself is more complex, and consumables like the resin tank and build platform have a limited lifespan and require periodic replacement, adding to the overall operational cost.
2. Mandatory and Messy Post-Processing:
SLA parts are not ready to use straight off the printer. They require a multi-step post-processing workflow that is both time-consuming and messy. This includes:
- Washing: The “green” part must be thoroughly washed in a solvent, typically isopropyl alcohol (IPA), to remove all residual uncured resin from its surface.
- Curing: The washed part must then be exposed to UV light and often heat in a specialized curing station to achieve its final, optimal mechanical properties. This workflow requires dedicated equipment, a well-ventilated space, and proper handling of hazardous chemicals.
3. UV Sensitivity and Potential for Brittleness:
Standard SLA resins, in particular, are susceptible to degradation from prolonged exposure to sunlight (UV radiation). Over time, this can cause the parts to become more brittle, change color, and lose their mechanical integrity. While UV-resistant coatings can mitigate this, it’s a key consideration for parts intended for long-term outdoor use. Many standard resins are also inherently more brittle than engineering thermoplastics.
4. Generally Smaller Build Volumes:
5. The Necessity and Impact of Support Structures:
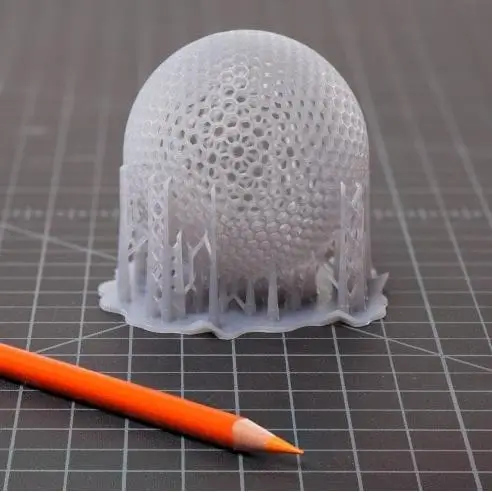
Nearly all SLA prints require support structures to anchor the part to the build platform and to support any overhanging features. These supports are made from the same material as the part itself and must be manually removed during post-processing. This removal process can leave small nubs or marks on the surface that may require careful sanding to create a perfectly smooth finish, adding to the labor time.
How Does SLA Compare to Other 3D Printing Technologies?
Choosing the right 3D printing technology depends entirely on the application’s requirements for cost, speed, material properties, and precision.
1. SLA vs. Fused Deposition Modeling (FDM):
FDM is the most common and accessible 3D printing technology, building parts by extruding a molten thermoplastic filament layer by layer.
① Resolution, Detail, and Surface Finish:
- SLA: Superior. Produces smooth surfaces and captures extremely fine details.
- FDM: Inferior. Visible layer lines are a distinct characteristic, and fine details can be lost due to the nozzle’s larger diameter. Extensive post-processing is often required for a smooth finish.
② Cost and Simplicity:
- SLA: Higher cost for both machine and materials. More complex workflow due to post-processing.
- FDM: Lower cost. Machines and materials are affordable, and the process is simpler with minimal post-processing.
③ Material Properties and Strength:
- SLA: Isotropic parts with good strength, but standard resins can be brittle. Specialized engineering resins offer robust performance.
- FDM: Offers a wide range of durable engineering thermoplastics (e.g., ABS, PETG, Nylon, Polycarbonate). Parts are anisotropic (weaker between layers) but can be very strong and durable.
Fused Deposition Modeling (FDM)
2. SLA vs. Selective Laser Sintering (SLS):
SLS uses a high-power laser to fuse powdered polymer (typically nylon) particles together, layer by layer.
① Detail vs. Functional Strength:
- SLA: Best for fine details and aesthetic prototypes where surface finish is critical.
- SLS: Best for producing strong, durable, and functional parts with excellent mechanical properties, rivaling injection-molded parts. Surface finish is inherently grainy.
② Support Structures:
- SLA: Requires support structures that must be removed.
- SLS: Support-free. The unfused powder surrounding the part acts as a natural support, allowing for the creation of complex, interlocking geometries without the limitations of supports.
③ Cost and Accessibility:
- SLA: Available in both affordable desktop and industrial formats.
- SLS: Primarily an industrial technology with a high cost of entry and significant facility requirements.
Selective Laser Sintering (SLS)
3. SLA vs. Digital Light Processing (DLP) and LCD/MSLA:
DLP and LCD (also called Masked SLA or MSLA) are also vat photopolymerization technologies and are SLA’s closest relatives. The key difference is the light source.
① Light Source and Speed:
- SLA: Uses a laser to trace each layer. Print time is dependent on the complexity and area of each layer.
- DLP/LCD: Use a digital projector (DLP) or an LCD screen with a UV LED array (LCD/MSLA) to flash and cure an entire layer at once. This makes them significantly faster than SLA, especially when printing multiple parts or large, solid parts, as the print time is only dependent on the part’s height (Z-axis).
② Resolution and Voxel Shape:
- SLA: The laser creates a continuous, smooth path. The resolution is defined by the laser’s spot size.
- DLP/LCD: The image is composed of pixels (called voxels in 3D). This can sometimes lead to a “pixelated” or “aliased” effect on curved surfaces, although modern anti-aliasing techniques greatly reduce this. The resolution is defined by the pixel size of the projector or LCD screen.
DLP/LCD
The Ultimate Guide to SLA 3D Printing
Dive into our definitive guide on Stereolithography (SLA) 3D printing. Learn the step-by-step process, material properties, costs, design tips, and key applications.
The Complete Guide to Stereolithography (SLA) 3D Printing
What Design Guidelines Should You Follow for SLA Printing?
Designing for SLA (DfAM – Design for Additive Manufacturing) is crucial to ensure print success, optimize part quality, and minimize cost.
1. Minimum Wall Thickness:
To ensure a part is self-supporting and prints successfully, walls must have a minimum thickness.
- Supported Walls: A minimum thickness of 0.4 mm is generally recommended.
- Unsupported Walls: For vertical walls that need to be rigid on their own, a thickness of at least 0.6 mm is safer. Thinner walls risk warping or failing during the print.
2. Overhangs and Supports:
Any part of a model that overhangs at an angle greater than approximately 45 degrees from the vertical will likely require support structures.
- Design for Self-Support: When possible, design with gentle curves and chamfers (using angles less than 45 degrees) to minimize the need for supports.
- Orientation Strategy: Orient the part in the slicing software to minimize supports on critical cosmetic surfaces, as their removal can leave small marks.
3. Hollowing and Drainage Holes:
Printing large, solid models is expensive and time-consuming. It also increases the risk of print failure due to suction forces during the peel process.
- Hollowing: Use your CAD software to hollow out solid models, creating an internal cavity and saving a significant amount of resin. A wall thickness of 2-3 mm is typically sufficient for the hollowed shell.
- Drainage Holes: It is essential to add at least two drainage holes to your hollowed model. These holes allow uncured resin to escape from the internal cavity during printing and washing. Without them, trapped resin could create pressure and cause the part to crack or burst. Place holes in non-critical areas.
4. Embossed and Engraved Details:
SLA excels at fine details, but there are physical limits.
- Embossed Details (Raised): Should protrude at least 0.2 mm from the surface to be clearly visible.
- Engraved Details (Recessed): Should be at least 0.4 mm wide and 0.4 mm deep to ensure the laser can cure them properly and that liquid resin can be washed out.
5. Tolerances and Assembly:
SLA is highly accurate, but for parts that need to fit together, clearances are essential.
- Clearance: For a slip fit or assembly, design a minimum clearance of 0.1-0.2 mm between mating parts. For a tighter press fit, a smaller clearance of 0.05 mm may be appropriate. It’s always best to print a small test piece to validate tolerances with your specific material and printer.
6. Avoiding "Cupping":
“Cupping” occurs when a hollowed section creates a closed volume facing the build platform, acting like a suction cup during the peeling process. This can cause print failure. Orienting the part differently or adding additional vent holes can resolve this issue.
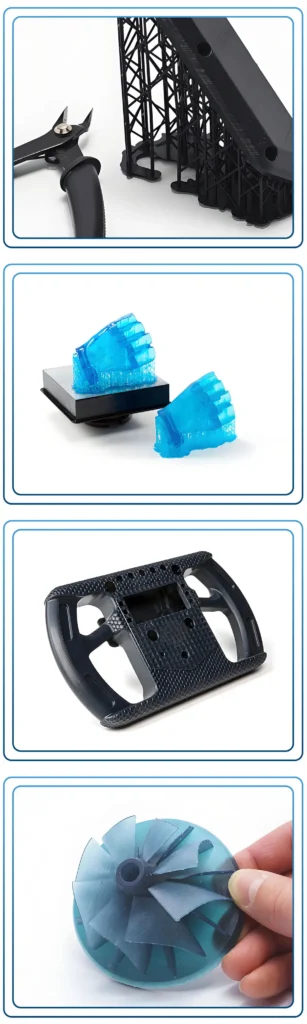
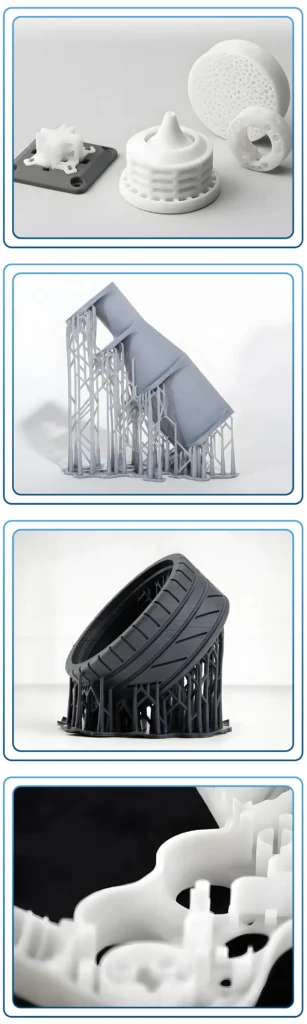
What Are the Common Applications of SLA 3D Printing?
The unique benefits of SLA have made it an indispensable tool across a multitude of industries.
1. Prototyping and Product Development:
This remains the primary application of SLA. Engineers and designers use it to create:
- High-Fidelity Visual Models: Perfect for marketing, focus groups, and investor pitches.
- Form and Fit Prototypes: Verifying that parts assemble correctly and meet ergonomic requirements before investing in mass production tooling.
2. Engineering and Manufacturing:
Beyond prototyping, SLA is used directly on the factory floor for:
- Custom Jigs and Fixtures: Creating highly accurate, custom tools to hold parts during machining or assembly, improving consistency and speed.
- Short-Run Injection Molds: Using high-temperature resins, SLA can produce molds for small batches (50-100 parts) of injection-molded components, drastically reducing tooling costs and lead times for pilot runs.
3. Dentistry:
The dental industry has been revolutionized by SLA due to its precision and the availability of biocompatible materials.
- Surgical Guides: Patient-specific guides for accurately placing dental implants.
- Models for Thermoforming: Creating accurate models of a patient’s teeth to thermoform clear aligners.
- Crowns, Bridges, and Dentures: Creating castable patterns or even directly printing temporary restorations.
4. Jewelry:
SLA, with castable resins, is central to modern jewelry making.
- Investment Casting Patterns: Jewelers print intricate designs, which are then used to create molds for casting precious metals like gold and silver. This allows for unparalleled design freedom and customization.
5. Healthcare and Medical Devices:
- Anatomical Models: Surgeons use highly detailed, patient-specific models printed from CT or MRI scans to plan complex surgeries, reducing time in the operating room and improving patient outcomes.
- Custom Device Housings: Prototyping and producing housings for medical devices where precision and smooth surfaces are critical.
6. Arts, Design, and Entertainment:
- Detailed Figurines and Miniatures: Hobbyists and character designers use SLA to produce highly detailed models that would be impossible to create otherwise.
- Movie Props and Special Effects: Creating detailed, custom props and models for the film industry.
What's the SLA Post-Processing Workflow?
A successful SLA print is only half the battle. Proper post-processing is non-negotiable to achieve the desired aesthetics and mechanical properties.
1. Washing:
The “green” part, fresh off the printer, is coated in a sticky layer of uncured liquid resin. This must be removed.
- Process: The part is submerged and agitated in a solvent, most commonly Isopropyl Alcohol (IPA) with a concentration of 90% or higher. This can be done manually in a container or, more effectively, using an automated wash station that circulates the solvent.
- Goal: To remove all residual resin from the surface and from any internal cavities. Inadequate washing will result in a sticky part and improper curing.
2. Drying:
After washing, the part must be completely dry before curing.
- Process: The part should be left to air-dry, or compressed air can be used to speed up the process. It is crucial to ensure all IPA has evaporated, as trapped solvent can cause surface defects and cracking during curing.
3. UV Post-Curing:
The “green” part is not yet at its full strength. Post-curing is a required step to finalize the polymerization process.
- Process: The clean, dry part is placed in a curing station, which exposes it to a combination of UV light (at a specific wavelength, typically 405 nm) and often heat. The duration and temperature are material-specific.
- Goal: To cross-link the polymer chains fully, maximizing the part’s strength, stiffness, and thermal resistance. Without this step, the part will be weak, tacky, and dimensionally unstable.
4. Support Removal:
This can be done either before or after curing, with trade-offs.
- Before Curing: The part is softer, making supports easier to remove with flush cutters. However, this can leave more significant surface marks.
- After Curing: The part is harder and more brittle, so removal requires more force and care to avoid breaking delicate features. The break points are generally cleaner. Most professionals remove the bulk of supports before curing and perform fine removal after.
5. Optional Finishing:
For a truly perfect finish, additional steps can be taken.
- Sanding: The small marks left by support structures can be wet-sanded with progressively finer grits of sandpaper.
- Polishing: For a glass-like transparent finish on clear resins, polishing is required.
- Priming and Painting: SLA parts take primer and paint very well, allowing for the creation of multi-colored, production-quality models.
How Much Does SLA Printing Cost and How Long Does It Take?
These are two of the most critical practical questions for any business considering SLA. The answers depend on several interconnected factors.
1. Factors Influencing SLA Printing Costs:
① Material Consumption: This is the most direct cost. It is calculated based on the total volume of resin used, which includes not only the part itself but also the resin required for the support structures and potentially a raft (a base structure). Hollowing parts is the most effective way to reduce this cost.
② Machine Time: This cost is related to the depreciation of the SLA printer and the time it is occupied. Unlike some other technologies, machine time in SLA is not primarily dictated by the part’s volume or complexity, but by its height.
③ Labor: SLA is a labor-intensive process. The cost must account for the skilled labor time required for:
- Print preparation (file setup, orientation).
- Machine setup and cleanup.
- The entire post-processing workflow (washing, curing, support removal, and finishing).
④ Part Complexity: While not directly impacting print time as much as height, very complex parts may require more intricate support strategies, more careful handling, and more intensive post-processing, thereby increasing labor costs.
2. Estimating SLA Print Time:
① The Primary Driver (Z-Height): The single most important factor determining print time in SLA is the part’s height along the Z-axis. Because the printer must perform the same sequence of actions (laser curing, platform movement, recoating) for every single layer, a tall part will always take longer than a short part, regardless of its width or volume.
② Other Factors: While Z-height is dominant, other minor factors can influence speed:
- Layer Height: A smaller layer height (e.g., 25 microns) will result in a better surface finish but will increase the total number of layers and thus the print time compared to a larger layer height (e.g., 100 microns).
- Material: Some resins may require slightly longer exposure times per layer, marginally affecting the overall speed.

Why Should You Choose Us for SLA 3D Printing Services?
Navigating the complexities of SLA requires more than just a printer; it requires expertise, precision, and a commitment to quality. Here’s why we are the ideal partner for your SLA 3D printing needs.
We utilize state-of-the-art industrial SLA machines that are meticulously calibrated and maintained. Our printing environment is climate-controlled to ensure resin stability and process repeatability. This guarantees that every part we produce meets the highest standards of dimensional accuracy and surface finish.
With a vast library of standard and advanced engineering resins, our team of experts will work with you to select the perfect material for your specific application. We understand the nuances of each resin’s properties and can provide a consultative approach to ensure your part performs exactly as intended, whether it’s a visual prototype or a functional, end-use component.
Our process is designed for efficiency. From our instant online quoting platform to our optimized post-processing workflow, we minimize lead times without compromising quality. We understand the importance of speed in modern product development and are committed to delivering your parts on time, every time.
We are more than just a printing service. We are a full-service manufacturing partner. Our team can provide Design for Additive Manufacturing (DfAM) feedback to optimize your parts for the SLA process, and our comprehensive finishing services—including sanding, painting, and assembly—mean you can receive parts that are ready for immediate use.
We view our clients as partners. Our goal is to become a seamless extension of your design and engineering team. We pride ourselves on clear communication, transparent pricing, and a dedication to helping you solve your most complex challenges and bring your most innovative ideas to life.
Most Frequently Asked Questions About SLA 3D Printing
The strength of an SLA part is entirely dependent on the resin used. Standard resins tend to be brittle and are best for non-functional models. However, engineering resins (like Tough, Durable, or ABS-like) are formulated for excellent mechanical performance, offering high tensile strength and impact resistance suitable for many functional applications, jigs, and fixtures.
Generally, no. Standard SLA resins are toxic in their liquid and uncured states and are not certified for food contact. For applications requiring skin contact, such as wearables or medical guides, you must use a specific Biocompatible or Medical-grade resin and follow a strict, validated workflow for printing and post-processing to ensure safety.
SLA is inherently a single-color process. The color of the part is determined by the color of the liquid resin in the vat. While some pre-pigmented resins exist (e.g., white, grey, black, clear), the selection is limited. For multi-colored parts, the standard professional practice is to print the part in a neutral color (like grey) and then prime and paint it during post-processing to achieve the desired look.
SLA is one of the most accurate 3D printing technologies available. Typical dimensional accuracy for industrial SLA machines is within ±0.1% of the nominal dimension, with a minimum tolerance of around ±0.1 to ±0.2 mm. This high precision makes it ideal for form and fit testing and parts with tight assembly requirements.
“Resin printing” is a general term for the family of technologies called vat photopolymerization. SLA, DLP (Digital Light Processing), and LCD/MSLA are all types of resin printing. The key difference is the light source:
- SLA uses a single laser point to draw the layer.
- DLP uses a digital projector to flash and cure the entire layer at once.
- LCD/MSLA uses a UV LED array shining through an LCD screen that acts as a mask to cure the entire layer at once. While they all use liquid resin, the method of curing affects speed and resolution characteristics. SLA is the original technology, known for its precision and smooth finish.

What Is Mold Inspection and How Can You Get It Right?
Key Takeaways Mold inspection is a systematic process of examining injection molds for dimensional accuracy, surface quality, and functional performance before and during production. Regular tooling inspections can reduce scrap

Metal Insert Injection Molding: Design & Defect Prevention
Key Takeaways Metal insert injection molding integrates metal components directly into plastic parts during molding for superior mechanical bond strength. Insert design—knurling, undercuts, wall thickness—is the primary driver of pull-out

Top 5 Injection Molding Companies in Pakistan
Key Takeaways Pakistan has an active plastics manufacturing sector centered around Karachi and Lahore, primarily serving domestic consumer goods, packaging, and automotive aftermarket markets. Precision injection molding capability for export-grade
Optimization Solutions Provided For Free
- Provide Design Feedback and Optimization Solutions
- Optimize Structure and Reduce Mold Costs
- Talk Directly With Engineers One-On-One

