 Skip to content

Reinforcement is an essential part of plastic parts. Reinforcement is effective as an “I” shape, increasing the rigidity and strength of the product without significantly increasing the surface area of the product, but without the “I” shape, the inverted structure would be difficult to mold, especially for plastic products that are often subject to pressure, torque, and bending.
In addition, the reinforcement can also act as an internal runner to help fill the injection mold cavity, which is very useful in helping the plastic flow into the branch part of the part.
Reinforcement is generally placed on the non-contact side of the plastic product, and its extension direction should follow the direction of maximum stress and maximum deflection of the product. The location of the reinforcement is also subject to some production considerations, such as cavity filling, shrinkage, and demolding.
The length of the reinforcement may be the same as the length of the product, with both ends attached to the outer wall of the product, or may occupy only a portion of the product to partially increase the rigidity of a part of the product.
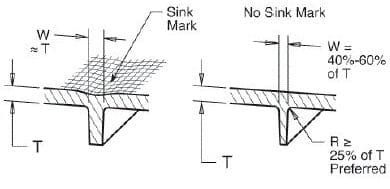
If the reinforcement is not attached to the outer wall of the product, the end section should not be abruptly terminated but should be gradually reduced in height until it is completed, thus reducing the problems of air trapping, underfilling, and scorch sink marks, which often occur in under-vented or closed locations.
The simplest shape of the reinforcement is a rectangular column attached to the surface of the product, but to meet some production or structural considerations, the shape and size of the reinforcement must be changed.
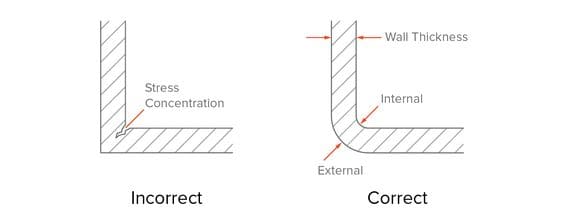
The bottom of the reinforcement must be rounded to eliminate excessive stress concentration. The rounded sharp corners also give the flow channel a gradual shape to make the cavity fill more smoothly.
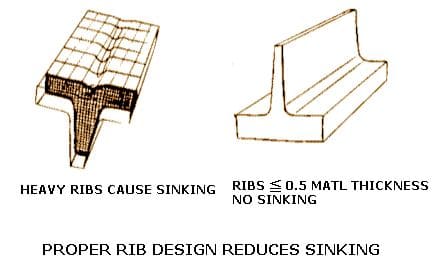
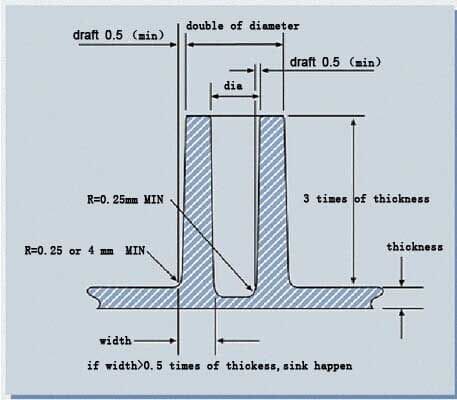
If the width of the bottom of the reinforcement is reduced by half relative to the thickness of the product (Figure b), the increase in thickness relative to the position is reduced to about 20%, and the chance of shrinkage is greatly reduced.
This leads to the use of two or more short reinforcement bars than the use of a single high reinforcement bar is preferable, but when using multiple reinforcement bars, the distance between the reinforcement bars must be larger than the thickness of the adjacent outer wall.
The shape of the reinforcement bars is generally thin and long, and the general design of the reinforcement bars illustrates the basic principles of designing reinforcement bars.
Note that too thick reinforcement design is likely to produce shrinkage patterns, cavities, deformation deflection, pinch patterns, and other problems, which will also lengthen the production cycle and increase production costs.

The Role of plastic reinforcement
Reinforcement is an indispensable part of the function of injection molded plastic parts.
(1) Enhance the strength and stiffness of the product without increasing the wall thickness of the plastic product to avoid wasting plastic in the injection molding process, increase weight and reduce cost.
(2) It can restrain the distortion and deformation of the products caused by the uneven force caused by the difference in wall thickness of plastic bottles.
(3) Facilitate the activity of plastic melt, and provide channels for melt filling in some thin wall plastic injection molded parts of the plastic bottle body.
Factors to be considered in the design of plastic reinforcement
(1) The design of the reinforcement is also related to the plastic material used. From a production point of view, the physical properties of the material, such as the viscosity of the melt and shrinkage, have a significant impact on the design of the reinforcement.
(2) The creep properties of the plastic are also an important consideration from a structural point of view. For example, from the production point of view, the height of the reinforcement is limited by the melt flow and the ejection characteristics (shrinkage, friction coefficient, and stability).
(3) Increasing the exit angle of the long reinforcement generally helps to eject the product, however, when the exit angle increases while the width of the bottom remains the same, the rigidity, strength, and ejectable area of the product are reduced.
The problem of reduced ejection area can be solved by adding several ejection bumps to the reinforcement part of the product or using more expensive flat ejector pins, and polishing in the direction of ejection will also help the product to eject easily.
(4) From the structural point of view, deeper reinforcement can increase the rigidity and strength of the product without a significant increase in weight, but at the same time, the bending stress at the highest and lowest points of the product increases, the product designer must calculate and make sure that the bending stress in this part will not exceed the acceptable range.
(5) From the production point of view, it is better to use a large number of short and narrow reinforcement bars than several deep and wide reinforcement bars.
(6) When manufacturing molds (especially hand plate molds): the width (and possibly depth) and several stiffeners should be left as much as possible so that they can be increased appropriately when the rigidity and strength of the product are found to be inadequate during mold testing because it is easier and cheaper to remove the steel from the mold than to use methods such as welding or adding inserts to increase the steel.
Design points for different materials
ABS
To reduce shrinkage on major component surfaces, the thickness of the ribs should not be more than 50% of the thickness of the intersecting rubber, and up to 70% of the thickness of the ribs on some non-deterministic surfaces. In thin plastic structural foam parts, the rib can reach 80% of the intersecting fabric thickness. Thick rubber ribs can reach 100%.
The height of the ribs should not be higher than three times the thickness of the adhesive. When more than two ribs, the distance between the ribs should be no less than twice the thickness of the rubber. The exit angle of the ribs should be between one side and the other for easy release.
PA
The height of the individual ribs should not be three times or more than the thickness of the bottom of the ribs. There should be some small ribs or grooves behind any of the ribs, as the ribs will cause indentations on the backside when cooling.

PBT
Thick ribs are avoided as much as possible to avoid air bubbles, shrinkage patterns, and stress concentrations. The way of consideration is to limit the rib size. Rib thickness should not exceed 60% of the wall thickness below 3.2mm (1/8 in). Ribs at wall thicknesses greater than 3.2 mm should not exceed 40%.
The rib height should not exceed 3 times the bone thickness. The ribs are connected to the molten plastic wall with a 0.5mm (0.02 in) R on both sides to allow for smooth plastic flow and reduce internal stress.
PC
The general recommended rib thickness depends on the plastic material flow and wall thickness. The design of PC ribs can be seen in the following figure for PS ribs.
PS
The thickness of the ribs should not exceed 50% of the wall thickness of the joint. Experience tells us that violation of the above guidelines will result in inconsistent gloss on the surface.
PSU
RIBS can enhance the impact strength of the product and achieve effective results at the most economical cost. Poor design can result in shrinkage marks and undesired impact strength.

Design points of reinforcement
(1) Replace a single reinforcement with a single reinforcement of higher height with a lower height and a slightly larger number of bars to avoid surface depression when the bottom of the thick bars cools and shrinks. When the back of the tendons show depression affects the aesthetics, the decorative reinforcing rib structure design can be used to cover up.
(2) The arrangement direction of the tendons should be the same as the filling direction of the melt material.
(3) The root of the tendon with a rounded transition, to avoid the external force when the stress concentration and destruction. But the radius of the root rounding is too large will show depression.
(4) Generally do not place any parts on the tendons.
(5) The tabs located on the inner wall of the plastic bottle should not be too close to the inner wall to avoid insufficient filling of the melt in the part of the tabs to enhance the application of the tendons in avoiding product deformation and increasing the rigidity of the plastic bottle.
Principles of reinforcement design:
(1) The thickness of the reinforcement should be less than the uniform wall thickness of the product being reinforced to prevent depression at the joint.
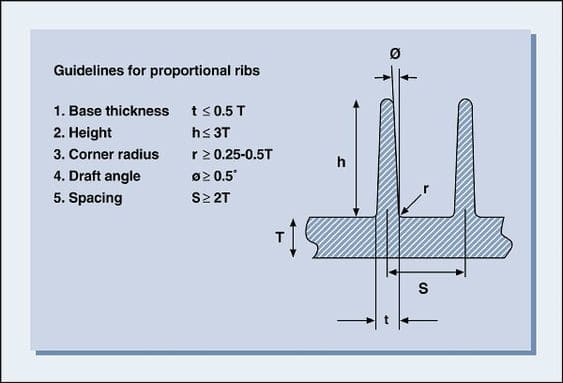
(2) The height of the reinforcement should not be too high, otherwise the reinforcement will be damaged by the force and reduce its rigidity. To increase the stiffness of the product, the number of reinforcement bars should be increased rather than their height.
(3) The slope of the reinforcement bars can be larger, and generally should be greater than 1.5 °, to avoid top injury, to facilitate the release of the mold.
(4) Multiple reinforcement bars should be properly distributed and staggered to reduce uneven shrinkage.
(5) Generally, the reinforcement is added to the oblique bone, the purpose is to avoid trapped air, conducive to plastic injection molding and strength.
Arrangement of reinforcement bars
There are the following shapes of reinforcing bars: bar, well, fork, fan, circle, or integrated shape
Bar shape
The shell can be designed on the reinforcing bar area is small, and do not need to bear high strength load, only to increase the strength of a single shell can be, reinforcing bars do not too dense, one is to affect the strength of the mold, one is easy to stick after the mold when out of the mold.
In general, the spacing between the reinforcement is designed to strengthen the constant wall thickness of the shell at the location of the reinforcement 3 times and more, the height of the reinforcement according to the actual product needs and design, there is no absolute to be lower than how much, depending on the mold is to go line cutting or do block splicing.
However, in the case of meeting the structural needs of the product, the lower the height of the reinforcement, the better the reinforcement of the screw column, because the reinforcement is followed by the screw column out.
Therefore, the height of the reinforcement bar can be designed much higher than the ordinary reinforcement bar, the specific structural design of the screw column reinforcement bar, put into the structural design of the screw column reinforcement bar height is too high has several problems.

Forming problems
The higher the height of the reinforcement, the more difficult it is to play full glue, the general design of the reinforcement is not designed and the shell material thickness is thick, the thickness of the reinforcement can be increased or decreased according to the actual needs of the product.
Out of the mold problem: the higher the height of the reinforcement, the more likely it to stick after the mold.
Strength problem: the higher the height of the reinforcement, the thinner the top of the rubber bit, the lower the strength.
Well-shaped, fork-shaped
The shell can be designed with a large area of reinforcement, and need to withstand high strength load.
Fan-shaped, round
The shell can be designed on the reinforcement area to be large, fan-shaped, and circular load is the center point for the strongest point of force, well-shaped and fork-shaped load for the uniform point of force.
Integrated shape
As the reinforcement of the well and fork shape is too thick in the cross-part due to the material thickness, there is a risk of indentation defects on the surface of the shell, which affects the appearance, so the round reinforcement is added to the design to form a comprehensive type of reinforcement.
As the number of reinforcement in well and fork shape is too much, it will make the product easy to stick to the back mold, after adding round reinforcement, it can be ejected with a syringe pin, which can avoid the sticky mold situation or can be understood as such.
It is necessary to add a certain number of columns in the dense reinforcement position to help the product out of the mold, especially when the height of the reinforcement is relatively high.
Summary
When doing product design, optimize the product reinforcement design according to the above reinforcement design principles, the role of product reinforcement not only can improve the strength and stiffness of plastic products, reduce the twist phenomenon, but also can make the plastic molding easy to fill the injection mold cavity, to the optimal product design and the most economical way to achieve your product project.


