 Skip to content
Custom Liquid Silicone Rubber (LSR) Injection Molding Service
Explore advanced liquid silicone rubber injection molding for precise, durable products. Enhance your manufacturing with innovative solutions from Zetar Mold.
The Complete Guide to Liquid Silicone Rubber (LSR) Injection Modling
What is Liquid Silicone Rubber (LSR) Injection Molding?
Liquid Silicone Rubber Injection Molding, often abbreviated as LSR Molding or LIM (Liquid Injection Molding), is a manufacturing process used to create durable, flexible, and high-precision parts from a liquid silicone rubber material.
At its core, it is a thermosetting process. This distinguishes it fundamentally from thermoplastic injection molding. While thermoplastics are heated until molten, injected into a cool mold to solidify, and can be re-melted, thermosets work in reverse. In LSR molding, a two-part liquid compound is mixed and then injected into a heated mold. The heat triggers an irreversible chemical reaction called curing or vulcanization, which transforms the liquid into a solid, stable, and elastic rubber part.
What are the Classifications and Types of LSR?
LSR is not a one-size-fits-all material. It is available in numerous grades and can be processed using several advanced techniques, allowing for a high degree of customization.
1. Classification by Material Grade:
① General-Purpose Grade: A standard formulation offering a good balance of physical properties for a wide range of industrial seals, gaskets, and consumer products.
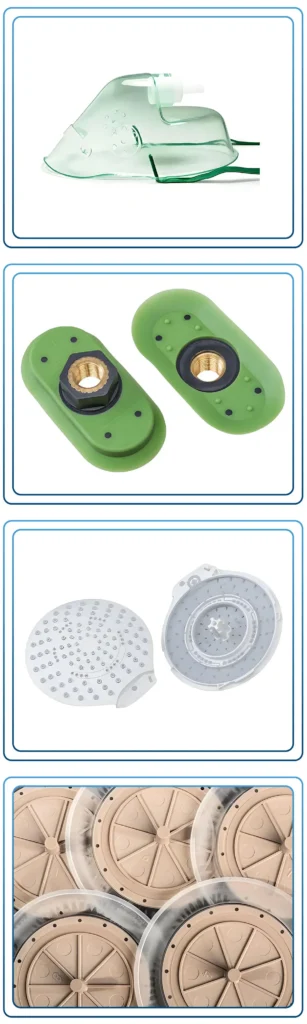
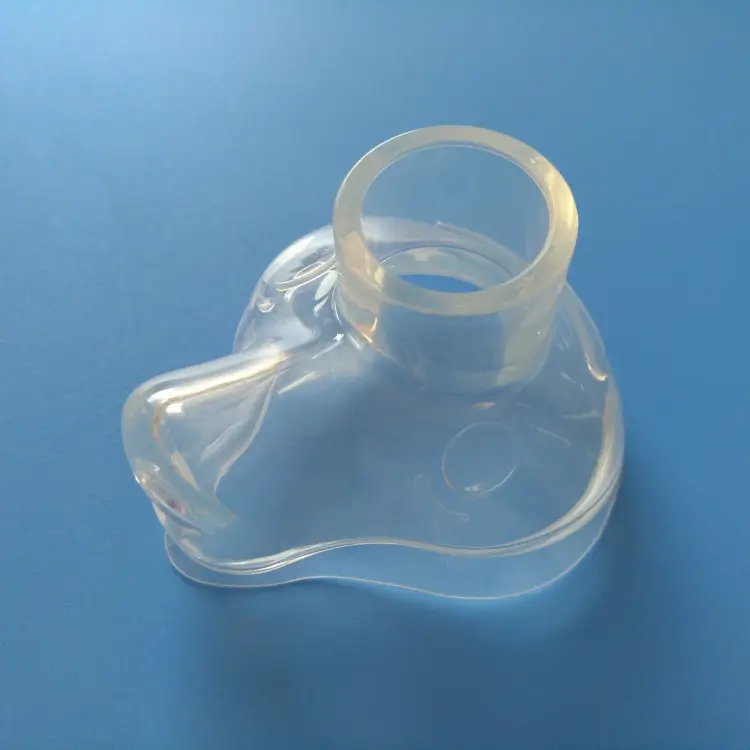
② Medical Grade: These grades are biocompatible and meet stringent standards like USP Class VI and ISO 10993. They are used for respiratory masks, surgical instruments, seals for medical devices, and short-term implants.
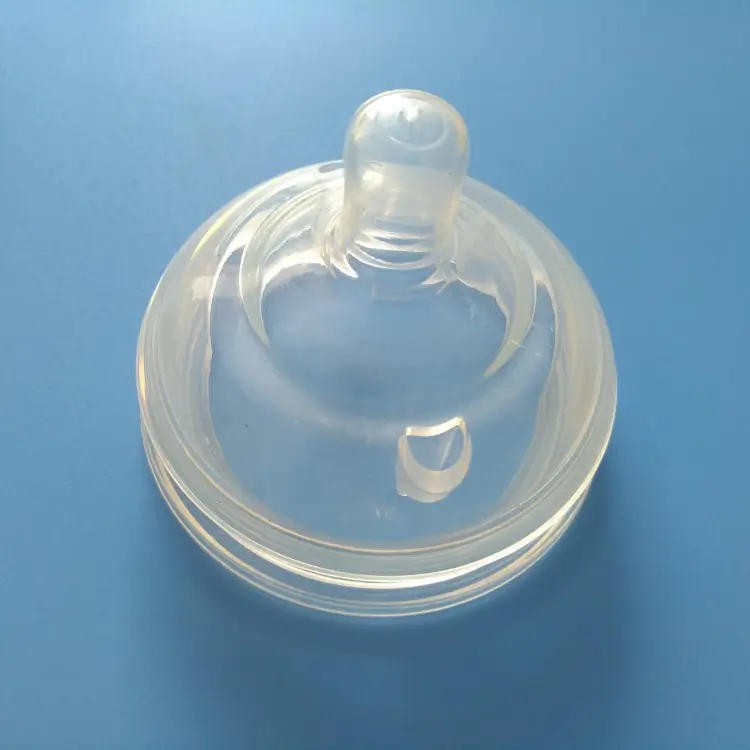
③ Food Grade: Compliant with FDA regulations (e.g., 21 CFR 177.2600) for use in articles that come into contact with food, such as baking molds, baby bottle nipples, and kitchen utensils.
④ Optical Grade: Characterized by high transparency and light transmittance, this grade is ideal for producing lenses, light guides, and covers for LEDs and sensors where optical clarity is paramount.
⑤ Conductive Grade: By incorporating conductive fillers like carbon black, these LSRs can be used for applications requiring electrical conductivity, such as EMI/RFI shielding gaskets, conductive pads, and electrical connectors.
⑥ Self-Lubricating Grade: This material exudes a small amount of silicone oil to its surface over time, reducing the coefficient of friction. It’s perfect for creating low-friction seals, O-rings, and connector seals that need to be easily assembled.
⑦ Fluorosilicone (F-LSR): Offers enhanced resistance to non-polar solvents, fuels, oils, and aggressive chemicals, making it a preferred choice for automotive and aerospace seals exposed to harsh fluids.
2. Classification by Process Variation:
① Standard LSR Molding: The fundamental process of creating a single-material LSR part.
② LSR Overmolding (2-Shot Molding): A multi-step process where LSR is molded over a pre-molded substrate. This can be:
• LSR on Thermoplastic: An engineered plastic part (e.g., PBT, Nylon) is placed in a second mold, and LSR is injected around it to create an integrated part with both rigid and soft features (e.g., a waterproof housing with a built-in seal).
• LSR on Metal: LSR is molded over a metal component (e.g., stainless steel, aluminum) to create handles, insulators, or vibration-damping components.
③ Micro-Molding with LSR: An extremely precise version of the process used to manufacture parts with micro-scale features or weights of less than a gram, often used in medical devices and micro-electronics.
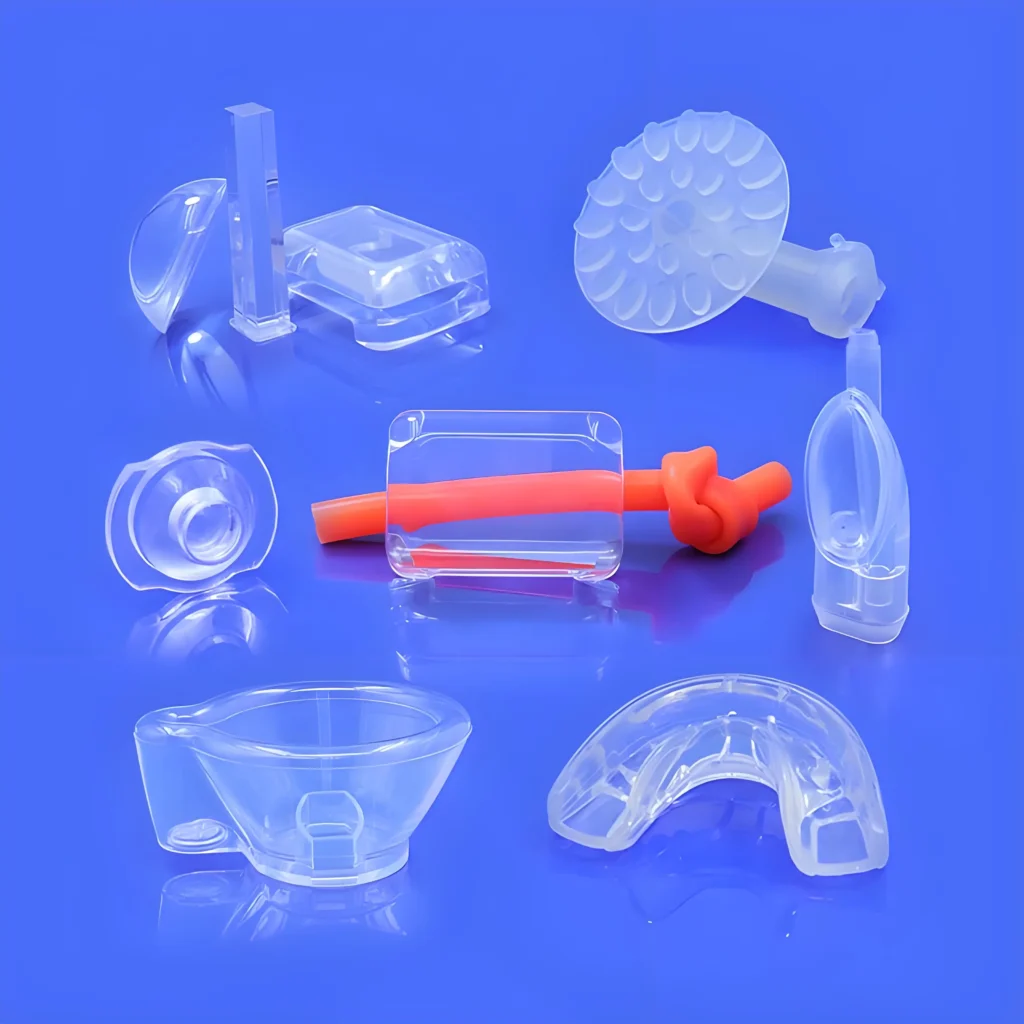
What are the Typical Application Scenarios for LSR?
LSR’s unique properties make it the material of choice in applications where performance and reliability are non-negotiable.
1. Medical and Healthcare:
Due to its superior biocompatibility, sterilizability, and inertness, LSR is ubiquitous in the medical field.
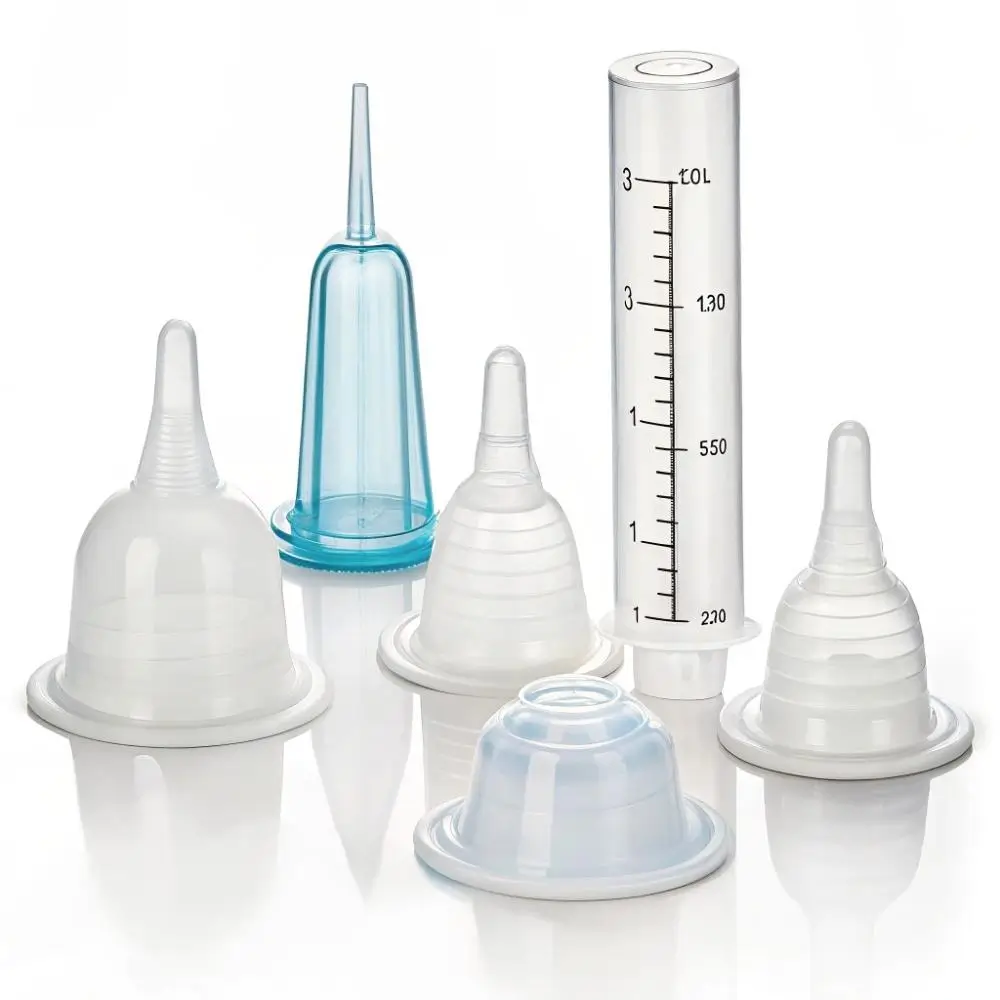
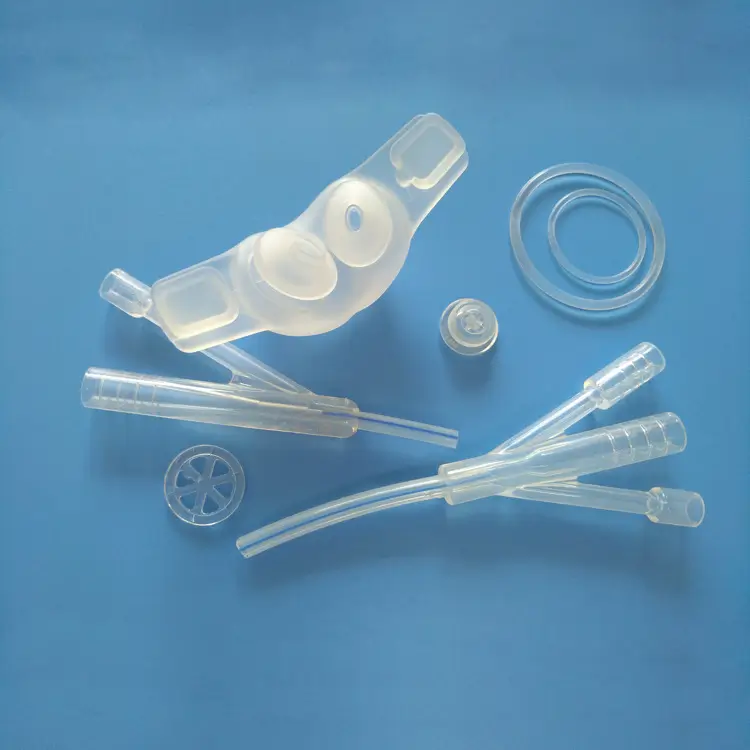
Examples: Respiratory masks, flexible seals for drug-delivery devices, syringe stoppers, catheters, valve components for fluid management systems, and soft, pliable components for surgical tools.
2. Automotive Industry:
The automotive environment demands resistance to extreme temperatures, vibration, and fluids.
Examples: Connector seals for wiring harnesses, gaskets for engine and transmission components, protective boots for sensors, vibration dampeners, and flexible diaphragms for pressure regulation systems.
3. Consumer Goods and Electronics:
LSR provides waterproofing, durability, and a premium soft-touch feel.
Examples: Seals and gaskets for smartwatches and ruggedized phones, soft-touch buttons on remote controls, flexible keypads, baby pacifiers and nipples, and high-end kitchenware like spatulas and baking molds.
4. Industrial Applications:
In demanding industrial settings, LSR provides long-term stability and sealing performance.
Examples: Gaskets for outdoor LED lighting fixtures, seals for industrial pumps, diaphragms for pressure valves, and protective covers for sensitive equipment.
What are the Advantages of LSR Injection Molding?
1. High Precision and Design Freedom: The low viscosity of liquid silicone allows it to flow easily into thin walls and fill intricate, complex mold cavities, enabling the production of highly detailed parts that would be impossible with other elastomers.
2. Superior Material Properties: LSR offers an unmatched combination of characteristics:
① Biocompatibility: Inherently inert and hypoallergenic.
② Temperature Resistance: Stable across a wide temperature range, typically from -50°C to +200°C, with special grades extending even further.
③ Chemical and UV Stability: Resistant to water, ozone, UV radiation, and a wide range of chemicals.
④ Low Compression Set: Parts return to their original shape after prolonged compression, making them excellent for seals and gaskets.
⑤ Electrical Insulation: Possesses high dielectric strength.
3. High-Volume Automation and Fast Cycle Times: The process is highly automated. Curing times are very rapid, often between 20 to 60 seconds, which facilitates efficient, large-scale production with minimal labor.
4. Clean and Waste-Free Process: The closed-loop system, from material pails to the sealed mold, minimizes exposure to contaminants. This is critical for medical and food-grade applications. Additionally, precision “flashless” molding techniques significantly reduce material waste and post-processing steps.
What are the Disadvantages of LSR Injection Molding?
1. High Initial Investment: LSR molds require extremely tight tolerances and specialized features (like cold runner systems) to manage the low-viscosity material. Both the tooling and the specialized injection molding machines represent a significant upfront capital expense.
2. Higher Material Cost: On a per-kilogram basis, LSR is generally more expensive than many common thermoplastics and some synthetic rubbers. However, this can be offset by faster cycle times and lower labor costs in high-volume production.
3. Thermoset Nature: As a thermoset material, LSR cannot be melted down and recycled in the same way as thermoplastics. While scrap can be ground and used as a filler in some applications, it is not a closed-loop recycling process.
4. Tooling Complexity: The design and fabrication of LSR molds are more complex than for thermoplastics. They must withstand high temperatures while keeping the material delivery system cool, and they require exceptional sealing to prevent flash.
How Does LSR Molding Compare to Other Processes?
vs. Thermoplastic Injection Molding:
The primary difference is Thermoset vs. Thermoplastic. LSR involves a chemical curing reaction in a hot mold, while thermoplastics melt and solidify in a cool mold. LSR parts are flexible and temperature-resistant, whereas thermoplastics offer rigidity and strength.
vs. Compression Molding (with HCR):
Compression molding typically uses High Consistency Rubber (HCR), a clay-like solid. It is a slower, more labor-intensive process with less precise material control, leading to higher material waste and more flash. LSR molding is automated, faster, cleaner, and better suited for complex geometries and high-volume production.
Liquid Silicone Rubber (LSR) Injection Molding
Explore our in-depth guide to Liquid Silicone Rubber (LSR) Injection Molding. Learn about the core process, materials, advantages, key applications in medical & auto, and expert design best practices.

The Complete Guide to Liquid Silicone Rubber (LSR) Injection Modling
What are the Key Characteristics and Properties of LSR?
Understanding these properties is key to selecting the right LSR grade for your application.
| Property | Description & Significance | Typical Range/Value |
|---|---|---|
| Hardness (Durometer) | Measures the material’s resistance to indentation, indicating its softness or firmness. Shore A is the standard scale for flexible rubbers. | 5 to 80 Shore A |
| Tensile Strength | The maximum stress a material can withstand while being pulled or stretched before breaking. Measured in Megapascals (MPa). | 5 – 11 MPa |
| Elongation at Break | The percentage increase in length a material can achieve before it ruptures. It indicates the material’s flexibility and stretchability. | 200% – 900% |
| Tear Strength | Measures the material’s resistance to the propagation of a tear. Crucial for parts that may be nicked or cut in use. | 20 – 50 kN/m |
| Compression Set | The percentage of permanent deformation remaining after a material is compressed for a set time at a specific temperature. A low value is vital for seals. | 10% – 25% (at 150°C for 22 hours) |
| Operating Temperature | The temperature range within which the material maintains its key properties without degrading. | -50°C to 200°C (-60°F to 390°F) |
| Dielectric Strength | The material’s ability to act as an electrical insulator, measured as the maximum voltage it can withstand before breakdown. | ~20 kV/mm |
What is the Core Process of LSR Injection Molding?
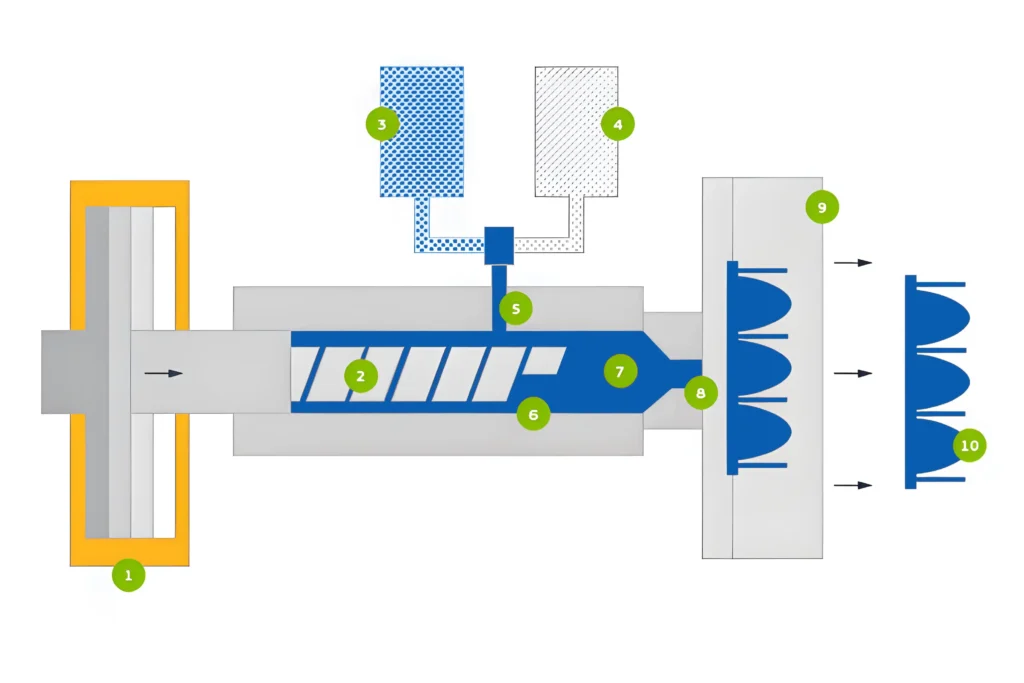
The LSR molding process is a symphony of precision and control. Here is a step-by-step breakdown of the workflow:
1. Material Supply: The process begins with two separate containers, typically 20-liter pails or 200-liter drums, holding Part A and Part B of the liquid silicone.
2. Dosing and Metering: A specialized dosing unit on the molding machine uses pumps to draw the A and B components from their containers in a precise 1:1 ratio by volume. If color is required, a third stream of color paste is accurately metered into the system.
3. Mixing: The A and B components (and any colorant) are propelled into a static mixer. This device contains a series of helical elements that repeatedly divide and recombine the material streams, ensuring a perfectly homogenous mixture without introducing heat or air.
4. Injection: The mixed, uncured LSR is fed into the injection barrel, which is water-cooled to prevent premature curing. A screw or plunger then injects a precise “shot” of the material through a cooled nozzle and runner system into the heated mold cavities.
5. Curing (Vulcanization): The mold is heated to a temperature between 150°C and 200°C (300°F – 390°F). This intense heat initiates the platinum-catalyzed cross-linking reaction. The liquid silicone rapidly transforms into a solid, elastic rubber part in as little as 20-60 seconds.
6. Demolding and Ejection: Once curing is complete, the mold opens. Due to LSR’s flexibility, parts can often be removed even with undercuts, sometimes assisted by ejector pins or robotic automation. The next cycle begins immediately.
What are the Key Considerations in LSR Molding?
Successful LSR molding depends on careful attention to three key areas: part design, mold design, and material selection.
1. Part Design Considerations:
① Wall Thickness: Strive for uniform wall thickness to ensure consistent curing and avoid sink marks. Transitions between different thicknesses should be gradual.
② Parting Line: The location where the two halves of the mold meet. Its placement is critical for aesthetics, mold function, and preventing flash.
③ Venting: Because of LSR's extremely low viscosity and fast injection speed, air can easily become trapped. Vents are tiny channels (0.005mm – 0.02mm deep) that must be precisely machined into the parting line to allow air to escape but not the silicone.
④ Draft Angles: A slight taper (1-2 degrees) on vertical walls is recommended to facilitate easy part ejection from the mold.
2. Mold Design Considerations:
① Cold Runner System: Unlike hot runner systems for thermoplastics, LSR molds often use a cold runner system. The channels that deliver material to the cavities are kept cool to prevent the LSR from curing before it reaches the part. This minimizes material waste.
② Gating: The point where material enters the cavity. Gate location and size must be optimized to ensure smooth, even filling and to avoid cosmetic blemishes on the final part.
③ Mold Sealing: The mold halves must seal perfectly to prevent the low-viscosity LSR from escaping, which causes flash. This requires exceptionally precise machining of the mold components.
3. Material Selection Considerations:
① Hardness: Match the durometer to the application's need for flexibility or rigidity.
② Environment: Will the part be exposed to chemicals, UV light, or extreme temperatures? Select a standard, fluorosilicone, or other specialty grade accordingly.
③ Regulatory Requirements: Does the application require medical (USP Class VI) or food-grade (FDA) compliance?
What are the Best Practices for Designing LSR Parts?
Follow these guidelines to create parts that are optimized for manufacturability and performance.
1. Maintain Uniform Wall Thickness: The ideal wall thickness for LSR parts is typically between 0.5mm and 3mm. Uniformity prevents uneven shrinkage and internal stresses.
2. Use Generous Radii: Avoid sharp internal corners. Adding a radius (at least 0.5x the wall thickness) improves material flow, reduces stress concentration, and increases the part’s tear strength.
3. Strategically Place Parting Lines: Work with your molder to place the parting line on a non-critical or hidden surface to minimize its aesthetic impact.
4. Leverage LSR’s Flexibility for Undercuts: Simple undercuts can often be molded without complex side-actions because the flexible part can be “peeled” out of the mold. Discuss complex undercut designs with your molder to ensure feasibility.
5. Design for Proper Venting: When designing the part, consider where the last fill points will be. These are natural locations for vents.
6. Incorporate Draft: While LSR is flexible, a draft angle of at least 1 degree simplifies ejection, reduces cycle time, and minimizes stress on the part during removal.
What are Common Problems in LSR Molding and Their Solutions?
| Problem | Description | Common Causes | Solutions |
|---|---|---|---|
| Flash | A thin, unwanted film of LSR on the part along the parting line. | 1. Poor mold sealing. 2. Excessive injection pressure/speed. 3. Insufficient clamp force. | 1. Improve mold tool precision. 2. Reduce injection pressure. 3. Increase machine clamp tonnage. |
| Air Traps (Voids) | Bubbles or empty pockets trapped within the part. | 1. Inadequate mold venting. 2. Turbulent material flow. 3. Trapped moisture. | 1. Add or enlarge vents at last-fill points. 2. Optimize gate location and injection speed. 3. Ensure material is dry. |
| Short Shot | The mold cavity is not completely filled, resulting in an incomplete part. | 1. Insufficient material injected. 2. Premature curing. 3. Poor venting (back pressure). | 1. Increase shot size. 2. Slightly lower mold temperature or increase injection speed. 3. Improve venting. |
| Sink Marks | Depressions on the surface, typically opposite thick sections like ribs. | 1. Material shrinkage in thick areas. 2. Insufficient packing pressure. | 1. Design uniform wall thickness. 2. Optimize packing phase. 3. Core out thick sections. |
| Bonding Failure (Overmolding) | The LSR layer peels away from the plastic or metal substrate. | 1. Incompatible materials. 2. Surface contamination (oils, mold release). 3. Insufficient substrate temperature. | 1. Use primers or surface treatments (plasma/corona). 2. Ensure substrate is clean. 3. Use compatible materials (e.g., PBT). |
What are the Related Technologies and Concepts?
1. Upstream Technologies:
① Silicone Chemistry (Addition Cure vs. Peroxide Cure): LSR uses a platinum-catalyzed addition cure system. This process is very clean, fast, and produces no byproducts. This is superior to the peroxide-cure systems used for some HCRs, which can leave behind residues and require a more thorough post-curing process.
② CAD/CAM: Computer-Aided Design (CAD) software is used to design the 3D model of the part. Computer-Aided Manufacturing (CAM) software then translates this design into instructions for the machines that will build the mold.
③ Moldmaking (CNC & EDM): The high-precision steel molds for LSR are manufactured using CNC (Computer Numerical Control) Machining for general shaping and EDM (Electrical Discharge Machining) for creating fine details, sharp corners, and complex textures that are difficult to mill.
2. Downstream Processes:
① Post-Curing: Although LSR cures fully in the mold, some parts, especially for medical and food-contact applications, undergo a post-curing step. This involves heating the parts in an oven for several hours to drive off any remaining volatile organic compounds (VOCs) and ensure maximum stability and inertness.
② Cryogenic Deflashing: For applications requiring perfect, flash-free edges, parts can be tumbled in liquid nitrogen. The extreme cold makes the thin flash brittle, causing it to break off cleanly while the main body of the part remains flexible and unharmed.
③ Assembly and Automation: Finished LSR parts are often integrated into larger assemblies. The consistency and precision of injection molding make them ideal for automated assembly lines.
3. Alternative and Related Processes:
① Silicone Compression & Transfer Molding: These processes use High Consistency Rubber (HCR) and are better suited for lower volume production, simpler geometries, or very large parts. They are generally slower and less precise than LSR molding.
② 3D Printing with Silicone: An emerging technology that allows for rapid prototyping and the creation of highly complex, customized parts without the need for tooling. While currently slower and more expensive for mass production, it is an excellent tool for design validation and low-volume manufacturing.


Family Molds vs. MUD Systems: Which Strategy Best Manages Multi-Part Injection Molding Projects?
Key Takeaways – Family molds produce multiple different parts in one shot, but a single compromised process window affects all cavities simultaneously. – MUD (Master Unit Die) systems use interchangeable

What is a High-Speed Injection Molding Machine?
Key Takeaways – A high-speed injection molding machine is defined by injection speed4s of 300–600 mm/s and clamp speeds exceeding 500 mm/s, compared to 100–200 mm/s for standard machines—enabling cycle

How to Improve the Precision of Injection Molds?
Key Takeaways – Mold precision is determined at every stage: part design, mold design, steel selection, machining, assembly, and process control—a weakness at any stage limits overall precision. – Properly
Optimization Solutions Provided For Free
- Provide Design Feedback and Optimization Solutions
- Optimize Structure and Reduce Mold Costs
- Talk Directly With Engineers One-On-One

