 Skip to content

Introduction: There are many variables in the equipment control process of heating, injection, and cooling during the molding process, especially in the injection process. For example: barrel temperature, hydraulic system flow rate, hydraulic pressure, hydraulic oil temperature, clamping force, ambient temperature, humidity, equipment wear, etc.It’s really complicated on the surface.

In the production process, the process parameters of the injection moulding machine have not changed, but the quality of the plastic products produced will change. So, how can we make sure that the quality of the plastic products produced will not change? This article mainly answers this question and summarizes the techniques for optimizing the injection molding processes.
What is the Injection Molding Process?
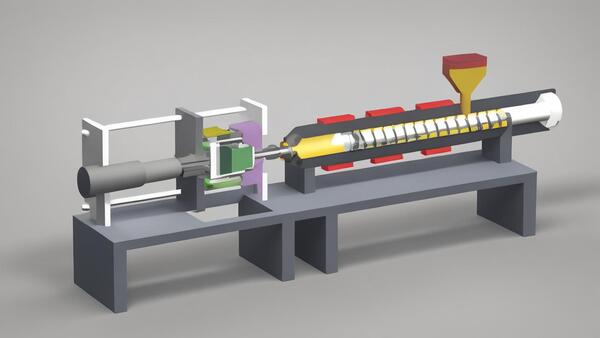
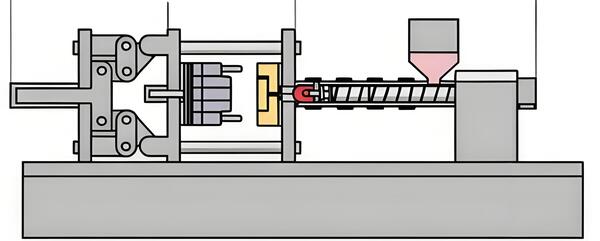
Injection molding is the process of making semi-finished parts of a certain shape by pressurizing, injecting, cooling, and separating the molten raw materials.It is a widely used manufacturing process.
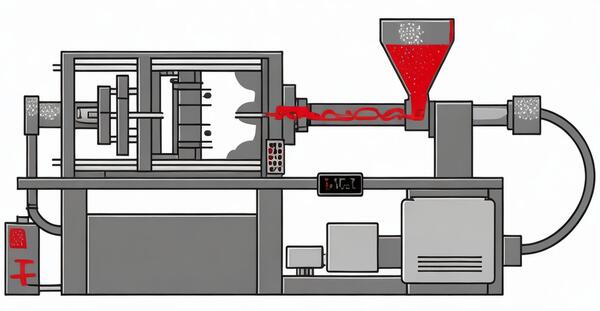
Optimization of injection molding parameters
We always talk about optimizing the injection molding process, but what does that mean? What parameters do we need to improve to achieve the best optimization? Here are 10 key parameters that need to be adjusted in injection molding to produce consistent, high-quality plastic parts.
Injection Speed
The speed at which you inject the plastic affects how the product fills and cools. If you inject too fast, the product will get burned on the surface, warp, and have other quality problems. If you inject too slow, the product won’t fill all the way. So, you need to pick the right injection speed based on the size, material, and other things about the product.
Shot Pressure
Shot pressure is the injection pressure applied by the injection molding machine to the molten plastic during the injection process. If the shot pressure is too high, the product will deform. If the shot pressure is too low, the product surface will be rough. Therefore, it is necessary to optimize the shot pressure and find a suitable shot pressure range to ensure the quality of the product.
Mold Temperature
The temperature of the mold affects how fast the product cools and how much it shrinks. If the temperature is too high, the product will shrink too much. If the temperature is too low, the product will have defects on the surface. So, you need to figure out the right temperature for the mold based on things like the melting point of the material and the size of the product.
Temperature Control
Plastic or melting temperature: It is important to control the plastic temperature accurately to melt the plastic uniformly. Different materials have different temperature requirements, and maintaining the correct temperature range can prevent problems such as incomplete melting or thermal degradation.
Mold Temperature: Controlling the mold temperature affects the crystallinity, shrinkage, and cycle time of the part. Keeping the mold at the recommended temperature helps ensure that the resin has the correct mechanical properties.
Cooling Time
Cooling time is how long the part stays in the mold after the material has been injected and filled. You need to cool it down right so it doesn’t warp and so it solidifies evenly. It also affects how long it takes to make the part.
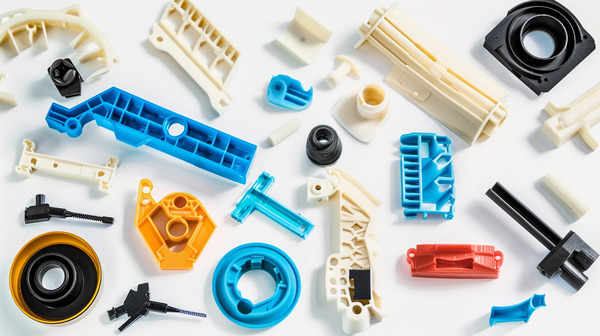
Plastic Material Selection
The type of plastic you use can have a big effect on how the injection molding process goes. Different plastics have different melting points, shrinkage rates, and flow properties. Picking the right plastic for what you’re trying to make is super important if you want your part to turn out the way you want it to.

Screw Speed and Back Pressure
Screw Speed: The rotational speed of the screw in the injection molding machine affects the overall shear of the material. The screw speed should be selected based on the material type and additive content. The correct screw speed will ensure the correct amount of shear provided by the rotation of the screw and the screw geometry.

Back Pressure: Keeping the right back pressure on the screw is important for mixing and blending the melted plastic. It also helps stop bubbling and makes the parts better.
Injection Molding Machine Calibration
You gotta calibrate your injection molding machine on the regular if you want it to be accurate. That means you gotta calibrate the pressure, temperature, and timing settings on the machine.
Mold Design and Maintenance
A good mold design with the right vents, runners, and cooling channels is a big help in the optimization process. Regular mold maintenance is important to keep problems like wear, corrosion, or damage from affecting part quality.

Monitoring and Control Systems
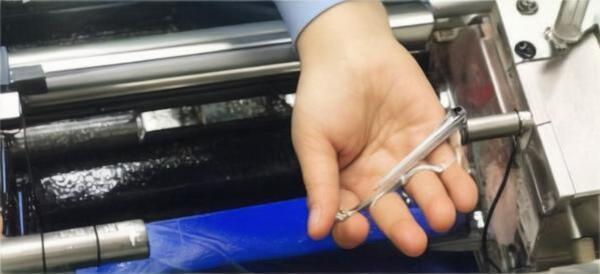
By using advanced monitoring and control systems like CoPilot®, you can track all sorts of things in real time. This helps you catch problems fast and fix them fast, so you can keep getting better at injection molding.
Injection Molding Process Optimization Steps
Viscosity Curve
The reason we make a viscosity curve is to pick a good injection speed that won’t make the melt viscosity change a lot when little things change. We want the differences between each mold to be as small as possible so we can make the same good parts every time.
Looking at the viscosity curve, you can see that when the injection speed is above 55mm/s, the viscosity of the melt is pretty much stable. So, if you set the injection speed to 65mm/s, you’ll have a consistent fill phase. Small changes in the parameters themselves won’t cause big changes in the viscosity of the melt.
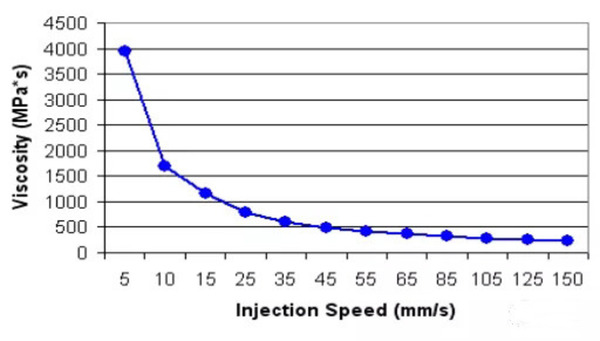
Of course, there are special cases where this optimized speed cannot be used, such as reducing gate halo. In this case, appearance is of course the priority, but this optimized speed should be used as a reference for the injection curve, such as starting with a low speed through the gate to reduce gate halo, and then quickly increasing to this optimized speed.
Flow Balance Test
This test is only required for multi-cavity molds, such as 2 cavities or more. The purpose is to check the maximum percentage deviation between each cavity at different filling stages.Filling imbalance may be acceptable or unacceptable, depending on the product quality requirements. This information is best determined after the appearance molding window (step 4) is completed.
If you can hold the product in your hand and the molding window is big, check if the product dimensions are within tolerance. If they are, the filling imbalance is OK.

If the molding window is small, and the first cavity to fill has burrs, while the other cavities have short shots or sink marks, find out why the filling imbalance is happening.
There are usually four main reasons for unbalanced filling: different runner sizes, different gate sizes, different exhaust sizes, and different cooling. However, this reason often has little effect when the machine is just started. Another situation is the imbalance caused by shear, especially for 8-hole cold runner molds.
Pressure Drop Test
The pressure drop test is done to see how much pressure is lost at different points during filling. This usually includes the machine nozzle, vertical runner, main runner, secondary runner, gate, and filling end.
Don’t use the maximum pressure of the machine to mold. For example, if the maximum pressure of the machine is 180Bar, the maximum pressure required for filling should not reach 180Bar. If it does, it means that the screw needs more pressure to achieve the set injection speed, but it can’t reach it because of pressure limitations. This is called “pressure limited.”
Typically, you don’t want to exceed 90% of the machine’s maximum pressure during the injection process. If you look at the pressure drop curve and you’re in the “pressure limited” area or you’re exceeding 90% of the machine’s pressure, find a steeper section of the pressure curve and try to reduce the pressure drop there.

For example, in the picture on the right, the pressure drop across the runner is very high, which means you need a lot of force to push the plastic through the runner. Increasing the diameter of the runner will help reduce the pressure.
Appearance Molding Window
The cosmetic process window is a very important test. Typically, this cosmetic process window is made up of packing pressure and material temperature (amorphous material), packing pressure and mold temperature (crystalline material).
The cosmetic process window tells you how much room you have to adjust the process while still getting an acceptable part. The ideal situation is to have a larger process window. If the process window is smaller, it will be easier to make cosmetic defects.
For example, in the picture above, if the process window is smaller, it will be easier to have short shots or flash due to the process itself fluctuating. A robust process is to have a larger process window to compensate for the process itself fluctuating.
The appearance molding window also provides the upper and lower limits of the material temperature/mold temperature and holding pressure that can be used in subsequent mold trials due to size adjustment or DOE tests.
Gate Freezing Test
For cold runner molds or semi-cold runners (hot to cold), to ensure repeatability between molds, the holding pressure must be continued until the gate is completely cooled.
Once the curve is generated, pick a time after the product weight stops going up. In the figure above, the product weight stops going up after 7s, so for safety and to account for the process’s own fluctuations, set the hold time to 8s.
It should be noted that the extra one second in the holding stage does not increase the cycle time, because during this time, the gate should have frozen and only the cold runner will be held for a short time, while the product has already begun to cool. Therefore, the extra one second should be subtracted from the cooling time to ensure the same cycle time.
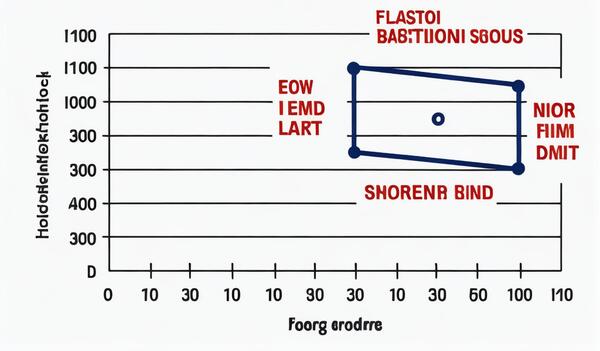
Mold Temperature Map
The purpose of the mold temperature map is to record the distribution of the instantaneous temperature of the mold surface after the product is ejected. It can be used to confirm whether the cooling water circuit is working or whether there are “hot spots”.

Also, this information can be used to solve problems later. For example, when the product size is inconsistent, it can be used to confirm whether the mold surface temperature is the same as before.You gotta use a contact pyrometer to measure the temperature.
After the first time you start or stop the machine, the mold temperature will gradually rise to a stable state. So, you gotta measure the mold temperature after it stabilizes (at least 10 molds).

The figure above shows 5 frames that can be used for different molds. For example, if you are testing a 4-cavity mold, you would record the measurements at the same spot in each cavity in the four corner boxes and leave the middle box empty. If you are testing a single-cavity mold, you would use all 5 to represent different measurement spots.
Tips for Optimizing the Injection Molding Process
What does it mean to “optimize” the injection molding process? In general, it means that you need to take a good, hard look at your process flow to make sure you’re achieving your process goals in the most valuable and effective way possible. Here are five tips to help you do that.
Quality Control by Manufacturing Samples
Quality control is a critical part of the entire molding production process. It is often performed in post-production. However, quality control of sample parts is different. Sample parts can play a key role in the pursuit of optimization of the injection molding process.
They eliminate the risk of full production testing and optimization. They also provide a better understanding of the process and how the machine will perform in a more controlled environment.
By running small batches, you can see how the whole process is going, checking part quality, shot volume, melt temperature of the actual batch of resin you have. The results you get from running samples and doing good quality control checks will often pay for the time and money you spend.
Mold Testing and Evaluation
Another way to optimize the molding process is to test the mold with the materials you want to use. There are so many different resins and formulations available that even small differences in viscosity, melt temperature, mold temperature, etc. can add up to create cumulative fluctuations and variations in the molding process, resulting in scrapped parts and inefficient processes.

Some of the keys to mold testing are short shot testing, fill rate and pattern, and pressure profile evaluation, etc.
Mold and Molding Process Testing and Adjustment
Once you have usable information from mold testing and sample part quality control, you can make fine-tuning adjustments that can yield big gains in process optimization and efficiency.

For example, if you are experiencing short-shot issues or inconsistent fill times, you can adjust the design and layout of the mold to optimize for those issues. If mold temperatures are inconsistent or outside of acceptable ranges, you can adjust to get the best heating and cooling times.
Process Parameters and Performance Ranges
From machines to molds to resins, every part of the injection molding process has an acceptable performance range. When you make small (or big) changes to process components using real results from testing, the results can start to add up until you have a big impact on profits, results, and the value you can give to your customers.
Creating or Following a Given Design of Experiments Process
A process that can be repeated will give you good part rates, is easy to troubleshoot, and gives you as much insight as possible into how the process works. Repeatability is also important to keep in mind when you are doing testing to optimize your injection molding process.
Other tips for optimizing the injection molding process include: control the plastic temperature within the range recommended by the material supplier; fill as fast as possible and with as few segments as possible; separate filling and shrinkage; only fill 95-99% of the product at the end of filling.

Slow down the filling speed appropriately to reduce plastic molecular orientation; ensure sufficient pressure during the filling stage; record and keep the filling time consistent; switch to shrinkage at the end of filling;Control the pressure and time for shrinkage.
Make sure the pressure is maintained until the gate is closed. Control the cooling rate and time. Make sure there is turbulence in the cooling channel. Control the inlet and outlet temperature of the cooling water. Don’t use automatic adjustment control technology.

Make the plasticization process as slow as possible without increasing the cycle. Don’t segment the back pressure. If the material properties change, don’t compensate by adjusting the temperature, but mainly by adjusting the filling speed.
“Experimental design” means you’re doing tests in a planned, structured, and recorded way. This way, if you find any violations or other problems, you can easily trace them back to their sources.
Conclusion
To sum up, injection molding is a common processing method that’s fast, accurate, and repeatable. But there are always problems. Almost every injection molding factory has problems like unstable injection, and there are always defects in the products.

Because plastics have their own characteristics, and the processing equipment is complicated, injection molding is relatively complicated. Reasonable control and adjustment of factors such as raw materials, molds, and process parameters in the injection molding process can effectively improve product quality and production efficiency.This optimizing injection molding production.


