Preface:In modern manufacturing, combining 3D printing with traditional casting techniques opens up a world of possibilities. The ability to create custom molds with complex designs and geometries through 3D printing has revolutionized the casting process. By using additive manufacturing, individuals and industries can explore new avenues of creativity, efficiency, and cost-effectiveness in producing high-quality cast objects.

This article is a complete guide to creating 3D printed casting mold art. We’ll explore how to bring your ideas to life and create casting molds using 3D printing.

What is 3D Printing Technology?
3D printing is a kind of rapid prototyping technology. It decomposes the three-dimensional digital model designed by the computer into several layers of plane slices, and then uses the 3D printer to paste powder, liquid or filamentary plastics, metals, ceramics or sand. It is a technology that stacks composite materials layer by layer according to slice patterns, and finally stacks them into a complete object.

This technology combines cutting-edge technical knowledge in digital modeling technology, information technology, electromechanical control technology, materials science and chemistry, and is a comprehensive application technology with high technological content.

What is Metal Casting?
Metal casting has been around for about 7,000 years. It’s a process where you pour hot liquid metal into a mold and let it cool and harden. People used to use it to make tools, weapons, and statues. People still use it today to make things like jewelry and cars.

The basic idea is that you pour or force hot liquid metal into a mold. Then you wait for the metal to cool and harden and take the shape of the mold. Then you take the solid part out of the mold. But there are a lot of different ways to do casting. The most important things are what the mold is made of and how you get the hot liquid metal into the mold.

3D printing can make it faster and cheaper to make molds for casting metal. This is especially true for investment casting (also called lost wax casting) and sand casting. You can 3D print the patterns you use to make the molds. Or you can 3D print the molds themselves.

Design the CAD Model
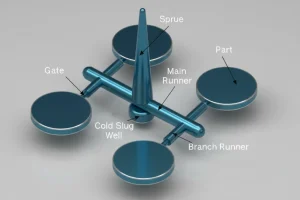
First, you’ll need to create a 3D model of your mold using computer-aided design (CAD) software. Make sure your model has the right draft angles and parting lines to make it easy to remove your mold, and the right wall thickness for your casting material. You’ll also want to include mold features like gates, runners, and vents to make it easier to cast your part. You can design your mold using CAD software like Autodesk Fusion®, SolidWorks®, Rhino3D®, AutoCAD®, Tinkercad®, and more.

When you’re designing your 3D printed mold model, there are a few things you’ll want to keep in mind. First, keep your design simple. Second, don’t fill hollow spaces with objects. Third, think about wall thickness. Fourth, choose a symmetrical design. And finally, design with your final details in mind.

Determine Whether the Model is Hollow or Solid
The casting process will differ depending on whether your model is hollow or solid. If your model is hollow, the casting process becomes more complicated. You will need to create a cast that supports the inside of the model, then remove the support structure from the final part. Your final piece will have a hole somewhere that is large enough to allow the support material to be removed when the cured resin is stretched.

If your model is solid, the casting process is simpler. Solid objects do not require any internal structure to support them. In this case, you can skip to step 4 of the casting process.

Generate theInternal Structure of the Hollow Model
To make the inside of a hollow model, you need to do a few things. First, make a solid block that’s a little smaller than the hollow model. Put the hollow model on top of the solid block and center it. Change the hollow model so it has a “hole” shape. This will make the inside of the model solid. Combine the solid block with the changed hollow model.

Now you have an exact copy of the inside of the hollow model. To hold the inside of the model in place when you make the mold, add supports that connect the inside of the model to the outside of the mold. You’ll take these supports off later.

Generate Solid Blocks Around the Model
First, check if your original model is already a solid or if it needs to be converted to a solid. If your model is already a solid, you can move on to the next step. If not, you will need to modify it so that it is a closed, watertight volume. Design a block or box structure that is much larger than your model. This block will be the outer boundary of the mold and will form the walls that surround the model. Put the model inside the block, making sure it is centered and aligned correctly.

The model should be surrounded by blocks, with space between the model and the inner walls of the blocks. Combine or merge the blocks and the model to create a single, unified object. This will result in a new 3D model where the blocks form the outer walls of the mold and the model is inside the mold.

By enclosing the solid blocks of the model, you have created the structure that is needed for the mold. The block will define the shape and size of the final casting and will provide support and containment during the casting process.

Divide the Block Into Two or More Pieces According to the Design
You might need to split the block into sections to make it easier to remove the casting from the mold. This depends on how complicated the model is. Some things to think about when splitting blocks are: First, look at the shape of the model and think about how you can get to it. The main reason to make it easy to take the mold apart is so you can get the casting out without messing it up.

Don’t make any wedges or shapes that will make it hard to get the casting out. When you look at the shape of your model, think about where you can split it. For example, if your model is round, you will need at least one split down the middle so you can pull the two halves apart. Make sure the lines you pick let you get to the inside of the model. This will let you get the casting out without squeezing or bending the model because the block around the model is solid.

Embed the Model Into the Solid Block
Put the symmetrical model on its side in the split block, centered. This way, when you put the blocks together, you’ll have equal coverage on both sides of the model. Put the blocks together carefully, making sure they fit snugly around the model. Line up the blocks correctly, using any guide features or registration marks to make sure they’re lined up right. Use locating pins to make sure the mold halves join up right and stay lined up.

These pins will help you line up the mold halves when you close the mold. There’s a big channel in the middle to let the casting material flow. Make sure the channel is wide enough to let the resin flow, especially if the resin is thick. Wider channels let the resin flow better and help keep it from getting stuck or getting air bubbles when you pour it. Make a chamber that sits on top of the mold and holds extra resin.

The chamber uses gravity to let the liquid resin flow naturally into the mold. The size of the chamber decides how much resin can be pushed down into the big channel and makes sure there’s enough material to fill the mold.

Start 3D Printing
Now it’s time to start printing the mold. To begin the 3D printing process of your mold, make sure your 3D printer is in good working order and properly calibrated. Check that the printer bed is clean and level and that there are no obstructions to the print head or extruder. Choose the right printing material for your mold. Consider factors such as casting material, desired mold properties (such as flexibility or heat resistance), and compatibility with 3D printers.

Common materials for mold printing include various types of resins and thermoplastics.Use slicing software to get your digital models ready for 3D printing. The software takes a 3D model file and generates a series of instructions that the printer needs to follow, specifying layer height, infill density, print speed and other settings. Adjust these parameters according to your specific requirements. Load your chosen printing materials into the 3D printer.

This may involve loading a roll of filament or pouring resin into an appropriate container, depending on the type of printer you are using. Start the 3D printing process by sending the slice file to the printer. The printer will start creating your model layer by layer following the instructions provided by the slicing software. Keep an eye on things at first to make sure everything is sticking and looking good, and to troubleshoot any issues that come up.

Use the Printed Mold and Pour the Silicone to Start the Casting Process
To start the casting process, mix the silicone according to the manufacturer’s instructions, making sure you have the right ratio of base and catalyst ingredients. When the silicone mixture is ready, pour it slowly and evenly into the mold. Start pouring from one end so that the silicone fills the mold cavity. Be careful not to introduce air bubbles during the pouring process as they can mess up the final casting.

Tap or shake the mold gently to get rid of any remaining air bubbles. This helps air bubbles rise to the surface, ensuring a smooth, bubble-free casting. Alternatively, you can use specialized equipment like a vacuum chamber or pressure tank designed for silicone casting to more effectively remove air bubbles.

Let the silicone cure for the amount of time recommended by the manufacturer. The curing time will depend on the type of silicone you’re using, so make sure to follow the instructions. You need to give the silicone enough time to harden and cure completely before you move on.

Once the silicone is completely cured, carefully take it out of the mold. Depending on the mold you’re using, you might need to separate the halves of the mold or bend the mold to get the casting out.

Trim Excess Parts
Once you’ve successfully demolded your casting from the silicone mold, the next step is to trim off the excess. This excess refers to any additional cast of silicone material that may have flowed out of the desired shape or formed along the edges.

Take a good look at your cast and identify areas that need trimming. Using a sharp hobby knife or scissors, start trimming away the excess silicone following the outline of the desired shape. Take your time to ensure accuracy and avoid accidentally cutting into the actual casting.

Depending on the complexity of your casting, you may need to use different tools or techniques to achieve the desired results. Trimming excess is an important step in the casting process as it helps improve the final appearance and quality of the casting. By carefully removing excess silicone material, you can refine details and achieve a clean and polished result that closely resembles the original model.

Advantages of 3D Printing Casting Molds
Using 3D printed molds has a lot of advantages, including:
Shorter mold production cycle
3D printed molds shorten the whole product development cycle and become the source of driving innovation. In the past, companies have sometimes chosen to delay or abandon product design updates because of the large investment required to manufacture new molds. By reducing mold production lead time and enabling existing design tools to be quickly updated, 3D printing enables companies to afford more frequent mold changes and improvements. It enables the mold design cycle to keep pace with the product design cycle.

Additionally, some companies buy their own 3D printers to make molds, which speeds up product development and makes it more flexible and adaptable. Strategically, it makes the supply chain more resilient to the risks of long lead times and development stagnation, such as getting bad molds from suppliers.

Lower manufacturing costs
If the current cost of 3D printing metal is higher than traditional metal manufacturing, it’s easier to save money with plastic parts.

Metal 3D printed molds are economically advantageous for making small, intermittent runs of final parts (because it’s hard to amortize the fixed costs of these parts) or for certain geometries (optimized specifically for 3D printing). They’re especially cost-effective when the materials are very expensive and traditional mold manufacturing results in high scrap rates.

Also, 3D printing can help manufacturing processes and profits by making precise molds in a few hours. This is especially useful when it’s expensive to stop production or keep a lot of tools in stock.

Finally, sometimes it often happens that the mold needs to be modified after production has started. The flexibility of 3D printing allows engineers to try countless iterations simultaneously and can reduce the upfront costs caused by mold design modifications.

Improvements in mold design add more functionality to end products
The special metallurgy of metal 3D printing often improves the metal microstructure and produces fully dense printed parts with mechanical and physical properties that are as good or better than those of forged or cast materials (depending on heat treatment and test orientation) .

Additive manufacturing gives engineers unlimited options to improve the design of molds. When the target part consists of several sub-components, 3D printing has the ability to integrate the design and reduce the number of parts. This simplifies the product assembly process and reduces tolerances.

Also, it can do complex product functions, so you can make high-functional end products faster and with fewer product defects. For example, the overall quality of an injection molded part is affected by the heat transfer conditions between the injected material and the cooling fluid flowing through the tooling fixture. If you make it the old way, the channels that carry the cooling material are usually straight, so the molded part cools down slower and unevenly.

3D printing can make cooling channels of any shape so you can have conformal cooling, which is more optimized and uniform, so you can make higher quality parts and have less scrap. Also, you can take the heat out faster, so you can make the injection molding cycle time shorter, since cooling time is usually about 70% of the whole injection molding cycle.

Optimize tools to be more ergonomic and improve minimum performance
3D printing makes it easier to validate new tools that address unmet needs in manufacturing, allowing more moving and fixed fixtures to be put into manufacturing. Traditionally, tools and corresponding devices have been designed to last as long as possible because of the considerable expense and effort required to redesign and manufacture them. With 3D printing, companies can refurbish any tool at any time, not just those that have been scrapped and do not meet requirements.

With little time and initial cost required, 3D printing makes it more economical to optimize tools for better marginal performance. Therefore, technicians can consider more ergonomics when designing to improve operating comfort, reduce processing time, and make it more convenient to use and store. Although this may only save a few seconds of assembly operation time, it does not add up to a lot. In addition, optimizing tool design can also reduce the scrap rate of parts.

Custom molds help customize the final product
With shorter production cycles, the ability to make more complex shapes, and the ability to reduce final manufacturing costs, companies can make a lot of custom tools to help make custom parts. 3D printing molds are really good for custom manufacturing, like medical equipment and medical stuff. It can give surgeons 3D printed custom tools, like guides and tools for surgery, so they can do better surgeries and do them faster.

Conclusion
In summary, using 3D printing to make metal casting molds is a game changer for manufacturing. You can make complex custom molds faster and easier than ever before. Compared to traditional mold making, this method has big advantages. It makes molds faster, cheaper, and better. You can make molds that do more things, like make tools more comfortable to use and make them work better. Custom molds help you make custom parts.

Also, you can try out and improve designs faster, so you can make better castings.But you have to think about what the mold is made of and how you print it to make sure it works right. If you plan and do it right, you can use 3D printing to make metal casting better and faster. As technology gets better, 3D printing and metal casting will change manufacturing. You will be able to make things in new ways and make more things.


