 Skip to content

Are you looking for an innovative way to manufacture your products? Knowing the ins and outs of injection molds can point you in the right direction!
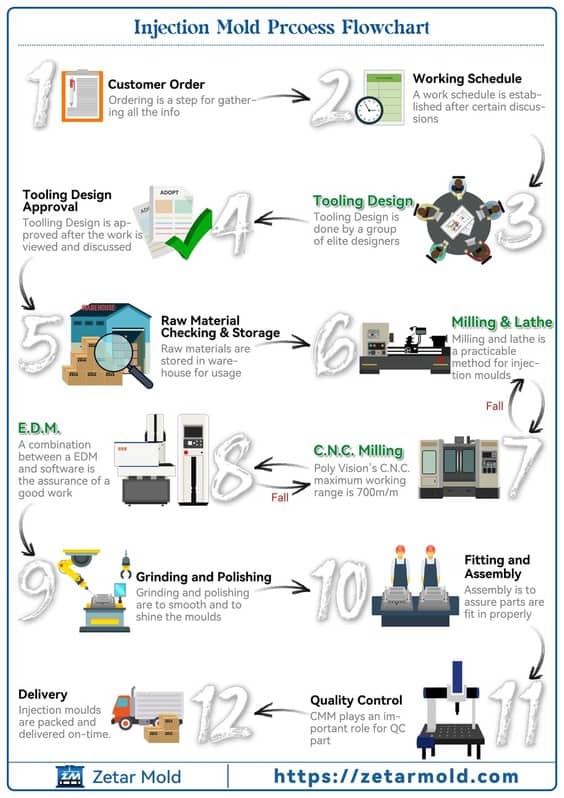
From a Detailed Design Report, all the way through mold trial – this article will provide essential information on how these intricate pieces are crafted. Dive into five key steps that make up the entire process today!
The First Step: DFM report
DFM is all about making life easier for manufacturers. By improving manufacturability, parts, aSuccess is just a few tweaks away!
DFM helps manufacturers cook up the perfect dish – lower costs and increased efficiency. With these improvements, businesses can spice up their injection molding production process like never before!
Source: https://www.youtube.com/@zetarmold
DFM report includes these details:
1: Surface requirements
2: Structural distribution: Schematic diagram of mold layout
3: Parting analysis: parting line of front and rear models
4: Parting analysis: front mold insert pin, insert the parting line
5: Parting analysis: back mold insert pin, insert the parting line
6: Type analysis: row position type line
7: Gating system: gate size and location
8: Product analysis: product thickness analysis
9: Product Analysis: Product Thickness Modification Suggestions
10: Draft analysis: draft analysis of front and rear molds
11: Draft analysis: draft analysis of front and rear molds
12: Draft analysis: position draft analysis
13: Ejection system
14: Marking and Engraving
15: Carrying water in the front model
16: Carrying water after the model
Crafting exceptional products starts with the little touches – from picking clever stamping marks that add character, ensuring a parting line as perfect as it is prominent, and giving every wall section just enough thickness. Together they create something truly remarkable!

The Second Step: Mold Design
The mold engineer is the craftsperson behind designing beautiful 2D and 3D plans that ultimately bring injection molded parts to life!
Mold structure design includes these details:
(1) Placement of plastic parts in the mold and selection of parting surfaces;
(2) Determine the number of mold cavities, the arrangement of the cavities, etc.;
(3) Design of mold gating system, including runner layout and gate type, size, and location;
(4) The structural design of the injection molded parts, mainly the structural form of the molded parts;
(5) The design of the part ejection mechanism;
(6) Design of side parting and core pulling mechanism (if necessary);
(7) Exhaust method design;
(8) The overall size of the mold is determined, and the mold base is purchased.
The mold base has been gradually standardized, and the mold base is selected according to the mold base atlas provided by the manufacturer.
The Third Step: Mold Making
Processing injection molds takes precision and know-how. To get the job done right, you’ll want to consider both standard machining methods as well as electrical discharge machining tools – two proven solutions that can take care of all your molding needs!
Standard machining
Did you know that traditional machining has been used to create injection molds for decades? This multifaceted process involves cutting, shaping, and heat treating metal parts to achieve desired dimensions.
On top of that, it tackles tricky blemishes and provides a stunning surface finish so your part is as beautiful on the inside as it looks outside! Who knew there was such potential in the amazing world of machining?
Electrical discharge machining
Spark machining is an exciting and reliable way to craft complex plastic injection molds. It offers exceptional precision with deep shapes, a smooth surface finish–even in exotic materials!
Plus it’s great for extra-deep cavities too; which makes spark machining unbeatable when you need super detailed creations made precisely just how you want them.
Electrical discharge machining (EDM) is a highly precise process that allows you to create intricate cavity shapes with ease.
It works by using an electrical spark between a tool and workpiece made of graphite, which vaporizes tiny pieces of the material’s surface in order to produce incredibly accurate cuts!
EDM has been used for decades across industries as diverse as automotive manufacturing, injection molding production, and more – making it truly versatile technology.
The electrode then is placed in a Ram EDM. This electrode is used to erode a hole profile in the workpiece. The electrode is made of graphite, brass, copper, or tungsten.
Dielectric fluid is pumped through a sparking gap. This helps to keep the electrode and workpiece apart. It also serves as an electrical insulator until a voltage is applied.
For complex, precise machining applications, Electrical Discharge Machining (EDM) is the way to go! It’s cost-effective and allows product teams to work with expensive metals.
To start off EDM cutting processes a carbide cutter coated in graphite creates electrodes around that part before a steady stream of dielectric fluid – generally deionized water – pumps through the zone; helping cool down an electrode while also removing extra plastic material from your injection mold design.
Source: https://www.youtube.com/@zetarmold
The Step Four: Injection Mold Assembly
Before putting the injection molding products together, inspecting each part is essential to guarantee high-quality results.
Learn about how each component works and fits into a bigger picture by taking time to carefully examine both the general assembly drawing and individual parts drawings.
By doing so you’ll ensure that everything comes together as intended in terms of function, characteristics, technical specs – all while ensuring safety for everyone who will use it!
Source: https://www.youtube.com/@zetarmold
1. Assembly datum
Plastic injection molding is a process of intricate parts that make up one whole – the core, cavity, insert and more all come together to create something beautiful.
But how do you know where everything goes? Well, we use guide posts in combination with template side bases as reference points for proper assembly. Trimming becomes an absolute breeze when your guides lead the way!
2. Mold assembly accuracy
Every element of a new injection mold needs to meet exacting standards in order for it to work perfectly. We need accuracy concerning distance dimensions, coaxiality and perpendicularity.
Dynamic precision is required regarding linear motion transmission as well as rotation motion – not forgetting the very important fit clearance when making contact with other components!
Lastly, something that can easily be overlooked but still so critical: plastic injection molding wall thickness must never fall below its minimum limit.

3. Repair principle
Keeping the size of each area within its respective tolerance range is key when repairing de-molding slopes.
When making adjustments, be sure to leave a slight gap between any vertical and horizontal parting surfaces – this can vary from 0.01mm for small molds up to 0.02mm for bigger ones!
Additionally, remember that the cavity should have smaller fillet radiuses compared with those in corresponding cores so everything fits together perfectly once it’s all put back together again.
Clamping molds with an incline is a great way to ensure accuracy – close the inclined surfaces, leaving a gap of just 0.02-0.03mm at parting points, and you’re good!
For patched up areas on smooth contours like those created by arcs or straight lines, it’s important that any filing work blends seamlessly into existing patterns in line with injection mold opening directions.

The Five Four: Mold Trial
The main steps of mold trial
Keep an eye on the temperature and pressure of your barrel and injection mold – with just the right adjustments, you can reduce production times to get that perfect result.
Extending processing time slightly could make all the difference in ensuring those materials are filled perfectly each cycle!
For a successful mold test, it is essential to pay close attention to how sample measurements hold up over time and whether any changes are within the accepted tolerance range.
This will help you ensure that your processing conditions remain stable – such as controlling temperature or hydraulic pressures – for longer runs along with yielding more reliable results!
Want to perfect the size of your finished product? Consider increasing the gate size or adjusting injection machine conditions like injection mold filling rate, temperature and pressure. If there are any slow-filling cavities check them right away so you can get it just right every time!
To ensure high-quality products and consistent results in the future, be sure to document all sample inspection details during your injection mold trial.
With comprehensive records of every process step on hand, you’ll have everything needed to recreate successful processing conditions down the line!
Source: https://www.youtube.com/@zetarmold
Need a Quote for Your Injection Molding Project?
Get competitive pricing, DFM feedback, and production timeline from ZetarMold’s engineering team.
Request a Free Quote → See our Injection Molding Complete Guide for a comprehensive overview.


